Everyone wants to make their site original and special. But how can this be done? Here, various decorative figures will come to the rescue, only they require costs.
Therefore, you can build a castle with your own hands on the site. This will not be a problem for those who do at least something with their own hands. In addition, this does not require special costs.
Decorations for the site
To decorate its territory now exists many options:
- Whole zoos are literally erected from old tires. There are swans, cats, giraffes and elephants.
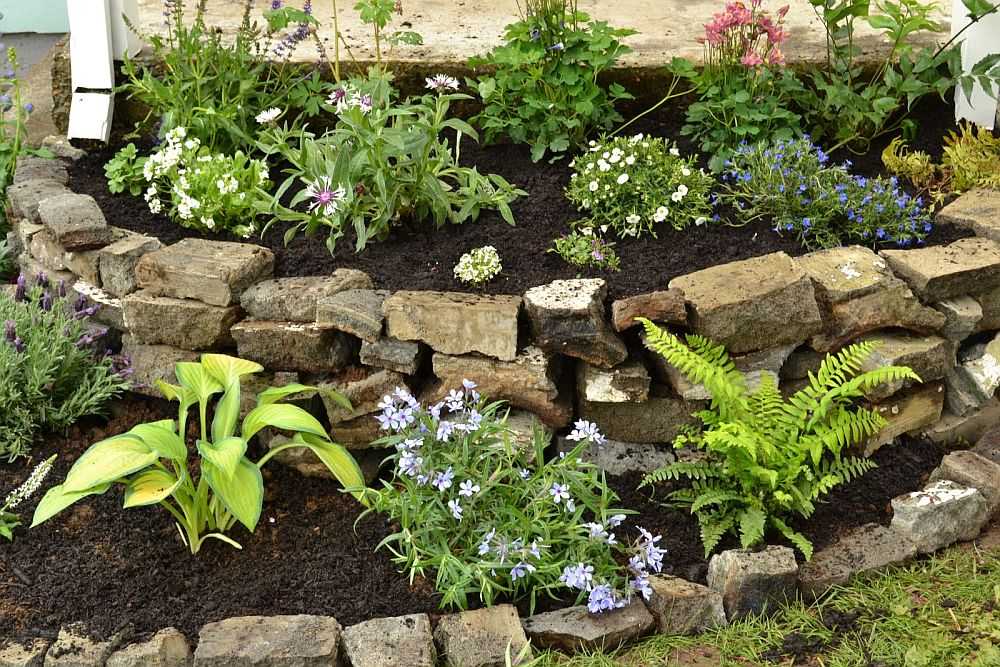
- From unusable logs and stones, you can arrange flower beds and flower beds.
- From polyurethane foam and bottles, you can create figurines for the garden.
- And if you use cement and have some skills in working with it, you can create simply magnificent sculptures that will decorate any terrain.
You can also build a castle with your own hands from scrap materials, or even build a whole kingdom that will delight not only children, but also adults. This building will add mystery to the garden, and in order to make it look livelier, you can make a rockery or rock garden.
For a stronger and more durable construction, use cement-sand mixture... For the composition, it is better to use 2 parts of sand and 1 part of cement. Before starting, it is advisable to dry the sand - the drier it is, the easier it will be to sift it and subsequently use it.
Most of the time, castles are quite large in size, and besides, building them is a bit tricky. To cope with this, you can try to build some parts separately, after which they can be easily assembled in the right place, like from cubes. Here's how to make a castle with your own hands.
Construction for building a castle
To build a tower from an iron sheet, you need to roll up a cylinder of the required size and fix it. It must be fixed so that after use it can be easily disassembled. To reduce the consumption of solution a bottle or can should be placed inside the cylinder, but it should be borne in mind that the thickness of the solution around the ballast should be about 5 cm.

When pouring the solution inside, make sure that it is thick. After that, he needs to give it a few hours for hardening, so that when removing the formwork does not crumble.
The height of the formwork should be chosen in this way: it should be approximately equal to the tower, if it is smaller, it should be disassembled and assembled above the already set part.
You can cut the solution after it has set. To perform such work, the following tools are used:
- chisel;
- screwdriver;
- scalpel or similar blade;
- a cloth from a hacksaw for metal;
- strips of tin to help form the elements of the lock.
A castle made of simple cylindrical shapes will look a little boring; to avoid this, you should experiment and use a chisel to imitate masonry, chips or cracks at the bottom of the castle to give the castle an antique effect. With a knife, you can make windows and loopholes.
The roof is constructed from tin cones and can also be used as a mold for mortar. The roof should be knocked out of the mold only after the mortar has solidified reliably.
Making walls
For the manufacture of walls, a rectangle of the required size is collected from the boards, after which it is placed on a flat surface, which is previously covered with a piece of film or roofing material. The solution is poured into the resulting frame. For making windows or doors in the wall, frames should be placed in the right place in advance.
 After the solution has been poured to the desired height, stones or gravel can be inserted into the lower part, so that as a result, a kind of imitation of the foundation is obtained, or, using a knife, draw grooves - characteristic gaps between the stones of the foundation.
When the solution hardens, the frame is removed and, if required, details are added: windows, loopholes, etc. After that, the walls are left to dry for another day.
It is better to choose a sunny day for the construction of the castle.... It is best to place it on a hill, it can serve as a pile of stones. In order for the walls to stand securely, a foundation is erected for them, on which a thin layer of cement is then applied. And only after that is it worth installing the walls. And also they can be strengthened in another way, for example, the inner cavity is filled with a stone, rubble or mortar.
Since concrete locks just look gray and dull, many decorate them. For this, acrylic paint is used. This decorative element will become a real decoration of the garden, in addition, both children and adults will be happy with it.
Giving your patio a cozy and inviting look is easy. A small flower garden by the path and an alpine slide on the lawn behind the house will create a unique charm for a country estate. And in order to show individuality and realize creative potential, it is better to create a flower bed with your own hands. But landscaping takes a thoughtful approach, so prepare well!
The main principles of creating a flower bed with your own hands
City dwellers breaking free for the first time in country life, often have no idea how to properly arrange their site. Fortunately, mistakes in gardening are not scary - you can always replace the plants you don't like. But why add to yourself the hassle and financial costs if everything can be done right?
Landscaping plan of the site
Even a small patio requires an elaborate landscape plan. Otherwise, it will turn from a work of art into a lush but tasteless flower bed. You can contact the professionals who will prepare a landscape design project based on specific data on the location and size of the site.


V the latter case you should adhere to the main principles of landscape design:
- Equilibrium. All sides of the courtyard must be equal, without preponderance in any of the parts. In practice, this means not overloading the center of the front lawn with a multi-tiered flower bed, leaving the far corner of the yard empty.
- Harmony. The garden should be liked, first of all, by its owners. But do not try to fit a pond, a fountain, a sundial and a rockery in it - if the plot is not the size of a hectare. There must be free space so that the abundance of plants does not create "pressure" on vacationers.
- Moderation. The number of flower beds should not clutter up the territory, but only zone it. So, it is better to divide a narrow courtyard into several zones so as not to create the effect of a long corridor with a path in the middle. In a square garden, round flower beds and curved lines will be appropriate.
- Seasonality. The garden should look beautiful not only in summer but also in winter. Luscious greenery or ocher colors of autumn leaves will make any area attractive. But bare branches and black empty flower beds will evoke melancholy. Therefore, it is imperative to include in the composition evergreen trees and bushes with bright non-falling foliage - barberry, juniper and boxwood.
- Color combination. Bright colors should be interspersed with calm greens, while you should not combine more than three primary colors in one flower bed. The abundance of flowering plants, arranged chaotically and without a well-thought-out pattern, evokes associations with the flower layout on the market.
- Points of attention. Each garden should have some interesting objects that will catch the eye. This can be a flower bed made from an old chest of drawers or a secluded gazebo hidden in a corner, braided with wild grapes. The main thing is that such objects should not immediately catch the eye, but attract attention and arouse the desire to examine them.


When the approximate site plan is ready, you need not be lazy, having studied the conditions of maintenance and the appearance in the mature state of the selected plants. After all, even a rock garden created by professionals will require constant and proper care, which an amateur gardener will definitely not cope with.

And a mast pine tree on three acres is not a very good choice.
Basic rules for flower beds
After the places for the arrangement of the flower beds are selected, you can start by planning their composition. It also has its own peculiarities:
- plants are selected according to the type of soil;
- the conditions of care and maintenance should be similar;
- the use of commensal plants is allowed - when one plant benefits from the existence of another, but does not harm it;
- the flower bed should look beautiful all year round.
So, you can not plant plants that love acidic and alkaline soils in the same flowerbed with a common soil. On the other hand, flowers that require highly acidic soil can grow in moderately acidic soil, although they will appear somewhat weaker. For example, on a flower bed with alkaline soil, you can plant maples, hawthorn, mountain ash, decorate it with barberry, boxwood and meadowsweet shrubs, and plant flowering low plants around the edges - Snapdragon, cloves or cornflowers.

Flowers in the same flower bed should love the same conditions - humidity, sun and top or root watering. For example, mosses and lichens require constant moist soil and grow best in the shade. Azalea also loves moisture, and in the open sun it can burn. So they perfectly complement each other and can be planted along the fence or under the shade of a spreading catalpa.

At the same time, roses do not tolerate overhead watering, so it is better to plant them separately from all other plants and water them individually, pouring water directly under the bush.
If you want to combine tall and low plants, you can plant low-growing evergreen trees, and under them - primroses, aquilegia and polemonium. A spreading crown will create sufficient shadow even in the middle of the yard, while flowers will add variety with bright colors.

If you plan to have a high flowerbed at the entrance, you need to think about how it will look at any time of the year. Here, annuals and wildly flowering plants: in spring and summer, sulphinia and petunias delight the eyes, in autumn - chrysanthemums, and in winter you can dress up a low artificial Christmas tree or put decorative figurines on a flower bed.

Mistakes of novice gardeners
Those who have not made mistakes have never designed their garden on their own. But you can learn from the mistakes of others! So, what a novice gardener should not do:
- You should not try to fill the void in the flower beds exclusively perennial plants... The young garden will constantly grow and in a few years five barberry bushes, interspersed with juniper, will fill the entire flower bed. Better free place fill with annual flowers - their number can be adjusted every year, depending on the need.
- There is no need to plant plants randomly, without a clear idea of the future picture. Firstly, it creates a sloppy look, and secondly, some flowers will simply get lost against the background of others. For example, rose bushes, planted in pairs - white with pale pink or red with maroon look very advantageous. In addition, roses make a great backdrop for low-growing flowers.
- You cannot choose flowers only according to the shape of the inflorescences you like. So, dahlias look beautiful in a bouquet, but on a flower bed they must be tied up and planted in the far line. Asters and chrysanthemums also need to be chosen according to the shape of the bushes, but petunias and carnations can be safely chosen by flowers.
- It is highly undesirable to make flower beds from color mixtures of one plant. It is better to choose several colors and make interesting patterns. In this case, it is advisable to avoid straight lines - winding, round or geometric shapes will look more original.


Very often, flower beds are planted with plants, the flowering of which occurs in one period. This situation is best avoided by choosing the composition in such a way that the plants can bloom from early spring to late autumn.

For example, snowdrops appear first, then the tulip period begins, and after them the leaves of daylilies and peonies bloom.
And in order for the household hand to be visible, the flower bed must be thinned regularly, removing faded and dead parts. A few yellowed inflorescences on hydrangeas are enough to make the flower garden look untidy. If regular grooming is problematic, it is best to focus on evergreens and conifers.
Simple flower beds from scrap materials
Financial constraints are not a reason to deny yourself a beautiful flower garden. After all, it can be done literally from everything! It is enough to connect your imagination and disassemble the trash deposits in the barn.
Bottle fences
This option is suitable for unpretentious summer residents and city dwellers who want to arrange a house plot. A low border will protect the flower garden from the encroachments of unscrupulous dog owners - animals are much smarter than people and often do not try to step over even such low fences. And the very fact of the presence of a border suggests that this flower bed is being looked after.
For a bottle fence you will need:
- glass or plastic bottles, best of all with a volume of 1.5 liters;
- garden shovel or hoe;
- sand (if there is not enough loose soil on the site);
- paint - paint the finished border if the bottles are of different sizes.
The procedure is quite simple, you can even involve children in it in order to cultivate diligence in them:

Tall flower beds from bottles look original. They are laid on a thick cement mortar, the first layer should be placed in a depression or on a base so that the bottles do not disperse. Each tier is filled with concrete from the inside so that the neck is in the solution. And so that the concrete does not flow out into the circle, they make an internal formwork. The only drawback of this solution is that it is quite difficult to find identical glass bottles.

Tire bases
Tires are the most popular bases for country and city flower beds. Strong, durable and useless. Appearance they are rather unassuming, but with a little imagination, you can create really interesting yard decorations.

Multi-tiered flower beds made up of several tires look good. In this case, you can take tires of different diameters, radii and widths. If you want to add variety, you can paint the old wheels, but it is better not to get carried away with variegated colors, stopping at white or green. So the base of the flower bed will not distract attention from the flowers themselves.

Original compositions from old things
What some consider to be unnecessary rubbish, summer residents can turn into real works of art! For example, an old chair makes a great vintage flowerpot stand. Complementing the composition with the rest of the headset, you get an original flower bed. No housewife has such a thing!

Any old things will go into business. Even a suitcase without a handle can come in handy again.

If there is an old chest of drawers at home, it should never be thrown away! It will be an excellent decoration for a blank stone wall in the far corner of the garden.

But inhaling new life in old things, it is important to carefully treat them with antiseptic solutions to prevent rotting. And then the original flower beds will become the hallmark of the house!
Beautiful and versatile flower beds
Complex flower beds look much more profitable in any area. But even if there is no desire to bother with capital construction, you can make beautiful vertical flower beds from pots.

To do this, you will need the actual pots and one metal rod. The pots begin to be strung on it through the drainage hole and themselves take the desired slope.

Another type of convenient and simple flower bed is a column of petunias. It can be moved on a stand with wheels throughout the territory, and for the winter it can be simply disassembled. The device will need a mesh, a large pot, black spunbond, a cable tie, and lots of petunias or sulfinia seedlings.

Create a brick fence
A brick flower bed allows you to profitably zone the space and is suitable for both large and small courtyards. It's also a great option for flower lovers who don't want to waste their time mowing the lawn.

It is not difficult to make such a flower bed, but it takes a long time:

A brick fence for a flower bed can be assembled without mortar. But it does not look so neat, and there is a greater chance that such a structure will collapse over time.

If you do not want to engage in mixing concrete, the flower bed can be framed with low stone sides.
Laying stone curbs without mortar

To do this, a small ditch is dug around the perimeter of the flower garden and bricks are laid in it. The advantage of this solution is that the flower bed can always be enlarged or its shape changed. When, after a couple of years, the curb begins to overgrow with grass, it is easy to take it out, clean it and put it anew.

To prevent the stones from sliding, it is still better to fix them with a small amount of cement. But it is quite possible to do without it. Such a border is placed on the ground, from which the top grass layer has been removed. The rows are laid gradually, and the evenness of the masonry is determined by the stretched twine.

So that it lies securely, the lower large stones are placed in a previously dug trench. The second layer of stones begins to fit after the earth is poured inside the flower bed. It will fix the stones already laid and allow the upper ones to be installed.

Their device is quite simple: you can buy ready-made cells and fill them with stones or assemble the base yourself. To do this, you need to dig a trench 25 cm deep, cover the bottom with geotextiles, install a strong mesh of the required height and fill the trench with gravel and sand. So that the gabions do not stagger, reinforcing rods are dug in every 50 cm. And the sections of the mesh are treated with an anti-corrosive compound.


They can be purchased or made from stiff wire yourself. Ready-made gabions are closed cells, for which they got their name. Self-made flower beds can be left open, simply by pouring stones "with a slide."

A flowerbed can even be made from corrugated board waste after installing the fence! The video shows a simple and quick way devices of a beautiful two-tier flower bed:
Bright spots of flower beds and flower beds on the site are not only a way to decorate the site. They are great for distracting attention from some problem areas. This, by the way, can also be guided when choosing a place. We will talk further about how to make flower beds and flower beds with our own hands in the country, in the courtyard of a private house. This is not an easy task, of course, but it does not require knowledge of higher mathematics either.
What are
First of all, let's find out what is the difference between flower beds and flower beds. The flower bed has clear boundaries and shape: a circle, an oval, a square. Most often, it is separated from the rest of the site and raised above it. We most often see this type of landscape design in parks and on the streets.
This is a flower bed. It has a clear, strictly defined shape and geometrically correct arrangement of plants.
A flower garden is any place where plants of any shape are planted. It happens with a fence, and it happens without. The boxes with flowers hanging on the fence or on the wall are a flower garden, plants planted in old galoshes are also, a flower spot on the lawn and a ribbon along the path are all flower beds.
We figured out the terms a little. Now about what they are. They are distinguished primarily by flowering time:

According to the type of planted plants, there are annuals, perennials, and sometimes mixed. In some, only one type of plant is planted. They are called monoclumbas or mono flowers.
Sometimes they are raised, they are also called high, there are multi-tiered. Their device consists of several stages: first of all, the fence is built, then the earth is poured into the finished form and the plants are planted.
That's all with theory, let's move on to practice. We start with where you can make flower beds and flower beds with your own hands.
Where to do
When the yard is spacious, it's just fine. Find the most viewed place and set up a flower garden there. What if the whole territory has already been developed, and you want to plant flowers? You can always find a place. For example, near your house, the site is concreted or lined with slabs, stone, etc. At the wall of the house, you can make an excellent raised or even multi-tiered flower bed with your own hands. And there is no need to break the cover. A brick or stone fence is built right on it. It is advisable to put them on the solution, and then cover them from the inside with a waterproofing impregnation (bituminous mastic) so that when watering, water does not flow onto the path. Then you can fill up the soil and plant flowers.
Flower beds are set up along the fences. This is a common way to decorate, for example, a long drive to the house. But this can also be done in different ways. Here, as well as near, a high flower bed looks better.

A high bed of boards. The building is inexpensive and the view is solid
You can make a flower bed in front of the gate. Street beds must be sturdy. Therefore, for their execution, stone fences are usually used: just in case. If desired, you can make tiered flower beds. They are more difficult to build, but much more attractive than flat ones.

Street multi-level (multi-level) flower bed of complex shape
Even if the yard is surrounded by walls on all sides, and then you can find a place for flowers: Hang on the walls, in pots or in the form of a flowering wall, put up a rack, etc. Do-it-yourself flower beds in the courtyard of a private house can be made from everything and everywhere. It is only important not to be mistaken with the style: it must match the design of all buildings. Some ideas in the photo gallery.
You don't need a lot of space and can be moved. A portable flower garden is convenient
You can make a flower garden in the country near a tree. They already belong to the garden category. Don't want it to be trite? Come up with an interesting fence.

What and how to make a fence
The most common flower bed fencing is brick, wild stone, boulders. A structure can be made of bricks in a strict "ceremonial" manner. Boulders and wild stone are more intimate, non-standard fences.
Since they have a decent weight, a foundation is often made under a brick or stone fence for a flower bed. Not if one or two rows fit, but if there are four or more rows. If the device goes on a concrete site, you can do without a foundation at all, but if a flower bed is broken on a lawn or soil, then it is advisable to do it.

It is not even necessary to fasten two rows of stone or brick with mortar. They can simply be laid out one on top of the other, covered from the inside and covered with earth. Brick flowerbeds made by this method will have to be corrected often: bricks can "move out" from their place
The first step is to remove the sod on the marked area. If you plan to make a high flower bed, dig a groove around the perimeter, about 20 cm deep, and 5-10 cm wider than the planned fence in width. This ditch is filled with crushed stone, rammed, spilled with liquid cement-sand mortar. For 1 part of M400 cement, take 4-5 parts of clean sand, mix and pour water until sour cream. Rubble is poured with this semi-liquid solution. When the concrete sets - you need to wait a few days - you can lay out the border for the flower beds.
How to make a brick or stone border
Do-it-yourself flower beds and flower beds in a fence made of stone and brick are the most expensive in the device, but also the most durable. They will stand for several years without any problems.
Stones or bricks are placed on a cement-sand mortar, similar to the one with which rubble was poured, but thicker. There should not be a lot of mortar between the bricks - 5-8 mm. If you put cobblestones or natural stone, it is easier to first fold them "on dry" by choosing the size, and then transfer them with mortar.
A few ideas on how to arrange stone borders for flower beds and flower beds in the photo gallery below.
This is a curb for a cobblestone flower bed. The technique used is different - a roller is formed from a semi-dry solution, small stones are stuck into it
If you do not need to raise the plantings so much, and you only want to mark the boundaries of the area planted with flowers, but are afraid that if the brick is simply dug in, it will fall, then you can dig a trench, fill it with rubble, and insert flagstone into the rubble (stone sawn on plates , it can be found in the section that sells materials for the exterior of the house) or standing to put bricks. Spill liquid cement-sand mortar around the installed elements of the fence. After two or three days, when the concrete has set, you can continue to work: fill up the fertile soil, but you cannot load the curb or step on it for about a month: it takes so long for it to gain strength.
By the same principle, you can make a do-it-yourself frame for a flower bed from slate or tiles cut into strips. A flower bed can be made of metal or asbestos slate. There are scraps left after installing the roof - use them. Here's what you can get.

Photo of a slate flower bed - such a fence looks good
Made of wood
It is easier to make a fence for a flower bed made of wood: it does not weigh so much. On the other hand, it is less durable. Do-it-yourself flower beds and flower beds from wood can stand for several seasons. Then you will have to restore or alter them. For ceremonial flower beds, it is used very rarely, but in the country or near a private house, a flower garden fenced with a wooden border is original and stylish. Especially if it has something in common with the style of design of buildings on the site.
You can use wood in any form to decorate summer cottages. They make flower beds from boards, small-diameter round timber (small logs), block house (boards, convex on one side, similar to a log) and any other wooden remains. You can even cut a dead tree into chocks, bury / hammer them into the ground, making such an unusual flower bed.
Birch woods - an excellent fence for a flower garden An interesting idea for a high flower bed - a well is made of scraps of logs Two pieces of a block house, installed one on top of the other - and in front of you is already an excellent summer cottage flower bed
How to make a wooden border? Find a small diameter log, cut it into chocks of different lengths and split them in half. You will get blanks, as in the photo on the left. They are laid on a flat surface with the convex side down, one next to the other. Take a flexible thick wire and use staples from a construction stapler or bent studs to attach the wire to the flat side of the pieces of wood. One wire is nailed at the bottom, the other at the top. It turns out a flexible border made of wood, which can be used to enclose a flower garden of any shape (pictured on the right).

So that the wood does not lose its attractiveness and does not rot, it is treated with protective impregnations. They can simultaneously give it color, or they can be colorless. From such pieces of wood collected in a ribbon, you can make flower beds with your own hands of any shape. Dig a shallow groove, a little wider than your fence, insert a fence for a flower bed there and sprinkle it with earth, tamp it.

From boards and beams
In our country, wood is one of the most inexpensive building materials. Therefore, they build from it a lot and often. They are made of wood and a fence or fence for flower beds. The easiest way is to enclose a flower bed with boards. For support, you will need several bars - not very thick, but wide. Approximately 50 * 150mm and edged board 20mm thick. Choose its width yourself so that several pieces installed on the edge give you the required height.
Soak the wood with protective impregnations, when it dries, you can start working. Support bars are installed first. They can be sharpened at one end and carefully hammered without damaging the upper surface (put a piece of a bar and hit on it), or you can dig a hole about 50 cm deep, install a bar in it, bury and compact the earth around. Bars are installed in increments of 1-1.5 meters, depending on how wide the flower garden will be. The wider and higher it is, the more mass will have to be held, therefore supports are more often put.
Boards are nailed to the exposed supports. They can be stuffed from the inside and then the support bars will be visible, or from the outside. In the second option, only a wall of planks will be visible. The joints of the boards should fall on the beams.
Plank beds can be made in a variety of shapes. Even in the form of a pyramid. Several interesting ideas there is below.
And this is how to make a flower bed in the form of a pyramid 
Made of plastic
There are many types of ready-made fences for flower beds and flower beds made of plastic or plastic. They have special legs that are immersed in the ground along the edge of the planted area.
But it's not about them, but about flower beds made of scrap materials. For example, you can make a decent fence for a flower bed out of plastic bottles.
They are selected by displacement and color. This will make the fence look better. Then the necks are cut off at one level and stuck into the ground. This is one mounting option for creating a low curb. The second will turn out to be much higher. It can be used in fondant taller plants. In this case, they take a wooden bar, to it at a certain distance, so that the bottles are close to one another, caps are nailed. Bottles are screwed into the caps. To make such a plastic fence for a flower garden more stable, it is pierced through with wire closer to the bottoms and closer to the narrowing point at the neck. The finished section of the fence is installed and fixed on the ground.
Despite the fact that the material is waste, if everything is done carefully, such a fence looks decent, nice, nice. A photo of fences for flower beds and flower beds made of plastic bottles is in the photo below.
Couldn't pass by ... a fence made of old bicycle wheels. Original flower beds can be made from any junk. If you have talent, of course ...

Old bicycle wheels can decorate your summer cottage. How? Make a flower garden fence out of them. A flowerbed of wheels is cool ...
Original and unusual flower beds and flower beds
Sometimes you wonder how people manage to make original, unusual, and, what is important, beautiful things. So it is in the design of flower beds. Well, he himself would never have guessed that an old chest or galoshes, a hat could be turned into a flower garden or a flowerpot for plants. Look for yourself - the photos don't lie.
Flowerbeds of tires
Completely unattractive car tires turn into beautiful flower beds. The tires are cut, the edges are sanded with a grinder with an emery nozzle. The resulting flowerpots are washed with soapy water and dried: the plants will not develop well if the machine oil, gasoline and other similar substances that get inside are not washed.
After drying, they paint it. You can paint a tire (tire) with ordinary oil paint, only the surface must be degreased, dry and clean. It lasts for several years. There are special paints for tires. They are much more expensive - they are made for styling tires. After the paint dries, you can install a finished flower bed from tires and fill it with soil, plant plants. How you can make a flower garden out of tires with your own hands, or rather, how to arrange it, see below (the photo gallery scrolls automatically, if you need to stop, click on the picture).
Sometimes you really want to surprise others with something outlandish. Do-it-yourself castle in the country is an image from a fairy tale, which captivates with its grace and at the same time simplicity. The diminutive structure creates a romantic mood even for adults, not to mention children.
Figure 1. A decorative stone castle will be a great addition to a rockery or an alpine slide.
A small castle, built with your own hands, is currently included in the idea of \ u200b \ u200bthe design of a suburban area. Various projects of castles fit perfectly into the European style of landscaping of private property. A miniature structure can become the center of a playground, or it can simply emphasize the romance of the nature of the inhabitants of the dacha.
Features of mini locks

From the remains of concrete, putty, paint and planks, you can make a small castle.
A mini-castle at the dacha is a small architectural form of landscaping a dacha or other suburban area. The main tasks of the building are to enhance the aesthetic perception and emphasize a certain style of decoration.
Often such an element serves as a children's attraction. Castles can be made in the form of an exact copy of the famous historical structures of the knight's times or built according to a specially developed plan.
By placement, a mini-castle often becomes a separate element of the design of a summer house, built on a specially designated area for this, but more often it is used as an element of a composition, being part of a flower garden, fountain, spring, playground.
Buildings can also differ in technical solutions - simple (only the building itself) and complex, including special multi-colored lighting (or even light music) with electronic elements.
Construction material
The construction of locks can be done from a variety of building materials, as well as improvised means. Structures of various sizes from stones are widespread, and both refined (marble, granite) and wild, natural stones (for example, pebbles) can be used. The fixing of such building materials is usually done using cement mortar, but sometimes clay, lime or gypsum compositions are used, as well as standard building mixtures.

Lanterns along the sidewalk can be decorated in the form of a tower.
Many decorative castles are built by pouring concrete. For such projects, small formwork is installed. The main advantages of concrete structures are durability, strength, moisture resistance and Fire safety... For small houses, concrete reinforcement is optional, and for large figures, you can use a reinforcing mesh.
It is difficult to do without wood when creating small architecture. Wooden parts are easy to process, they can be given any shape. The need for antiseptic treatment complicates the application. Many locking elements have to be made of sheet metal, giving it a cylindrical or conical shape.
Foam is used as a building material. This dense material, when cut, becomes small building bricks or blocks that form a whole wall. You can use plastic of different types and sizes. Various improvised means are widely used - bottles, pipe cuttings, parts of old household appliances, etc. It is difficult to list all the materials that are used in the construction, it all depends on the imagination of the performer.
Structural elements
These castles were built at different times and therefore had a slightly different style. Most often, the concept of castle architecture is associated with gothic style characterized by various spiers and pointed roofs. With all the variety of styles, characteristic structural elements locks:

Figure 2. A flower bed can be placed inside the castle walls.
- Hill and moat: castles were built using natural defenses - hills (hill, mountain) and were surrounded by a moat with or without water.
- Courtyard: A sheltered area within a fortress wall, often with outbuildings and quarters for guards and servants.
- Donjon: the central tower of the castle for the owner's residence - a fortress inside the fortress; the shape of the keep was different - rectangular (England), round, polygonal, irregular.
- Fortress wall: a high wall with battlements at the top for shelter of warriors and loopholes.
- Defense towers: similarly to the wall, they had battlements and loopholes, most often they were round, but square shapes were also used, they were necessarily located at the corners of the wall and in the middle part.
- Gate: to strengthen the security, they were equipped with watchtowers, the entrance was usually blocked by an arch, an obligatory element was a drawbridge.
The very layout of the castle territory depended on the terrain and had a triangular, rectangular or polygonal shape. In a number of countries (for example, Germany), a circular layout with a central courtyard without a clearly defined keep was common.
Required tools
When building a castle with your own hands, you will need the following tool:

Figure 3. Sketch of the castle-flower bed.
- hacksaw;
- hacksaw for metal;
- scissors for metal;
- electric jigsaw;
- file;
- chisel;
- putty knife;
- Master OK;
- hammer;
- Grinder;
- plane;
- emery cloth;
- ruler;
- roulette;
- shovel;
- vice;
- electric drill.
Manufacturing features
Building a castle with your own hands begins with a drawing of a building plan and its individual details.
The plan can be a miniature copy of a well-known real structure or a completely invented author's solution.

Figure 4. Putty and paint can be used to decorate the castle towers.
Then the installation site is cleared, an elevated location (hill) and an imitation of a protective ditch are provided.
Stone castle. In fig. 1 shows an example of a simple stone castle of the author's project. For the construction of towers, three pieces of metal or plastic pipes with a diameter of about 6-7 cm are vertically installed, pebbles are laid around them and connected with cement mortar. Tin cones are installed on top. Inside the towers, after removing the pipes, a dark brown plastic bottle is placed, which decorates the loopholes.
When the castle architecture fits into the overall design, the characteristic stone elements are combined with other design solutions. In fig. 2 shows a flowerbed castle.
Fortress wall. One of the most simple ways the construction of a fortress wall is the use of sheets of dense foam. In fig. 3 shows a diagram of such a wall with towers. Foam plastic with a thickness of 3-5 cm is used, from which the necessary shapes with teeth are cut. Towers are formed from additionally fixed pieces of foam. On top of the towers, you can make a roof of flower pots. Similar structures can be made of concrete, after installing the formwork.
Towers and dungeons. For the construction of towers, you can use foam for pipe insulation, pipe insulation foam with a diameter of 11 cm, plastic pipes, asbestos-cement pipes, etc. Decorating elements are attached with waterproof glue. The teeth and loopholes are cut out neatly with a knife.
When making round towers or donjons from concrete, plastic bottles of different diameters (outer layer) can be used as formwork, and any core can be used inside. The thickness of the concrete wall must be at least 3 cm.
Decorating castles
To ensure an aesthetic perception, the constructed structure should be refined as much as possible - painted with bright acrylic paints; fix the overhead carved elements, install coats of arms, flags, pennants, and other symbols of chivalry. In fig. 4 shows an example of the design of the towers.
If necessary, the walls of the building are covered with finishing facade plaster.
The tree is excellent natural material for the manufacture of flower beds, it is harmoniously combined with various colors and fits in the most natural way in the country landscape. On any site you can find old boards lying around, small blocks, hemp, barrels and boxes. If you show a little ingenuity and creative imagination, you can build excellent wooden flower beds from them, which will create a special flavor in the country house and enliven its landscape.
What flower beds can be made from wood
Natural wood is safe and beneficial for the soil, since, when decomposing, it introduces into it nutrients... Wooden fences allow you to decorate the dacha in a single style, give a more well-groomed and neat look to the lawns, and divide the site into different zones.

It will not be difficult to make do-it-yourself wooden flower beds of a wide variety of designs, shapes and sizes. They can be placed directly on the ground in the form of fences of arbitrary shape, which will serve as the border of flower beds, and build rectangular or square small beds in different parts of the site. The wooden flower garden can also be set up in free-standing tall boxes. See how impressive wooden flower beds look in the photo.

Raised log bed

The flower garden of their old barrel
Options for the manufacture of wooden fences
Before making a wooden flower bed, decide how you would like to see your future flower garden. An excellent fence will turn out using old hemp, you can make a border from small boards, which is also a good option.

The second life of the chest of drawers
How to make a border from logs
To make a wooden fence for a flower bed with your own hands, you will need small narrow logs of the same width. Their lower part must be sharpened in the form of a wedge so that the hemp fits well into the ground. If you want to make an even fence, then the blocks should be of the same height. Alternatively, you can use logs of different sizes, as a result, you get an original wave-shaped fence. Please note that approximately 20 cm of height will go underground.

Lumber blocks are driven into the ground with a hammer
A tree like anyone natural material, is prone to decay, and harmful insects can also start in it. To prevent this from happening, you need to remove the bark from the block of wood and treat it with an antiseptic.
Around the future flower garden, dig a small trench where you place the stumps, pressing them tightly to each other. Then sprinkle the lower part first with sand and then with soil and tamp it well so that they sit tightly in the ground. The photo shows how to correctly install the logs along a wooden flower bed with your own hands.

This is how the flower garden will look if you refuse staining.
How to make a fence from boards
You can make a flowerbed-fence of a different type from boards. They must first be cut into identical small blanks, shaped into a top and sanded with sandpaper. Then fasten them with transverse strips to make several sections. First, dig the posts into the ground small size, and attach the resulting sections to them using self-tapping screws.

The fence is based on boards
To make a flowerbed of boards in the form of a fence, as shown in the photo below, you need to make the first and last boards of the section longer than the middle boards, and give them a pointed shape at the bottom. The resulting fence is inserted into the ground using the extreme planks.

Another option for a flower bed made of boards
How to make a tall flower bed
It is very easy to make a wooden flower bed in the form of a high box with your own hands. To do this, you will need two boards 50 cm long and two 80 cm long - these will be the sides of the future design. You can take blanks of a different size, the main thing here is that one pair of boards is shorter and the other is longer. Assemble the base frame using 76 mm screws.

Screw on the legs
Now you need to make the bottom of the garden. Take a sheet of plywood that is equal to the perimeter of the frame and attach it to the edges of the boards with 36mm screws. It turned out to be a box, but to make a high flower bed, you need to put it on its legs. Saw off eight pieces of the same size from the plank and screw them to the sides as shown in the photo. To make the structure complete and neat, nail planks along the upper edges of the sides. The wood can be stained and then varnished or painted with multi-colored paints.

Ready flower bed
You can come up with many more interesting options for flower beds, for example, make a fence using pegs, long boards, or just decoratively lay solid logs on the ground. Wooden flower beds create a unique color and special mood, they fit perfectly into any landscape, but look more harmonious on areas with wooden houses.


