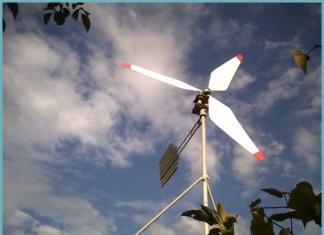
A wind generator made from a car generator can help in a situation where there is no way to connect to a power line in a private house. Or serve as an auxiliary source of alternative energy. Such a device can be made with your own hands from improvised materials, using the achievements of craftsmen. Photos and videos will demonstrate the process of creating a homemade wind turbine.
There is a huge species diversity of wind turbines and drawings of their manufacture. But any design includes the following mandatory elements:
- generator;
- blades;
- storage battery;
- mast;
- the electronic unit.
 With some skills, you can make a wind generator with your own hands
In addition, it is necessary to think over the control and distribution system of electricity in advance, draw an installation diagram.
wind wheel
The blades are perhaps the most important part of a wind turbine. The operation of the remaining components of the device will depend on the design. They are made from different materials. Even from a plastic sewer pipe. Blades from a pipe are easy to manufacture, are cheap and are not affected by moisture. The wind turbine manufacturing process is as follows:
- It is necessary to calculate the length of the blade. The diameter of the pipe should be equal to 1/5 of the total footage. For example, if the blade is meter long, then a pipe with a diameter of 20 cm will do.
- We cut the pipe with a jigsaw along into 4 parts.
- We make a wing from one part, which will serve as a template for cutting subsequent blades.
- We smooth out the burr on the edges with an abrasive.
- The blades are fixed to an aluminum disk with welded strips for fastening.
- Next, the generator is screwed to this disk.
 Blades for wind wheel
After assembly, the wind wheel needs to be balanced. It is fixed on a tripod horizontally. The operation is carried out in a room closed from the wind. If the balance is correct, the wheel should not move. If the blades rotate themselves, then they need to be sharpened to balance the entire structure.
Only after the successful completion of this procedure, you should proceed to check the accuracy of rotation of the blades, they should spin in the same plane without skew. An error of 2 mm is allowed.
 Generator Assembly Diagram
Mast
For the manufacture of the mast, an old water pipe with a diameter of at least 15 cm, a length of about 7 m is suitable. If there are buildings within 30 m of the intended installation site, then the height of the structure is adjusted upwards. For efficient operation of the wind turbine, the blade is raised above the obstacle by at least 1 m.
The base of the mast and pegs for fixing the guy wires are concreted. Clamps with bolts are welded to the stakes. For stretch marks, a galvanized 6 mm cable is used.
Advice. The assembled mast has a considerable weight, with manual installation you will need a counterweight from a pipe with a load.
Alteration of the generator
For the manufacture of a windmill generator, a generator from any car is suitable. Their designs are similar to each other, and the alteration comes down to rewinding the stator wire and making the rotor on neodymium magnets. Holes are drilled in the poles of the rotor to fix the magnets. Install them by alternating poles. The rotor is wrapped in paper, and the voids between the magnets are filled with epoxy.
 car alternator
In the same way, you can remake the engine from an old washing machine. Only magnets in this case are glued at an angle to avoid sticking.
The new winding is rewound along the coil onto the stator tooth. You can make a bulk winding, it's convenient for anyone. The greater the number of turns, the more efficient the generator will be. Coils are wound in one direction according to a three-phase scheme.
The finished generator is worth trying out and measuring the data. If at 300 rpm the generator produces about 30 volts, this is a good result.
 Wind turbine generator from a car generator
final assembly
The generator frame is welded from a profile pipe. The tail is made of galvanized sheet. The rotary axis is a tube with two bearings. The generator is attached to the mast in such a way that the distance from the blade to the mast is at least 25 cm. For safety reasons, a calm day should be chosen for the final assembly and installation of the mast. The blades under the influence of a strong wind can bend and break on the mast.
To use batteries to power equipment that runs on 220 V, you will need to install a voltage conversion inverter. The battery capacity is selected individually for the wind generator. This indicator depends on the wind speed in the area, the power of the connected equipment and the frequency of its use.
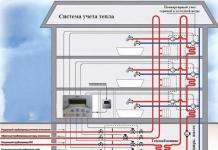
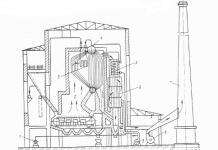
 Wind generator device
To prevent the battery from failing from overcharging, you will need a voltage controller. You can make it yourself if you have sufficient knowledge in electronics, or buy ready-made. There are many controllers for alternative energy mechanisms on the market.
Advice. To prevent the blade from breaking in strong winds, a simple device is installed - a protective weather vane.
Wind turbine maintenance
A wind generator, like any other device, needs technical control and maintenance. For the smooth operation of the windmill, the following work is periodically carried out.
 Scheme of the wind generator
- The current collector requires the most attention. Generator brushes need cleaning, lubrication and preventive adjustment every two months.
- At the first sign of a blade malfunction (trembling and imbalance of the wheel), the wind generator is lowered to the ground and repaired.
- Once every three years, metal parts are coated with anti-corrosion paint.
- Regularly check the fastenings and tension of the cables.
Now that the installation is complete, you can connect appliances and use electricity. At least as long as it's windy.
The basis for the experiments was a 12V, 95A generator. In order to get rid of the excitation winding and its accompanying brushes and the electronic control circuit, I tried to replace the winding with permanent magnets. I took out the winding, in its place I placed 3 pieces inside the “crabs”. ring ferromagnet size 85 * 35 * 15mm from the loudspeakers. "Crabs" began to attract pieces of iron to themselves quite well. But when I planted everything on my own steel shaft, the attraction disappeared. It turned out that the shaft shunted the magnetic lines of force through itself.
I had to order a turner a new shaft made of non-magnetic material. A piece of titanium rod was found, from which the shaft was machined. The rotor worked just fine. But at 600 rpm the alternator only put out 4V without load. I had to hand over the stator for rewinding. I increased the number of turns by 5 times (from 7 to 35 per coil), respectively, reducing the diameter of the wire. The voltage at the same idle speed, the generator was already giving out 20V. I loaded it with an electric bulb from a car headlight (60 candles). The voltmeter showed 12V and the ammeter 5A.
It seemed to me not enough - from a generator of 1.3 kilowatts I received only 60 watts!? But then I realized - 600 rpm, of course, is too low a speed to compare with a car generator. Power increases in proportion to rpm. Enough to charge an acid battery. To increase the speed, you need a gearbox.
Soon I managed to purchase neodymium magnets 50 * 20 * 5mm in size in the amount of 12 pieces. and I decided to make a new rotor.
To do this, he collected aluminum scrap (old pistons from internal combustion engines), made a steel mug with a handle, in which he melted aluminum scrap. From the resulting blank, the turner turned the base of the rotor, which was mounted on the old shaft from the first rotor. Leaving on one side a side 8 mm wide, the rest of the aluminum was removed with a cutter to the depth of the magnets and the steel ring-bandage (5 + 5 mm).
The bandage was machined from a piece of a suitable steel pipe with a diameter of 100 mm and mounted on the base until it stops against the side. On the side, I applied markings from above, i.e. 12 sectors. I glued the magnets on a steel bandage, adhering to the markings, first with a quick glue of the “Second” type, alternating their polarity. Then, wrapping the magnets with waxed paper, he reinforced them with adhesive tape from above so that the adhesive tape stuck to the side. I prepared epoxy glue, put the rotor “on the butt” and carefully poured epoxy into the gap between the magnets.


When the glue hardened, I balanced the rotor on two parallel steel rulers clamped in a vise horizontally through a piece of board. The rotor relied on them with its shaft and rolled freely, as if on rails. The imbalance was not noticeable.
The generator shaft diameter is 20mm. At the end of the shaft there is a key and a thread. Between the propeller and the generator bearing there is a spacer two-stage bushing, the outer diameter of this bushing is the maximum possible so that the propeller is well pressed against its end. There is also a spacer behind the bearing inside the generator, which rests against the rotor blank.
When I assembled the generator, it turned out that the magnetic sticking was very significant, it was very difficult to turn the rotor by hand by the shaft, despite the fact that I glued the magnets with a slight distortion.
I tested the generator on a lathe. The results were encouraging. At 125 rpm it produced 15.5 volts and at 630 rpm it produced 85.7 volts with no load. Under load on a piece of nichrome wire at 630 rpm, the voltmeter showed 31.2 volts and the ammeter 13.5 amperes. Those. power gave out 421.2 watts. It turns out that neodymium magnets are 7 times more efficient than ferrite ones.
Now again I had to rewind the stator with a large wire diameter in order to reduce the resulting voltage. To reduce the magnetic sticking between the rotor and the stator, I decided to sort out the stator plates. The work is very painstaking. He removed the seams with a grinder, separated the plate after the plate with a knife and a hammer.

On a flat anvil, I leveled them with light blows of a rubber mallet. When the plates were cut, I ordered the turner to turn the tooling for their assembly. The tooling consists of a cylinder with a diameter equal to the inner diameter of the plates. A flange is welded on the bottom to stop the plates. The second flange slides freely over the cylinder. In the flanges, two opposite holes with a diameter of 6 mm are drilled for guide rods. Having inserted rods with a diameter of 5 mm into the holes of the flanges, he began to assemble the plates on the snap, putting them on the cylinder so that the rods went inside the opposite grooves. After assembly, he tilted the rods in different directions to the stop, gradually compressing the plates with four clamps, and the grooves became oblique. The misalignment was 13mm with a plate set height of 36mm. The width of the groove inside turned out to be 5mm (according to the diameter of the rods).


After the final crimping with clamps, I restored the seams with a semi-automatic welding machine. I processed all the burrs on the poles with needle files, especially carefully processed the inner surfaces of the grooves - after all, the walls there turned out with ledges. I handed over the stator for winding. It turned out 15 turns per coil with a wire with a diameter of 1.35 mm.
With excitement, I assembled the generator. I tried to turn the shaft by hand - and was upset. Sticking remained, although it became less. How much work, but little sense!
While the stator was being rewound, the propeller was riveted. The blades in the amount of 3 pieces were cut out from the same duralumin pipe 1 m long. Width at the beginning of 120mm, at the end of 50mm. The hub was made in the form of a three-layer three-horned sandwich. Inside there is a steel disk with a diameter of 100 mm and a thickness of 2.5 mm, as well as the thickness of the body of the blades, top and bottom are solid swings cut from sheet steel with a thickness of 2 mm. and rolled on a mandrel made of a steel pipe with a diameter of 220 mm. Drilled holes for rivets. Then he inserted the blades between the lower and upper swings, adjusted their ends so that an equilateral triangle was obtained, drilling through the body of the blades, and riveted. I did the balancing by hanging the propeller on a thread through the center. http://www.thebackshed.com/Windmill/Articles/DonBrown1.asp I removed the excess weight with a grinder with Velcro emery cloth, grinding the blades.
I welded a frame from a steel corner for mounting the generator, welded the tail axle to it.
I attached paws to the generator body, with which it is attached to the frame. I made a tail 1.5 m long, the tail unit measures 60 * 40 cm.
I riveted a spinner (fairing) from millimetric aluminum, I cut out a shield-roof for the generator.
Attached to the top of the mast was a swivel assembly that I made a couple of years ago. It turned out to be universal and reliable, on two radial and one thrust bearings. these two M8 bolts are short, they protrude a little inside the glass under the lower bearing to hold the glass. A spacer sleeve is inserted between the upper and lower bearings, which is locked with the central pipe with the same bolts. A flange is welded to the central pipe. I developed the design of the swivel assembly myself, having bearings, made drawings, and carried it to the turner. He corrected it a little for the better, turned it, the welder welded it where necessary, it turned out well.

I attached a frame to the pivot point with bolts, passed a drop cable - two copper stranded insulated wires with a cross section of 10 mm2, screwed a generator and a shield to the frame, a propeller to the generator, a spinner to the propeller.
The winch lifted the mast with this stuff to a vertical position. The diameter of the rope on the winch is 6.5mm. I checked with a dynamometer the force that the cable experiences at the beginning of the mast, this force is 450 kg. Will survive.
It starts working with a working wind (there is nothing to measure the speed), but when it starts working, the ammeter immediately rises to 3-4 amperes.
With a strong wind, the tail protection reliably works, the current reaches 20-25 amperes, the voltage at the terminals is 16-18 volts. When the windows are closed, the noise of the propeller is not audible. When open, moderate noise and whistling are heard when the protection is triggered.
In a strong wind, a rumble is heard, as if a tractor is driving somewhere far away. I could not immediately understand where this roar came from, but when, with a very sharp gust of wind, I heard a short-term scribbling of the blades along the mast in time with the roar, I realized: In the idle position, the distance of the ends of the blades from the mast is only 10-12 cm. I thought it would be enough, because the centrifugal force will not allow the blades to sag. But when I began to observe from the side, I saw that the ends of the blades approach the mast, depending on the strength of the wind, at a distance of up to 2-3 cm. When the end of the blade passes at a small distance from the mast and at high linear speed, a sound like cotton appears, and these pops merge into a rumble.
If you want to make a wind generator from a car, then you will need to prepare all the tools and materials, as well as familiarize yourself with the work methodology. Quite often, carrying out this kind of work does not take much time and effort from the master, but you may have to use the services of a turner. This statement, of course, is only true if you yourself are not a professional in this field. Be that as it may, a specialist of this profile will perform a minimum number of manipulations, which is why you can do the rest of the work yourself. As a result, it will be possible to obtain a structure with a long service life.
For work, you can use a 95A 12 V generator. At the first stage, it is recommended to remove the excitation winding and electronic control circuits. Now you can remove the winding, and in its place put ring ferromagnets in the amount of 3 pieces, the size of each of which should be 85 x 35 x 15 millimeters. These elements need to be borrowed from the loudspeakers.
How to eliminate errors?

The installation should be done inside the so-called crabs, after manipulations they will attract iron elements well. In order to exclude this phenomenon, you need to put everything on a metal shaft. This is due to the fact that the shaft shunted the magnetic lines of force through itself. If you decide to make a wind generator from a car generator with your own hands, then you may have to order a new shaft from a material that is not related to the magnet. To turn the shaft, you can find a piece of titanium rod. After that, the rotor should work properly. If the 600 rpm alternator is only putting out 4 volts with no load, then the stator will have to be rewound.
Work technology

The master must increase the number of turns by 5 times, this will reduce the diameter of the wire. At idle, the voltage will be 20 V. If you load using an electric light bulb borrowed from a 60 candle car headlight, then the voltmeter will show 12 V, while the ammeter will show 5 A. If it seems insignificant to you that a 1.3-kilowatt generator produces 60 watts, you can use a reducer. This is because 600 rpm is too low to compare to a car's alternator. Power will increase in proportion to the number of revolutions. If it is possible to purchase neodymium magnets, the size of which will be 50 x 20 x 5 millimeters, in the amount of 12 pieces, then a new rotor can be made.
Work on the rotor

If you decide to make a wind generator from a car generator with your own hands, you can make a rotor. To do this, you need to prepare scrap aluminum, which can be old pistons from an internal combustion engine. Scrap aluminum can be melted in a steel mug, and the base of the rotor can be machined from the resulting blank, this element can be mounted on the old shaft from the first rotor. On the one hand, a side should be left, the width of which will be 8 millimeters, and the rest of the aluminum must be removed with a cutter, deepening to a distance that will be equal to the dimensions of the magnets and the metal bandage. To these parameters it will be necessary to add 5 millimeters.

A do-it-yourself wind generator from a car generator can be easily made. The bandage is easy to make from pieces of steel pipe, the diameter of which should be 100 millimeters. This workpiece should be pushed all the way into the side of the base. On the sides, the master must apply markings, which will be represented by 12 sectors. The magnets must be fixed with glue on a metal bandage, while it is worth adhering to the previously made markings. You need to use the glue "Second", while alternating the polarity. The magnets are then wrapped and reinforced with tape from above so that the adhesive tape sticks to the side. You will need to prepare the epoxy by carefully pouring it into the space between the magnets. After the composition has hardened, it is necessary to balance the position of the rotor on parallel metal rulers, which must be clamped horizontally in a vise through a piece of board. The rotor will rest on these elements with its shaft, rolling as if on rails. It is important to consider that there should not be an imbalance in this case.

If you are thinking about how to make a windmill from a car generator, then you should consider that the shaft diameter must be equivalent to 20 millimeters. At the end of this workpiece there should be a thread and a key. A two-stage spacer sleeve is installed between the bearing and the propeller of the generator, the outer diameter should be as large as possible, only in this way the propeller will be well pressed against the end. Behind the bearing inside the generator there should be a spacer sleeve, which must be rested against the rotor, or rather against the blank. After you assemble the generator, it may turn out that the magnetic sticking is excessively large, while turning the rotor mechanically will be quite difficult, despite the fact that the magnets are glued with a slight skew.
Generator test

It is quite simple to make a windmill from a car generator with your own hands; you can test the generator on a lathe. If all is well, then the results should please. At 125 RPM, it will put out 15.5 volts, while at 630 RPM without load, this figure will be 85.7 volts. If we are talking about a load at 630 rpm, then the voltmeter will show 31.2 volts, while the ammeter - 13.5 amps. Thus, the power will be equal to 421.2 watts. This indicates that neodymium magnets work 7 times more efficiently than ferrite ones.
The nuances of the work
When making a wind turbine with your own hands, it may be necessary to rewind the stator with a large wire diameter in order to reduce the voltage. To reduce magnetic sticking between the stator and the rotor, you can sort out the stator plates. It should be noted that this work is very painstaking. Using an angle grinder, you can get rid of the seams, with a hammer and a knife, each plate should be separated. If you decide to make a wind generator with your own hands, then you may need a flat anvil, on which you can level with light blows with a rubber hammer. As soon as it is possible to separate the plates, you can use the help of a turner by ordering a tooling undercut for assembly. The equipment incorporates a cylinder, the diameter of which is equivalent to the same indicator characteristic of the plates. The second flange will slide freely along the cylinder. In the flanges, two oppositely located holes must be made, each of which will have a diameter of 6 millimeters. They are needed to install the guide rods. The latter should have a diameter within 5 millimeters. from a car generator, the master can begin to assemble on a snap, putting it on the cylinder so that the rods are inside opposite grooves. After assembly, the rods can be tilted in different directions until they stop, clamping the plates with clamps in the amount of 4 pieces. The skew should be 13 millimeters with a plate set height of 36 millimeters.
How to choose between rotary and drum wind generator?
A do-it-yourself wind generator can be made on the basis of a drum or rotary design. The coefficient of removal of air masses will always be lower for drum structures compared to propeller ones. If you try to approximate this parameter, then the device will turn out to be quite complicated. At the same time, excessive financial costs cannot be avoided with the same power. Among other things, the drum unit must have a very complex protection system that excludes spacing. In view of this, masters quite often refuse this element in the design.
A homemade windmill from a car generator cannot be made without a propeller. After the rewinding of the stator can be carried out, it will be possible to start manufacturing one of the important parts. There can be three blades, and they need to be cut out of a duralumin pipe, the length of which is 1 meter. At the very beginning, the width of the element should be 120 millimeters, while at the very end it should be 50 millimeters. Inside is a metal disk with a diameter of 100 millimeters. Its thickness should be equivalent to 2.5 mm. For rivets, holes will need to be made, and blades will have to be installed between them and the upper swings. The ends of the latter will need to be adjusted, taking into account the fact that an equilateral triangle is obtained. When a windmill is made from a car generator, it will be necessary to balance by hanging the propeller on a thread through the central part.
It will be possible to get rid of excess weight with the help of an angle grinder, which is supplied with an emery cloth. Blades should be well sanded. You will need to prepare a frame from a metal corner to fix the generator, the tail axle is welded to it. Paws must be attached to the body of the generator, which will allow fixing to the frame.
Conclusion
The wind generator from the autogenerator may make some sounds during operation. This is due to the fact that in the idle state, the step from the end of the blades to the mast is only 12 centimeters. The centrifugal force does not allow the blades to bend, and the ends of the blades approach the mast depending on the strength of the wind. A wind generator from a car generator has many advantages, and the creation of some noise during operation cannot be called a clear minus.
A wind generator made from a car generator can help in a situation where there is no way to connect to a power line in a private house. Or serve as an auxiliary source of alternative energy. Such a device can be made from improvised materials, using the achievements of craftsmen. Photos and videos will demonstrate the process of creating a homemade wind turbine.
There is a huge species diversity of wind turbines and drawings of their manufacture. But any design includes the following mandatory elements:
- generator;
- blades;
- storage battery;
- mast;
- the electronic unit.
 With some skills, you can make a wind generator with your own hands
 In addition, it is necessary to think over the control and distribution system of electricity in advance, draw an installation diagram.
wind wheel
The blades are perhaps the most important part of a wind turbine. The operation of the remaining components of the device will depend on the design. They are made from different materials. Even from a plastic sewer pipe. Blades from a pipe are easy to manufacture, are cheap and are not affected by moisture. The wind turbine manufacturing process is as follows:
- It is necessary to calculate the length of the blade. The diameter of the pipe should be equal to 1/5 of the total footage. For example, if the blade is meter long, then a pipe with a diameter of 20 cm will do.
- We cut the pipe with a jigsaw along into 4 parts.
- We make a wing from one part, which will serve as a template for cutting subsequent blades.
- We smooth out the burr on the edges with an abrasive.
- The blades are fixed to an aluminum disk with welded strips for fastening.
- Next, the generator is screwed to this disk.
 Blades for wind wheel
 After assembly, the wind wheel needs to be balanced. It is fixed on a tripod horizontally. The operation is carried out in a room closed from the wind. If the balance is correct, the wheel should not move. If the blades rotate themselves, then they need to be sharpened to balance the entire structure.
Only after the successful completion of this procedure, you should proceed to check the accuracy of rotation of the blades, they should spin in the same plane without skew. An error of 2 mm is allowed.
 Generator Assembly Diagram
 Mast
For the manufacture of the mast, an old water pipe with a diameter of at least 15 cm, a length of about 7 m is suitable. If there are buildings within 30 m of the intended installation site, then the height of the structure is adjusted upwards. For efficient operation of the wind turbine, the blade is raised above the obstacle by at least 1 m.
The base of the mast and pegs for fixing the guy wires are concreted. Clamps with bolts are welded to the stakes. For stretch marks, a galvanized 6 mm cable is used.
Advice. The assembled mast has a considerable weight, with manual installation you will need a counterweight from a pipe with a load.
Alteration of the generator
For the manufacture of a windmill generator, a generator from any car is suitable. Their designs are similar to each other, and the alteration comes down to rewinding the stator wire and making the rotor on neodymium magnets. Holes are drilled in the poles of the rotor to fix the magnets. Install them by alternating poles. The rotor is wrapped in paper, and the voids between the magnets are filled with epoxy.
 car alternator
 In the same way, you can remake the engine from an old washing machine. Only magnets in this case are glued at an angle to avoid sticking.
The new winding is rewound along the coil onto the stator tooth. You can make a bulk winding, it's convenient for anyone. The greater the number of turns, the more efficient the generator will be. Coils are wound in one direction according to a three-phase scheme.
The finished generator is worth trying out and measuring the data. If at 300 rpm the generator produces about 30 volts, this is a good result.
 Wind turbine generator from a car generator
 final assembly
The generator frame is welded from a profile pipe. The tail is made of galvanized sheet. The rotary axis is a tube with two bearings. The generator is attached to the mast in such a way that the distance from the blade to the mast is at least 25 cm. For safety reasons, a calm day should be chosen for the final assembly and installation of the mast. The blades under the influence of a strong wind can bend and break on the mast.
To use batteries to power equipment that runs on 220 V, you will need to install a voltage conversion inverter. The battery capacity is selected individually for the wind generator. This indicator depends on the wind speed in the area, the power of the connected equipment and the frequency of its use.
 Wind generator device
 To prevent the battery from failing from overcharging, you will need a voltage controller. You can make it yourself if you have sufficient knowledge in electronics, or buy ready-made. There are many controllers for alternative energy mechanisms on the market.
Advice. To prevent the blade from breaking in strong winds, a simple device is installed - a protective weather vane.
Wind turbine maintenance
A wind generator, like any other device, needs technical control and maintenance. For the smooth operation of the windmill, the following work is periodically carried out.
 Scheme of the wind generator
 - The current collector requires the most attention. Generator brushes need cleaning, lubrication and preventive adjustment every two months.
- At the first sign of a blade malfunction (trembling and imbalance of the wheel), the wind generator is lowered to the ground and repaired.
- Once every three years, metal parts are coated with anti-corrosion paint.
- Regularly check the fastenings and tension of the cables.
Now that the installation is complete, you can connect appliances and use electricity. At least as long as it's windy.
DIY windmill generator: video
- useful thing. It helps to generate electrical energy using only natural phenomena, in this case, this phenomenon is the wind. The stronger the wind, the more energy can be obtained using a wind generator.
They fall into two categories:
- industrial;
- domestic;
Industrial ones are established by the state or large energy corporations, and most often they are networked. Using a wind generator at home, they primarily receive not electricity, but direct alternating current.
They are classified:
- in count ;
- the material from which it is made;
- along the axes of rotation;
- by screw pitch;
There are 2 main types of wind turbines:
- The axis of rotation is vertical.
- The axis of rotation is horizontal.
Principle of operation
When the lifting force begins to act, the rotor of the generator begins to rotate. This force arises when the blades begin to flow around the wind flow. Under these circumstances, the generator begins to produce variable and unstable current flows, which are rectified in the controller.
This current is used to charge batteries. At the same time, a second device is connected to the batteries - this is an inverter that converts the DC voltage of the battery equipment into AC single-phase or three-phase, which is used by the consumer.
The wind generator normally does its job with the controller and inverter, but there are other ways to use it:
- Automatic battery operation.
- Automatic operation with battery and solar battery.
- Automatic operation with battery and diesel back-up generator.
- A windmill that does its work in parallel with the network.
The benefits of wind power are certainly good. Wind energy is abundant, does not harm the environment, is completely safe and reliable as a resource for generating electricity.
Components without which a wind generator cannot do:
- foundation base;
- electrical cabinet;
- towers;
- stairs;
- rotating mechanism;
- gondolas;
- electric generator;
- anemometer;
- brake system;
- transmissions;
- blades;
- systems for changing the angles of attack of the blades;
Required tools:
- electric drill with drills (5.5 - 7.5 mm);
- gas and adjustable wrench;
- electric jigsaw with a saw for metal;
- screwdriver;
- roulette;
- protractor;
- compass;
- marker;
- ¼ ×20 tap;
How to make a windmill
 Before you start building a windmill, you should choose a suitable generator that will provide energy at low rotations. A good generator is an automobile one, however, before using it, it is necessary to rewind the stator and implant neodymium magnets.
If there is no autogenerator, then you can weld the housing for the stator.
The action plan is:
- Take a sheet of steel whose thickness is 2 mm.
- Cut out 2 octagons with a grinder, which will exceed the outer diameter of the stator by 2 centimeters.
- Cut off 2 strips, the width of which will be 1.5 centimeters.
- Press the strips over the stator and weld them to the octagons.
- Make 2 flanges from 2 mm steel.
- Drill holes for 201 bearings to attach flanges with bearings.
Rotor manufacturing:
- Find a metal bar with a thickness of 12 mm.
- Cut the thread on the stud to secure the screw.
- Get a metal sleeve, the thickness of which will be 76 mm.
- Take a piece of the 72nd pipe and make a 2 mm ring.
- Fry with clamps and weld.
- Fill the sleeve with epoxy resin on the stud.
- Weld plates on the stud so that it does not spin.
- Cut out 2 circles from tin along the outer diameter of the sleeve.
- Insert the stud into the holes and pour the epoxy.
- The rotor is polished to a shine.
This rotor will help save a certain part of the money.
When the housing has acquired a normal appearance, it is necessary to move on to the stator. First you need to remove the old winding and scrape off the old varnish from the grooves. Then you should purchase 200 enamel wire in 200 turns of 0.56 mm.
The stator must be wound on each coil directly on the tooth, so that it turns out tightly and evenly, and also many turns fit. Notebook cardboard can be used as an insulating material. The wire must be wound in phases, it should be stepped over every 2 teeth. Then you should check the phases to see if they are short and coat with varnish. You should get 12 coils of 3 phases.
It is necessary to create 24 poles on the rotor, since the ratio of magnet to coils is 2/3. Next, stick 24 magnets on the rotor at the same distance and fill with epoxy.
After all the actions taken, it is necessary to assemble the generator, connect the phases into a star and scroll. It will turn out about 2000 rpm with the issuance of 13 volts.
 Blade manufacturing:
- Take a barrel.
- Divide with a marker and tape measure into 4 parts that will be equal.
- Cut out the blades.
- Attach them with bolts to the bottom and pulley.
- Bend the blades, doing it carefully to avoid a sharp gust of wind.
After that, you need to mount the wheel and balance it. Balancing the wind wheel should be carried out in a closed and spacious room. An important part will be the stillness of the air.
Balancing:
- Suspend the wheel in working position at a height so that there are no obstacles for free rotation.
- Stop the wheel until it is completely still and release.
- Turn the wheel by hand through an angle that is 360/3.
- Stop and let go.
- Repeat the observation again until the wheel turns completely around the axle.
If the stopped and released wheel starts spontaneous rotation, it indicates that the part of the wheel that rushes down has a heavier weight. It is necessary to make this part easier by grinding the edge of one of the blades.
Similar tests on the same stand will show whether all parts of the blade "fit" into the plane of rotation of the wheel. To do this, it is necessary to completely stop the wheel and place two bars on both sides of the blade that will not interfere with the rotation of the bar at a distance of 2 mm from the blades. When rotating the wheel, the blade should not touch the bar.
Assembly
 In order to assemble a windmill, you need to make a rotary axis. It can be made from bearings and a branch of the 15th pipe with threads and nuts. It is necessary to fill the tube with epoxy inside the bearing, and pour it on a piece of plastic pipe, the diameter of which will be 50 mm. Thus, the turning axis appeared.
How to install the visor:
- Make a beam 60 centimeters long from a 50 * 25 mm profile.
- Attach it to the generator beam.
- Fasten the tail.
- Cut holes for fixing the rotary axis.
- Install the blades.
- Attach the finished wind generator to the mast.
- Connect a small battery pack.
- Connect multimeter.
The wind turbine is installed and ready to use. This windmill can easily provide LED lighting, a TV with a laptop and other little things in low windy weather. But this is only in light weather. With a strong wind, energy production increases several times.
At the present time, the biggest problem that hinders the development of industrial small wind turbines is their too high cost, and based on this, their acquisition in order to fully provide the house and nearby electrical power will be financially beneficial with an average annual wind gust that will reach more than 6 m /With.
If a weak wind is blowing, then it is quite enough for the replacement energy to be able to assist in providing electricity to some small structures, then it is necessary to make a wind structure for giving by hand - at a cost it will cost several times cheaper than buying a ready-made one.
However, it should be remembered that wind energy is an industry that is developing rapidly, and therefore, if you always follow the latest production, it will not be difficult to find the best option to solve the difficulty in building windmills for private houses.


