Fruit trees are surprisingly easy to grow on personal plot... In the spring they will delight you with beautiful flowers, and then with an abundance of fruits. Apple trees, peaches, plums and pears - all of these trees grow well in different climates. When making your choice, consult with the fruit nursery, whether the selected fruit tree will suit the conditions of the area in which you live. Read this article to learn how to plant fruit trees so that they will bear fruit successfully for many years to come.
Steps
Part 1
Choosing a landing site- When choosing a location for a fruit tree, you must visualize it as an adult. If you imagine the width of its crown, keep in mind that the roots of the tree extend the same length as the branches. This means that you should not plant the tree too close to a building or road.
-
Check the drainage capacity of the soil at the proposed planting site. Besides the sun, good soil drainage is the second essential condition for prosperity. fruit trees... The water in the soil should not stagnate, since this will cause the roots of fruit trees to rot in the ground. Test soil drainage by digging a 1 foot deep hole and filling it with water. If the water is absorbed into the soil quickly, the site is perfect for planting a fruit tree. If the water stagnates, choose a different location.
- If your site has heavy clay soil that results in insufficient drainage, the tree can still be planted if certain methods are used. For example, you can plant a fruit tree in a raised bed, or loosen the clay by mixing it with compost to help improve drainage.
Buy a fruit tree with an open root system. Fruits with good palatability - sweet apples, plums, pears, etc. - are produced by grafted trees. Although fruit trees can be grown from seeds, such trees do not necessarily produce fruit that is edible. To ensure that the tree you choose will bear fruit with good tasting qualities, it is best to buy an open-rooted fruit tree, a very young and already grafted tree.
Choose an open, sunny spot on your property. Fruit trees usually need at least 6 hours in full sun to produce full fruit. Find a spot in the area where the fruit tree will not be shaded by the house or other taller trees. There should be no other vegetation near the fruit tree that would compete with it for nutrients and water.
Part 2
Digging a hole and preparing the soil-
Start preparing for planting in the spring. Although fruit trees can be planted at any time of the year, in areas with cold winters, it is best to do so in the spring. Then the tree will immediately begin to adapt to the soil and grow roots. Spring is also the best time to dig the soil, as the ground has already thawed and softened.
Add compost to the soil as needed. If you have heavy clay soil or heavy compacted soil, it is a good idea to dig at least 2 feet deep and add some compost. This will make the soil looser, provide better drainage and create better conditions for root growth. Use a garden shovel or cultivator to dig up and loosen the soil, then add the compost and mix with the soil.
Dig a wide hole. Use a shovel to dig a hole twice as wide as the diameter of the roots of the tree you are planting. The roots of fruit trees usually grow away from the trunk, so you give them plenty of room to grow. Make sure the roots are surrounded by loose soil and not compacted soil that will restrict their growth.
When planting fruit trees, follow the instructions for improving the soil. Depending on the type of tree and soil condition, you can add organic nutrients to the planting hole. In some cases, it is only necessary to pour compost into the bottom of the planting pit.
- Consult your fruit nursery regarding the possibilities and need for soil improvement. In some cases, you may not need to patch and improve the soil as the existing soil is rich in nutrients.
- Do not add compost and other nutrients unless advised to do so. Once the roots grow outside of the improved soil, they will need to survive on naturally available nutrients... Therefore, in the long run, the very rich soil they end up in when planting will not provide the expected benefits.
-
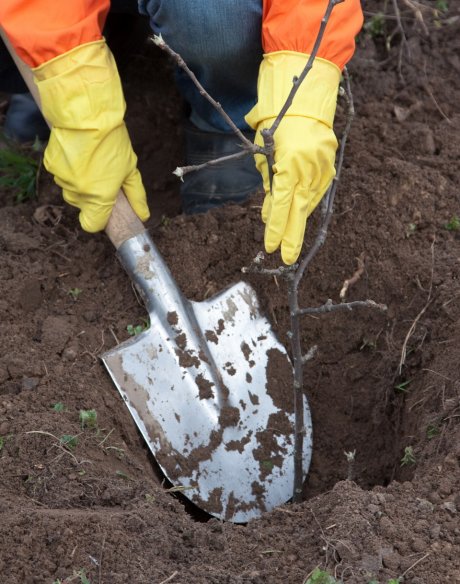
Place the tree in the planting hole. Pour loose earth into the hole about the length of your finger to form a slide. Place the fruit tree on a hill with its roots, straighten the roots and make sure the grafting site at the base of the tree trunk is above ground level. Adjust the position of the tree by adding or removing soil from the slide. Check if all roots are in the ground.
- If there are roots in / above the graft site, cut off those roots and check again that the graft site is above the ground. If the roots from the grafting site reach the soil, then the tree will always give growth that weaken it.
-
Tamp the soil around the roots. Fill the voids around the roots of the tree with nutritious soil and make sure the roots are completely covered with soil. Step back and check if the tree is upright. Tamp down the soil carefully.
Water the roots. Water the planting area completely so that the soil fills any voids around the roots of the tree. Add soil, tamp it carefully and water again. Continue this process until the soil at the planting site is level with the ground at the site.
- Do not overflow; if the roots of the tree are flooded, they will start to rot.
-
Install fruit tree supports if necessary. If you live in an area with strong winds, reinforce the tree by tying it to a sturdy peg with a sturdy cloth or rubber band. Check to see if this will restrict the growth of the tree trunk. The support will also help the tree grow upright and tall.
For a fruit tree to grow well in your garden, you need to plant it correctly. Find out how to do it.
You can spend a lot of money on the purchase of elite seedlings of super-yielding varieties, a lot of time and effort to prepare planting pits. But everything will be in vain if you make gross mistakes when planting seedlings. Therefore, read the rules described below and try to follow them strictly. Only in this case the trees planted by you will take root and start growing.
Rule 1
The soil for planting should be prepared in advance, after loosening it and adding fertilizer.
Rule 2
Before planting, the tree must be placed in water for several hours so that the root system receives the required amount of moisture.
Rule 3
Before planting, you should smoothly cut off too long, damaged or frozen roots of the tree.
Rule 4
The planting hole should be sized so that the roots of the tree can be placed freely in it.


Rule 5
Rule 6
The soil from the planting pit must be mixed with compost, mineral and organic fertilizers, and sand. Manure should not be applied.
Rule 7
Plants in the pit must be placed strictly vertically, and the grafting site must be 10 cm above ground level.
Rule 8
The planting hole should be covered with prepared soil and during planting, evenly, carefully compact it, carrying out intermediate watering.
Rule 9
It is also important to form a watering circle. To do this, make a mound in the form of a roller 5-7 cm around the entire circumference. The surface of the circle must be mulched with wet compost, as well as rotted manure or straw.
Rule 10
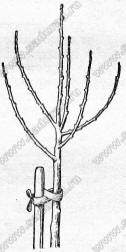
The planted tree should be watered abundantly and tied to a reinforced peg.


Optimal timing of planting fruit trees
In the middle lane, the best time for planting seed trees (apple, pear) is considered to be the period from mid-September to the end of October, stone fruits (cherry, sweet cherry, plum, cherry plum, apricot, etc.) - from late March to mid-April. However, you should focus on the specific weather conditions of your region and each specific year.
The survival rate of a seedling depends on many factors: from the preparation of the planting pit, from the introduction of pre-planting fertilizers, from the observance of the rules and technique of planting, from the quality of the planting material and from timing landing.
Landing pit begin to prepare in advance - a few months before planting the plant. This is necessary for the earth to settle.Sizes of planting pits for stone fruit (Cherry, plum,, apricot, cherry plum) approximately 60 cm deep and 40 cm in diameter. Seed breeds (Apple tree, pear) planted in pits 80 cm deep, 60-80 cm in diameter. Berry bushes can be planted in holes or trenches (40x40 cm). On dense clay soils, it is better to dig holes of larger diameter, but shallower depth.
In hazardous areas flooding, drainage can be done. To do this, in the lowest part of the landing pit, a 1-1.5 m deep channel is made with a drill, which is covered with broken brick or gravel.
You can also plant trees on mounds(or "flower beds"), for which a stake of 1.5 m high and 5-6 cm thick is driven in at the place chosen for planting a tree, the ground around the stake is dug to a depth of 20 cm and the necessary organic fertilizers
(up to 8 kg per 1 m²
). The seedling is tied to a stake, spreading the roots. All are covered with fertile soil, forming a mound. So that the walls of the earthen mound do not crumble, they can be overlaid with sod around the perimeter![]() th.
th.
The mound on which the tree is planted (see figure) can be of different heights, depending on the depth groundwater: 50 cm, if the groundwater lies at a depth of 0.5-1 m, 30 cm, if the groundwater is 1-1.5 m. The diameter of the mound must be increased by adding as the root system grows.
Planting trees on hills is best in spring.
Advantages planting tree seedlings on hills:
the roots are provided with a deeper fertile layer;
the roots of the tree are better supplied with oxygen;
in spring, the flowerbed warms up faster and the roots begin to grow earlier;
the harvest is earlier;
with the onset of frost in the fall, the roots are hardened and quickly adapt to winter;
the bark of trees does not undermine in rainy autumn and snowy winter;
it is easier to regulate the soil level at the root collar - if it settles after watering, then the soil can be poured along the perimeter of the mound, if the root collar of the seedling is too deep - you can shake off the soil, reducing the height of the entire mound, and there is no risk that the root collar will be below the soil level in the garden and to it into the hole, all excess moisture will drain, leading to damping.
The most fertile soil in any area (see. indicator plants ) is concentratedon in the upper layer (upper 20 cm), therefore, when digging the planting holes, this soil layer must be removed and set aside separately from the rest of the extracted soil, without mixing. After planting, the soil taken out from the depth of the pit is distributed along the near-trunk circle (and ideally, it is better not to use this land at all). When the entire hole is dug, it is filled with a mixture of the upper fertile soil with organic and mineral fertilizers, taking into account the requirements of the planted plants.
As organic fertilizer rotted manure, compost are suitable for filling the planting pit (15-30 kg per 1 pit (if the soils are clay, you need to add coarse sand - 2-5 buckets, if the soils are sandy - the same amount of clay). organic fertilizers they are not introduced into the landing pits, because they are poorly decomposed at depth and can poison the roots of the plant, releasing ammonia and hydrogen sulfide. Weakly decomposed organic matter is laid out in the near-trunk circle as mulch in the first or second year after planting, or placed in the depth of the planting pit so that it is in the upper layers of the pit (above the roots, without contact with them).
The number of mineral fertilizers it is different for each crop (see the table below), the main thing to remember is that all fertilizers and fertile soil (from the upper layer) must be thoroughly mixed, and when planting, the soil is poured directly to the roots without mineral fertilizers! Better to embed them in the soil of the lower third of the planting hole. Nitrogen fertilizers are not applied to the planting pit (they worsen the survival rate of plants)!
Before planting, the broken branches are removed from the seedling, roots do not cut off unnecessarily. Only if the roots are damaged are they shortened to a healthy part. The roots of a healthy seedling should be fresh, dry, not frost-bitten, preferably not shorter than 30 cm, branched. If the roots dry out on the way, they need to be immersed in water for 12-24 hours. Before planting, it is good to dip the roots of the seedling in a clay mash (clay diluted in water until sour cream is thick). If the root system of the seedling is open, and it will be possible to plant it only after a few days, the roots at this time can be wrapped in wet burlap or moss and wrapped in several layers of newspaper.
Saplings it is better to choose 1-2 year olds. The older the seedling, the worse its survival rate. If the seedling has an open root system, it is better to choose a plant with a powerful root system and the sky  the largest above-ground part.
It is advisable to plant seedlings in the same position, relatively cardinal points how they grew up in the nursery, because in 2-3 years, plant cells have already adapted to certain conditions. In practice, the south side of the stem of the seedling has a darker brownish color (more tanned), the north side is lighter, greenish.
If the seedlings are planted immediately after digging holes, it is necessary compact the soil after backfill, tamping it down with your feet or spilling plenty of water (1-2 buckets per plant).
| Culture | Landing pit size, cm (diameter-depth) | Organic fertilizers, kg / pit | Phosphate fertilizers, g.w. / pit | Potash fertilizers, g.w. / pit |
| Apple tree, pear | 60x80 | 15-30 | 200 | 60 |
| Cherry, plum, cherry plum, | 40x60 | 15-30 | 150 | 60 |
| Sea buckthorn | 40x60 | 8-10 | 60 | 30 |
| Black currant | 40x40 | 8-10 | 30 | 15 |
| Honeysuckle | 40x60 | 12-16 | 30 | 15 |
| Red currants, gooseberry, chokeberry | 40x40 | 8-10 | 15 | 30 |
| Raspberries | 40x40 | 8-10 | 15 | 20 |
After watering and soil subsidenceroot collarfruit treesmust be at ground level (not buried!). The root collar (not to be confused with the thickening of the graft site) is the conditional border of the transition of the root system into the trunk (stem). Root collar of fruit
 the tree is located 5-7 cm below the grafting site and 3-4 cm above the first branch of the root. When planting, seedlings of berry bushes are slightly deepened compared to the level at which they grew before, which contributes to the formation of additional roots. If smoreodin or chokeberry it is planned to grow in a standard form, then their seedlings are not buried either. As a consequence, after the soil subsides, the root collar of the fruit tree may be below the soil level. In this case, you must immediately carry out raising a seedling
, without waiting until it turns into an adult plant (if it does not die from podoprevanie).
the tree is located 5-7 cm below the grafting site and 3-4 cm above the first branch of the root. When planting, seedlings of berry bushes are slightly deepened compared to the level at which they grew before, which contributes to the formation of additional roots. If smoreodin or chokeberry it is planned to grow in a standard form, then their seedlings are not buried either. As a consequence, after the soil subsides, the root collar of the fruit tree may be below the soil level. In this case, you must immediately carry out raising a seedling
, without waiting until it turns into an adult plant (if it does not die from podoprevanie).
After planting the soil of the trunk circle mulch... The tree is not tied tightly to a stake (figure eight) or two crossed stakes for stability. It is best if the peg is located on the south side of the tree trunk (to protect the trunk from the sun). The height of the stake should not be higher than the lowest branches of the crown, otherwise when the tree is swayed by the wind, its branches will be damaged by friction.
After planting the seedling, special holes are arranged around the trunk for summer watering.
If in the fall timing planting was missed, it is necessary to dig in seedlings for the winter. To do this, at the highest point of the site (where water does not stagnate and cold air does not accumulate), a groove is dug (see figure). The northern wall of the ditch is made more steep, 50-60 cm high, almost vertical, the southern one - gently sloping. The seedlings are laid in the groove with the crown to the south (so that it is not sunny  burns), sprinkle the roots with loose earth or sand, watered thoroughly to compact the soil, if necessary, add more earth. At the onset of frost, the whole plant is sprinkled with earth, leaving only the tips of the branches of the seedling sticking out. To protect against mice, everything is covered with spruce branches. In the spring, the dug-in seedlings are planted in prepared pits until the buds have blossomed.
Necessary 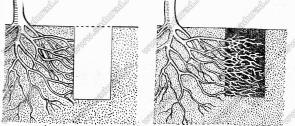 remember that the roots of the seedling are within the planting pit only for the first two years, and then go beyond it and grow in untreated soil. Some gardeners, 2-3 years after planting, dig in trees outside the area of the planting pit and plant fertilizers there. At the same time, circular ditches should be 40-50 cm deep, 30-40 cm wide. Any roots are cut with a sharp garden knife. In such ditches, the same fertilizers are applied as in the pits when planting seedlings. After another 2-3 years, you can again dig a circular ditch outside the previous one and repeat everything. It is possible to fill the ditches with plant residues with manure - everything will rot at the right time.
In addition to preparing the planting holes and proper landing, it is necessary to observe a few more conditions that will allow you to lay a successful orchard and avoid mistakes.


: planting, growing and care at home and in the garden Hymenocallis flower planting and care")


: species, reproduction and care at home To feed a flower")


