Pinching plants - removing the upper part of a young shoot. Pinching is also called, the word comes from German, it is translated as "remove the end." The procedure is used for the development of lateral shoots when vertical growth stops, increasing productivity, decorative effect.
Fruit trees are pinched to form a crown, to facilitate winter pruning. Pinching stops the progressive growth of green shoots, promotes rapid lignification, the development of lateral buds. Such buds more easily tolerate winter cold and spring unstable weather, give good fruits in the next season.
They remove competitive, strong vertical shoots that thicken the crown and change the lighting and shape of the tree. They pinch new lateral shoots, force the branches to develop horizontally, to increase fruiting.
Pinching of vegetable plants is aimed at improving the quality, full-fledged formation and ripening of the crop from the already existing ovaries. Removing the tops of the shoots prevents the emergence of new flowers, the dispersion of the plant's forces for the formation and development of ovaries, which will not have time to become fruits.
For indoor crops, pinching gives abundant branching and flowering of young shoots. Pinching the tops give the shape to the trunk, achieve the splendor and neatness of the crown. Shoots are shortened if part of the root system was removed during transplantation and the top of the plant ceased to correspond to the size of the bottom.
General rules
Pinching is carried out only when the tissues of the shoots are soft, green, and have not hardened. This involves pinching the garden plants at the start of the summer season, in June.
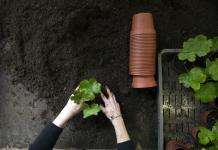
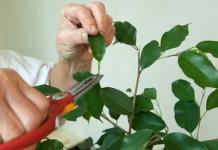
In indoor crops, the formation of a bush requires the removal of the tops of the shoots throughout the year, but during the period of active growth, the process occurs most intensively. This is done with two fingers - forefinger and thumb, or with scissors, a knife.
Fruit
The process requires skill, practical experience. Choose shoots green, young, 10-15 cm long, growing vertically upward on skeletal branches. In the future, they will become competitors to the main trunk, take away the juices, expanding, obscure the sun with excessive foliage.
Sterile fat "tops" are removed completely. Shoots that have directed their growth downward or horizontally are not touched. Having pinched the growth point on the vertical green processes of the lateral branches, 3-5 buds are left, which become fruit buds from growth ones with the redistribution of plastic substances. During the growing season, carry out up to 3 times.
Vegetable
By pinching, the tops of the shoots are removed necessarily above the first leaf, which has grown after the formation of the last ovary, which has time to form a fruit. Pinch at the beginning of mass flowering, no later than three weeks before the last harvest.
Room
Plants pince when they form the stem of a young or recently transplanted flower. Pinch the top of the trunk at the desired height (30-100 cm), wait for the development of 5-6 lateral shoots, their tops are removed above the first pair of leaves, leaving 10-12 cm.To maintain a beautiful shape, rejuvenation, flowering, shoots growing inside the crown are periodically pushed ...
What plants are shown
Stone fruit crops are pinched in the first half of June. These are apricots, peaches, cherries. From pome fruits, quince, apple, and occasionally a pear are pincer. From exotic crops, persimmon, olives, lemon, tangerine need to remove green shoots.
Pinch vegetables after the formation of 2-3 brushes with flowers. For good yields, pepper, zucchini, tomatoes, potatoes, and eggplants are pinched. The tops of the shoots of watermelons, pumpkins, melons are removed from melons. In cucumbers, the tops of the lateral processes and the main stem are removed, provoking self-pollination and improving the quality of the fruit.
Of domestic plants, pinching is required for abundant flowering: indoor maple abutilon, rhododendron, alamanda, bougainvillea, jasmine, fuchsia, hoya, chrysanthemum. Green shoots are removed, forming a beautiful crown: ardisia, acube, euonymus, heather, gardenia, cypress, clerodendrum, coleus, money tree, lantana, oleander, roses, ficus.
Houseplants
 Pinching will make the flower compact, make it bloom more abundantly, and strengthen the axillary buds. Pinching is carried out during the growth period, allowing the flower to gain strength and get the necessary development.
Transfer
When transplanting, plants lose part of the root system. To replenish the volume, to allow the flower to develop and grow roots, the new shoots are pinched so that no energy is wasted for vertical growth.
Formation
In ornamental gardening, the ability to pinch a shoot so that it grows in the right direction is appreciated. This experience and practice is especially relevant when creating sculptural compositions and growing bonsai.
Non-woody green shoots not only pinch, but also force them to change shape, fixing them with wire. Pincer the top of the plant trunk to avoid pulling the flower, the formation of a tall, but weak, frail stem. Shaping the crown, they provide access of light and air to the flower.
Rejuvenation
After pruning for renewal fuchsia, perlargonium, other acanthus pinch, achieving maximum branching, abundant foliage and flowering. Used for homemade lemons, tangerines.
Delaying flowering
To get a bush with large, lush flowers blooming at the same time, remove young shoots with early buds. This increases the quality and abundance of flowering at the right time.
Garden crops
 Many modern varieties of vegetables do not require additional care - pinching, pinching. If the weather conditions are unfavorable for the ripening of the fruits, pinching will provoke a high-quality harvest on time.
Potato
The tops of the bushes are removed before flower buds form on them. They cut off the very tip of the stem, 2-3 cm. The tubers will grow large, and will give a bountiful harvest for the next season.
Tomatoes, peppers, eggplant
Strongly elongated plants are pinched 40 days before the intended harvest of fruits. Two leaves are left over the formed ovaries, the stem is removed above, preventing new flowers from appearing.
Zucchini
Self-pollinated varieties do not need pinching; to prevent rot, several leaves thickening it are removed from the bush. For the rest, pinch the tops, leaving 4-5 sheets. In climbing crops, the top of the stem is removed after 1 meter in length, 3 lateral processes are left with one full ovary on each.
Watermelon
Pinching of the processes of the main stem of the berry is done when 2-3 fruits have already reached a diameter of up to 7 cm.
Pumpkin
The lateral shoots and the central stem are pinched if the number of formed pumpkins reaches 2-3. When the fruits begin to pour, pinch the tops, the internodes are covered with humus, provoking an early, high-quality and stable harvest.
Cucumber, melon
The main stem is pinched so that female flowers appear on the developed lateral processes. This provokes pollination of male flowers on the main stem, increases the number of ovaries. Tear off the top of the head above 6 sheets, remove weak processes. Hybrids leave 3 side shoots.
Pinching plants is a component of the necessary care, which is aimed at the formation of a full-fledged harvest, good flowering and decorative appearance of garden and horticultural crops.
Growing a variety of flowers and fruits on the site is not an easy matter, here you need to know a lot and be able to. I myself do not yet have much experience of a gardener-gardener-florist, therefore, with gratitude I use the experience of practitioners. In this case, the site helps me, the site is very useful and interesting, for which I am grateful to the authors of the articles.
To accumulate the necessary knowledge, I also read all the printed literature available to me, including magazines from the periodical subscription of previous years, from various publications.
And just recently, leafing through the old magazine "Household Economy" (1989), I came across a curious note about the old way of growing beautiful annual asters. It told about how the luxurious flowering of asters was previously achieved.
Growing gorgeous asters in my garden is of interest not only to me, but also to many other flower growers.
The availability of various varieties of aster seeds for sale allows you to create colorful aster flower beds in the summer and autumn garden, playing with literally all shades of the rainbow. In addition, asters stand in bouquets for a very long time. Due to the many advantages of this plant (despite the fact that it is an annual), there are so many fans of asters among gardeners.
I familiarized myself with this old method of growing asters with interest and adopted it, and also inform other gardeners about it.
This is what ancient flower growers did, trying to get very beautiful, profusely blooming terry asters.
The ancient technology of obtaining luxurious asters
The peculiarity of this ancient method consists in multiple transplants of aster seedlings at all stages of its development, up to budding.
Of course, picking seedlings and replanting seedlings should be done carefully, and it is best to do this at sunset.
So, the sown asters on the second or third day after the seedlings emerged dived into the prepared ridge. The aster seedlings were left to grow here for two weeks.
Then the grown asters were transplanted to a new bed for the second time. And as soon as the asters rooted well in this new place, they were replanted again.
The process of transplanting seedlings continued until the buds of the asters began to develop.
With the appearance of buds in the seedlings, they made the last transplant of plants - to the final place in the flower garden, intended for flowering asters.
As a result, with the help of such numerous transplants "... luxurious specimens of asters with abundant flowering are obtained, and the flowers themselves become double" ...
Here is such an old technology for growing beautiful asters.
I'm wondering: does any of the modern florists practice the same technique?
How can you successfully transplant such small 2-3 day old aster seedlings?
I would like to hear the authoritative opinion of experts and gardeners-practitioners about the effectiveness of this ancient method of growing magnificent asters.
I myself plan to conduct such an experiment and find out how justified this method of growing luxurious asters with double flowers is. Although on sale now there is an abundance of seeds of a variety of terry asters for every taste. And if asters with non-double flowers grow in the garden, this is mainly due to.
Lyubov Vasilievna Temchenko (Ukraine, Poltava region)
Transplant of annual asters at any stage of their development
I have not yet grown asters according to this old method to its full extent, but I think it is quite possible.
My practice has shown that asters really easily tolerate transplanting at any stage of plant development. Including, asters take root well after transplantation, even in a flowering state! Therefore, in the fall, before the onset of frost, dug out of the garden and put them on the glassed-in balcony. Here they continue their long flowering, and some inflorescences even manage to set full-fledged seeds before the onset of severe cold weather.
In my floriculture practice, I have successfully dived small seedlings of various plants, including VERY small seedlings (here it should be emphasized that asters have relatively large seeds and seedlings!). Therefore, I do not see any technological difficulties in this matter.
It is necessary not only to cut seedlings without injuring the seedlings, but also to water them carefully. I mean both the delicate method of moisturizing and the reasonable maintenance of optimal soil moisture. At the same time, it is important not to wash off small seedlings and not be mistaken with watering the transplanted plants in order to avoid their death.
Asters are relatively unpretentious. However, the unpretentiousness of asters does not mean that you can be negligent in handling them while hoping for excellent results.
Transplanting seedlings of asters must be done carefully, not thickening the planting. Transplanted plants must also be provided with a favorable temperature regime for keeping, sufficient watering (flooding of the soil and its drying out is unacceptable) for rapid rooting and subsequent healthy growth of seedlings after each stage of their transplantation.
Minor damage to the roots of an aster does not deal much damage to the seedling. On the contrary, it helps the aster seedlings develop a fibrous, powerful root system - but if the plant conditions are favorable.
The simplest garden greenhouse with a covering material and a film stretched over its frame helps to grow excellent aster seedlings from seedlings transplanted there at any stage of their development.
The only point, from my point of view, is controversial in the description of this ancient technique. This is a statement that aster seedlings, due to multiple transplants, may increase the terry of the inflorescences. I believe that this trait of flowers in plants is due to the genetic characteristics of the seeds.
And yet, such an important point is not indicated here: for the abundant flowering of asters of many varieties, which do not genetically have the ability to bush independently, it is imperative to pinch the tops of the shoots in time - so that many side branches are formed, on which flowers will then develop.
On site site
Weekly Free Site Digest Site
Every week, for 10 years, for our 100,000 subscribers, an excellent selection of relevant materials about flowers and garden, as well as other useful information.
Subscribe and receive!
Letniki are definitely the brightest and, perhaps, the most unpretentious inhabitants of our gardens. But they also need care. Weeding, feeding and, of course, the correct and timely formation of each bush. Plants will thank you for their thorough care with lush and especially long flowering. So let's start in order!
Formation of annual vines
Annual vines are fast growing plants. With their help, you can decorate an unsightly wall of an outbuilding, decorate a fence or a gazebo, create a flower arch or a floral-emerald curtain. Simply put, with their help, you can turn routine and dullness into something completely fantastic and charming. In order for the vines to capture the eye with their power and splendor in the future, they need to be pinched at the seedling stage. Pinching - removing the top of the shoot above 3-4 leaves, stimulates the formation of lateral shoots. This procedure is necessary for tall and medium-sized varieties of peas, fiery red beans, moonflower, dolichos, asarina, tunbergia and others.

Formation of thermophilic perennials
Heat-loving perennials, which are cultivated as, also need timely pinching. Removing the top over 4-6 leaves has a beneficial effect on the development of hybrid fuchsia, Peruvian heliotope, hybrid brovallia and coleus. Zonal pelargonium, fiery red kufeya, New Guinea balsam and Waller's balsam also need a pinch. The result is branchy, compact and abundantly flowering bushes.
But do not get carried away, because each pinch pushes the beginning of flowering. 1-2 procedures are enough. Overly zealous growers of the northern regions, due to repeated pinching, may not wait for flowering before the onset of cold weather.

Formation of ampelous plants
Queens of hanging pots and balcony boxes: petunia, surfinia, fuchsia, ivy pelargonium, calibrachoa, ferulifolia, large-flowered anagallis, sutera and others need to be shaped. Repeated pinching as it grows promotes branching of the bushes. As a result, shoots and flowers form an incredibly lush and colorful cascade.
Some decorative leaf ampelous plants also need to be pinched and pruned. Florists do not need to be careful when shortening the shoots of ivy, zelenchuk or, for example, ivy. Indeed, even frequent pruning will not harm these plants.

Forced pinching
Florists, lobularia, petunia, zinnia, hybrid verbena and other flowering annuals, often face the same problem. And solely through their own fault.
Attention!
Incorrectly calculated timing of sowing seeds, lack of light during the growth period, untimely planting of seedlings of summer plants in the ground - all this leads to stretching of the stems of young plants. To correct the situation, in this case, removing most of the stem will help.
From the axillary buds remaining on the shoot, new branches will soon grow. And after a short time, the plants will look as expected - healthy and strong.

Ageratum Mexican
Pinching after planting in the ground
Cloves or, for example, tall varieties of gelichrizum bracts begin to grow only after planting in a permanent place. For this reason, pinching of shoots is also carried out after planting seedlings in the phase of 3-4 pairs of leaves. The central shoot is cut at the level of 2-3 knots, which further contributes to better tillering and abundant flowering of plants.

Gelichrisum bracts
Pinch to prolong flowering
Every summer it gives surprises to flower growers. Either it shines like a rainbow, now it cries with rains, now it smiles with a ruddy sun. But sometimes the "gift" of summer is the merciless heat that turns the flower garden into a desert. In such unfavorable conditions, plants are in a hurry to leave behind offspring. You can often see how, after a short flowering, Chinese carnation, Iberis umbrella, Drummond phlox, Lobularia and hybrid gatsania, seed pods are already swaying on their branches ...
To enjoy the vibrant colors for as long as possible, the bloom can be extended. To do this, at a height of 5-8 cm from the ground, the shoots must be cut off. After that, feed and water the bush. After one to two weeks, flowers will appear on the newly formed shoots.
Ageratum, calendula, salvia, verbena, snapdragon, petunia, pelargonium, large-flowered godetia, marigolds, and others are plants whose flowering can be prolonged by plucking wilted inflorescences. Of course, in very large areas it is difficult to do this alone. But in small garden plots, it is quite possible to carry out what was conceived, even for a beginner. Moreover, the reward for work is the opportunity to admire the overflow of colors until late autumn.

Space for creativity
A little imagination, skills in working with scissors and the hands of a florist can work wonders. But this is provided that the site has santolina, coleus, perilla, or, for example, a groundwort. These plants with variegated or curly leaves are easy to pinch and form. So it will not be difficult to create a small hedge or a colorful border with their help.
But, no plant can compare with. It will provide an opportunity to feel like a real sculptor. By cutting off branch by branch, a lush bush can be turned into a pyramid, cube or ball. And the way the sculpture is simple and unpretentious, but it was made by hand. And what could be the best decoration of a flower garden, if not a creation dear to the heart?

Cochia broom
If quality is more important than quantity ...
Asters, levkoi, zinnias and chrysanthemums are beautiful not only in a flower bed, but also in a bouquet. In order to grow as large flowers as possible, lateral shoots must be removed during the budding period. In dahlias grown for cut, you need to pinch the side shoots, and from the three buds formed on each peduncle, leave two, breaking out the middle one.
Thus, knowing these simple rules for the formation of annuals and applying them in practice, you will be convinced that flowers are the most grateful creatures!
2012 - 2016,. All rights reserved.
Aster shows a huge variety of shades and shapes of flowers. It is easier to name what color asters are not found: orange and green. There are even two-color baskets, which are not so common in the world of flowers. This arouses the interest of gardeners and excites the imagination of landscape designers. But aster, like any other plant, requires a special approach to cultivation.
Sowing asters in open ground
The most common is the cultivation of asters from seeds. They can be purchased from specialized stores or you can use your own. But in order for the flowers to meet your expectations, it is important to know where, when and how to sow the planting material.
Optimal sowing time
Naming the ideal time to plant asters is not always easy, as it depends on the type of plant. So, early asters are immersed in the ground earlier than usual, and some are sown in the literal sense of the word in the snow.

Early asters are sown in the second half of March. By July, about 90 days after planting, you will have your first flowers. Mid-early varieties bloom in 110 days.
Sowing dates for late varieties of asters are set for late April - early May, when the air temperature does not drop below 10 ºC. They can be expected to bloom in 120 - 130 days, that is, by the end of August or the beginning of September, and some varieties can bloom until frost. In any case, plants grown outdoors from seed will flower later than those grown from seedlings grown in a greenhouse.
Did you know? The family of Asteraceae, or Compositae, has 200-500 species. These are annual or perennial grasses, flower baskets of which are collected in the form of panicles or scutes. They grow everywhere in Central and North America. And that flower, which is usually called aster, actually belongs to the genus Callistephus and has the name Callistephus Chinese. It has green or dark red simple stems, alternate leaves, inflorescences in the form of a basket.
 Another question is how many asters sprout from seeds planted in late autumn. Seeds are sown in grooves made in slightly frozen soil after the first frost. It is good to close the grooves with humus or peat. Some varieties can be thrown directly into the snow, covering the grooves with peat. This is done in December-January. This planting method is an excellent prevention of fusarium. When the snow melts in the spring, it is advisable to cover the place where the seedlings are planned, creating a greenhouse effect. Remember that it is advisable to sow seeds harvested from last year's harvest. Two-year-olds have less germination, and older seeds practically do not germinate.
How to choose a site for planting asters
So that growing asters does not bring a lot of trouble, it is important to choose a suitable place for the flower bed in advance. Asters grow well in partial shade, but they still like sunny places more. However, it is necessary to take into account the peculiarities of the climate, since in extreme heat they noticeably lose their decorative effect. Also, make sure the area is well ventilated and not too damp. It is advisable to clarify how close the groundwater lies to the flower bed.
 Pay attention to what grew in the flowerbed before the asters. For example, if earlier tulips, gladioli, levkoi, carnations, tomatoes, potatoes, asters grew on this place, it is better not to plant, as there is a high risk of their being affected by Fusarium. These flowers can only be planted in such a land after six years. Asters feel good in a flower bed after calendula, marigolds, perennial grasses.
How to prepare the soil for planting
For the plant, neutral fertile or light soil is best. It must be prepared in advance. If sowing is planned in the spring, then in the fall the site must be deeply dug up with compost or humus at the rate of 2–4 kg per square meter with the addition of sand. The latter will give good drainage and breathability.
In the spring, if the soil is depleted, it is necessary to carry out another digging with superphosphate (20–40 g per square meter), ammonium sulfate and potassium salt (15–20 g each). Before planting, the flower bed must be weeded out, loosened by 4–6 cm. In order to have lush and healthy flowers during flowering, the soil for the aster must be well moistened before planting.
Important! Today there is no single generally accepted classification of asters. None of these are complete. But if you divide it very roughly, then perennial asters are divided into two groups according to the flowering time. The early flowering group includes Italian asters (Aster amellus), Bessarabian (Aster bessarabicus), Alpine (Aster alpinus). More numerous is the group of autumn flowering plants: New England, New Belgian, shrub and others.
How to sow correctly
 The planting grooves should be shallow, up to 4 cm. Before throwing seeds into them, they must be well watered. After sowing, the grooves are covered with soil and covered with special materials. Mulching can also be done, but only in dry weather. When shoots appear, the shelter can be removed, and when two or three leaves appear, sowing can be thinned out. There should be a distance of 10-15 cm between the shoots. Seedlings that had to be removed can be transplanted to another place.
Basic rules for caring for asters
The main rule in the question of how to care for asters is to weed the soil from weeds in time and loosen it well to a depth of 4–6 cm after each rain. To accelerate root growth, it is recommended to huddle the bush 6–8 cm.
How to properly water asters
When watering, remember that asters do not like excessive moisture and dampness. It is a drought-resistant plant, although it requires intensive watering in hot weather. On average, about three buckets of water are needed for each square meter, provided that the earth will then loosen. It is especially important to do this when buds appear. Abundant watering during this period promises flowers with large buds during flowering. If tightened with watering, the flowers will lose not only in splendor, but also in color. 
When, how and what to feed asters
For the entire life span of asters, they must be fed at least three times. The first feeding is recommended to be done two weeks after planting. For this, mineral fertilizers are used, for example, 50 g of superphosphate, 10 g of potassium sulfate, 20 g of ammonium nitrate per square meter. When the buds appear, fertilizers that do not contain nitrogen are used. During the flowering period of asters, 50 g of superphosphate and potassium sulfate are used per square meter. It is recommended to use organic fertilizers only on poor soils.
The benefits of pinching for asters
Removal of buds and tips at the ends of the shoots gives an active growth of lateral shoots and wide branching of the main stem. This is usually done with a sharp knife or just nails. Most often, these manipulations are carried out when the plants are in intensive growth. Although not all plant varieties do this. It is recommended for the shrub aster, from which it is possible to form low-growing enclosures, strewn with flowers.
Did you know? From Latin the word "aster" is translated as "star". The name of the flower is associated with a philosophical legend about how two monks decided to approach the stars, climbing to the top of the highest mountain. After many days and nights, reaching the summit, they found that the stars were still far from them. An equally long and arduous journey awaited them below, without food or water. When they reached the foot of the mountain, exhausted, they discovered a beautiful meadow dotted with amazing flowers. "Marvelous! We were looking for stars in the sky, and they live under our feet! ”- said the monks and took away with them several bushes. Returning to the monastery, they began to grow and distribute them all over the world.
Ecology of cognition. How to care for asters so that they have a compact look, bloom for a long time and do not get sick? Aster seeds are best sown before winter in open ground in late autumn. Can be sown in spring as well. To do this, in the fall, a new place is allocated for a seedling bed. It is made at least 20 cm high so that the earth warms up faster in spring.
How to care for asters so that they have a compact appearance, bloom for a long time and do not get sick?
Aster seeds are best sown before winter in open ground in late autumn. Can be sown in spring as well. To do this, in the fall, a new place is allocated for a seedling bed. It is made at least 20 cm high so that the earth warms up faster in spring. Ripe humus is added in advance, scattered with "Kemira" and dug up. In early April, if the snow has not melted yet, sprinkle the ridge with wood ash, and after two weeks it is ready for sowing. Loosen the surface with a dagger, level it and make edges around the edges so that water does not drain off when watering.
Seeds are a must! treat against fungal diseases with any fungicidal agent. And also carry out hardening with variable low temperatures.
Store seeds for sowing in the winter on the refrigerator door. Take it out a week before sowing to keep warm. Etch in a strong solution of potassium permanganate and soak in Epin, then rinse and dry on a newspaper. You can sow the next day; prepared seeds cannot be stored for a long time.
Asters prefer to grow in loamy soils. Asters cannot stand fresh humus in the soil and are often affected by fungal diseases.
The abundance and duration of flowering is achieved with dressings, which are carried out regularly. The first feeding is done as soon as the plants grow actively. Then two dressings are carried out in June, then in July.
Asters do not grow well on dry soils, so watering should be regular. The development of the plant depends on watering. With a sufficient amount of moisture, the bushes have a longer flowering.
Do not forget about loosening the soil, the rule applies here: watering today - loosening tomorrow.
To make the aster bushes look beautiful and have a compact shape, be sure to pinch the tops of the stems.
ASTER DISEASES:
Fusarium
How to define this disease? The first signs are drooping of inflorescences and leaves. Do not process a diseased specimen! It must be urgently removed from the flower garden and burned! And treat healthy plants with a fungicide.
Septoriasis
Septoriosis appears as brown spots on the leaves, the leaves begin to turn yellow. Plants are recommended to be treated with copper-containing preparations at the first sign.
Blackleg
Darkening and thickening of the stem base is a sign of black leg disease. Most often, asta seedlings are ill with this disease, therefore it is recommended to sow asters before winter. In greenhouse conditions, asters most often get sick. This usually happens when the cultivation technique is violated. For prevention, treat the plantings with a weak solution of potassium permanganate, ash and loosen the soil in a timely manner. You can also use drugs such as "Fundazol" and "Cineb".
How long can cut asters be kept in a vase?
Add to water - one teaspoon of sugar, per vase of water (two liters). Tear off the lower leaves. Cut off wilted flower stalks. published
Join us at


