This site contains mainly diagrams and videos of origami folding.
Sections of origami folding schemes
Folding patterns for origami animals and more | Folding schemes for origami plants. This section also includes flowers that can be found in a separate category. |
Origami folding schemes for various objects | Folding schemes of origami flowers, a part of the "Origami plants" section allocated into a separate category |
Movable origami folding schemes. Everything that moves, jumps, jumps | Origami diagrams consisting of folding several sheets of paper |
Origami folding patterns to be inflated | Origami folding napkins for table setting |
A selection of origami from all sections containing videos of folding schemes |
This site contains diagrams and videos of origami folding.
At the moment, the resource is mainly designed for beginners, almost all assembly schemes are quite simple, but interesting even for those who have long been fond of origami.
1. There is nothing to keep the child busy? Teach him how to fold simple origami paper. This will not only interest him, but also develop fine motor skills of the fingers, teach him patience and attentiveness, and introduce him to the world around him. Children love to do something with their own hands, and not only children, it is always nice to create something so that later you can proudly say: “I did it myself”.
2. The best gift is a handmade one. An unusual paper craft is a great option, because the gift turns out to be absolutely unique, and most importantly, it is not just a hastily bought item in the nearest store, but an original item that was made on purpose, on which a person spent time dealing with the origami scheme, sometimes even more than one hour. Someone will say that giving a paper craft is not serious, but just look at this rose like a real one! And from these you can collect a whole bouquet. Of course, you can give money as well, but even here you can present a gift creatively by adding a paper hare or a bull out of money.
3. Valentines. Yes, yes, here you can also show individuality and surprise your soul mate not with an ordinary heart cut out of paper, but with a beautiful neat paper valentine folded using the origami technique.
4. Useful little things in the form of paper envelopes, beautiful gift boxes or photo frames. All this is, first of all, original, unusual and quite easy to do on your own using step-by-step origami schemes.
5. Origami is a way to decorate a room. A paper swan made of modules can take its rightful place in any home and attract admiring glances of guests. Do not forget about kusudams - bright flower balls. Such paper crafts can be hung on a string anywhere in the apartment.
Summary: DIY paper crafts for children. How to make a paper craft with your child. Children's craft from colored paper.
Paper is the most affordable material for doing creative work with children, which is why paper crafts are so popular. In this article, we will tell you about the most interesting paper crafts for children. When making paper crafts with their own hands, the child learns to work with scissors, develops fine motor skills, accuracy, patience. Working with glue also requires certain skills from the baby. Not always everything turns out the first time as beautifully and neatly as we would like. We tried to select for you only those paper crafts that children can handle on their own or with a little help from adults.
1. Crafts from paper. DIY paper crafts
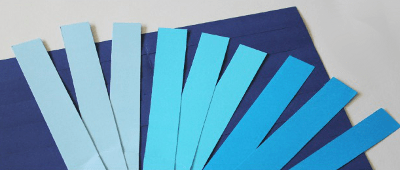
We will start with the simplest paper crafts that even small children can make. By the age of 4, most children already know how to cut simple shapes from paper with scissors. To make a do-it-yourself paper craft, the kid must cut out several strips of paper of the same width. The head of the hare is made of a strip of paper glued with a ring. The ears are glued on top separately. To make the legs, you need to make small cuts on both sides on the strip that is intended for the body. The finished paper craft should be glued onto a strip of green paper - "grass".
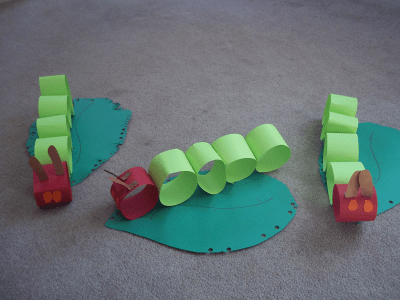
Swirl birds. Also a very simple paper craft for children. The bird's body and head are made of strips of colored paper of the same width, but different lengths. Each strip of paper is glued with a ring, after which the rings are inserted into each other and glued together in one place. Even a small child can make such a paper craft for children.
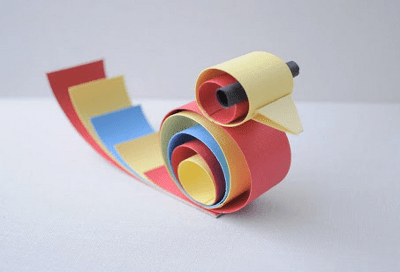
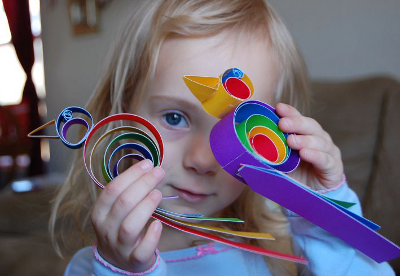
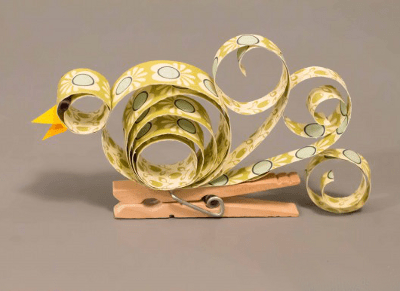
Here is another version of a similar craft from colored paper. These birds have their tails twirled by wrapping them around a pencil. For detailed instructions on how to make this paper craft, see the link.
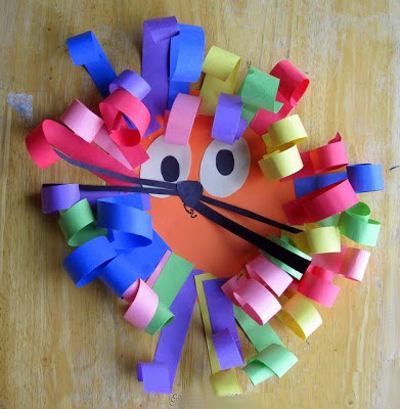
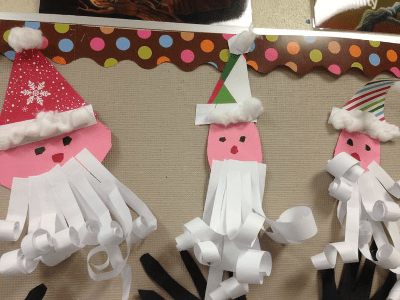
Craft from colored paper "Lion". This cute, multi-colored lion is also made of strips of colored paper curled with a pencil.
Similarly, you can make a paper beard for Santa Claus.
3. How to make a paper craft. Kids paper crafts
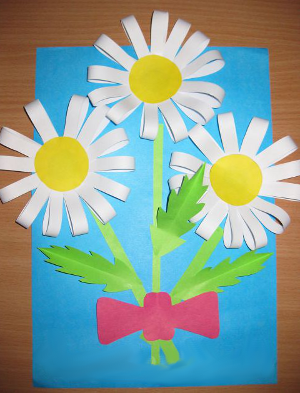
Separately, I would like to talk about the colors made from strips of paper. As in the previous crafts, instruct your child to cut strips of paper. A 3-4-year-old kid can easily cope with this task. After that, help him cut out the centers of the flowers and stems with leaves. First, glue each strip of paper separately in the form of a "loop" (these will be the petals of the future flower). Then, in the correct sequence, glue all the details of the applique onto the cardboard base.
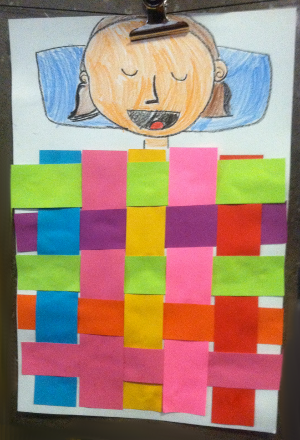
4. Crafts from paper. Weaving paper
Weaving is one of the most ancient forms of art. With its help, you can do a lot of useful things: bookmarks for books, rugs, baskets, etc. In addition, paper weaving fosters perseverance, accuracy, patience, develops attention, eyes, and coordination of movements. There are several types of paper weaving. In this article we will tell you about the simplest, and therefore the most popular, type of weaving - straight paper weaving.
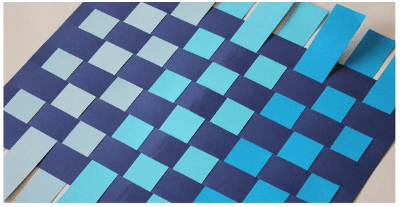
To make a paper craft "Rug" you will need:
Two sheets of colored paper in contrasting colors
- ruler, pencil, scissors, glue
On the back of the sheet, you need to make a markup, which is applied with a pencil using a ruler. To do this, you need to retreat from the edge on all sides by 1 cm - this will be the border. Draw horizontal lines every 1-1.5 cm. Fold the base in width (length) with the front side inward and make cuts along the marking lines to the border, unfold the workpiece.

Cut strips of a different color (the width of the strips is equal to the distance between the cuts).
Start weaving from the seamy side into the 1st strip: the strip, like a duck, emerged, hid, etc. Glue the tip of the strip from the wrong side.

In this technique, you can make many unusual paper crafts. Here are examples of just a few of them.

Prepared by: Anna Ponomarenko

What to do with a preschooler, if it is cold or rain outside the window, there is nothing interesting on TV, but you are tired of the computer? There is a wonderful, very useful type of joint creativity between adults and children, which develops artistic abilities, the ability to handle scissors and glue, and fine motor skills of the fingers.
Parents, studying together with the child, gradually get carried away by themselves. Step-by-step instructions for making any item from paper can be easily found on the Internet.

From simple to complex
The simplest is snowflakes. By folding the paper in four and cutting it in the corners and in the middle, you can get dozens of options. They will decorate windows in the New Year, from which you can make whole panels and garlands.
Garlands can also be made of colored paper by folding the strip in half and cutting to the end. The resulting strips are glued to the thread. The second option is to make many, many wheels from the strips, each new one is threaded into the already glued ring.
You can make a Christmas tree out of green paper. Here you need a compass. Several circles of different sizes are cut out, folded in four and strung on a wooden stick or pencil. The tree can be decorated with sparkles.
There are many options.

You can also make from paper:
Airplane and a whole aircraft fleet for boys;
pigeons for a fun game;
tulips and roses;
small box;
tank;
ball;
snake;
hand to scare friends;
beautiful envelopes;
frog;
cracker;
pyramid;
sword;
claws for Halloween or other similar holiday;
an asterisk-shuriken - a hidden weapon of the samurai;
boats. If you fold them out of waterproof paper, you can let them in the spring along the rivulets of melt water.

In kindergarten, children make paper crafts every week, especially for the holidays, they prepare beautiful postcards from napkins, colored paper, various scraps and scraps. Children bring very beautiful works from the kindergarten, especially colorful and unusual ones for the holiday on March 8, February 23, for the New Year.

These beautiful carrots can be made from crepe paper with children and put in a decorative basket, you can play with them, put them for beauty, and take them to the competition in the kindergarten.

Competitions for the best craft are often held in educational institutions. Together with your child, make an original palace or forest with wild inhabitants, or maybe a space station with aliens. For the New Year and May 9, they are asked to make a composition on an appropriate topic.

Making paper works is not only interesting, but also useful, because fine motor skills of hands, perseverance, and just imagination develop. For some people, this type of activity becomes the main source of income or a favorite hobby.

Corrugated paper - what can you do?
- the simplest is flower arrangements, bouquets;
- toys;
- decorations for holidays and performances;
- clothing, fancy dress;
- Garlands;
- any things you can imagine.
For starters, the best thing to do is to create flowers from corrugated paper. This is the easiest thing to create, and at the same time, you get an unusually beautiful product. Even in kindergartens and school lessons, children are encouraged to make flowers and other compositions from corrugated paper. By the way, paper with smaller folds, the so-called corrugation, is called crepe. It is even better suited for home crafts, as it is more pliable and softer, more comfortable to use.

The beauty of corrugated paper is that it makes the work look like real work. From a distance, you can confuse an artificial flower with a living one. And despite this, the composition seems even more fabulous, it is hard to believe that this can be done with your own hands. Such a flower arrangement can be presented for a holiday, roses, tulips, violets, gladioli, made with love, will delight their new owners.
You will need some additional materials and tools for creativity:
- scissors;
- glue;
- wire;
- cardboard;
- needles;
- lurex threads;
and for a more individual performance, you can prepare beads, ribbons, decorative stones, rhinestones and other attributes.
Nowadays, topiary is very popular - handmade trees made of crepe paper. Some craftswomen make custom-made furnishings like this, but you can learn how to make them yourself.

And this is what the finished tree looks like. Very gentle and sweet, it refreshes the interior and will serve as a wonderful gift for your family and friends.

There is another popular technique that is used when creating pictures, frames, patterns from corrugated or crepe paper - this is facing. Everyone can master it, including children, the main thing is to get used to it.
It is necessary to cut out small pieces in the shape of a square, 1 by 1 cm in size from crepe paper, it is possible and smaller, the smaller the squares, the more beautiful the pattern will turn out. Then we press our piece with the middle to a toothpick or a pen shaft and wind it to make a tube. After that, we put the resulting tube on a prepared drawing with a contour, previously smeared with glue. And so on along the contour we glue the whole picture with our tubes of different colors, or, as you intend, the main thing is to press them closer to each other, leaving no gaps. The result is very unusual, fluffy works that are pleasing to the eye.

And, finally, you can make a unique valentine from paper, which your beloved or beloved, perhaps, will keep for life, appreciating your work, taste and attention. There are a lot of ways and ideas on how to make a paper valentine, you just have to choose the one you like the most.

Starting with simple crafts, the child can gradually move on to a deeper understanding of the Japanese art of origami. There are many instructions on the Internet on how to do this or that thing. Craftsmen build whole fairy-tale castles and cities, cut and glue different types of weapons - from pistols to rocket, robots, human skeletons, animals, cars - almost anything that fantasy tells you is possible.

Mastering paper crafts also develops perseverance, perseverance, and the ability to work for a result in the child. It is also a great way to give your child an interesting and rewarding activity as he begins to recover from an illness.
You like origami. Be delighted with beautiful paper figurines, but find it extremely difficult. Believe me, there is no need to engage in self-deception. Monks in ancient times figured out how to fold special figures out of paper, which were intended to decorate temples and conduct religious rituals. It is not as difficult as it seems at first glance, and today we will try to prove it to you.
Materials for work
First, it will be necessary to purchase a set of tools for our future work. The first thing to pay attention to is the choice of paper. Office work is best because it is quite tough. It is quite enough for any folding schemes. To connect small parts, you need paper glue, for example, PVA or a special glue stick. If you need to connect several blanks of different colors, aerosol glue will come to the rescue; when using it, you can achieve the creation of unique multi-colored figures.
You can also use other specialized masses of glue, especially those that do not leave any traces on the paper or are quite easy to remove are especially good. At the same time, it is convenient to fix it with such glue both outside the product and inside. If the figurine is made of white or gray paper, then you can use spray paint to give the craft the desired color. Several types of scissors may be required. Sometimes a cutter comes in handy. This tool is used to align the slices. Be very careful, the blade can be very sharp, otherwise you will not get a smooth and beautiful cut.
Purchase several different lines. They are useful for making a craft scheme, tracking the desired angle during assembly, applying the main part and correctly placing the product on the basis of the panel. Regular pencils or a special pencil will come in handy. Experienced origami makers use rhinestones, various ribbons, pieces of fabric, unnecessary beads, beads, the remains of other jewelry and much more in their work. All this is suitable for creating unique and original figurines.
The right approach to choosing paper
To obtain a result, the choice of paper should be approached with full responsibility. After all, the creation of figures mainly involves folding and folding paper sheets. A lot, if not everything, depends on its quality. The list below will allow you to understand which material is best suited for origami, and which one is not suitable at all:
- Office paper is quite heavy, stiff, and quite cheap. The first steps in creating figures should be done with the help of it. When connecting parts of the paper, it is very good to hold, and if the workpiece is damaged, it is not a pity to throw it away.
- Multi-colored office paper - has the same advantages as plain office paper and does not appear stains and white stripes on the folds, great for modular origami.
- Stickers - great for multi-colored figures, most often used in modular origami and kusudami.
- Colored paper for school is not 100% suitable for this hobby. Thin, not dense, tears easily enough, light stripes remain at the folds.
- Foil paper is very dense, it is almost impossible to tear it, it is more often used for the manufacture of complex schemes and models. If you straighten the fold, hard, dense stripes will remain.
- Glossy magazine pages - perfectly retain their shape and fold, quite dense.
- Banknotes - good strength, perform well on folds. Perfect for creating small exclusive gifts.
- Paper intended for origami has several types (double-sided, monotone, and so on), it is found in the form of sets.
- Calca - suitable for those who take the first steps decided to test their strength.
- Different variations of expensive paper have both advantages and disadvantages and are used only for certain products.

What are the types of origami
There are several types of origami that help to have a great time, learn how to create jewelry with your own hands, improving your skills and abilities over time. In addition to the well-known origami techniques of the so-called classical direction, there are several alternative ones:
- Plain (simple) origami - suitable for those who decided to try themselves in a new business. Assembling the figurines does not require special skills; folds must be made towards yourself by the so-called valley or from yourself by the mountain. A figurine of a crane is a good example.
- Modular origami (blanks from modules). The connection is carried out from several identical parts, called modules, which are folded according to the laws of ordinary origami from a single sheet. They are connected by simple folding. They do not disintegrate due to the frictional force between individual modules.
- Aerogami is a name that speaks for itself. The art of creating airplane figurines.
- Kusudami - origami using volume, modules are assembled with glue or thread. Most often, crafts are made in the form of a ball.
- Kirigami - making various figurines using scissors. Suitable for making holiday cards.
- Raw or wet origami. At the base, paper moistened with water to give products a more expressive shape, firmness and clarity of lines. More often found in the manufacture of figurines of animals and unusual plants. The paper must contain water-soluble glue, otherwise the product will inevitably creep.

Crane - origami
One of the simplest models, it is believed that if you collect 1000 cranes, your most cherished wish will come true.
Step-by-step instructions for making an origami crane look like this:
- We fold the paper sheet diagonally.
- We take scissors and cut off all unnecessary, in the end there should be a triangle.
- We make another fold.
- From the resulting triangle, (One since there are 2 of them), we make a square using the straightening method. On the other hand, the procedure is repeatable.
- We take the edges from above and gently bend them towards the center.
- Bend the triangle located on top.
- Unbend, we have a contour.
- Bend the lowest corner horizontally.
- Fold the edges towards the center until you get a rhombus. We repeat all actions on the other side.
- We take it by the bottom and bend it along the inner counter. It turned out to be a neck.
- We also make a tail.
- At the neck, gently bend the beginning to obtain a beak.
- Bend the wings using a small angle.
The crane is ready, you can paint it if you want.


Paper rose
One of the most popular models is the origami rose. It is quite simple to make it:
- We bend a sheet in half, preferably red. We make another fold.
- Opening the top layer and flatten the top a little.
- We turn to the other side, turn over.
- We repeat the second step.
- We take both corners and bend them to the upper corner.
- We fold the resulting triangle in half until we get fold lines.
- Pull the corners down, flattening a little and open the triangles.
- We take the pockets by the upper part, and very carefully bend them down.
- On the other hand, repeat steps 5-8.
- Bend the top corner.
- Open the lower part like a notebook.
- Pull and flatten until you get two triangles.
- We put the workpiece on the other side.
- Raise the triangle to the top.
- The lower square located to the right bends strictly diagonally from top to bottom.
- Turn the workpiece 180 degrees and repeat the previous step.
- We shift the product to the left hand, gently grasp the walls of the product with the fingers of the other hand and twist it clockwise until we get a rose. Bend the petals with a handle.


Volumetric origami - flower ball
It is very easy to make a beautiful origami in the form of a flower ball, the main thing is to be patient and follow the instructions:
- We fold the paper sheet for notes in half in the shape of a triangle.
- Bend the edges and press them very tightly.
- Unbend the right corner back.
- We bend the left side of the triangle, folding it in half.
- We do the same with the right.
- Then we fold the entire workpiece in half.
- Bend the triangle below in half again.
- In this case, the larger figure should be on top of the smaller one.
- We fold the part of the protruding triangle and bend it inward.
- One module is ready, we do the same with 4 more sheets. They should all be completely identical.
- We glue the modules or put them on tape.
- The first flower is ready, we do the rest in the same way.
- It will take about 11 such flowers, we connect them together, with glue until we get a ball.


Origami in the shape of an Easter egg
To create an egg, you need to make about 1000 modules. They will be fastened with grooves. The colors and patterns are limited by your imagination. The assembly begins at the top, we take 8 modules of the same color and make a circle out of them, add another module between the rows. It turns out two rows of 8 modules. In the next row, two blanks are added between the rows. To increase the volume, it is necessary to add modules in each subsequent row. There should be 32 modules in the middle. The bottom is assembled in the same way, but the number of modules will decrease.
After the egg is ready, you can start making the stand. We take 18 modules and form a circle from them. Modules are inserted into unoccupied gaps in a row. Coming up with a pattern by selecting blanks by color. The parts for the central axis of the stand consist of two rows of 12 pieces. To start row number 3, you need to move the modules towards the center, turning them out a little. We spread the finished parts up. We have formed a column. In the middle of the stand there will be 7 rows of modules. The top is assembled in the same way as the bottom.


Modular origami in the form of a white swan
Step-by-step instructions for creating a modular origami in the form of a beautiful volumetric swan:
- We make 458 blanks from plain paper in the form of a triangle. For the beak, make one red.
- We insert two modules with corners into the pocket of the third.
- Add another 2. We fasten the corners in the pockets.
- We prepare 3 rows in the same way, each will need 30 blanks, we close the circle.
- We also put on modules for 4 and 5 circles.
- We hold the product with our fingers and press on the center, gradually turning it inside out.
- We fold the edges of our future swan upward.
- We make the 6th row, observing the staggered arrangement of the blanks.
- We prepare blanks for the wings in the seventh row, for which we put on twelve modules, skipping 2 corners, we fasten another 12. At the left narrow place there will be a neck, on an extended tail.
- In the eighth row, the number of modules in the krill is reduced by one.
- Next, we also do with each row until one triangle remains.
- The tail is made by decreasing by a module in each row.
- The head and neck are assembled from 10 regular and one colored blank, red or yellow. The corners of the colored workpiece must be glued together so that the beak does not split in two. We collect the neck, inserting the corners into the pockets of the blanks, then gradually arching it.
- We put the neck in place.
The swan is ready.


Anyone can learn origami more fully, you need to have a little free time and desire and you will succeed.
99 new photo origami paper ideas


")


