Elizaveta Rumyantseva
Nothing is impossible for diligence and art.
The upcoming New Year holidays force us to go for tricks to decorate our home. Now it has become fashionable to make Christmas tree decorations and other attributes with your own hands. More recently, the popularity of the snowman from plastic cups began to gain. This product is used to decorate apartments, offices, schools. Forming a figurine of a symbol of winter is a very painstaking but interesting job.
How many cups for a snowman do you need
Before doing the crafts, purchase the necessary material. Making a snowman out of plastic cups involves purchasing at least 3 packs of disposable tableware, 100 pieces each. Create a composition of a standard size, taking containers of 200 g, for a smaller toy diameter, use small ones of 100 g. The value of the holiday attribute is regulated by the number of glasses. The larger the figurine, the more material you have to buy. You can make a classic snowman with 3 segments or smaller with 2 parts.

It is better to buy dishes in one store so that they do not differ from each other. Choose containers with narrow rims so that the joints between the parts are less visible. If you want to use containers of different sizes for making the head and body of a snowman from plastic cups, try to choose dishes of the same color and texture, so the product will look more aesthetically pleasing.
Step-by-step instructions on how to make a snowman with your own hands
When making a spherical figure, a material that is not at all round is used. Cups, fastened together in a certain way, form spheres. Before making a snowman, study the master class on how to make New Year's crafts from plastic cups. The needlewomen recommend photographing the process in order to remember everything next year. The scheme for making New Year's decor is very simple. First you have to make the torso, then the head. Next, staple both pieces together and decorate your new year symbol.
Scheme
You can make a New Year's craft from cups using the following components:
- disposable glasses - 300 pcs.;
- stapler or glue;
- packing of staple clips.

Manufacturing scheme:
- Spread out 25 pieces. disposable cups in a circle upside down. Fasten the edges with a stapler, or use glue.
- The second row should be laid out in a checkerboard pattern with respect to the first, fasten not only the dishes on the side, but also on top. The stability of the workpiece will ensure that each line moves slightly backward. In total, you need to lay out 7 rows. The structure must be left open to attach the head.
How to make a head
To make a snowman head you will need:
- disposable glasses;
- stapler;
- tennis balls;
- plasticine.

Manufacturing in stages:
- The first row should have 18 vessels that need to be fastened, as for the body.
- Lay out all other details in a checkerboard pattern. A hole forms in the ball, you can hide it under a hat by putting an accessory on the snowman.
- You can make his eyes with the help of tennis balls, painted black. If there are none, cut out the paper eyes, attach with glue.
- Make the carrot-shaped nose of the snowman plasticine. The head is ready.
How to fasten a snowman

Use a stapler or glue to hold the head and torso together, placing a small ball over a large one. This creates a seam. You can hide it by putting on a scarf on a festive product. Bumps will not be visible under the accessory, and the snowman will become more comfortable. Place a regular Christmas tree garland inside the craft from disposable cups. When you plug it in, the toy will glow, which will create a special holiday atmosphere.
Video: craft a snowman
New Year is a time of miracles and everyone wants to somehow diversify the decorations for this holiday. Home-made products have become fashionable. Various materials are suitable for the formation of cute Christmas gizmos. Use a toy from plastic glasses as a craft for the new year in the kindergarten, just please the child, decorate the interior by inserting light bulbs. A bright and pretty product will become an invariable attribute of the holiday. You will learn all these secrets from the video below.
Found a mistake in the text? Select it, press Ctrl + Enter and we'll fix it!Original and eye-catching cup crafts are always a great way to have fun decorating a room. If you include imagination, then it is quite possible to create a bright craft, the appearance of which will be incomparable.
Photos of handicrafts made from cups on the Internet will make it possible to understand that if you wish, you can create something interesting and unusual, exclusive.

Also, parents must learn a simple thing, many psychologists say that by creating such crafts, doing work with children, you can not only get closer to them, showing your love, but this is also a great way to develop fine motor skills of the hands, to develop perseverance.

How to make a craft from cups?
In order to be able to make interesting crafts from cups, first of all, you need to understand what exactly you want to get as a result, for what purpose you are doing it. For example, it is quite possible to decorate a festive table with such products, and if you wish, it is quite possible to make one or another figurine that can only interest you.


Flashlights, a mini-lamp can act as the main materials for such accessories; various figures can be safely attributed here. The result will be to create a romantic atmosphere.
Be aware that the most relevant and popular are considered to be certain products that will be cut with scissors. For example, it is possible to create artificial flowers, balls, certain objects.

Do not forget about the creation and application, but in this case, you just need to stick certain elements on the glass, even a kid at the age of five to six years can make such a composition.

Simple handicrafts made from cups for children, created with their own hands, will always bring only joy and vivid emotions.

Glass for pencils
If you decide to make such a craft with your children, then know that you can teach kids how to use plasticine, see a new use even in simple, ordinary objects, which is important.

For work, you will need to prepare a plastic bottle, and it can be from milk, kefir, plasticine, scissors, but of course, flowers, everything is at your discretion. For example, if specialized colors are not available, you can also use artificial ones, even those made from paper.

In advance, you need to prepare the upper part of the bottle, cutting it off so that the glass turns out to be at least 15 cm, if you ignore this practical advice, then the glass will not turn out to be stable at all.


Next, it is important to take plasticine, starting to glue thick sausages from it, differing in green. This is due to the fact that it goes well with plant stems. As for the upper strip, plasticine is attached to it, the lower strip is intended for attaching large flowers.


As soon as the glass is ready, you can safely put both pencils and brushes in it. Such a step-by-step DIY craftwork will make it easy to implement such an idea, making it a reality.

Snowman made of plastic glasses
To implement this idea, you will need to carefully look at the master class on fakes from cups, and then it will turn out to make a snowman without unnecessary difficulties and problems.

Snowman making instructions
At the very beginning, you need to build the first level; plastic cups are used for this purpose. You decide how many of them are required, since a lot will depend on the goal you pursue, that is, on the desired size of the craft. Glasses can be stapled together using a stapler.


Now start building the next formation, keep in mind that this is done strictly in a checkerboard pattern, after the glasses are correctly placed, they are fastened with a stapler.

So you need to build levels, doing until a closed ball is formed, the second ball is different in size, which is known even to children. Do not forget that the largest ball acts as a torso, the smaller ball is the head, so you can easily calculate the number of cups intended for the middle basic level.


Now you can proceed to decorating, connecting your taste to this process.

Thus, after spending a little time, you can always make a beautiful, original and attractive snowman with your own hands using plastic glasses, everything is extremely easy and simple.

If there is a desire, then you should know that you can make a unique, bright and attractive Christmas tree, again, using plastic cups for these purposes. As for the work in general, it follows the same principle as the creation of a snowman itself, no problems will arise.

All this leads to the fact that if you connect a little patience and imagination to this process, you can always create real masterpieces, they will impress everyone around you.

Know that bright and unique ideas and instructions on how to make a craft out of cups will help you realize any ideas that interest you.


Now everything depends only on you, do not forget to involve your children in this process, so that it becomes even more interesting, there is a great opportunity to get closer to children, and in general there is nothing more beautiful when you create something with your own hands.

Photo of crafts from cups


Crafts from cups are a great pastime. Their advantages are the simplicity and availability of the source material. It is also a good way to decorate a room for a gala event. In addition, according to pediatricians, such homemade products made by a child develop fine motor skills of the hands and develop perseverance.
Benefits of Making Cup Crafts
Making light crafts from cups for children has many advantages. Kids, doing this type of creativity, become more:
- attentive;
- independent;
- assiduous;
- neat;
- patient.

Collecting such trinkets, they acquire the skills of working with glue and scissors, which, undoubtedly, will be useful for them in kindergarten or school. Completed crafts will remain a pleasant reminder of childhood.

Also, do not forget that children who are engaged in hand-made creativity develop their brains much better than their peers who are not engaged in such work.

As a result, if your little one has difficulty communicating with peers or has poorly developed logical thinking, then no doubt you need to start creating original crafts from glasses with him.


Other benefits of these homemade products include:
- low cost;
- ease of manufacture;
- beautiful appearance;
- no need for special knowledge and complex tools.

Variations in using cup crafts in practice
As you can see in the photographs of the cup crafts, these items are usually created for different purposes. They can, for example, decorate a dining table, if any celebration is planned. Moreover, this applies to both the dishes and the dishes served. The scope for imagination is huge here.

Having studied the different ideas and instructions for making crafts, which are abundant on the Internet, you can make a variety of types of flowers, garlands and balls. Also, cups are the main material for making many funny figures. In addition, the uniqueness of the cups lies in the possibility of creating lighting elements from them, whether they be lanterns, miniature lamps or glowing garlands.

Such accessories can be used to decorate the same table to add romance to the setting. They will look especially impressive in the evening.

What else can be made from plastic cups? Together with your child, you can make a variety of shapes, ranging from animals and birds, and ending with fairy-tale characters, and then present them to your loved ones. Such a gift will definitely be remembered for a long time.

Another area for using homemade plastic cups is interior decoration. For a kid, you can create a thematic composition, for example, an island where pirates live or a house for a fairy tale man. You can arrange such beauty not only in the nursery, but also in other rooms where the toddler is.

Types of handmade plastic products
All crafts from cups are divided, depending on the method of execution, into the following groups:
- Products cut with scissors. This group includes balls, coasters, flowers, garlands, etc.
- Figures. Most often, wire frames or glue are used here. You can make heroes of fairy tales, representatives of flora and fauna, toy houses.
- Application. This method consists of gluing different parts to the cup. Even five-year-olds can do it.
- Combined trinkets. For example, glasses made of plastic can be combined with bottles made of the same material. The result is a tree. Some of these crafts have moving parts, making them even more attractive to kids.


Materials and tools
After watching several master classes on crafts from cups, you can easily make sure that nothing particularly complicated for such creativity is required. We only need:
- cups (plastic or paper - to your taste);
- stationery scissors;
- stapler;
- glue.

You may also need plasticine, textiles, colored paper, paints, felt-tip pens, varnish, decorative details (beads, feathers, beads, rhinestones, etc.). All of the listed materials and tools are available to everyone.

As a conclusion
Crafts from glasses can be very different. From such an affordable material, you can make decor for a festive event, and spectacular souvenirs for friends. In general, experiment, bring your creativity to life, involve a child in such activities and have great pleasure from all this.

Photo of crafts from cups


Note! 


Note! 


Winter is already close, which means that soon one of the most beloved holidays of the year will come - New Year. To give yourself and your loved ones a festive mood, we suggest making a funny snowman out of plastic cups with your own hands. Using our step-by-step instructions, it won't be difficult to do this. The product will not only decorate your house or yard, but will also bring a lot of joy to you and your children.
What you need to create a snowman from plastic cups
Making a snowman out of disposable glasses is a snap. They taper downwards and this shape allows the formation of spherical structures. You do not need expensive materials and any special tools, because glasses are cheap, and there is a stapler in almost every home. In addition, making such a craft will not take you much time and will be a great way to have fun for the whole family.
You may need the following tools and materials:
- plastic cups - 300 pcs.;
- stapler;
- staples - pack 1 yew. PCS.;
- glue or glue gun;
- transparent tape;
- Double-sided tape;
- scissors;
- elements for decoration.
The number of cups may vary. This primarily depends on the size of the snowman, the number of parts it will consist of, and the shape of the body - a sphere or a hemisphere. Cups can be chosen as one size or different. For the body, you can take ordinary 100 ml cups, and for the head, small ones, 50 ml.
Choose glasses with narrow rims because they are easier to staple together.
It is better to buy glasses with a small margin, because during operation, some of them may be damaged and become unusable.
The main tool for creating a snowman is a stapler. You will need the most common stationery stapler and a pack of staples (approximately 1000 pcs.). The number of staples used will depend on how the snowman is made. If you decide to use glue or double-sided tape, then you will need much less.
It is better to take universal polymer glue, which is designed to connect plastic parts. Great if you have a glue gun. With its help it is very convenient to apply glue pointwise. You can also use double-sided tape.
Glue and tape are rather auxiliary materials. It is not necessary to use them, since the cups can be connected using staples alone.
Photo gallery: tools and materials for manufacturing
 Instead of traditional white cups, you can use transparent
  The stapler will need a small size so that it fits easily in the cup
  Any craft can be done with a glue gun
  It is better to buy scotch tape with a cutting knife.
  Using double-sided tape, you can connect large parts of the structure
  Eyes, nose, mouth, headdress and buttons are made of colored cardboard
Plastic cup snowmen options
All options are quite similar to each other. The glasses are connected in such a way that the result is a ball or hemisphere. This can be done in two ways: with a stapler or glue. Let's consider both methods.
Step-by-step instructions for creating with a stapler
This is the easiest and fastest way. In addition to the stapler, you will also need tape. For decor, prepare colored cardboard, tinsel for decorating the Christmas tree, or a regular scarf. Cardboard is needed to make eyes, nose and buttons. A tinsel or scarf is tied between the "head" and "body" so that the image of our homemade snowman is complete.
The snowman will consist of two parts - a torso and a head. The cups are connected together only with a stapler. We suggest making the lower part from large cups (164 pcs.), And the upper part from small ones (100 pcs.). You can, of course, use the same dishes, but then the head and body of the snowman will be the same.
"Sculpt" a snowman in stages:
- Lower torso.
- Head.
- Attaching the torso to the head.
- Decoration.
First, make the bottom part. So that the snowman can stand on the floor, the bottom ball is not completely covered and a hole is left. The head is "sculpted" from small cups and also not completely covered. A small hole is needed to connect the top to the bottom.
The cups are placed with the bottom inside the ball, aligning the outer walls with each other.
As for the decor, you can limit yourself only to making eyes, a nose and buttons. Or you can give yourself and your loved ones a real holiday and put an LED garland inside the finished snowman.
Consider making a snowman step by step:
- Open the packaging of the cups and lift them off each other.
- Lay out a 17-piece circle and staple the cups together with a stapler on the rim side.
Place a circle of glasses on the floor and staple them together.
- This will be the base of the "torso".
You should get a circle of glasses
- Arrange the second row in a circle: the upper glasses are placed between the two lower ones, as if filling the space between them.
Place the glasses on top and clip them to the bottom
- Fasten together the upper row with the main one (the upper glass with the lower one, and so on in a circle).
- Clip the glasses together from the second row.
- Make the rest of the rows in the same way. You should get a hemisphere - this will be the upper part of the body.
Gradually, you will have a hemisphere
- Make the lower hemisphere in the same way, only it will already have a small hole and consist of four rows.
- Connect the bottom of the sphere to the top using the same stapler.
Remember to leave a hole in the bottom ball
- Now start making the "head". Everything is the same: we build the main row of small glasses (also 17 pieces), then the next row (15 pieces) and so on until we get a sphere.
- We also leave a hole in the “head”, the size of one glass.
Leave a small hole for the head, about the size of one glass
- Now you need to make a "rod" to connect the head to the body.
- Take 2 glasses and make three cuts on each, 4 cm deep.
- Position one glass at the very top of your torso so that each cut is lower in the glass.
- For reliability, wrap the glass with tape so that the cuts do not "go" up.
- Place another glass on top of the first one and also tape it together.
- To prevent the glasses from falling out of the structure, glue their ends with tape to the inner walls of the glasses.
- Slip the "head" over the resulting rod.
When you attach the top to the bottom, you get this design.
That's it, the snowman is almost ready. It remains only to glue the eyes and nose, and also make a headdress.
The snowman can have three parts, but then it will be unstable and you will need more cups and staples.
How to decorate and animate a snowman
Prepare colored cardboard, scissors and glue. Better to use two types of glue. One for working with paper, that is, ordinary stationery or PVA, and polymer glue for gluing the decor to the snowman. If you have double-sided tape, you can use it. What and how to do:

From the same cardboard, you can make a hat, for example, a cylinder.
In the same way, you can connect structural parts with glue. The glasses are arranged in a circle and glued together.
If you want the snowman to glow like a Christmas tree, then put an LED garland inside and connect it to electricity.
It turned out to be a beautiful lamp
Video: how to make a snowman from plastic cups and an LED garland
And from the remaining glasses you can make a disco ball and a garland.
Video: disco ball made of plastic cups
How to make a product with your own hands using a glue gun
You will need about 300 cups of the same size, a stapler, staples, and a glue gun. The essence of this method is that you need to combine a connection with staples and a connection with glue. Do the following:
- Lay out a circle of glasses (17 pcs.) On a flat surface. This will be the main row.
By connecting the glasses together in this way, you will be able to form a circle.
- Staple each glass together.
Don't worry if the cups are wrinkled
- Apply glue to each glass approximately in the middle (make a circle).
- Place the next row of glasses on top. This will form a hemisphere.
- Wait a few minutes and allow the adhesive to “grab”.
- Additionally fasten the glasses together in the top row.
Before you have time to look back, two rows of glasses will be connected to each other.
- Then put the glasses in such a way that they move inside the structure.
- Apply glue to each row and hold the glasses together in the same row.
- When the upper hemisphere is completely ready, proceed to the lower torso.
- For the first row, you should need 15 glasses (just in case, count how many glasses you got in the second row of the hemisphere).
- The lower hemisphere should be unfinished; it is enough to make three rows. Then the snowman will stand steadily on the floor and not fall.
- Make a head, also from two hemispheres. The hole does not need to be left.
- When the head and torso are ready, make a "rod" from two glasses. With it, you will connect the top and bottom.
- Connect the cups together so that the rim of one glass fits into the rim of the other (you can make several cuts on one glass).

Content
Winter is coming, New Year's holidays, matinees time, time to decorate your home. Already now you can practice creating several interesting New Year's items, you will not notice how time flies and the child will require crafts for school or kindergarten. And there will be something to decorate your home. So, involve children in the creation. In this article, we will look at several options for creating a snowman from cups.
The easiest option
Let's start with a simple option. To do this, we need a couple, or even more disposable paper cups, felt-tip pens, threads, sparkles, shiny glue, paints, wire. This set of items can vary, it all depends on how exactly you want to design the snowmen.
Turn the cups upside down. And start creating: draw eyes, a nose-carrot, mouth-buttons with paints or felt-tip pens. Tie a kind of scarf for a snowman from woolen threads; you can put on a knitted small hat on top. You can make a kind of rim with cannons for the ears. Use glitter glue or glitter varnish to decorate your snowmen.
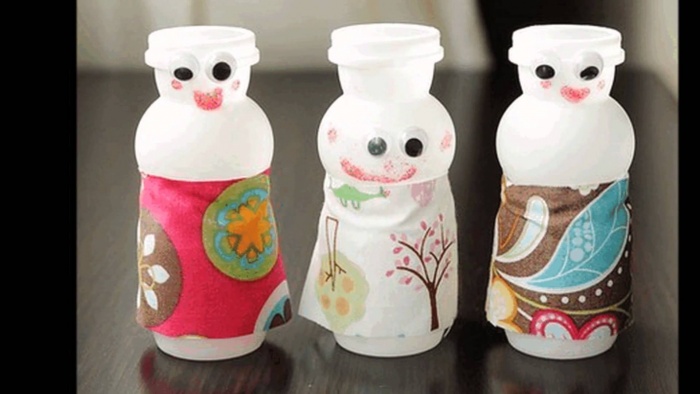
By the way, instead of disposable cups? you can also use plastic bottles of yoghurt, detergents, decorating it all with buttons, colored paper, paints and bright varnishes.


Christmas toy from a plastic cup
Another pretty simple but fun way to create a Christmas toy. We need a transparent plastic cup, styrofoam, cardboard, a bell, a snowman figurine, a Christmas tree.
Cut a circle out of the cardboard, which will be slightly larger than the top of the glass. We attach a figurine of a snowman, a Christmas tree to it, decorate all this with grains of foam. We cover the composition with a glass and attach it to glue. The protruding part of the cardboard can then be carefully cut or also decorated with small grains of foam. You can glue a bell on top, the souvenir is ready!
Any figures can be used as internal filling. Small figurines of angels, deer or favorite children's characters will do.


Snowman made of plastic cups: lamp
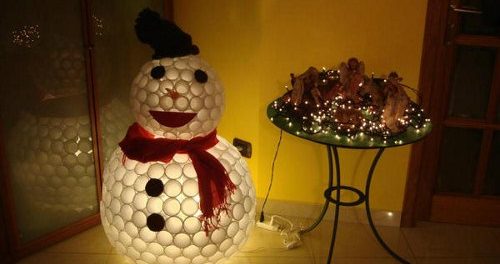
A snowman made of plastic cups with his own hands can turn out to be very multifunctional: firstly, it will decorate the house and please the eye, and secondly, it can become an excellent nightlight or lamp for reading a book or doing handicrafts. What we need:
- somewhere between 200-300 pieces of plastic disposable cups (yes, here you have to go broke a little, just a little);
- stapler with staples or glue;
- colored paper for decoration;
- a scarf or piece of red fabric;
- light bulb or garland.
To begin with, lay out 25-30 pieces of cups with the bases inside and fasten them with a stapler or glue. We lay out another row on top, but with a smaller number of glasses and in a checkerboard pattern. And so you need to lay out somewhere 6-7 rows, do not completely close the structure so that you can attach the head.

Now we are preparing the head of the snowman. For the head, fasten 18 glasses to start, as in the version with the torso. Next, lay out several rows, and you should have a small hole, which then you just need to close with a hat.

Please note: glasses must be combined with glasses from the previous row.
Now you can style the face of the snowman. To do this, use colored paper, cut out the eyes, mouth, create a voluminous nose. For the eyes, you can use tennis balls, having previously painted them black or dark blue. The nose can also be molded from plasticine and attached to one of the cups, many use foil for the nose.
The docking between the torso and the head can be covered with a scarf. The craft will look impressive if you place a light bulb or a whole garland in the middle.

To create such a snowman, you can use both matte and transparent disposable cups, it all depends on what effect you want to achieve.
You can also use colored plastic cups as a decoration, you can make buttons for a snowman from them, and blue glasses can act as eyes.

In addition, such a craft can be a good decoration for a wall or door to a school class. To do this, you do not need to make a full circle of glasses, but leave a semicircle so that the product is easier to attach to a flat surface.
Use a garland to illuminate the torso and head separately, it looks very original and at first glance you won't even say that the snowman is made of disposable tableware.

By the way, not only plastic cups can be used. Also use plastic water bottles that are clear or can be painted white. The assembly principle is the same, only it is better to use not a stapler, but serious glue.


It looks amazing, and, most importantly, it teaches children, and adults too, to reuse plastic products.
And here is a variant of such a hybrid of a snowman and Santa Claus. Please note - there is a method of using materials of different colors.


