First of all, about what a home DLNA server is and why you need it. DLNA is a media streaming standard, and for the owner of a PC or laptop with Windows 7, 8 or 8.1, this means that by setting up such a server on your computer, it is possible to access movies, music or photos from a wide variety of devices, including a TV , a game console, a phone and tablet, or even a format-compatible digital photo frame.
For this, all devices must be connected to the home local network, it does not matter - using a wired or wireless connection. If you access the Internet using a Wi-Fi router, then you already have such a local network, but additional configuration may be required.
Creation of DLNA server without using additional programs
The instructions are given for Windows 7, 8 and 8.1, but I will note the following point: when I tried to set up a DLNA server on Windows 7 Home Basic, I received a message that this function is not available in this version (for this case, below I will tell you about the programs using which you can do), only starting with "Home Extended".

Let's start. Go to your control panel and open "Homegroup". Another way to quickly get into these settings is to right-click on the connection icon in the notification area, select "Network and Sharing Center" and select "Homegroup" in the menu on the left, at the bottom. If you see any warnings, refer to the instructions I gave above: the network may be configured incorrectly.

Click "Create a homegroup", the wizard for creating homegroups will open, click "Next" and indicate which files and devices should be granted access and wait until the settings are applied. After that, a password will be generated, which will be required to connect to the homegroup (it can be changed in the future).


After clicking the "Finish" button, you will see the homegroup settings window, where the "Change password" item may be interesting if you want to set a memorable one better, as well as the "Allow all devices on this network, such as TV and game consoles," item. play shared content ”- this is what we need to create a DLNA server.

Here you can enter the “Media Library Name”, which will be the name of the DLNA server. The devices that are currently connected to the local network and support DLNA will be displayed below, you can choose which of them should provide access to media files on your computer.
In fact, the setup is complete and now, you can access movies, music, photos and documents (stored in the corresponding folders "Videos", "Music", etc.) from a variety of devices via DLNA: on TVs, media players and game consoles, you will find the corresponding items in the menu - AllShare or SmartShare, "Video Library" and others (if you do not know exactly, take a look at the instructions).

In addition, you can get quick access to the media server settings in Windows from the menu of the standard Windows Media Player, for this use the Stream item.
Also, if you plan to watch DLNA video from a TV in formats that the TV itself does not support, enable the "Allow remote control of the player" item and do not close the player on the computer to broadcast content.
Programs for configuring DLNA server in Windows
In addition to configuring using Windows, the server can also be configured using third-party programs, which, as a rule, can provide access to media files not only via DLNA, but also via other protocols.
One of the popular and simple free programs for these purposes is the Home Media Server, which can be downloaded from the site http://www.homemediaserver.ru/.
In addition, popular equipment manufacturers, for example, Samsung and LG, have their own programs for these purposes on their official websites.
Today you will learn how to properly connect a TV to a computer and about all the possibilities of such a connection, as well as how to organize viewing of your media library on Smart TV and other devices that support a home DLNA server.
What is DLNA?
The Integrated Digital Networking Network (DLNA) Consortium is a group of companies that have joined together to create a generally accepted open standard for connecting devices so that all DLNA-enabled clients can automatically view media content from each other while on the same network.
What devices support DLNA?
DLNA technology is compatible with any device:
- smart TVs;
- smartphones and tablets;
- PCs and laptops;
- media players and Blu-ray players;
- game consoles;
- home media servers (NAS);
- wireless printers;
- photo and video cameras;
- audio system.
All DLNA-enabled devices have a corresponding logo or sticker indicating the type of digital content supported (for example, audio, video, photos), as well as the purpose: server, printer, player, etc. Most devices from major manufacturers such as Intel, HP, Motorola, HTC, Microsoft, Samsung, Sony, LG, Panasonic, etc. have DLNA support. Apple has developed its own standard - AirPlay. If you have a device from Apple, then it is not possible to use it in your media network consisting of clients from other manufacturers.
How does DLNA network work?
As you already understood, DLNA devices are designed for interconnection: creating a multimedia network among themselves. Each device is assigned its own type, depending on its purpose. For example, any storage device: a smartphone, media player, TV or PC, can belong to both the Digital Media Server and Digital Media Player types, because they are capable of both receiving and playing digital content from another DLNA device.
How to create a DLNA network?
A wireless router (or wi-fi router) is the centerpiece of a network and is used to connect devices to each other on a shared home wireless network.
Equipment for building a home network with DLNA
You will need:
- DLNA TV;
- DLNA digital media server (e.g. file server, PC, laptop or media player with HDD);
- wi-fi router.
I will talk about building a DLNA network not only with a wireless connection, you can also use a wired method of connecting devices, instead of a wi-fi router, use a regular router (switch) to connect a file source (home server - DLNA server) with a display device (DLNA customer). You can also use (to distribute the Internet through the power grid), in addition to this, you will need Ethernet cables to connect devices to your network.
How to set up a DLNA home media server?
1 Connecting a TV with DLNA support to a wi-fi router (for example, Samsung with Smart TV).
Option 1 - wired connection... Connect with an Ethernet cable to the router. It is enough to connect one end of the cable to the LAN port of the TV, and the other to an free port of the router (or switch, depending on the structure of your network).
Option 2 - wireless connection... If you are using a wi-fi router (wireless router), then it is enough to connect the TV to an existing wireless network via a built-in or external (USB) wi-fi adapter directly to the router. If the TV is far from the router, then you can install a wireless bridge (use the router in Bridge mode or buy) to connect the TV to the router. I also recommend reading the article about. The wireless bridge is connected to the TV via the LAN port, and to the router via a wi-fi access point.
Option 3 - Connect with Powerline Adapters... This type of connection uses the power grid without Ethernet cabling. This method will help you set up your home network using your existing electrical wiring and you will no longer need cables to connect DLNA clients. Powerline adapters are produced by almost all manufacturers of network equipment: TP-Link, Netgear, D-Link, etc. They are called Powerline devices. Next, you just, as usual, connect the plug of the router, TV and other devices to the power outlet, but now all your devices will form a DLNA network.
2 Adding other DLNA-compatible devices to your home network
Now you can connect DLNA servers (devices from which you want to play files on your smart TV) to the router - PC, laptop, phone or media player. All servers will be displayed on the smart TV, since they are on the same network and it is possible to play the content that is stored on their media. There are different ways to set up different types of devices on a DLNA network.
DLNA PCs and Laptops
Connect your computer or laptop to your router or router using any of the above options. The most important point in setting up DLNA on a PC or laptop: the need to install the appropriate program - a media center (media shell). The most popular of them (for each program there is a link with information about it and settings):
- Serviio
It is possible not to install media center applications to create a DLNA server, but to use Windows Media Player 11 or 12. To use them as a DLNA server, you must allow access to files on your laptop or PC: open Windows Media Player, go to Options menu, then open the Windows Media File Sharing tab and enable media sharing.
Kodi media center interface windowYou can choose a media shell to use as a DLNA server from the list above. After installing the program you like to create a media center (DLNA server), you should configure it and select files (photo, video, music files) for transmission to a TV or other display device.
DLNA mobile devices
3 DLNA setup on TV
After you have connected all DLNA devices, turn on the TV and go to the home screen of your Smart TV (for example, Samsung TV). Search for and launch the AllShare app to find music, photos and videos stored on DLNA devices on your network.
If you have a Sony TV (pre-2015 model), then you need to turn it on, press the "Home" button and turn on the "Media Player". Once you select the type of content: music, photos or videos, you can see the DLNA servers on your home network.
4 Using DLNA on Android OS
To watch videos from a computer on smartphones and tablets with the Android operating system, you need to install a special application. There are quite a few such applications, I can recommend MediaHouse or Bubble UPnP, which can be downloaded for free on Google Play.
After you install the application, you need to take a few simple steps:
- select the source - your computer or other device with DLNA support and installed, from which you will watch the video;
- select a receiver, that is, your Android device;
- select a video from the list of available files.
In addition to universal apps, mobile device manufacturers offer their own DLNA-enabled software. Samsung has AllShare, LG has SmartShare, etc.
There is no configuration required to use DLNA-enabled apps on Android devices. It is enough to launch a DLNA server (for example, Kodi on a computer), and it will immediately appear in the list of available connections in the application on a smartphone or tablet. Select your computer from the list, click “Browse” and select the required folder. Do not forget that your smartphone can also act as a DLNA server.
We've already covered a number of features related to home networking and media playback in Windows 7. The way this all connects in a particularly user-friendly way is called streaming media streaming. You can use your Windows 7 PC as a multimedia content distribution center - transfer it to other computers and devices on your home network for playback, and even do the same securely over the Internet. Scott Manchester from the Devices & Media team coordinated the creation of this article, but as you can see, it also includes the work of other departments - Core User Experience, Media Center, Networking, and even Windows Live, which is also gaining well-known benefits. when introducing and using new APIs. This is a very detailed article, there is a lot of information in it that you will definitely want to try out. For those of you using the pre-release version of Windows 7 exclusively in test mode, you can install it on another computer and use it for 30 days without having to enter a new installation key. Enjoy! - Stephen
Windows 7 adds many new video / audio streaming features to help you fully enjoy the media library at your disposal on your PC and other home devices. This is possible even when you are on the go using the Internet. We've created a new way of using network connections that is much easier and more user-friendly than the standard one, including when setting up. Now, using music, video, pictures on your own network “just works” - you don't need to think about file formats, their transport and the required protocols.
There is a growing number of Network Multimedia Devices (NMD) certified to interoperate using the well-known and widely accepted industry standard Digital Living Network Alliance (DLNA). Windows 7 uses this open standard. This means sharing your media library for NMD, Windows PCs, Windows Home Server, Media Extenders for Windows Media Center (including Xbox 360) has become easier and more natural. Support for this standard also means that a myriad of devices such as digital photo frames, network radios, televisions and others can be seamlessly integrated into the home networked multimedia environment around Windows 7 PCs.
Not just for tech enthusiasts
We've made it a lot easier to set up your streaming media. Prior to Windows 7, such a setting was only possible for true lovers of such things. In order to simplify this process, the setting for streaming playback has been combined with the setting for the new function HomeGroup that is, in a typical network configuration, streaming is enabled and working by default. The new Stream menu in the main Window Media Player window offers the most popular features based on predefined usage scenarios. These scripts will allow you to:
Set up your home PC so that you can access your home media libraries even when you are away from home
Transfer media content to the player from other computers running Windows 7 and manage it
Quickly allow access to your media library to all home PCs and devices
In today's article, we will talk about each scenario separately.
Fig. 1. The new Stream menu in the main Window Media Player window offers the most popular features based on predefined use cases.
HomeGroup presents a new concept publicly available media libraries for music, videos and photos. As stated in previous article, these libraries are accessible from the navigation bar in Windows Explorer and Windows Media Player, and in the General category for each content type in Windows Media Center. They have the same appearance in all presentation options.


Fig. 2. Media libraries are accessible from the Windows Explorer and Windows Media Player navigation pane and from the General category for each content type in Windows Media Center
Windows Explorer will automatically find and share the media libraries of all computers included in the HomeGroup. In addition, Windows Media Player and Windows Media Center will automatically add media libraries from:
Windows Media Player 11 and 12
Windows Home Server
All DLNA compliant media servers (e.g. network storage)
Who Can Access Shared Media Libraries?
HomeGroup is a set of securely connected PCs running Windows 7. They can discover and use each other's devices without additional configuration. Sharing is enabled for computers in the group automatically. Group settings let you define what types of files will be shared; for example, it can only be music, no images or videos.

Fig. 3. Group settings let you define what types of files will be shared.
In addition to the PCs included in the group, Windows 7 makes it easier to access media libraries for playback devices. You can configure such access from the HomeGroup control or directly from Windows Media Player:


Fig. 4. You can configure access to media libraries for playback devices from the HomeGroup control panel or directly from Windows Media Player.
You can also restrict certain computers or devices from accessing your media libraries by choosing the "More playback options" option from the Stream menu in Windows Media Player.

Rice. 5. You can restrict certain computers or devices access to media libraries
"Play To": Windows 7 as a universal remote control for your media library
In addition to media from shared media libraries played with Windows Media Player, Windows 7 can stream content for playback on other Windows 7 PCs and DLNA-certified devices. We named this function "Play To". It lets you browse or find the media you're looking for directly from Windows Media Player or Windows Explorer, and then choose which to play. For each session, the user will be offered a flexible control panel in a dialog box, with which he will be able to fully control the playback process.


Rice. 6. Windows 7 can stream content to play on other Windows 7 PCs and DLNA certified devices.
It doesn't matter where the media library is stored. "Play To" can be used for both local and public media libraries. If you want to send media from one Windows 7 computer to another, select “Allow Remote Control of My Player” from the Windows Media Player Stream menu on the receiving computer. This will make it possible for Windows Media Player to be detected and appear in the Play To menu on other Windows 7 computers on the same network.

Rice. 7. If you want to send media from one Windows 7 computer to another, select “Allow Remote Control of My Player” from the Windows Media Player Stream menu on the receiving computer.
When streaming is enabled on your computer, the "Play To" option will be available in Windows Media Player and Windows Explorer by right-clicking the media files. If Windows 7 does not find a PC or device that can work with Play To, this context menu will not be available. The DLNA Alliance provides the necessary documentation to certify various devices and their capabilities. Not every standard-certified device supports Play To. Try to find DLNA-certified Digital Media Renderer (DMR) devices and, for best performance, devices with the "Compatible with Windows 7" logo.

Rice. 8. DLNA-certified devices bearing the "Compatible with Windows 7" logo will provide the best streaming performance.
When you select files to play on another PC, the Play To remote will open a window with standard controls such as play, pause, stop, rewind, search, volume, and mute. Not every device will support all controls, and some files may not be searchable. With the Play To Console window open, you can reorganize or delete files, queue for playback, and turn repeat on or off. You can even add new files from Windows Media Player or Windows Explorer by dragging and dropping them into the remote control window.

Rice. 9. With the Remote Play To window already running, you can reorganize or delete files, queue for playback, or turn repeat on or off.
There is no specific limit on the number of simultaneous Play To sessions that can be started. You can send pictures to your photo frame, video clips to your TV, and music to another laptop, all at the same time. Moreover, in one "direction" you can send several different types of media files, as shown in the example.
What about the Xbox 360 and Windows Media Center media boxes?
The Xbox 360 can receive streaming playback data from a Windows 7 computer in two modes - dashboard mode and extender mode.
In the "dashboard" mode, the set-top box plays the role of a regular media player. Although the Xbox 360 is not officially certified as a DLNA device, you can use it to view files in the public library of a Windows 7 computer (which is also supported by Windows Media Player 11) and play the contents of those libraries using the dashboard.


Rice. 10. Xbox 360 can receive streaming playback data from a Windows 7 computer in two modes - dashboard mode and extender mode
In extender mode, the console, like other Windows Media Center Extenders, is viewed by a Windows 7 computer on the network as both a Digital Media Player (DMP) and a Digital Media Renderer (DMR). Using Relay for Windows Media Center on your set-top box, you can manage media libraries on other computers and download their content for local playback, much the same as in dashboard mode. It should be noted that in set-top box mode, the console supports the "Play To" function so that Windows 7 users can redirect content to a PC. All set-top boxes registered on such a computer appear in the Play To menu and on other computers.
Accessing your home library from the Internet
In Windows 7, we made streaming possible for those who are away from home, and this will allow you to access your home media library from anywhere via the world wide web. We've made Internet streaming a natural addition to home streaming. In order for this integration to work, we had to solve several serious technical problems:
Discovery - detects a computer by the name it carries on the home network and redirects the name to a routed IP address
Confidentiality - the ability to access media files only for authorized users
Security - encryption of the procedure for viewing and playing media files to prevent data leakage
Reliability - network connection speeds, media file formats, bit rates, firewalls and routers can cause playback problems
To overcome all these technical issues, we created a model in which each computer receives a special online ID. This will help ensure privacy, security, and discovery of computers on the network. A new infrastructure based on online IDs connects your ID (e.g. [email protected] ) with a Windows 7 user account. This allows the Authentication and Authorization Server to provide the necessary level of privacy to establish a secure connection between two Windows 7 computers (your laptop used outside the home and your home PC).

Rice. 11. Internet access to your media library is opened from the Stream menu in Windows Media Player.
The setup process will guide you through the steps of linking your online ID to your account, which must be done on both your home PC and the one you intend to use outside the home. The same identifier must be used on both PCs so that a connection can be established between them. In order for the remote PC to access the media library on the home PC, the user must have “Home” specified as the network type. A remote PC acting as a client can view and receive content from a home PC from anywhere (public, home, and work network location). The type of network location is selected when you first connect to the network and can then be changed in the Network and Sharing Center.

Rice. 12. In order for the remote PC to access the media library on the home PC, the user must have “Home” specified as the network type.
Reliability - Network Connection Requirements
Internet streaming works best with a broadband connection that is always connected to the network. Upload speeds for such a connection can range from a modest 200 kb / s to 10 Mb / s or even more. Download speeds can also vary greatly depending on location: hotspot in a crowded cafe or train station, hotel room, apartment with wireless. We wanted to ensure that even high bitrate media (like HDTV) played smoothly and without errors, regardless of the connection speed. Internet streaming uses sophisticated bandwidth-sensing mechanisms and point-to-point heuristics to deliver high bitrate content even in the most challenging connection conditions.
Another problem with Internet access to the home media library was the creation of a P2P connection between the remote client and the home PC acting as a media server. A typical home network receives one unique IP address from an ISP, and this address is shared among all computers and devices on the home network through Network Address Translation (NAT), a feature built into Internet gateways or routers, into including wireless. This creates problems for the direct connection of a remote client to such a network, both in the sense of determining a unique address, and in the sense of bypassing NAT restrictions in order to directly interact with a PC - a media server or other device on a home network.
Windows 7 has some techniques for bypassing NAT restrictions to establish a P2P connection, which allows, in most cases, and through most commercially available Internet gateways, to establish a reliable connection between a remote PC and a home PC. For best results, use a Windows Logo certified Internet gateway or wireless router.
Media formats
In Windows 7, you can play various media without worrying too much about having to keep track of which types and codecs you need in each case. (details in Table 1.) In addition to supporting local playback of new data types, you can be sure that remote streaming will work even on devices that do not themselves support codecs, bitrate, format or container of the broadcast file. This is done through a new way of transcoding in Windows 7.
Let's say you have a DivX video that you want to watch on a DLNA-certified TV that only supports WMV and MPEG2. Windows 7 detects the TV's capabilities (codec, bit rate, etc.) and dynamically converts DivX video to the format supported by the device. The general rule is that if Windows Media Player is able to play a media file, then it will almost always be played on a device connected to the network. Speed-adaptive technologies are used to streamline smoothly both at home and over the Internet, allowing Windows 7 to choose the best conversion options.
Table 1. New decoders in Windows 7
|
Standard format name |
File extensions |
Container |
Video decoders |
Audio decoders |
Known Limitations |
|
Mp4 (A, V, A + V), .m4a (A), .mov |
ISO, MPEG-4, AVI |
H.264, MPEG-4 ASP and SP |
Nearly all industry-standard files are playable; cannot play FairPlay protected iTunes files; plays most mov files from digital camcorders, excluding embedded playlists and segmented files (most movie trailers) |
||
|
3gp, 3g2 (A, V, A + V) |
H.264, mpeg-4 SP |
Although it plays some of these files, most mobile phone cameras create files containing ACELP or AMR audio and H.263 video that Windows 7 does not play. |
|||
|
ASP in AVI (compatible with DivX 4 - 6, XviD, 3ivx |
Avi (A, V, A + V) |
Does not support MKV, DivX special subtitles or protected with DivX proprietary proprietary protocol |
|||
|
M2t, .m2ts, .mts (A, V, A + V) |
Dolby Digital, LPCM |
Some camcorders use their own AVCHD dividing protocol, which then cannot be automatically recreated when transferred to a PC. |
|||
|
M2t, .m2ts, .mts (A, V, A + V) |
The file format and bit rate for it, chosen for transcoding, especially for video, strongly depend on the performance of the PC processor performing this operation, as determined by the WEI (Windows Experience Index):

Rice. 13.Windows Experience Index determines the file format and bit rate selected for transcoding.
We've created a flexible interoperability model for our chip maker partners to provide hardware acceleration that automatically works with Windows 7 streaming features. optional chipset). With hardware transcoding support, Windows 7 can ease the load of this resource-intensive procedure on the central processor and run it as a background task that does not significantly affect PC performance.
DLNA support in Windows 7
The Digital Living Network Alliance (DLNA) is a consortium of more than 200 companies interested in promoting technologies for sharing media content in home networks. The DLNA architecture is based on the UPnP specifications, but in addition to this, DLNA defines transport protocols (based in turn on HTTP and RTP) and a set of media file formats.
DLNA defines the roles of devices (server, player, converter, etc.) and the protocols that these devices use for mutual discovery and communication (UPnP, HTTP, RTP, etc.). Windows 7 uses some of the DLNA-compliant device roles, as well as the DLNA protocols required to communicate and exchange media content between devices. With Windows 7, your PC can run a wide variety of alliance-certified hardware — TVs, stereos, mobile phones, game consoles, and more.
Table 2. Supported DLNA Profiles in Windows 7
|
DLNA device class |
Abbreviation |
Description |
|
Digital Media Player |
A device in this role finds media content on media servers and provides playback and conversion capabilities. WMP and WMC act in this role when browsing the contents of the public media library. |
|
|
Digital Media Renderer |
In this role, the device plays media content from the media controller, which finds this content on the media server. WMP acts in this role when configured for remote management. |
|
|
Digital Media Server |
In this role, the device stores media content and provides it to DMP and DMR. When streaming is enabled, Windows acts as a media server. |
|
|
Digital Media Controller |
In this role, the device finds media content on the media server and plays it back on the DMR. Play To for WMP and WE launches DMC to control playback. |
Since Windows 7 can play various roles, there are several options for using a PC running it for you to choose. Several of these scenarios are discussed below.
Rice. 16. You can redirect images from your phone for viewing on your computer.
Scenario 4: You have purchased a stereo system with the DLNA logo. On your Windows 7 computer, you have a rich music collection with thousands of songs. Since the collection is large, you prefer to search, sort and organize it using the rich capabilities provided by Windows Media Player. When you select songs, you transfer them to your stereo through the "Play To" function. You also have a NAS that hosts an additional collection of music and videos. You can use your computer to browse the contents of your NAS and transfer it to your stereo. Rice. 17 illustrates this scenario. In this case, the Windows 7 computer acts in the dual role of DMS and DMC.

Rice. 17. From a computer running Windows 7, you can view information from the local network. You can then redirect this information to TV.
All in all, there are definitely plenty of opportunities to have fun. Enjoy them!
Scott, Tim and the entire Devices & Media team
In this article, we will look at how to set up your DLNA server on Windows using the Home Media Server (HMS) program as an example.
Nowadays, it is more and more often required to have a DLNA server on the home network, since most modern TVs do not support data transfer protocols such as SMB or NFS, but only work over DLNA.
What is DLNA?
DLNA (English Digital Living Network Alliance) is a set of standards that allow compatible devices to transmit and receive various media content (images, music, video) over a home network, as well as display it in real time. That is, a technology for connecting home computers, mobile phones, laptops and consumer electronics into a single digital network. Devices that support the DLNA specification can be configured and networked automatically at the user's request. (Source - Wikipedia)
DLNA Home Media Server (HMS) Installation
The installation of HMS is very simple, but we will still explain in detail how it works.
First you need to download the installer. At the time of this writing, the official site was down. And it did not work a month before, so below I will give a link to download the latest version of HMS from our server:
(47.2 MB)
Let's get started with the installation.
Run the installer:
Here we are asked to select a directory into which the installation files will be unpacked. Select the directory and press the button " Execute". After unpacking, the installation will start automatically.
Attention: Unpacked files are not automatically deleted after installing the program, I advise you to delete them manually after the installation is complete
After unpacking, the installation of the program starts automatically:

There are not many settings here. In this window, you select the directory where the Home Media Server (HMS) program will be installed and the "Program Group" - the name of the folder in the "Start" menu.
After selecting the installation folder and the name of the folder in the "Start" menu, all that remains is to check the box "create a shortcut to launch the program on the desktop", if necessary, and press the button " Install«.
At the end of the installation, which takes less than a minute ( depends on your equipment), we are offered to immediately launch the Home Media Server (HMS) program.

This completes the installation of the program.
DLNA Home Media Server (HMS) Initial Setup
So, we have a freshly installed DLNA server, let's launch it and see what it offers us to configure first, as well as make a couple of useful settings. Let's get started.
After the first launch of the program, we see the initial settings window.

In this window, we are asked to select a device to which the media content will be broadcast. There are many templates on the list.

If you did not find your own device or a device similar to yours, then you can leave the standard DLNA Device, as practice has shown, this does not greatly affect anything. After choosing, go on.

And then a choice of folders appears before our eyes, from which we will take media content. You can select folders with your media content now, or you can add them further. We'll look at how to do this below. After selecting folders, press the button " Ready«.

After the initial settings, we are offered to make a backup copy of the settings, the image cache, the database, and set up an automatic backup schedule. We will not dwell on this in detail now and will go further. To do this, press the button " Close«.
After that, the main window of the program appears in front of us. Let's move on to several "important" settings at once.

On the left are the types of settings, on the right are specific settings.

Let's go straight to additional settings and set up the DLNA server autoloading with the PC turned on.
To do this, select items 2 and 3.
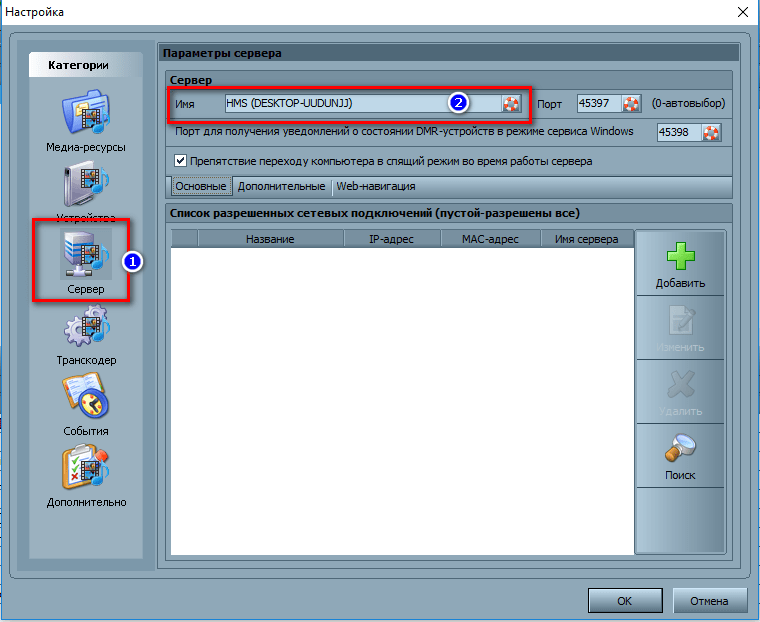
Now let's go to the " Server"And write down the name of our DLNA server. As we will see it on the net.

After changing the name, you need to add folders with media content (if you did not do this in the "initial setup" or decided to add more folders. Everything is simple. Press the " Add»(2) and select the folder you want to add. After that, you need to " Scan»(3) so that the files from the folder / folders go to the server.

If you did everything correctly, then your files should appear on the right side (as highlighted in yellow in the screenshot).
If you have your files there, then we already have quite a bit. Launch and use. Everything is very simple here - we press the button " Run«.
If you have Windows Firewall enabled, the system will ask you whether to allow it access to the network. Choose which ones to allow access and click " Allow access«.

Conclusion
We have installed the Home Media Server (HMS) program, or to put it simply, we have configured a DLNA server on the Windows operating system.
It remains only to start the playback device (TV, media set-top box, mobile phone, etc.) and check if our device is on the network and if it contains the files we need.
We hope this article helped you. If something does not work for you or you have questions - write comments, we will try to help.
Before performing configuration manipulations, it is worth understanding what a DLNA server is. The abbreviation stands for Digital. The service includes special standards that, when working with equipment that support them, will allow you to transfer and view media files. Many devices have DLNA support, including smartphones, laptop computers, digital cameras, TVs, set-top boxes, and stereos.
DLNA server connection diagram
Thanks to this function, there are ample opportunities to view and transfer media content. So, you can download a new movie, and instead of watching it on your laptop, you can just play the file on a big TV. You can create a home video server without a USB stick or additional cords. Also, without a flash drive and wires, you can play music directly on your smartphone. A really useful feature and it only needs a local network. Let's find out how to set up DLNA server in Windows.
How to set up a DLNA server using standard Windows tools
If everything is clear with the theory, then go to the settings procedure. Take Windows 8.1 as an example (you can set up a Dlna server for Windows 7 and 8 in a similar way). Therefore, the instruction will be useful for owners of these OS versions. The whole procedure takes place in 11 stages, which will help to make a media server for a home network.
- First, go to the control menu. In the "eight" for this purpose, click the right mouse button on the left side of the screen, and in the list provided, select the line "Control Panel". In we go to "Start" and on the right side select the item "Control Panel".
- Select the "Network and Internet" icon, in the menu of which we click on the line for selecting the configurations of the home network and access to information.
Select "Network and Internet" in the Control Panel
- We select the item "Create a home group".
- A menu with information about the function appears. We read all this, and select "Next".
- We select the shared access to the Windows 7 folder (we set the necessary items).
- The program will display the access code word. It is better to write down the password so that you do not have to repeat it all over again. After completing the settings, you can set the usual password. Click the "Finish" button.
- The settings menu opens again, but in a different guise. To set the code word, select the "Change password" item.
Important! When you set a new password, all home network users will be deleted, so you need to change the code before connecting a new device.
- At the next stage, we again return to the home network configuration window, allow the gadgets participating in the group to play media files.
- Create a name for the DLNA server. To do this, click on the line of the corresponding name.
- Gadgets that support this feature will be displayed at the bottom of the menu. To set access to these devices, click the "Allow all" icon. It is also possible to set access to only some gadgets, for this we leave marks next to the name of a specific model of equipment.
- Setting up Windows 8.1 for DLNA protocol can be considered complete.
Setting up a home server for LG and other companies' products shouldn't be a problem. Only 11 steps will help you to establish access to the media library data of the operating system. So that you can play or transfer data on the network, we add the necessary folders to the libraries for them through Win Media Player. That's all, without the use of third-party software, now we are comfortable watching a movie on the couch from a smartphone, or we gather a large group of friends and turn on a movie on a widescreen TV. The convenience of this function will be appreciated on the very first day of use.


