Useful Tips
If you want to decorate your home with beautiful homemade flowers, or want to give them to your loved ones, then this master class is for you.
From paper you can make a huge number of different colors, which, unlike living ones, will never wither.
Today such flowers decorate banquet halls and festive tables.
They can create flowers with their own hands both adults and children.
Paper flower (master class). Paper roses.

You will need:
Thick paper
Pencil (marker)
Scissors
1. Prepare thick paper and draw a spiral on it with a pencil.

2. Cut out the spiral. You can use both regular and curly scissors.

3. Try to wrap the ends of the spiral outward, if the paper rips a little, this is even good, as the rose will turn out more realistic.

4. Twist the spiral to make a rose.

5. Take your time to twist the spiral to the end, slowly releasing the tension.
6. After you have tightened the spiral, secure it with glue. Next, fold back the circle that you got in the center when cutting the spiral - it will serve as the base of the rose.

7. Apply a drop of glue to the base and glue the rose to it.


If you used ordinary scissors, then the flowers you should get are as follows:

Crafts of flowers from paper. Bouquet.

You will need:
Multicolored soft paper
Scissors and nippers
Thin wire
1. Prepare the stem wire and apply some glue to it.
2. One end of the wire should be wrapped with a thin yellow paper strip.

3. Prepare the paper in the color you want to use for the buds. This example uses pink paper. Fold the paper 12 times and, using scissors, cut out the petals for future flowers.

4. Make a bud from the cut petals.
5. Apply glue to two petals and attach them to the stem (where you wrapped the yellow strip).

6. After you have folded all the petals into a bud, use green paper to wrap the stem of the flower.

7. To make the composition look complete, make 5 buds.
8. When you have finished making all the flowers, you can put them in a vase.
Paper flowers (master class). Blooming branch.

Those who are in a spring mood will love this simple and very beautiful craft.
You will need:
Soft paper (red and pink in this example)
Dry branches
Scissors
Glue (glue gun)
1.

1. Fold sheets of soft paper several times until you get 7-8cm squares.

2. Cut out the flowers with five petals from folded paper. It is not necessary to have even petals, rather the opposite, so they will look even more realistic.

3. Gently glue the two flowers together using a small drop of glue. This must be done so that all the petals are visible.

4. Glue your flowers to a dry branch and you will have a beautiful spring craft.


You can also use ordinary paper, which needs to be divided into several squares and then fold the squares so that you get origami flowers.
This is how it looks:

How to make flowers out of paper. Flower toy.

You will need:
Thick colored paper
Scissors
Wire
1. Cut 6 circles of different colors out of thick paper. Each circle is approximately 7-8cm in diameter, but you can choose the size yourself.
* It is not necessary to make even circles.

2. Prepare a wire and bend one end of it so that you get a circle with a diameter of about 10 cm (see picture).

3. Fold 5 circles in half and make a small notch in the middle of the fold.

4. One free circle that you have left must be attached to the circle on the wire. Use scotch tape for this. This will be the middle of your flower.
5. It remains only to attach the petals in the middle of the flower using the cuts made earlier.

6. To make the wire stand, bend its other end so that you get a base (see picture).
The petals can be easily removed and reattached without the use of glue. This makes your craft not only beautiful, but also useful, as it can be used as a toy for children who can learn colors, for example.
Craft a flower from paper. Making giant flowers.

You can beautifully decorate an apartment for some holiday with such giant flowers, but making them is not at all difficult.
You will need:
Thick colored paper
Pencil
Scissors
Glue gun or glue
1. Prepare a thick piece of paper and draw a petal on it.
* To make one flower you need to prepare 6 petals.

2. Cut out the petal.
3. Now you need to twist your petal a little so that it takes the desired shape.

4. On each petal, an incision must be made from the bottom.

5. Now join the ends of all six petals and glue them together.
* First you need to glue 3 petals for one half of the flower, then 3 more petals for the second half, and then connect both halves.


6. Prepare green paper for the leaves. Draw and cut out the leaves, then fold them in half.

7. Glue your leaves under the finished flower.
8. In the center of the flower, you need to glue a circle of a suitable diameter.

Paper flowers (diagrams). Napkin carnations.

You will need:
Napkins (white and pink)
Wire
Scissors
Markers
Tin can lid
Below you can take a look at the instructions in the pictures on how to make such a delicate flower.


Flowers from colored paper. Bright circles.

You will need:
Hole punch for large circles (or scissors and pencil)
1. First you need to make a few circles. This can be done with a special hole punch or by hand by drawing circles and cutting them out with scissors.

2. Fold all of your circles in half.

3. Mark the middle on one circle and start gluing the blanks neatly folded in half to it. In this case, one folded circle must be enclosed in another (see picture).

You should have such a sun.

* If you want a lush flower, use more circles.
You can also make a blooming flower. To do this, you need to put several blanks in a folded green circle (see picture).

If you fold the green circle in four, then you can make a flower like this, in which the diameter of the petals can be different.

Volumetric flowers made of paper and beads

In this master class, you will be able to combine a voluminous flower and a bead pattern.
You will need:
Colored thick paper
Pencil
Scissors
Thread and needle
1. Draw and cut flowers on thick paper.
* If you want, you can make the petals of the flower convex using the embossing tool (you can replace it with another round object). Just drag in the middle of the petal a couple of times with this tool and you will get a small indentation.

2. Fold your blanks and sew the beads in the center of the flower.


3. You can also use beads to decorate a card to which you attach a flower. Use a needle and thread for this as shown in the image.


DIY paper flowers. Flowers from a roll of toilet paper (option 1).

Such flowers are very easy to make, since everything you need to make it is available in almost any home.
For 3 flowers you will need:
4 rolls of toilet paper
1 egg carton
Pencil
PVA glue
Ruler
Stationery knife
Scissors
Acrylic paint
Brush
1.1 Paint any cardboard cylinders left over from the toilet paper in green color and leave to dry.

1.2 Divide one of the cylinders into 3 equal parts.

1.3 Use a utility knife to make cuts along the lines.

1.4 Draw a line 1cm from the edge of the cylinder. Draw leaflets around the cardboard "ring". Do this for all parts.

1.5 Cut out the leaves as shown in the picture and you will have 3 small green "crowns".

1.6 Bend all the leaves towards the outside of the crown and cut it (see picture).

1.7 Prepare an egg carton. You will need to cut 6 "cups" (2 for each flower). Do not cut through the middle of the package. You will need the square pieces in the middle of the package, between each egg cup. Take a look at the picture - you need to save 3 pieces of packaging for one flower.

1.8 For each flower, you need to have 2 "cups" and 1 square, while one cup should be slightly smaller than the other.

1.9 Make cuts on two cups to create petals. Around the large cup, make cuts with scissors to the very bottom, and around the small one by about 1 cm (see picture).

1.10 Uncover the petals and color them to your liking, both inside and out.

1.11 You also need to color your squares.

1.12 Prepare 3 more green toilet paper cylinders. Draw 2 lines across each, which should be 1cm from the edges of the cylinder. Also draw lines that run along the cylinder (see picture).

1.13 Use a utility knife to make cuts along the lines that run along the cylinder. Do this on all three cylinders.

1.14 Carefully bend all the strips out of each cylinder to form a vase shape. This will be the stem of your flower.

1.15 It's time to collect flowers. For one flower you need: 1 large and 1 small cup with petals, 1 square, 1 green crown and 1 green stem.

1.16 Using glue, attach a green crown to the top of each stem. Also glue the square inside the small cup, which in turn needs to be glued to the large cup.
1.17 Glue the flower to the stem and you're done, you've got a flower!
Decorating interiors in a floral style is gaining popularity: giant peonies, roses, sunflowers, poppies are used to decorate weddings and themed parties, romantic photo shoots and create unusual storefront designs. Even for hats and suits, you can make large flowers with your own hands - it's no more difficult than assembling a small bouquet or.
Let's talk about materials
When it comes to growth flowers, it is not immediately possible to believe that this beauty is created from paper. But corrugated has unusual properties - in the article on the manufacture of small flowers, we examined them in detail. Recall that crepe paper with a density of at least 120 g with A and B-flut (folds 1.6 and 3.2 mm deep) is most suitable for growth giants - this will allow the petals to keep their shape.
But! Not all growth flowers are made of thick corrugated paper. There are models, the petals of which must bend, curl or fall freely. For these colors, thin paper is used.

For making large flowers, also prepare auxiliary materials and tools:
- thick cardboard for the base;
- scissors or knife for cutting blanks;
- thermal gun - large petals are easier to connect with hot glue;
- wire for the frame of the stem;
- round-nose pliers for bending the wire;
- fabric, threads, cotton wool for padding the base or for combining materials;
- foam balls or plastic containers as a base.
And you will also need: fantasy, good mood and some magic ...
Basic techniques and secrets of creating growth flowers from corrugated paper
The entire decorative effect of the finished product depends on the beauty of the flower head. The process of its formation is similar to making flowers from isolone, but adjusted for the properties of the material. Let's learn how to create big ones!
The "accordion" method
This funny hat can be made with children - the flower is assembled according to the principle of an accordion.

We need several sheets of thin corrugated paper 20–25 cm wide. The length and their number depend on the desired splendor of the finished flower. Before starting work, the sheets must be laid one on top of the other and the edges must be aligned.

Stages of work:
- Fold the sheets with an accordion and scissors to give a semicircular shape to the edges.
- Mark the middle of the prepared strip and tie it with a thread or clamp it with floral wire, forming a loop for subsequent assembly.
- Disassemble the accordion, smoothing the edges.

- Raise the layers one by one, straightening each sheet.
- When all layers are separated, the flower is ready.
- You can make several flowers and connect them through the prepared loops.
The hanging balls from the previous photo were created according to this principle. You can combine paper of several colors to create these colors.
The difference with this design is that the inner part of the flower is cut with a fringe separately, and then both parts are combined into a single flower.
And here are some more flowers made in the same technique.

Detailed way
You will use this method if you decide to collect exactly giant flowers from corrugated paper do it yourself. To do this, you need to cut out individual petals and leaves according to templates. The patterns of large flowers differ from small ones only in size, so you can use those that we suggested in the article.

Since you will need a lot of blanks, it is better to make patterns from thick cardboard or press board - this way they will last longer. You can cut the petals with scissors or a clerical knife.
Tip: unfold the roll, fold it several times and then cut it out - you will get several blanks at once.
Next, the most creative stage in creating a flower begins - shaping the petals. Smooth bends and detailing of the edge are obtained by straightening the folds with your hands, stretching the workpiece using a metal ruler or blunt edge of scissors.
First, using a pencil or stick, twist the edges of the petal, press firmly to secure the bend.

Volume is created by straightening the corrugations: stretch them slightly at the top of the petal and straighten the middle almost completely.

In the end, you can add waviness to the edges in the same way.
Important! When applying a template to a sheet, it is necessary to ensure that the folds go along the petal - then it can be formed correctly.
In this type of MK, the process of making peony petals is described in detail:
If you are just learning how to collect large paper flowers with your own hands, many of the nuances may seem incomprehensible. Let's take a look at them with an example.

This chrysanthemum is assembled from individual parts, fixed on a branch and installed in a stand from a flower pot. We will talk about these assembly details a little later.
For the flower head we need:
- corrugated paper;
- cardboard circle with a diameter of 30 cm;
- glue gun.
Cut out the blanks of petals and leaves according to the pattern, process the edges and shape them.

You will need at least 30 petals of each size, 6 blanks 20 cm high for a sepal and as many leaves as your imagination and the length of the stem tell you.

The assembly is carried out on a cardboard circle. Let's look at the nuances that will make the flower look realistic:
- The petals should be directed strictly to the center, thanks to this we will preserve the symmetry of the flower.
- The filling is carried out in circles, with the displacement of each subsequent layer to the center by 1.5 - 2.5 cm. This will ensure a smooth decrease in the diameters of the arrangement of the petals, without the formation of voids. Approximately three rows should be obtained from each type of part. If necessary, you should add certain blanks.
- The closer to the center, the more the petals should be bent up, and the smallest ones are bent almost vertically before gluing, thereby filling the middle. This principle is laid by nature - the petals open from the bud.
After the front part of the flower head is ready, we glue a piece of cardboard tube to the back side, the diameter of which is suitable for the future fastening.

The reverse side is decorated with six sepals. They should be glued in a spiral, with the next one, in order to cover the entire surface of the cardboard base.

Tape method
Flowers made in this way differ little from the previous ones. The whole feature is that the petals are not cut out separately, but are formed on the tape: the profile of the petal is formed in the upper part of the paper strip, and the lower part remains uncut.
Peony made in this technique:
And another fantasy flower that resembles a dahlia:
Leaves and stem
If you make growth flowers with your own hands, then you will definitely need a stem and leaves. To realistically reproduce the structure of the leaf, make veins and create a relief:
- lay a wire in the middle of the sheet,
- position the corrugations towards the top of the leaf,
- reproduce the wavy edge.
Making leaves for growing flowers, see the video:
The next element of the growth flower is the stem. Depending on the purpose, the stem can be made to hold the flower in the hands or as a stand.

In these colors, the stem can be made from a cardboard tube, for example, from foil or cling film, or you can cut a piece of plastic pipe. This leg is multifunctional - such a flower is freely planted on a rack of metal rods.
To design spectacular photo zones, a flower on a leg would be an excellent option, as in this photo:
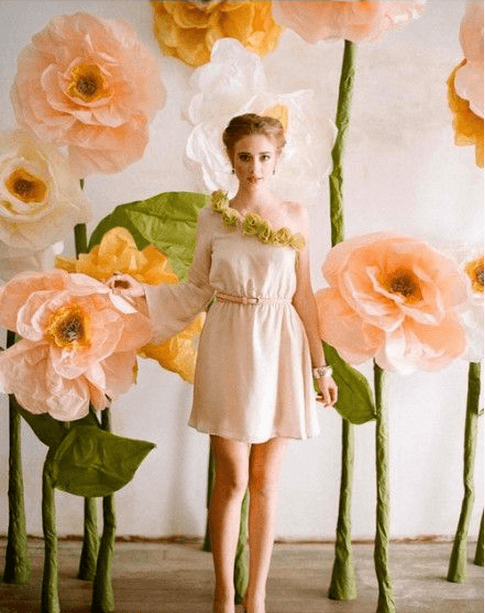
The stem is made of wire frame. The secret of its stability is in a plastic cup filled with cement mortar.

Advice. A plastic cup can be replaced with a small flower pot, and cement mortar can be replaced with any building mixture: gypsum, alabaster and the like.
The resulting rack should be wrapped in thick paper, then decorated with green corrugated paper. Using any technology convenient for you, make leaves and screw them to the trunk on a wire.
Also, a metal-plastic tube can serve as a stem, and even a real branch - for beauty they must be decorated with green teip tape.

The metal-plastic tube holds the flower securely
and looks great in the interior
Stand
The guests of the holiday will be very surprised when they find out that you have made growth flowers from corrugated paper with your own hands. And to decorate everything, you will need that stand. It can be metal, wood, or a weighted flower pot.
It is especially important to make a stable stand if you plan to install more than one flower, but a whole branch or a giant bouquet.

See the video for options for making stands for growth flowers:
Important! Take care of stable coasters when setting up wedding ceremonies. The flat supports are perfectly disguised as a layer of artificial grass.

Compositions of large flowers on the wall
If you do not need a separate flower for a photo shoot, but a whole photo zone, you need to decorate the wall. There is no need to do permanent fastening, since the flowers gather dust over time, they can accidentally break or just get bored with you, so you should use simple options:
- Double-sided tape - ribbons or ready-made mugs are sold. This method is not suitable for a wall in a room, since traces remain on the surface. As a way out - use a portable smooth plastic surface as a base and lean it against the wall, reinforcing it so that it does not fall.
- Hooks - there are ready-made hooks on the market, but you can attach homemade wire hooks to the back surface with hot glue.
- Velcro - ordinary sewing is used, which is attached to the surface with a construction gun, and to the back of the flower with hot glue. Also sold are adhesive-backed Velcro, which is also better to reinforce for reliability.
All these methods are united by the fact that a special surface is needed for mounting flowers.

But in order to create an original design, it is not at all necessary to hang the decor on the wall. You can tie a ribbon with a couple of hooks, to which you can attach flowers and threads with petals, as in this photo:

Or pull strings under the ceiling to which the decor is attached, creating a magical atmosphere.

Video with illustrative examples of attaching paper flowers:
However, large flowers made of corrugated paper can be used not only for photo zones. They can serve as an amazing costume for a theatrical performance or theme party.
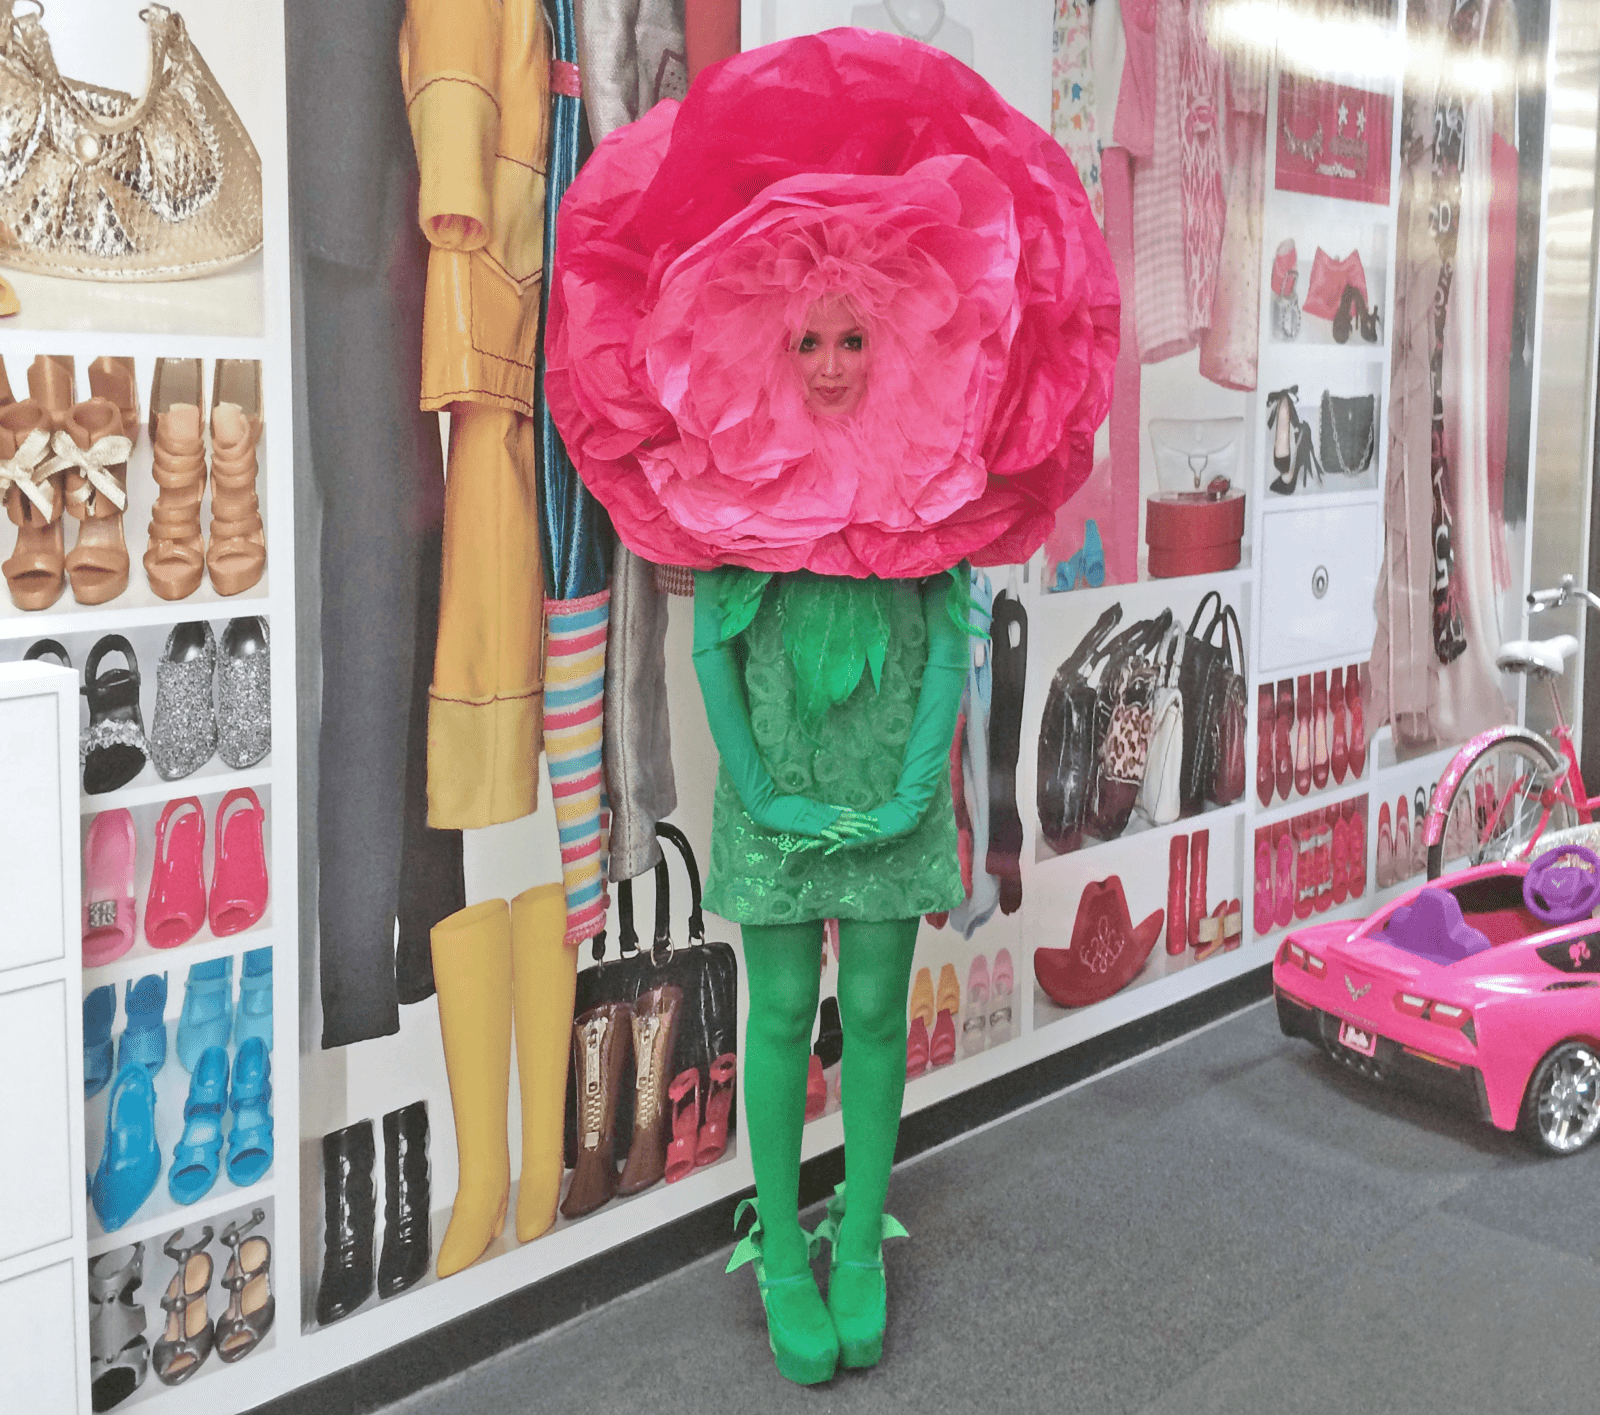

To create these costumes, the designer combined paper with fabric.
Nothing is impossible for unlimited imagination! Even a chandelier can be made from corrugated paper. The only condition is that there are no problems with the wiring and that the lamps do not come into contact with flowers.

And this adorable corrugated paper cabbage will be an excellent entourage for a children's photo shoot. It is made according to the principle of flat colors - on a cardboard base. To make the baby comfortable, there is a pillow in the middle.

There are a lot of ideas for using giant flowers from corrugated paper - fantasize, create beauty and please yourself and others with your creativity!
CategoriesSummary: DIY paper flowers. How to make flowers out of paper. Corrugated paper flower. Paper flower master class. Volumetric paper flower. Outline flowers. DIY gift for mom.
March 8 - "International Women's Day", the holiday of Spring and Love. On this day, you cannot do without a bouquet of flowers for your beloved women: wives, mothers, grandmothers, daughters! And if these flowers are made by hand, then they are doubly pleasant to both give and receive! In this section, we have collected for you a large number of DIY master classes for making paper flowers.
1. Paper flowers. Paper flower
Origami tulip
With older children, you can make a more complex version of the tulip out of paper. A master class on making a tulip using origami technique, see the link >>>>

And here is another very beautiful paper tulip. you can download ready-made templates for making this paper craft, and follow this link to read the instructions.
 Flowers from paper. DIY gift for mom
 Another spring paper flower invites you to make the site Krokotak.com. Detailed instructions how to make paper hyacinth read

Beautiful flower you can make origami from paper as a gift to your mom or grandmother with your own hands. For instructions on how to make such a flower out of paper, read the link.

How to make flowers out of paper
Paper flower stalks can be made from plastic tubes. Multilayer flowers cut from colored paper of different colors look beautiful, as in the photo below. Flower stand - half a cardboard tray from chicken eggs painted with green paint.

How to cut paper flowers. To cut a flower out of paper, use the scheme shown in the photo below.


How to make a flower out of paper
To make a festive bouquet of paper flowers as a present for your mom for her birthday or March 8, see the instructions on this site.

2. Paper flowers master class
3. Volumetric paper flowers. Volumetric paper flower
In general, egg cartons are a very suitable material for making flowers with your own hands. For detailed instructions, see the link >>>> To decorate homemade flowers, the author of the craft used buttons. The flower stalks made from the so-called. chenille (fluffy) wire.


Flowers can be made from plain or corrugated paper. Attach them to the twigs with tape, a glue gun, or string.


More tree branches (with or without green leaves) can be decorated with small paper roses. It is very simple to make such roses. A spiral is cut out of double-sided colored paper, which is then twisted from the outer end into a multilayer cone. You can wind the spiral around a toothpick. For detailed instructions, see the link >>>> If you want to make such flowers for your mother by March 8, then cut a few tree branches in advance and put them in the water at home. When green leaves bloom on them, decorate them with paper roses.

5. Paper flowers master class. Flowers from circles
This flowering twig is made using mixed media. Petals and leaves - using origami technique from circles. The techniques of twisting into a tourniquet and rolling into a ball are also used. For a detailed master class paper flowers, see the website
Paper flowers can be used for interior decoration, decor and even as a gift! Let's try to learn how to make volumetric paper flowers with our own hands, see examples and photos of beautiful finished works, and also see a master class for beginners.
Simple products
The easiest way to make flowers is from colored paper - it can be corrugated or ordinary, and if you plan to make strictly decorative flowers, you can take paper with a mother-of-pearl or metallic effect. Do not make a tulip or a rose as your first experiment - try something very, very simple for a start.Decorative crafts

In order to make simple and spectacular flowers you will need:
- double-sided colored paper (corrugated paper is also suitable);
- thin wire;
- sharp scissors and a marking pencil.
For beginners, the easiest way is to do the following: fold colored paper several times so that you get a stack of squares of about 6 * 6. Then, with a pencil, mark on the upper square with a pencil the shape of future buds - it can be a smooth rounded shape, regular circles, or in general what your imagination tells you.
Then, with scissors, you need to carefully cut the stack in the shape of the marked sepal and disassemble it into its components - for each flower you need three to five blanks. The wire must be cut into pieces of about 15-25 centimeters, twisted on one side so that a decorative center is formed, then the previously obtained "petals" are put on each wire, after which a stand is made in the lower part of the wire (a stable ring is twisted).
You can decorate a table with such crafts for a holiday, or use them for a photo shoot or interior decor, or you can simply attach them to the wall in the nursery or in the hall near the mirror - a good mood is guaranteed.
Or here's a simple option:


From what is at hand
For the manufacture of these products, old magazines or newspapers are used. Thus, you can make large flowers out of paper - the technique is simple, and paper crafts are quite effective.
What you need:
- unnecessary magazines (absolutely any);
- green sticky tape;
- sharp scissors;
- large barbecue skewers;
- paper glue or regular hot melt glue.
 By the way, these recommendations can be used for beginners too - they are done quite easily. If you want to make such flowers with children, then make sure that they have safe scissors, or cut the fringe yourself.

Decorative flower garlands
Do you want to make gorgeous garlands? Use giant paper flowers for them. By the way, making paper flowers with your own hands for garlands is very simple - you only need beautiful spectacular paper and a little skill. You will not need any patterns of flowers for cutting, or schemes, the main task of such large products is to look bright, unusual and attractive, large paper flowers do not have to be realistic.
What you need:
- scissors;
- corrugated paper of two or three colors (it is better to take bright and light);
- thread or fishing line;
- stapler or glue.
The size of the rectangles is chosen independently, you just need to remember that the flowers will be of the same diameter as the rectangle along the narrow side.
Each stack is collected in an accordion (look at the photo, how to make flowers from such accordions, if the description is not too clear).

Each accordion of five sheets of paper must be stapled in the center with a stapler or glued with a paper ring. It is best to round the edges of the accordion - cut something like a petal.
Now each blank needs to be turned into a bud - straighten the buds from the accordions you made. The accordions need to be straightened in different directions, and you will see how you get beautiful paper flowers in just a few seconds.
Then cut the line or thread to the desired length and string the buds - your garland is ready.


Another version of the garland:

Bouquets for decoration
Do you want to make a bouquet of flowers out of paper? See the photo:Want to learn how to make a tulip? Watch the video and below for step-by-step photos of how to make tulips in different ways.
Useful information and a few step-by-step workshops
At the very end of the article, download color schemes and patterns for cutting. By the way, if you want to make origami out of paper, then it is best to use special double-sided paper.Watch a detailed master class on how to make flowers and plants using the origami technique from paper - this is not only interesting, but also quite difficult, so do not wait for perfectly made flowers right away, you will have to try a little to get paper flowers with your own hands.
Also, flower stencils will come in handy if you will make large paper flowers of complex shapes - it is more convenient to collect the same tulip or rose from a special shape of petals.

Try to make large paper ones - just collect a huge rosebud from this master class (see below for a photo of how to make flowers lush and beautiful).
Here are the large color templates for paper cutting:

And here are the step-by-step photos:
How to make flowers for children? Try to minimize any risks - for example, keep children away from adult scissors, prepare the wire beforehand, and make sure the children are disciplined.
Learn how to make paper flowers with your own hands using coffee filters or napkins - a thin and fragile napkin looks almost like a real petal, you just need to shape it and collect the bud.
This video explains how to make a paper flower for beginners.
Some inspiring photos - see how beautifully you can decorate your holiday with camellias or roses.

Try to make voluminous flowers out of paper with your own hands using cardboard or thick paper - even a child can handle this technique.

Another option for a simple flower:

Leaf templates:


Learn how to make paper flowers master class on paper soaking technique - such items look almost like real ones!
Now you know several ways how you can make spectacular and expressive flowers from colored or even ordinary glossy paper, which means you can easily assemble a chic bouquet, make accessories for a photo shoot, or even just decorate a hall for a holiday.


Use diagrams to make a tulip or other flowers - you need to print and cut them out, and then circle them like a pattern.
Templates of leaves and petals for different flowers:


If you want to show your imagination, then try touching up finished goods with a thin brush in watercolor technique - the streaked flowers will look even more elegant and interesting.
Useful Tips
A huge number of different colors can be made from paper.
And if you consider that paper can be different types(regular, colored, thin, corrugated, etc.) then you can create an uncountable number of bouquets of different shapes and colors.
Paper flowers can be used to decorate an interior, a table, gifts, or simply give them to loved ones.
Here are some very pretty flowers that can be made with paper:

How to make paper flowers with your own hands: using a coffee filter

You will need:
Coffee Filters
Flower wire
Pliers
Watercolor.
Instead of filters, you can use corrugated paper (or any thin paper) in the shape of a circle.
1. You will need 4-8 coffee filters for one flower, depending on how lush you want each flower to be.
2. Pile up all the filters, fold them in half, again in half and again in half.
3. Cut off the edges to shape the future petals. You can trim the edges with a wavy line, for example - experiment with patterns.


4. Set aside half of the filters, and cut the other half a little more (4-5 cm) - the flower buds will look more realistic if the filters in the middle of the flower are slightly smaller.
5. Unfold all filters and place on a flat surface (small molds on top of large ones). Pierce the wire from the bottom through the center of all filters. Slide the wire halfway through, bend it, and poke it through the paper again. Leave about 5-6 mm between the two holes.


Twist the wire underneath to secure it.
6. Begin to squeeze the paper with your fingers, rolling it up and twisting it a little. Do this in turn with each filter.


7. Wrap the wire around the base of the bud.
8. Wrap green duct tape around the flower, starting from the base of the bud and ending with the end of the wire.
The filters are easy to paint and absorb paint well. Multiple colors can be used.
* You can color the filters before starting the craft or after making the flowers.
* Just dilute the watercolor in water or food coloring and dip the paper (flowers) in the paint.

Simple paper flowers

You will need:
Thin colored paper (corrugated paper can be used)
Wire
Scissors
1. Cut out three circles of different colors from colored paper - each circle has a diameter of 6 cm.
2. Cut a piece of wire 20 cm long and bend it at one end in the shape of a circle (to create a stand).

3. Cut two small circles out of yellow paper and glue them to the top and bottom of the future bud.
4. Fold all the circles and make a hole in the middle of them, thread a wire through it. At the top of the flower, make a small loop from the end of the wire.
The flower is ready. Make some of these flowers and you can decorate the holiday table with them.

Paper flower (instruction): camellia


Beautiful paper flowers: exotic Australian flowers

You will need:
Quilling strips
Colored paper and scissors (can also be used as an alternative to quilling strips)
Quilling tool or toothpick
Scissors.
1. Prepare paper quilling strips of different widths or cut these strips from colored paper.

2. To make leaves, cut them out of colored paper and bend them (see image).

3. For one flower you will need two strips - one wide and one narrow. Cut the fringe into a wide strip and glue it to the narrow one. Twist them with a toothpick or a special quilling tool, starting with a narrow strip. Glue the ends together after winding around a toothpick.

4. Straighten the petals on a wide strip. You now have a flower that you can glue to a postcard, for example.
5. Make several of these flowers in different colors, glue them and add leaves.
A bouquet of paper flowers: we use old magazines

You will need:
Scissors
Green duct tape
Old magazines

1. Find colorful pages in magazines, pluck them out and fold each page in half, and then each half to the center fold.

2. From the fold side, start cutting the fringe on the folded page, leaving 1 cm to the bottom.

3. Wrap a piece of paper around the skewer to create a bud. Secure the bud at the base with duct tape.


4. Use green duct tape to wrap around the skewer.
5. Make the bud more lush by loosening the fringe.


6. Make some of these flowers for a beautiful bouquet.

Making flowers from paper: hyacinths

You will need:
Thin or corrugated paper
Scissors
Toothpicks
Super glue or hot glue.
1. Cut thin colored paper into wide strips.
2. Cut a fringe on each strip.
3. Roll each fringe into a tube (with a toothpick).
4. Wrap the workpiece on a skewer and secure with glue.
5. Wrap the skewer with green tissue paper or green tape.
6. You can cut leaves from green paper and glue them to flowers.
Paper flowers for children (in stages): flowers in a cone

You will need:
Waffle cone
Stationery knife
PVA glue or hot glue
Scissors
Colored paper.
1. Cut a quarter circle out of colored paper to wrap the cone.
2. Wrap paper over the cone and glue the ends.

3. Make a rose or other flower out of paper. To make a rose, you need to cut out several groups of petals from paper - in each group there are about 4 petals cut out in the shape of a heart or a quarter circle.
4. Begin glueing the petals staggered around the skewer. Add some glue to the edges of the cone and glue the bud to them.

5. Cut the leaves out of green paper and glue them to the cone. To shape them, you can first wrap them around a handle or similarly shaped object.
* Any flower, artificial or natural, can be attached to the cone.


DIY paper flowers (master class): garland
You can make any flowers out of paper or fabric and glue them to a thread. Here's one of the options:

You will need:
Colored paper (preferably thin)
Scissors
Thread or thin wire
Thick thread
PVA glue or for fabric.
1. Cut rectangles out of thin colored paper and place them in groups of 5. Choose the size of the rectangle yourself. In this example, their size is 20 cm x 10 cm.
2. Fold a stack of 5 rectangles with an accordion.

3. Tie the center of the accordion with string or wire.
4. Round off the ends of the workpiece.

5. Dissolve the bud by lifting and bending, right and left, the paper accordion. Bend the paper towards the center of the bud.

6. Make a few similar details - their number should be even. Next, glue 2 pieces together to get a lush, large bud.
7. Inside each flower, apply a little glue and glue the flower to a thick thread or fishing line.

Wait for the glue to dry and you can decorate any interior with flowers.

Colored paper flowers: peonies
Peonies can be made in a similar style, only for this you will need to use large sheets paper, and cut out rectangles of different sizes from them.

You will need:
Corrugated paper of several colors
Paper clips
Wire
Scissors

Paper flowers for beginners: flowering tree branch
This is a very simple but incredibly beautiful spring craft.

You will need:
Thin paper
Scissors
Super glue or hot glue.


 Radeon Graphics Card Families Reference")


")