These days, plastic windows are very popular. This is due not only to their ease of operation, long service life, excellent noise and heat insulation properties, but also to their affordable price. However, despite all the advantages, even high-quality windows require regular maintenance, so periodically you need to invite a specialist to adjust them.
The question arises: “Is it possible to adjust plastic windows yourself?” In reality, it is not as difficult as it seems at first glance. After reading the instructions for adjusting plastic windows yourself, you will be able to correct the most common problems yourself. This way you will save both money and time.
What common problems can you repair yourself?
We suggest that you familiarize yourself with the list of the most common problems that arise during the operation of plastic windows:
- When closing, the sash rests against the frame from the side or bottom;
- The handle broke;
- The locking plates are worn or deformed;
- The handle is stuck in the “closed” position, the window frame is open and does not close;
- The sash closes normally, but is not secured by a lock, and the handle does not rotate;
- The sash does not press very tightly against the frame;
- The handle turns poorly or does not turn at all.
DIY window adjustment tools
- Hex keys (from 2.5 to 5 mm);
- Two screwdrivers (regular and Phillips);
- Pliers.
Basic aspects of adjusting PVC windows
The sashes of standard plastic windows can be adjusted in three directions - this sets the optimal location of the sashes in the frame, and also adjusts the degree of pressing of the sealing linings on either side of the sash.
Methods for adjusting fasteners, design features of individual parts and the set of tools required for adjustment may differ for PVC windows from different manufacturers, however, the basic principles set out in the instructions for adjusting plastic windows yourself are the same (see pictures).

You should look in more detail at troubleshooting methods in each specific case.
When closing, the sash rests against the frame on the bottom side
In this situation, you need to move the sash slightly up. The sequence of actions is as follows:


When closing, the sash rests against the frame on the side
In such a situation, it is necessary to move the window sash closer to the hinge posts. If the side of the sash only touches the frame at the bottom, then it is enough to move the sash closer to the lower hinge, having first unscrewed the lower adjusting bolt. (see photo).

If the side of the sash rests against the frame along the entire vertical line, it is necessary to move the window leaf closer to the upper hinge post, as shown in Fig. 3.
Wear and deformation of striker plates
To assess the technical condition of the locking bars, open the window and inspect it. As a rule, there is one locking plate on each side of the window casement. If you find wear on any of the strips, this will indicate that the sash is not positioned correctly in the frame. To correct this defect, you need to open the window, remove the plastic covers from the adjusting screws, which are located on the lower and upper hinges, and, using a 4 mm hexagon, unscrew the screws slightly.
Then, by tightening the adjusting bolt, adjust the position of the upper part of the window sash. First you need to make a horizontal alignment relative to the frame, after which you need to use the bottom screw to adjust the “up-down” shift. Achieving high accuracy is not at all difficult. Tightening the screws little by little, open and close the window until it seems to you that the sash fits smoothly and without pressure into the frame.
The sash does not press very tightly against the frame
A system of eccentrics located at the side end of the window frame allows you to adjust the tightness of pressing the sash to the frame. Regardless of certain design features of eccentrics in windows from different manufacturers, their operating principle is the same.

Using pliers or a hex wrench, it is easy to set the required degree of pressing of the window frame to the frame. When adjusting plastic windows for the winter yourself, it is recommended to increase the pressing force, and in the summer, on the contrary, to weaken it. When you need to adjust the force of pressing the sash against the frame from the side of the hinge posts, turn the adjusting bolt located on the bottom hinge in the desired direction (see photo).

For tilt-and-turn windows, it is possible to set the desired pressing force on the sash using the adjusting screw located on the top hinge post (see photo below). First, open the sash, then press the lock (see photo of the lock below) and lock the handle in the ventilation position. If you need to adjust the sash closer to the frame, then turn the screw clockwise, otherwise do the opposite.

Certain types of fittings can only be adjusted using the strikers located on the side of the handle (see photo - a). To increase the force of pressing the window sash to the frame, use a hex key to move the sash in the direction of the street. In addition, there are clamping elements on the frame on the side of the hinge posts, which can also be adjusted with a hexagon (see photo - b, c).

The handle is stuck in the “closed” position, while the sash is open and does not close
To prevent damage to certain parts of the fittings, the handle should be turned only when the sash is completely closed. To avoid accidental turning of the handle when the sash is open, the design includes auxiliary locks, which are located just below the handle at the end of the sash. From different manufacturers they may have certain design differences (see photo). Before unlocking the handle, press the lock.

The sash closes completely, but the handle does not turn
This means that the clutch of the latch with the response mechanism located in the frame does not work. There are two options to solve this problem.
- 1. Having unscrewed the adjusting screw under the lower hinge, slightly move the sash towards the counter part of the lock.
- 2. Slightly loosen the fastening, insert some rigid plate between the counter part of the blocker and the frame. Choose the thickness of the plate based on the current situation.
There are situations when the window does not close at all (for example, if it opens in two directions at the same time).
Handle breakage
To install a new handle, you need to pull out the pressure panel and turn it 90° (see photo). Then, unscrew the screws, remove the broken handle, install another one and return the cover to its original position.

Very difficult to turn the handle
Most often this occurs due to lack of lubrication. To avoid such troubles, it is enough to lubricate the fittings once a year either with machine oil or with special aerosol compounds. It is important to note that it is necessary to monitor the technical condition and lubricate the fittings at least once a year, even in the absence of obvious faults.
To properly adjust PVC windows you must:
- Regularly check the condition of rubber seals, and if they are worn, replace them in a timely manner;
- When removing plastic plugs, extreme care must be taken. These parts are very fragile, so it is important not to deform them during preventive or repair measures;
- If there is deformation of the frame or the window opening itself, it is unlikely that you will be able to make the adjustment yourself.
If you feel that even after studying the instructions for adjusting plastic windows, you are unable to work independently, you should call experienced professionals. Then you can rest assured that everything will be done correctly, and no further rework will be required. It will also be useful to watch a video that explains in detail how to adjust a PVC window with your own hands.
Adjusting plastic balcony doors
The design of fasteners in PVC doorways makes it possible to adjust the position of the door in three directions:
- vertical (the height of the door relative to the doorway changes);
- horizontal (the gap between the door and hinge posts is adjusted at the top, bottom or along the entire vertical);
- frontal (adjusts the tightness of the door to the rubber seals of the doorway).
To get to the adjustment screws, you need to open the door and remove the decorative panel from the hinges (here you will need a 3mm hex key). So that you can adjust the plastic balcony doors yourself, we will consider the correct sequence of actions in each of the above options.
Horizontal
The horizontal movement of the door (to the hinge post and back) is controlled by an adjusting screw, which is located under the decorative plug. When, when closing, the door touches the frame on the latch side in the middle or along the entire vertical, the screws must be turned clockwise 1-2 circles in each of the three hinges.
In the case where the lower edge of the door leaf farthest from the hinges clings to the threshold, turn the screws only in the upper and middle hinge posts.
Vertical
The vertical adjustment screw allows you to move the door leaf up (turn clockwise) and down (counterclockwise). This adjustment is necessary when the lower door leaf rubs against the threshold when opening or closing, or if defects appear on the upper or lower seals during normal closing.
To turn the above adjustment screws, you will need a 5 mm hex key. A similar 2.5-mm hexagon, as well as a flat-head screwdriver, will be needed to adjust the location of the top and bottom doorway trims. And using a Phillips screwdriver, the main locking plates are adjusted.
Frontal adjustment of the door in the opening is made in the same way as adjusting the pressing of window sashes to the frame.
Adjusting plastic windows yourself video
When making your windows, after some time drafts will appear, or the sash will begin to cling to the frame when opened or will begin to close poorly. All this means that windows need to be adjusted. This procedure is also performed when transferring them to the winter or summer position. To adjust metal-plastic windows, you only need a hex key.
Adjusting window sashes.
In order to adjust the window sashes, you need to figure out where to move them. Take a simple pencil and trace the entire perimeter of the sash. Then open the window and measure the distance from the line to the profile edge, as shown in Figure 1. This size should be between 6 and 8 mm. A smaller distance can cause drafts, a larger distance will cause the sash to cling to the window frame.
Picture 1
Sash height adjustment.
Adjusting plastic windows in height is not difficult. To do this, use a wrench to rotate the adjusting screw at the top of the lower canopy. Rotating clockwise will raise the sash. Accordingly, on the contrary, in order to lower the sash a little, you should turn it counterclockwise. Figure 2.
 Figure 2
Adjustment of the upper part of the sash along the plane of the window.
This type of adjustment is carried out by rotating the adjustment screw on the upper canopy. In this case, the sash moves further from the hinge or closer. If you need to pull the sash closer, you should rotate it counterclockwise. And accordingly vice versa. Figure 3.
 Figure 3
 Adjustment of the lower part of the sash along the plane of the window.
This adjustment of plastic windows is identical to that described above, only now you should pay attention to the bottom hinge. Rotating clockwise will move the sash away from the canopy and vice versa. Rotating counterclockwise will pull the sash towards the hinge. Figure 4.
 Figure 4
Converting windows to winter and summer modes.
This type of adjustment is quite complex, so it is best to entrust it to specialists. But if for some reason it is not possible to invite a traffic controller, then you can do this work yourself.
The force with which the plastic window sash is pressed is adjusted with a 4 mm hex key. In the winter season, a stronger pressure is required; in the summer, you can loosen the force a little. This allows you to additionally ventilate the room and relieve internal stress in the sealing gum.
The adjustment is performed by rotating the eccentrics of the clamps, which are located around the perimeter of the sash. They have special sockets for hex keys. To switch the window to winter operating mode, the eccentrics are set so that the larger radius is on the side of the room in the closed position of the sash. In this case, the pressure will be stronger. Figure 5.
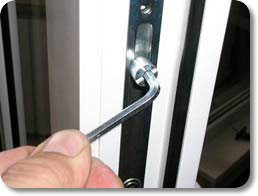 Figure 5
Switching a plastic window to summer mode is carried out in a similar way. Only the eccentrics should be installed in a position where the smaller radius faces the room when the sash is closed. In this position, the pressure is slightly weaker and a micro-ventilation effect occurs. Figure 5.
As you can see, there is nothing complicated in this procedure. Now it will become clear to everyone how to regulate plastic windows. But you should perform the work very carefully and remember each step so that, if necessary, you can return everything to its original position.
Adjusting PVC windows with your own hands is possible only after studying the basics of their design, the principles of operation of the internal mechanical system and subject to knowledge of the rules of this technological process.
PVC windows have gained very wide popularity because they are easy to use, unpretentious in maintenance, and create comfortable conditions of silence and warmth in a house or apartment. They do not require painting or the use of putty or putty, but minimal care is still required.
Windows will last longer if they are installed on time and, if necessary, preventative adjustments are made to their individual elements. To be able to independently cope with all maintenance or minor repair work, you need to know the procedure for performing certain manipulations and have the necessary tools for this.
Tools for work
You need to start the adjustment process by preparing the necessary tools. Standard set for these events:
 A simple hex wrench is the main tool for adjustment
 - Hex key with a size of 4 mm. The easiest way, if you don’t have it in your home arsenal, is to purchase such a key at a furniture fittings store: it costs – a penny, but there are a lot of benefits from it.
- Screwdriver with a set of bits. Most often, in the adjustment process, cross-shaped types of bit attachments marked TX and T are used.
- For some sections of the window, a simple shaped screwdriver with a size of 3-4 mm is suitable;
- For lubrication you will need a special WD-40 aerosol or regular machine oil, which is used for sewing machines.
- Pliers.
The main regulatory tool is still a hexagon, which is mainly used for assembling furniture, which is why the name “furniture” is assigned to it. Phillips bits on a screwdriver and screwdrivers of the same type are useful for working with bolts that secure almost all hardware elements to the profile. When adjusting sliding window options, adjustments are made distances of roller carriages, which are a fastening for a movable sash.
Pliers will be needed as an auxiliary tool when it is necessary to disassemble some parts.
Adjusting mechanisms

Adjustment of fittings is required mainly in some units that have moving elements, in which malfunctions or breakdowns sometimes occur. It is better to entrust the replacement of fittings to qualified craftsmen, and you can try to solve minor problems yourself. Spare parts for the window system can be purchased from the same manufacturers that assemble the double-glazed windows themselves.

To solve specific problems, it is worth considering various problems that arise during the operation of PVC windows, as well as preventive measures that will help to operate the system longer. The most frequently encountered problems include the following:
- The appearance of sagging of door and window sashes.
- Difficulty in moving door or window sashes.
- Broken tightness (appearance of cracks) of the double-glazed window when the sash is closed.
- Difficulties when switching a window from one mode to another.
- The need to replace individual elements of fittings when they are severely worn or damaged.
- Loose door or window handles.
- Handles jammed in any position.
- The need to replace one handle with another, for example, one with a safety lock or a built-in lock. This option is installed for safety reasons if there are small children among the residents of the house (apartment).
The basic points for adjusting the window mechanism system are:
— sashes horizontally;

- vertical sashes;

- window sash clamp;

— bottom corner of the window horizontally;

By rotating this screw, you can achieve greater pressing or distance of the lower corner of the sash towards or away from the frame.
By moving the key installed in the desired unit, depending on which direction it is turned, the sash will gradually move.
Video - Adjusting the top hinge of a plastic window
When moving the sash, turning the key one or half a turn of the screw, you need to close and open the window frame each time, checking its operation. If necessary, turn the screw back a little. It is recommended to move it gradually by one or two millimeters, so as not to accidentally damage one of the system’s mechanisms.
In addition, the fastenings, which are held on bolts with cross-shaped slots, are also subject to adjustment. Therefore, for this process you will need an appropriate screwdriver, which is sometimes used in conjunction with a hexagon. Tools will help you tighten or loosen, or slightly move one of the elements. For example, this is how they regulate:

- Trunnions, the shift of which will help strengthen or weaken the pressing force of the sash. This process is carried out by switching the double-glazed window to winter or summer mode.
Video - Adjusting the pressure level of window sashes
- Scissors system.
- Attaching the upper and lower canopy.

- Magnetic latch on the balcony door.

Video - Adjusting the bottom hinge of a PVC window
Adjusting or replacing handles
Adjustment or reinstallation of the handle may be required in various situations that can occur during operation of even the highest quality ones.
1. For example, a handle on a door or window may become loose over time, and if this problem is not addressed immediately, it may become jammed, and then it will be even more difficult to figure out. Moreover, this problem can be solved quite easily at the initial stage - it can be called the simplest operation of all adjustment work.

To eliminate this drawback you will need a Phillips screwdriver, which is used to tighten the fasteners. Any handle on double-glazed windows is installed on a masonry that has a top plastic cover, under which the mounting bolts are hidden. To get to them, the cover is turned 90 degrees, and then the bolts are tightened using a Phillips screwdriver. The cover turns easily enough, so do not pry it off with a screwdriver or other sharp tool. This may damage the plastic frame or the lid itself, making it difficult to close or open in the future.
2. Another case that will require intervention in the glass unit mechanism is replacing the handle with a more advanced model that has a safety lock.
This precaution is necessary if there is a small child living in the apartment, who can easily open a regular double-glazed window handle. This is extremely dangerous if the apartment is located above the first floor. The protective mechanism installed on the handle will not allow this to happen.

The process of reinstalling this element is also quite simple. As in the first situation, the top cover turns on the masonry, revealing the fastenings. Then the bolts are unscrewed, the handle swings a little from side to side and is removed.
Then, a new handle with a safety lock is installed. It is important to install it in the same position as the previous one was installed. The handle is fixed to the bolts and the system is checked for functionality. At the end of the work, the decorative cover is put in place.
3. Another one quite common situation when the handle is difficult to turn, or does not reach the desired level when turning it.
Solving this problem is a more difficult task, since this situation has several causes.
- It is possible that the turning mechanism of the handle requires cleaning and lubrication if the window has been in use for more than one year.
- It may be that the clamping mechanism is set in an awkward position or is too tight, in which case it should be loosened. In this case, the same processes that have already been mentioned above are applied - the trunnions are adjusted, and the frame adjustment bolts are adjusted on the spring hinges.
4. It also happens that a window cannot be opened because the handle is jammed in one position. There is also a way out of this situation. The reason for this phenomenon is the incorrect operation or failure of the lock, which does not make it possible to change the position of the handle in the open position of the window. In order to correct the situation, you need to manually move the locking lever, and the handle will still turn freely.

The lever is located on the accessible end side of the sash and is a metal plate, which, when the window is open, is moved at a certain angle from the sealing rubber and attached to the end in such a way that it can move.
When carrying out this manipulation, you do not need to unscrew the bolts or remove the handle.
Prices for fittings for PVC windows
Accessories for PVC windows
Lubrication of PVC window mechanisms
Not many people know that some unpleasant situations that lead to the need for adjustment arise due to the fact that the moving components and mechanisms of the window located inside the frame were not lubricated in a timely manner.
If PVC windows are used for several years, especially if they are installed in houses located near roads with heavy traffic, then the mechanisms become clogged with dust, which, when mixed with lubricant, turns into dirt. This substance not only makes it difficult for the doors to move smoothly when opening them, as well as to turn the handle. Such a “paste” has a pronounced abrasive effect, which means that the rubbing mechanisms quickly wear out, begin to creak, and then may completely become unusable. In addition, dust deteriorates the rubber seals that ensure tightness, and the windows lose their positive qualities, which means they will have to be replaced over time.
Therefore, it is necessary to periodically clean the mechanisms and replace the lubricant in them, as well as treat the rubber seals so that they do not lose their elasticity. Such processing of all necessary components is carried out at least once a year, but it is better to carry them out immediately after the end of winter, as well as before the onset of cold weather.

For preventive measures, you can use technical oils, which are used to lubricate moving mechanisms. For example, machine oil used for sewing machines may be suitable. In addition, silicone-based lubricant is sometimes used. Special products are also on sale for treating rubber seals and lubricating moving mechanisms. They are produced in plastic bottles with nozzles convenient for lubrication, as well as in cylinders.
The processing process includes the following technological stages:
- All window sashes are opened and inspected.
- Then all visible fittings are wiped with a soft cloth, since fresh lubricant must be applied to a dry and clean surface. To clean inaccessible tissue areas, brushes or a sponge are used.
- The next step is to apply lubricants to the fasteners, latches, bolts, and the rotating mechanism of the handle.

- It is recommended to use a product produced in cylinders for lubrication, since by spraying the lubricant can penetrate into the most inaccessible corners of the mechanisms.
- If formulations from bottles are used for lubrication, then it is necessary to apply 2-4 drops to each part, and then let the mechanism work, closing and opening the shutters, as well as turning the handle to different positions.
- Rubber seals are treated with a compound specially designed for rubber, which will maintain it in an elastic state, preventing it from drying out.
- For preventive maintenance, you should not use oils that are not intended for the maintenance of mechanisms, for example, herbal or cosmetic ones.
- It is very important to carry out all lubrication procedures at the same time - this moment will enhance the overall preventive effect.
If you do not forget to carry out lubrication work on time, then all elements of double-glazed windows will serve uninterruptedly for quite a long time.
The mechanisms in PVC windows from all companies are practically identical, therefore the adjustments are carried out for the most part in the same way. The manufacturer usually provides a description of its products and instructions for its use on its website. Therefore, you can always refer to this information if any difficulties arise.
Having prepared the tools and lubricants, you can move on to work that needs to be done without haste, thoroughly understanding the design. If you approach the process responsibly, then it is quite possible to carry it out yourself, and it will not take much time.
Find out, and also consider the causes and solutions, from our new article.
Video - Activities to prepare PVC windows for winter
PVC windows are found in many houses and apartments, as they are easy to use, protect against drafts and have an aesthetically attractive appearance. It is important to know, how to adjust plastic windows, if you want them to last a long time. This can be done if you follow the instructions and use a special tool.
The most common breakdowns are:
- when closing the sash, the side and bottom parts come into contact with the frame;
- the need to replace the locking bar;
- poor fit of the sash;
- poor turn of the handle;
- failure or blocking of the window handle;
- open sash with locked mode and open window;
- a closed sash, with the window unlocked and the handle not working.
How to properly adjust plastic windows yourself
To adjust window fittings you need:
- special hexagon with a diameter of 4 millimeters;
- "stars";
- pliers;
- screwdrivers of 2 types (phillips, flat).
All plastic window sashes are adjustable on three sides. This makes it possible to achieve the desired position around the perimeter, in the sash, and also helps to strengthen the fit of the seal. There are many methods for adjusting the operation of fittings and elements of plastic windows, so you can choose the most optimal one for yourself.

If, when closing a plastic window, the sash comes into contact with the bottom of the frame, the sash is directed upward towards the hinge. The sash swings open to make adjustments. From left to right, a hexagon is used to turn the screw, which is located at the end of the sash next to the top hinge, several turns (3 - 4). To adjust the fittings of a plastic window vertically, the sash must be closed. The protective cap is removed from the loop located below. Make 3-4 turns with the hexagon from left to right.
If the sash touches the frame when closing from the side, the sash must be moved towards the hinges. The side part of the sash, when it touches the bottom of the frame, is moved with a screw for adjustment to the hinge from below. Horizontal adjustment of the fittings is needed when the side of the sash is in contact with the frame; in this case, it moves up towards the hinge.

When the wear of the slats is checked, the window is opened and an inspection is carried out. A common option is to place the plank around the perimeter on all sides. When any strip wears out, an unevenness in the fit of the window sash appears. To correct this, the sash is opened, the caps are removed from the top and bottom bolts for adjustment, and the bolts are loosened. The screw adjusts the position of the window from above. Left and right, lower and upper position are adjustable.
At the end of the sash on the handle side there is a system of eccentrics (regulators). It regulates the degree of fit of the sash. The type of systems depends on the company of the installed window; the principle of operation is always the same.
Watch the video: How to adjust plastic windows yourself
When adjusting the pins, the eccentrics are turned with a hexagon. They help in adjusting the degree of contact between the frame and the sash. In hot weather, the fit of the valves should be weakened, and in the cold season - strengthened. The screw in the bottom hinge adjusts the degree of contact between the window sash and the hinges.
The hinge at the top is used to adjust the touch on both the tilt and swing sash. The bolt is located on the scissors near the top hinge. The window sash opens. A special lock is pressed. The handle needs to be ventilated. To ensure a tight fit of the sash, the bolt rotates from left to right. The fittings can be adjusted near the handle.

To ensure a good fit of the sash, the bar is shifted towards the street. The frame has mechanisms for pressing (on the hinge side), which allow you to adjust the fittings with a hexagon. The degree of contact of the sash depends entirely on the degree of extension of the tongue.
Useful video: Do-it-yourself adjustment of metal-plastic windows and doors
To prevent the mechanisms from deteriorating, the handle moves when the window is closed. To protect against the movement of handles in the open position of the window, window blockers are provided. They are located at the end of the sash under the handle. The window lock must be pressed before releasing the lock.
If the sash is in the closed position, and the window cannot be closed, the handle does not move, the lock requires adjustment. The sash is moved with a screw under the hinge from below towards the window blocker. The fastening is made weaker; a metal plate is inserted between the blocker and the frame.
If the handle is broken, it requires replacement. To do this, carefully pull the pad back and move it 90 degrees. The screws are unscrewed. The broken handle is removed. Another handle is installed. The cover is attached.
A common problem with the handle turning poorly is poor or complete lack of lubrication in the fittings. To avoid this problem, the mechanism is coated with any aerosol lubricant once a year. During the inspection, we must not forget to inspect the rubber seals.
It is quite possible to do all the adjustment work yourself if you put in a little effort. If in doubt, you can call a specialist and reduce the time, but spend money. How to adjust plastic windows yourself We suggest you look at the tutorial video. Try to do the housework yourself, then you can save your budget.
HideModern plastic windows are made using simple and reliable metal fittings, which for many years perform their functions without problems even in the factory state. However, for greater comfort, sometimes it is necessary to adjust the plastic windows yourself - for example, to better retain heat in the room in winter.
Another possible need is repair of the moving parts of the window during active use. The handle becomes loose, jams and requires replacement, the doors stop opening smoothly and effortlessly; in addition, from time to time they shift and begin to touch the frame. How to repair or adjust a plastic window without calling a specialist?
Necessary tool
It is not at all necessary to spend money on turning to professionals to fix it - repair and adjustment of these structures do not even require special tools. Here's what you need to prepare:
- hexagon with a diameter of 4 mm - also used for adjusting bicycles;
- screwdriver with attachments - T, TX (star, for some window models), Phillips;
- pliers;
- WD-40 or machine oil.
Main adjustment points
Adjustment is made at four main points:
- Bottom hinge - for adjusting the position of the sash vertically and horizontally.
- “Scissors” at the top hinge - to adjust the tilt angle of the sash.
- Eccentrics along the entire perimeter of the sash - to adjust the pressing force against the frame.
- Pen.
Adjusting the pressure of the sash to the frame
Working with windows has a number of tasks, but most often it requires adjustment for the winter, which consists of adjusting the force of pressing the window sash to the frame. This adjustment is made by changing the position of the trunnions, or eccentrics, which come in two types depending on the window model:
- oval - adjusted by hand or pliers;
- round - adjustable using a hexagon.
These parts are built into grooves into which, when the handle is turned, the strikers enter, cling to the eccentrics and press the sash against the frame. Depending on the type of fittings, do-it-yourself euro-window repair And involves adjusting either the trunnions or the counter hooks.

The eccentrics have three positions:
- exactly in the center of the groove - standard clamp;
- to the right of center - weak pressure;
- to the left of center - strong pressure.
You need to use all three positions, since the double-glazed windows need to be adjusted several times a year - in winter, press harder, in summer - less.
If you leave the trunnions in one position for a long time, this will lead to deformation of the seal, and in the future the adjustment will no longer protect against blowing.

If there is air blowing from the hinge side, the awnings should be adjusted. This is done like this:
- a plastic cap is removed from the bottom hinge, under which there are several bolts - tightening it perpendicular to the frame will increase the pressing force of the sash;
- The scissors are adjusted from above - for this, the same pin is used as on the sash.
Adjusting the sash position
Sometimes installation includes adjusting the position of the sash in the horizontal and vertical planes. The structure deviates from its standard position due to damage to the moving parts due to the window being open for a long time or due to careless handling of the mechanisms.

Setting the tilt angle of the sash during ventilation
The plastic window handle has 4 positions, two of which are tilting the upper part of the sash. Turning the handle all the way up is the maximum recline; positioning it between the horizontal and vertical positions is a micro-ventilation mode, useful in severe frosts.
In some cases it is absent - the window reclines exactly the same distance as with full ventilation. Adjusting windows for winter involves changing this distance. To adjust the degree of pressure on the upper part of the sash, a pin on scissors is used.
This is done this way:
- The window opens in ventilation mode.
- If there is no access to the scissors in this position, you should open the window in two modes at once - fully open and ventilate. Sometimes a blocker prevents you from doing this - you can disable it by pressing the metal tab on the handle mechanism.
- When the scissors open, an eccentric will be visible on them - the same as for adjusting the sash pressure. Tightening it with a hexagon will reduce the tilt angle, loosening it will increase it.
When the adjustment of the plastic window fittings with your own hands is completed, the sash returns to its original position.

Correcting the vertical position
The displacement of the sash in the vertical plane affects the convenience of opening and closing the window - the sash begins to touch the frame, and you have to forcefully lift it or press it down.
The vertical position of the sash is adjusted using a bolt on the bottom hinge. This is done like this:
- The plastic cap is removed from the canopy.
- On top of the metal part of the hinge there is a hex bolt that runs parallel to the frame. Loosening it moves the sash down, tensioning it lifts the structure.
- If the window or balcony door is large and wide (from 100 cm), metal closers are used to facilitate closing. Along with adjusting the bolt in the lower hinge, this structural part must also be adjusted.

Shift of the sash in the horizontal plane
How to adjust in horizontal axis? For this, both canopies are used - a loop at the bottom and scissors at the top.
- To adjust from below, you need to remove the plastic protection from the hinge and tighten the side bolt running parallel to the frame. It can be accessed both from the side of the slope and from the inside, from the side of the sash. Tensioning the bolt will move the sash to the right, loosening it will move it to the left.
- To adjust the position of the sash from above, you do not need to fully straighten the scissors. You should open the window and find a recessed hex bolt on the inner end of the sash - it is located near the upper edge of the structure. Its weakening and tension in the same way affects the position of the sash.
Remember that such adjustment is carried out only in the open position of the sash, otherwise the mechanisms can be damaged.
Handle repair and adjustment
Active use of the window, constant impact on its main mechanism - the handle - leads to various types of breakdowns. In such cases, calling a specialist is not required, since adjusting the handle on a plastic window is very simple.
Loosening
If the handle becomes loose, just tighten the two bolts hidden under the plastic decorative cover. To dismantle it, no tool is required - just pull the handle towards you and turn the part 90 degrees. The bolts are tightened with a Phillips screwdriver, then the fittings are returned to place.
Jamming
If the handle turns with force or does not move into standard positions, the cause is usually clogging of the mechanisms. In this case, you should unscrew the handle and clean all moving parts of the structure with WD-40 aerosol. After this, the window is lubricated with machine oil.

Adjusting the plastic window handle
In addition, the reason for poor window functioning is sometimes:
- incorrect position of the plastic window sashes - do-it-yourself repair and adjustment in this case consists of changing their position using a hex key, as described above;
- if the handle does not fit well into the “closed” position, this indicates that the sash is being pressed too hard against the frame - it is necessary to adjust the trunnions around the entire perimeter, loosening them a little.
Jamming
The handle getting stuck in one position is a consequence of the locking mechanism. It is necessary so as not to break the fittings - the metal locking tongue prevents, for example, opening a window when it is in ventilation mode. However, the blocker sometimes works at the wrong moment, preventing you from closing the window. This happens due to improper handling - too sudden a change in the position of the handle.
Adjusting the handle of the plastic window in this case depends on the manufacturer of the fittings:
- The lock is disabled as follows: the sash opens, there is a metal plate near the handle, which you need to press on and turn the handle in any direction.
- Maco et al. There is a steel tongue underneath the handle that sticks out at an angle when in lock mode. You need to press it, placing it in the “parallel to the frame” position, and change the position of the handle.
Replacement
If the standard handle is damaged or it needs to be replaced with a locking mechanism, you can install a new part yourself. This is done very simply:
- The plastic protection is removed from the old handle.
- Two cross bolts are unscrewed.
- A new handle is installed and screwed on.
Such installation and repair of plastic window fittings does not take much time, and a new part can be found in any hardware store.
Thus, everyone can cope with the work, since you can adjust plastic windows with your own hands quickly and without the use of complex tools.


 All about the variety of projects")


")


