Router guide
The devices that will be discussed do not just make it convenient working with a hand router, but turn it into a universal machine that both professionals and amateurs can only dream of. Many devices can work as part of your other tool, for example, a circular saw or a jigsaw.
More experienced specialists who are already well acquainted with the capabilities of hand-held milling machines may find it more interesting to look at an example of the practical use of a hand-held router in a separate article dedicated to it.
Guide rails for hand router
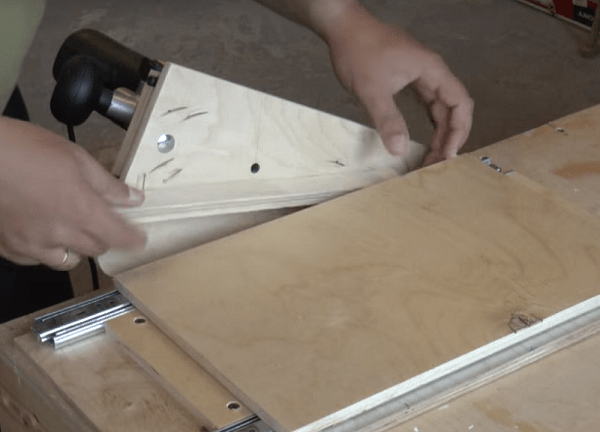
Guide bars not only make it easier to control the router, but also ensure precision machining. They are quite unique systems. As can be seen from the large photograph of this article, they can be used in combination with various hand-held power tools, are easily extended in length, complemented by other devices, and can even be of a specialized nature, for example, as a guide rail for milling holes in furniture making.

The guide rail provides high precision when processing furniture boards. It guides the router easily and directly with its rip fence.
Guide bars and a number of other devices not only improve the quality of processing, but also make it simple and convenient. The accuracy of dimensions and their reproducibility on any number of processed parts simply amazes even experienced craftsmen. Regardless of their purpose, any of them has an elastic plastic protector on the bottom, which prevents slipping on the surface being treated and damaging it.

Milling is carried out at any angle to the edge of the workpiece. The guide bar makes this operation simple. Secured with a clamp, it will never slip even from the edge of the part.
In addition, the guides can be easily installed directly on a workbench with an angle stop. In this case, guides of short length are used. Many guides are equipped with very practical equipment. Thus, a limiting tab installed on the tire fixes the boundaries of the stroke of a hand-held router. By installing it in a given position, you can easily reproduce grooves of identical size on various parts.

The limiting tab of the guide rail allows you to fix the boundaries of the grooves and reproduce them automatically on identical workpieces.
Of course, each master independently determines the priority of one or another device for his own machine, but they usually start with a guide bar and dust removal. The guide rail, as you will see later, also serves as the basic structure for installing many other devices on an electric wood router.

The protective protector of the guide bar prevents it from sliding on the material being processed and does not scratch its surface.

Long guides are used to cut drywall sheets to size.
The guides are easy to extend to the desired length. The cutter, cutting the sheets, simultaneously prepares their edges. This cutting eliminates the labor-intensive process of sealing joints: they turn out smooth and neat.
|
The guide rail can be easily mounted on a modern workbench and provides new processing capabilities. The result is profiles of any complexity with high accuracy. |
The milling work table is equipped with an angular stop. The guide rail installed on it is height adjustable. The table stand folds easily. |
The adjusting screws allow you to set the machine stop without any clearance relative to the tire. The result is clean precision milling and no surface chipping. |


A high level of reproducibility of complex grooves is ensured by the guide rail. Making this classic carpentry joint takes a lot of skill and makes it fun.
Specialized guides for hand router
Furniture joints with tenons do not lose their importance among furniture makers and carpenters. It is inexcusable if it takes a long time to make one connection and the accuracy is not ensured. The tenoning attachment we bring to your attention is a whole template system.

The 500 mm long template system provides three types of connections for wooden parts: finger, dovetail and dowel.
For each type, its own cutters are recommended. The template system is equipped with three guide templates: 1 - dovetail (end tenon cutters), 2 - finger connection (groove cutters), 3 - dowel connection (drills for dowels). This is what a complete tenoning kit looks like.
The photographs of the console show the set of templates themselves and the results of their application. In many countries, furniture boards are produced with ready-made rows of “32” holes, which allows anyone to easily and quickly manufacture (or rather, assemble) entire furniture walls, even based solely on their own ideas.

Guide for step-by-step milling of furniture holes
according to the “32” system. It simplifies the assembly of furniture.
While our manufacturers of furniture boards have not yet mastered this rational system, we suggest using the FS-LR 32 attachment for milling machines and carrying out this modification of the boards yourself. As a rule, it is supplied already fully assembled.

The usually complex and labor-intensive production of drawer joints is turned into a simple operation thanks to the template system. Three templates – three types of connections and speed in their production.
A guide for cutting drywall with a milling machine is necessary for professionals involved in the construction of partitions. It is assembled from individual elements and can be extended to the required length. For drywall you will also need an appropriate cutter.
The template and copying ring allow you to make flush-mounted grooves. Milling holes - for furniture handles becomes convenient. These devices show the best results when working with a milling machine with electronic speed control.
Devices for step-by-step drilling of holes. A specialized guide is mounted on it: 1 - board for installing the milling machine on the guide; 2 - side stop with upper limiter; 3 - upper limiter.
Using the proposed equipment, the support-copy rings can be easily changed and adjusted in height. All adjustments are made with a screwdriver.

Using a compass, you can easily mill along a radius. It allows you to work with a radius of 50 - 1300 mm. You can make such a device yourself. Don't forget the metric scale.
Devices for copying and reproducing identical parts
An angle lever and a set of tracing probes are needed to produce a series of identical parts. There is a scale on the angular lever (division value is 1/10 mm). This allows the thrust ring to be centered under the cutter. When copying, the shape of the part is accurately reproduced by a cutter on a new workpiece. The angle arm can be equipped with a support plate and chip guard. This combination will ensure perfect edge processing.
But copying with a template and a copying ring allows you to professionally cut grooves into furniture or mill holes for handles in drawers.
A very simple and extremely necessary device for a milling machine is a compass. The most suitable material for it is transparent plexiglass. A precise metric scale is printed on its surface. Some models provide a circumference of up to 1.5 m. With this device, any round tabletop is not a problem. By the way, it’s easy to make it yourself.
Copying on the workpiece is provided by an angle lever with a precise adjustment scale and a set of copying probes. You have the opportunity to center the thrust ring exactly under the cutter. The angle arm, complemented by the support plate, also enables advanced edge milling. Complete set of angle lever: set of copying probes, support plate, chip protection.
Dust removal units for routers
To organize dust removal, professionals purchase a suction unit (technical vacuum cleaner), which is connected directly to the router with a flexible hose via an adapter. The hose does not interfere with operating the machine, and the very place where the part is processed and its markings will always be open for visual inspection.

Dust removal is a top priority for any milling machine. And for this it is not at all necessary to buy an expensive dust extraction unit. Effective dust extraction can be achieved using a conventional vacuum cleaner.
It is simply impossible to work with a milling machine without dust removal. For those who like it, making such a purchase is burdensome in terms of money, and it is not always justified due to the work that is rarely performed. But there is a solution for them too, how to eliminate dust using a powerful household vacuum cleaner. A hermetically sealed tank is connected between the vacuum cleaner and the tool, which will catch the bulk of the dust. It is equipped with an additional hose, and the inside is separated by a fine fabric mesh, which traps dust in the tank. Such tanks can be purchased ready-made or made independently. We draw attention to the fundamental arrangement of hoses in it, separated by a mesh. For an amateur, this option will allow him to localize the bulk of dust from milling. A homemade dust collector allows a household vacuum cleaner to effectively collect not only wood dust, but also large construction debris.
By the way, one of the previous articles already talked about the most common power tool. It's hard to believe, but a drill can be adapted for pumping liquids and even mixing cement mortars.
And in conclusion, as always, several videos about working with a manual wood router, clearly demonstrating the capabilities of the router, which were discussed in this article.
The use of various devices for a manual router significantly expands the capabilities of this unit, and also increases the comfort and safety when working with it. There are ready-made models of devices on sale that are designed for use in conjunction with a router, but, as a rule, they are expensive. Therefore, many craftsmen prefer to make accessories for this unit with their own hands.
If you attach a hand router in a special way under the table, you will get a universal carpentry machine that allows you to accurately and quickly process long and short pieces of wood. To make a table for a router with your own hands, you first need to prepare the necessary parts to assemble the entire structure. The figure below shows a cutting map on which all the details of the future milling table are located. They are cut using a circular saw or format cutting machine.
The device can be made made of plywood, chipboard or MDF. The cutting card indicates a material thickness of 19 mm, but this is not a prerequisite. The table can also be assembled from slabs with a thickness of 16 or 18 mm. Of course, to make a countertop it is better to use laminated or plastic-coated sheet materials, which will allow the workpiece to easily slide across the surface.
It should also be noted that this homemade table is intended for installation on trestles. If you need a tabletop option, then the drawers (5) need to be made much wider than 150 mm. Their width should be slightly larger than the height of the device so that it can fit under the countertop.
If the table parts are cut from plywood or MDF, then their ends should be sanded. The ends of parts made from laminated chipboard will need to be covered with a melamine edge using an ordinary iron.
Making a countertop
Installation of the router into the table can be done either with or without the use of a mounting plate. Preparing the countertop for direct mounting to it the unit occurs as follows.

Fixing the unit with a mounting plate
When installing the device on the main plate, its thickness significantly reduces the overhang of the cutter. Therefore, to install the unit on thick countertops, it is customary to use thinner mounting plates made of durable materials (steel, duralumin, polycarbonate, getinax or fiberglass). The plate is made as follows.

Improvement of the stop
The parallel fence can be modified to make setting up the milling table more convenient and quick: to do this, you need to cut C-shaped guides into the tabletop. The profile can be made of aluminum. A straight groove cutter is used for tapping. The profile is placed in the prepared groove and screwed in place.


Next, you should select bolts with a hex head of such a size that it can fit into the C-shaped profile and not rotate in it. Drill 2 holes in the base of the rip fence to match the diameter of the bolt.

You should also cut a C-shaped profile into the front stop bar to attach various clamps and protective covers to it.

The stop is screwed to the tabletop using wing nuts.

On the back side of the stop you can make chamber for connecting a vacuum cleaner. To do this, just cut a square out of plywood, drill a hole in it for the vacuum cleaner pipe and screw the resulting cover to the gussets.

You can also add to the stop safety shield, made of MDF or laminated chipboard and a small rectangle of plexiglass. To select grooves, you can use a jigsaw or a router with a groove cutter installed.

To be able to process small parts, it is necessary to make clamps and clamps from plywood or MDF.

It is made on a circular saw with a pitch between cuts of 2 mm.

If desired, you can make a milling table with tool boxes.

Making the table base
If you need to make a stationary machine from a manual milling machine, then you cannot do without making a solid base. Below is a cutting map with the parts marked on it that will be required to assemble the table base. The dimensions of the parts will need to be adjusted if you use sheet material of a different thickness.


All parts of the table for a manual router are assembled using confirmations. To make it easier to move the table, rollers can be attached to its bottom. If you expand this table a little and attach a circular hand saw in its free part, you will get universal table for router and circular saw.

To make the machine take up less space, it can be made according to the principle of a table-book with tabletops lowering on both sides.

Homemade tools for a router
To expand the functionality of this unit, quite expensive accessories are available for sale. But in order to save money, owners of milling cutters try to make various devices with their own hands that work no worse than factory ones.
A simple tenon cutter for a router is made from two pieces of plywood and a pair of furniture telescopic guides. The milling cutter is installed on a platform that has a hole for the tool. The platform is attached to the workbench at an angle (for more convenient positioning of the equipment in height), as shown in the photo below.


So, the tenoning device is made in the following order.
- Cut out 2 pieces of plywood that are the same size. The size of the device can be any.
- Place two telescopic guides parallel to each other along the edges of the first platform and fasten them with screws.

- For more precise positioning of the guides, you can screw two strips of equal length between them.

- You should extend the counter strips and place a second platform under them flush with the first. Use a pencil to place points through the bar on the second site, and then draw a line through them.
- Remove the strikers from the guides by pressing on the plastic “antennae” located on their reverse side.
- Place the strikers on the marked area so that the line passes through the center of the mounting holes, and screw them in with screws.

- Carefully align the 2 guides and slide them in (you should hear a click). If you insert a part askew, you will break the telescopes and balls will spill out of them.

- Between the vertical stop with the unit and the movable table, it is necessary keep a certain distance. This is done so that when lowering the cutter it does not touch the table platform. Since in this case the maximum overhang of the cutter will be about 25 mm, you can temporarily lay a bar of the same width, that is, 25 mm, between the table and the stop. The bar will allow you to place the structure parallel to the vertical stop
 .
. - At the next stage, holding the fixture, drill 2 holes for the dowels. They will allow you to quickly position the tenon cutter on the workbench. When the holes are ready, insert a couple of dowels into them. Now you can remove the bar placed between the stop and the device.

- Now that the movable table is fixed, a vertical stop must be installed on its upper platform, as shown in the following figure. For rigidity, the stop is supported by two gussets.

- When all tenoning elements are secured, testing can begin. Place the workpiece on the fixture table and press it against the stop. Set the required cutter height, turn on the unit and mill the workpiece.

- After the first pass, turn the workpiece 180 degrees and repeat the processing.

- Rotate the workpiece 90 degrees, placing it on the edge, and repeat the operation again.

- Rotate the part 180 degrees and finish the tenon.

As a result, you will get an even and high-quality tenon.

By changing the height of the cutter relative to the tenoning platform, you can obtain tenons of various thicknesses.
Copy sleeve
If your router did not come with a copy sleeve, then you can make one in literally 30 minutes using improvised materials. For homemade work, you will need a metal or duralumin washer, which can be made from sheet metal, and a plumbing threaded extension.

The copy sleeve is made in the following way.
- Select a nut that fits the threads of the extension and cut it with a grinder so that you get a thin ring. After this, straighten it on the sharpening machine.

- It is necessary to make a round platform for the sleeve from sheet metal or aluminum 2 mm thick. Depending on the model of the unit, the hole in its base may have different shape. In this case, the platform must have cuts on the sides, which are ground off on a sharpening machine.

- After sanding off the washer on both sides, place it on the sole of the unit.

- Place the unit vertically without removing the washer and mark with a pencil the places for fastening through the holes in the base of the unit.

- The places marked with a pencil must be marked for precise positioning of the drill.


- First, drill the holes with a thin drill bit, and then with a drill bit that matches the diameter of the mounting bolt.


- Place the washer on the threaded extension and tighten the ring nut. Clamp the part in a vice and trim the excess thread flush with the nut using a grinder.


- Clamp the part in a vice with the other side and shorten it slightly.

- Align the part on the grinding wheel, insert it into the base of the device and secure it with screws. The ring nut should be slightly below the base of the unit.


Guides for working with a router
If you need to select a very long groove in the workpiece, you will need a tool for the router, which is called a tire. Ready-made metal tires can be purchased in specialized stores. But they are also easy to make with your own hands from plastic, plywood or MDF.
The thickness of the material should be about 10 mm so that the parts can be tightened with screws.
The guide for the unit is very simple to make.
- Cut three strips on a circular saw. One wide, about 200 mm, and 2 narrow ones - 140 and 40 mm each.
- Also make a small strip from the same material, about 300 mm long and 20 mm wide.
- Place a 140 mm wide piece on a wide strip, align it along the edge and screw both pieces together with screws.
- Place a narrow strip 40 mm wide on top of the wide strip, opposite the screwed part. For precise positioning, place a 20 mm wide strip between the upper parts and screw the narrow strip to the lower part with screws. Thus, you will get a long tire with a groove 20 mm wide.
- Take a 20 mm wide strip and screw it to the base of the device, as shown in the following photo. To select a groove, select straight or shaped groove cutter and is fixed in the collet of the device.

When all the fixtures are prepared, follow these steps. Place the workpiece that needs to be processed along its entire length on the workbench, place the tire on it, securing it with clamps. Insert the strip attached to the router sole into the groove of the guide. Start the machine and mill the workpiece along its entire length.
If you need to select a deep groove, then processing occurs in several passes so that the equipment is immersed into the workpiece gradually.


Any products made from natural wood are highly valued due to their environmental friendliness and uniqueness. To create real masterpieces from such natural material with your own hands, you need to have a hand router and have the necessary skills to use it.
In addition, additional accessories for the router are also important, allowing the production of parts of any complexity exactly as they were intended by the author. Homemade devices for such woodworking tools are fairly simple designs, the execution of which does not require special skills or material resources, the main thing is to have the desire. But thanks to their use, processing a variety of parts will become much easier.
Tool table
The very first necessary device that makes it possible to conveniently work with such a hand tool is.
The simplest table design consists of a table top, which can be a sheet of chipboard or other similar material with holes for installing tools, as well as a guide that is attached to the table with clamps.
Having made ordinary legs, we get the main device for our hand tools - a table on which we can install any other devices.
Rip fence
 A similar device is often included with equipment. But there is always the opportunity to do it yourself. Why is this being done? The stop itself makes it possible to cut the material in a straight line. But it often happens that the cut needs to be made not straight, but, for example, arched.
In this case, it is advisable to make a milling stop, one of the sides of which will be straight, and the other will repeat the shape of the part. In this case, it will be possible to cut wood in different ways. Each master creates templates for such stops with his own hands “for himself”, depending on the purpose of using the milling machine.
Router guides

One of the main components of a manual wood carving machine is its guides. You can make them yourself from ordinary bars.
If one guide is used, it must be tightly attached to the base on which all necessary work will be carried out. To make the entire structure more reliable, while eliminating the possibility of the template shifting, it can be additionally secured with side stops.
If you use such a device for a manual machine, which we made with our own hands, you can always make additional grooves in several products.
Homemade guides are:
- T-shaped;
- On hinges, can be folded like a book;
- L-shaped.
The guides, which look like skis, are quite convenient to use. They can be used with any type of hand router, making work with wooden workpieces as precise and clean as possible.
Devices for processing bodies of revolution
 If, when working with such a machine, you have to process certain bodies of rotation, for example, balusters, pillars, and the like, then in this case the process of processing them with a manual milling cutter will become much easier when using another device. It consists of:
- housings;
- a movable carriage on which the tool itself is installed;
- disks with which you can set the required angle of rotation;
- screws that securely fasten the workpieces.
Using such a device, the products will rotate slowly, which will make the processing process more convenient. Thus, you can make a device with your own hands that will become a full-fledged replacement for a lathe.
Compasses

Such devices for a manual milling machine ensure its movement along the required circle. The design of a self-made compass is very simple, it consists of a main part - a rod, which is attached at one end to the base of the tool, and a secondary part - a screw, which is inserted into the hole of a hand router.
A compass with two rods is more efficient in use. By making it from some transparent material, for example, plexiglass, a metric scale can be applied to the surface of the device, which will make its use even more convenient.
Using an angular lever with a scale, copying is carried out on the workpiece being processed. In this case, it will be possible to center the ring on the cutter with your own hands during work. The angle arm with support plate will ensure precise processing of the edges of the part. The design of such a device for working with hand tools consists of a set of probes, a support plate, and protection from chips.
Small extras
Usually, the set of the hand tool itself contains some minor devices that make it easy and convenient to work with parts of non-standard shape. You can always make such devices yourself or slightly improve existing ones to suit your needs and requirements.
Copy rings. Such accessories are ordinary round plates that determine the movement of the device along the workpiece that is installed on a table or other base. The diameter of such rings is selected depending on the diameter of the cutters.
The diameter of the template will also depend on the selected ring. They are selected in inverse proportion - if the diameter of the cutter is larger than the diameter of the ring, then the template is smaller than the finished product, and vice versa.
Devices for working with a manual machine on narrow surfaces will not allow the router to move to the sides, passing exactly in the center of the products.
Devices for creating spikes. Such accessories are most often used in the manufacture of furniture to create connecting tenons on parts.
The functionality of milling equipment can be significantly expanded by using special devices. Serial accessories that can be found on sale are quite expensive. That is why many craftsmen decide to make accessories for a wood router with their own hands. Most of the manufactured elements are intended for the correct placement of hand tools in space. In addition, devices for can significantly increase processing accuracy. Some instruments come with accessories out of the box. However, they are not highly specialized equipment and are often not suitable for the assigned tasks. Let's take a closer look at the most common equipment.
Rip fence
A rip fence can be used to make straight and curved cuts. This device is very popular today and is included in the supply of many tools. This milling device includes several structural elements:
- Guides, made in the form of rods for niches formed in the body of the wood router.
- A locking screw is used to fix the device in the desired position.
- A screw designed for precise spacing between the axis and the surface of the workpiece.
- Contact jaws. They are required so that the router stop rests on the surface.
The side support for the router is suitable for a wide variety of work. You can prepare it for work as follows:
- As previously noted, at the base of the wood fixture there are holes designed to accommodate the rod. It is inserted into them and fixed in the required position with a locking screw.
- After fixing the device, the locking screw is slightly loosened, and the position of the stop is changed using the adjustment tool.
Knowing the design features of the device, you can make it yourself. To do this you will need bars and metal elements, as well as screws. There are quite a large number of different models of rip fences on sale, which are selected directly to the characteristics of the router designed for working with wood workpieces.
Guide rail
When processing wood, it is important to control the position of the tool used. The guide rail, like the previous equipment, is designed to ensure the movement of the router along a strictly straight path. All wood milling fixtures are made so that they can be used for certain jobs. The salient features of this device are as follows:
- Guides for a manual router can be located at any angle relative to the edge being processed. Due to this, the device ensures accurate movement of the tool in any direction within the horizontal plane.
- Plywood is often processed with a milling cutter in order to obtain holes that are located relative to each other at a certain pitch. The design under consideration may have additional elements that make it possible to obtain holes with the specified parameters.
- To fix the device, a special clamp for a milling machine is used. If the delivery package does not include clamps, they can be replaced with ordinary clamps.
- Some models come with a special adapter for the router table.

The simplest homemade design can be made from a long beam, which will be attached to the workpiece using clamps. To make it comfortable to use, you can equip the beam with additional side supports.
The above proposal is not always convenient to use. The following homemade design is more popular:
- The device is represented by a combination of two boards, which are located parallel to each other and a plywood sheet.
- The design in question is used only if milling cutters of the same diameter are used.
- By using two boards, the processing accuracy and stability of the template during milling are significantly increased.
In cases where cutters of different diameters are used, it is advisable to use a slightly different design. It is characterized by the presence of a folding board, which is attached using hinges. The purpose of this structural element is to fix the template. After fixing it, the board tilts back and you can use cutters of various diameters.
It is worth considering that clamps are used in almost all cases to fasten homemade templates.
They provide reliable fixation of the equipment. During operation, the fixture will be pressed against the surface of the template, due to which the accuracy of processing is ensured.
Compass for router
When doing work in a home workshop, you may often need tools for a hand router that make it easier to mill a round surface. An example is a special compass, which you can make for a router with your own hands. The main recommendations for carrying out the work are as follows:
- To create the simplest design, you will need: a bolt with a nut, a small piece of plywood, a few self-tapping screws and a wooden lamb. In manufacturing, the router itself is used, as well as a saw with a screwdriver.
- On the surface of the piece of plywood used, a platform is marked with a width of about 50 mm and a length of 150 mm. Note that the width should be greater than the router platform, the length greater than the processing radius.
- After marking the working part of the site, holes should be made for the mounting bolts. You can drill with a percussion, the diameter of the resulting holes should be 20-30 mm.
- A through groove is created along the center line. Its width should be less than the width of the axle bolt.
- On the reverse side of the platform being created, a recess is created for the nut with a washer, the second nut is fastened in a wooden lamb.
- The central axis is being assembled. As a hairpin, you can use a bolt of the required length, from which a hat is sawn off.
After creating a homemade compass, it is attached to the router and you can check the device in operation.
Copy ring
A variety of accessories for a hand router can significantly simplify the process of processing various workpieces. A copy ring for a router is a kind of product that acts as a side. During work, the ring slides along the template used, setting the position of the wood router. Machine versions can be manufactured using a wide variety of materials. In this case, various fastening mechanisms are created:
- Screw.
- In the form of a threaded hole.
- When using special antennae.
It is worth considering that the rings used must have a diameter close to that of the router. However, during processing it should not touch the ring, as this will damage the cutting tool.

The copy ring can also be fastened using commonly used clamps. In the manufacture of rings, steel is used, designed for applying force. Soft alloys are not used due to the fact that they can be deformed, and this will lead to serious errors.
Templates for the router
Templates have become very widespread. They are manufactured for the production of specific products. That is why the question of how to make a template for a router with your own hands has become quite widespread.
The milling template is characterized by the following features:
- Some versions are designed for milling a workpiece along a straight contour, others at an angle or rounded shape. A template is often used for milling rounded corners of various radii.
- Some models of the equipment in question are equipped with rings or bearings. They are suitable for hand routers. If a ring is used, it must be taken into account that it must not come into contact with the installed cutting tool during the milling of the workpiece.
- Creating grooves of unusual shape can be called a rather difficult task. Recently, the milling of grooves is carried out using the equipment in question. For example, you can quickly make a stencil for wood carving with a router or to create a groove that fits the door hinges.
Templates for a DIY router are often made of wood. This choice can be attributed to the fact that such a material is characterized by a high degree of machinability. That is why it is much easier to get patterns on a tree with a manual milling cutter, since the template will completely repeat the geometry.
On sale you can find a variety of templates, for example, . However, almost all craftsmen are faced with the fact that they have to create a similar product with their own hands in the manufacture of unique parts for furniture or other products.
Wood bits
Depending on the complexity of the work being carried out, the equipment of a wood router may vary significantly. An example is the case when the task is to mill grooves on narrow surfaces. Standard attachments for milling machines in this case may be less effective, and then special attachments are used.

The key features of the nozzles used include the following points:
- when using special nozzles, treatment will be carried out in a strictly limited area. That is why it is possible to significantly improve the quality of the resulting grooves.
- The design is represented by a base, which can have a wide variety of shapes.
- There are two pins on the base. They ensure the straight-line movement of the cutter during processing of the workpiece.
When considering attachments intended for wood processing, it should be taken into account that the main requirement for their design is that the guide pins be located in line with the center of the cutter used. If this condition is met, the groove will be located strictly in the center of the end surface.

In conclusion, we note that the design of most of the equipment is quite simple, and therefore it can be made with your own hands while spending a small amount of money and time. However, some design options are difficult to manufacture, and the quality of processing largely depends on their accuracy of execution. That is why it is better to make some products yourself, while others can be purchased at a specialized store. Recently, universal designs have become increasingly common, which are more expensive, but are suitable for use in processing a wide variety of products.
Nowadays it is very difficult to imagine any plumbing activity without the use of a router. But not so long ago, people made grooves, made three-dimensional figures using a plane, chisel and hacksaw. In modern times, various milling devices, including those made independently, are becoming increasingly popular. Do-it-yourself templates for a router make it easier to control the mechanism and help process surfaces as accurately and accurately as possible.
Such a device is necessary where you need to make a hole, smooth the edge of a product, or cut out a three-dimensional shape. Milling is used when cutting out ornaments, patterns, and preparing niches for installing corners, locking mechanisms, and hinges. This tool allows you to remove a chamfer and round the edge of any part. According to its characteristics, the router resembles the actions of a plane.
This processing device works with wood, plastic and aluminum. However, each case requires the installation of specified speed limits and appropriate equipment. Despite the active use of a router, such attributes of construction significance as a chisel, hacksaw, and cutter are still used in work. The use of templates for these installations is often associated with furniture making.
Making a homemade furniture template

Any employee of a furniture organization knows perfectly well how difficult it is to make a corner kitchen. Installing the countertop requires precise joints, rounding the leading edge and flattening other parts. It is known that a flat edge, placed in the form of a rounded beginning, will acquire an unattractive appearance with a noticeable rough seam. To ensure that the cutting is carried out correctly and accurately, a milling device and a specially made template for furniture are used. Creating such samples yourself is not so difficult.
The main devices, without which installation will be impossible, will be:
- fiberboard sheet;
- manual milling mechanism;
- blueprints.
Return to contents
Step-by-step production of a template for furniture

Furniture parts cut according to a template have the same shape and size.
- Such a template, made by yourself, will perform its functions no worse than one purchased in a store. To create it, you need to prepare a drawing and a cover for the processing machine. Then a test homemade product is made from a fiberboard sheet; its thickness is equal to 8 mm.
- Next, the diameter of the cutter and the machine itself is measured. Then 2 intersecting lines are drawn, the angle of which is 135°. To smooth out these indicators, an arc is taken. To calculate its radius, you should find out similar readings for the cutter and rings. The resulting difference in the radii of the rings and cutters should be subtracted from the value of the first device.
- This creates an internal arc. The flat end of the postforming is milled along its base. As the ring moves along a given radius, the cutter describes an arc whose diameter is equal to its own.
- From the drawn segment, 2 lines are laid parallel to each other. The distance between these points is equal to the diameter of the ring of the router used. 5 mm is added to these readings. The line starts from the middle of the previous arc.
- The connection point of the segments is smoothed using an arc. Its radius corresponds to similar readings of the device’s thrust ring. During movement, the cutter will no longer be able to perform arcuate movements.
- You need to draw 2 equal rectangles that imitate the contours of the tabletop. An angle is applied to them, after which it is extended to a certain distance.
- Marking the template will make your work much easier. The arcs of the top and bottom rows will not overlap. Therefore, it is necessary to carry out verification for each detail by slightly shifting these boundaries.

Return to contents
Templates for a hand router
- The first step is to make a template from hardboard, the thickness of which is 6 mm. The height of the MDF stencil is 12 mm. These materials are very easy to process and are in no way inferior to wood. However, their corners easily bend from accidental impacts or falls. In order for the templates to serve for a long time, it is necessary to take high quality birch. Despite its high cost, unlike MDF, it has greater strength and consistency of characteristics.

The boundaries of the parts are drawn on the surface of the template in compliance with natural proportions. Then the starting grooves are drilled, the unnecessary material is cut with a jigsaw, keeping an indent of 1 mm near the contour line. The edges of the edge are carefully polished, the paper stencil is removed.
- Using a template, a given number of parts is created. Then this element is placed on the product and outlined with a pencil. Unnecessary material is cut out, moving away from the contour by 1.5 mm. Similar actions are carried out with other blanks.
- Using fabric-based double-sided tape, the template is fixed to one of the products. In order for the work to proceed as quickly as possible, you should insert a cutter with a bearing on the shank into the machine collet. This part rolls along the edge of the stencil.
- Then you need to select the type of cutter. All varieties with bearings are used for milling according to templates; the device is held in the hand and installed on the surface. Using a copying cutter, the operation of the machine is monitored at the moment when the part moves along the table, the template is located on top.
- The space between the tip and the shank does not need to be machined with a bearing cutter in one pass. This can be done in 2-3 times using a cheaper version of the cutter. Milling is carried out by aligning the bearing with the middle part of the stencil thickness.
- A thrust rod device is placed close to the cutter. The machine turns on, the part is pressed against this part and gradually moves towards the rotating cutter until the bearing comes into contact with the template. Milling of external contours is carried out counterclockwise, internal contours - in the opposite direction. At the moment the cutter bearing comes into contact with the template, the part is removed from the rod stop device.
The copying device at the shank functions similarly, however, it is necessary to rotate the part so that the stencil faces the table surface. Milling is carried out similarly to a table. During the manipulation process, it is important to monitor the integrity of the base of the workbench.
Return to contents
Wedge templates for hand router

You can make a template in the form of spikes or wedges on your own. This compound is elegant and is most often used in furniture production. And there, as you know, high build quality is required. Using such primitive devices as a saw and a chisel in work, one cannot do without some experience in the construction industry, which cannot be said about a hand router. It allows even beginners to carry out the given work.
How to connect templates for a router so that it clearly marks the wedges on all workpieces? To do this, you can use a manual machine with decent characteristics. The ring must be the right size for the machine, otherwise it must be purchased.
A partially hidden wedge-shaped device can be seen on one side. The end-to-end connection can be traced from both points. To combine the two parts, the light element is installed strictly vertically. Periodically, the interdental space of the template is cleaned of sawdust. Upon completion of the work, existing roughness must be treated with emery cloth.


 Gold leaf application")


