A universal selection of gift ideas for any occasion and occasion. Surprise your friends and loved ones! ;)
Hello dear readers and visitors! I have already written many times that I really love to decorate gifts in the most unexpected ways. And today I suggest you make paper flowers with your own hands. As many as twenty-odd methods, by the way.
Now, unfortunately, I rarely get to the mass packaging of gifts. Moreover, every year more and more acquaintances and friends appear, who should be congratulated along with their relatives. This is very joyful! I love giving presents. But if I choose them very carefully, then I have been packing them in organza bags lately, since I decide on detailed packaging only for single holidays (like a birthday).
However, it is difficult to defeat my passion for all kinds of packaging beauty, so today I will train with you to make beautiful flowers according to step-by-step schemes.
DIY paper flowers: simple and with a hitch
There will be a bunch of master classes, get ready. Good news for all rose lovers: there will be as many as 4 roses.
Aster
Guys, honestly, I'm not very good at naming colors. So if you see an obvious discrepancy for you - write in the comments.
So, the first in line is the aster. For her, cut out five circles: two large, two medium and one very small. Fold each circle in half three times, then arrange the edge as in the 4th photo. After unfolding the structure, squeeze each petal to add volume. Fold all circles into each other and decorate the middle.
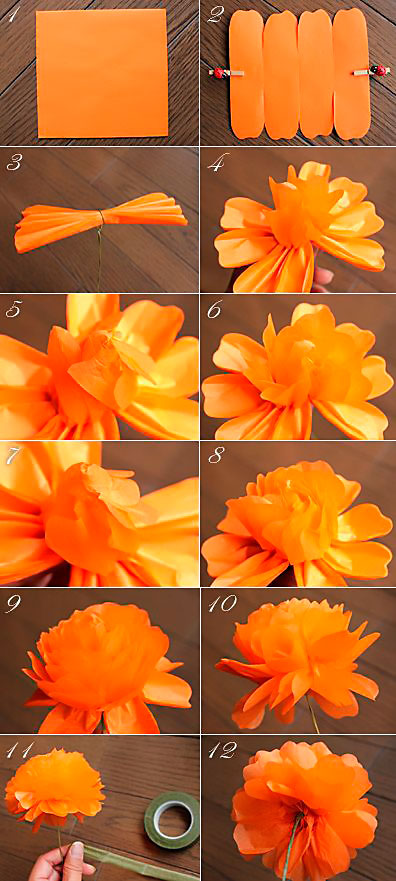
Almost calendula
This flower looks much more like a packing bow. Prepare a square of paper for it of the desired length and cut the edges according to step 2. You will need several such blanks. Lay them one on top of the other and squeeze in the center, pulling them together with a wire or thread.
Now the most important thing is to spread the petals so that you get a beautiful semblance of a flower. Accordingly, the more layers, the more petals and the more magnificent the flower as a result.
Tip: make several of these flowers of different sizes and glue them on the package next to each other, then you get a beautiful semblance of a bouquet.
Calla
To create calla lilies, you can use both ordinary double-sided paper and foamed rubber (I wrote what it is in the section about the minion).
For calla lilies, take a stamen (you can crumple it out of paper or mold it out of polymer clay) and a petal made in the shape of a heart. Place the stamen in the petal, fold the edges of the petal over the stamen, gluing together. It remains only to unscrew the edges to get the maximum resemblance to calla lilies.
Such flowers are well suited for decorating postcards, and for decorating packaging, and as an independent gift in the form of a bouquet.

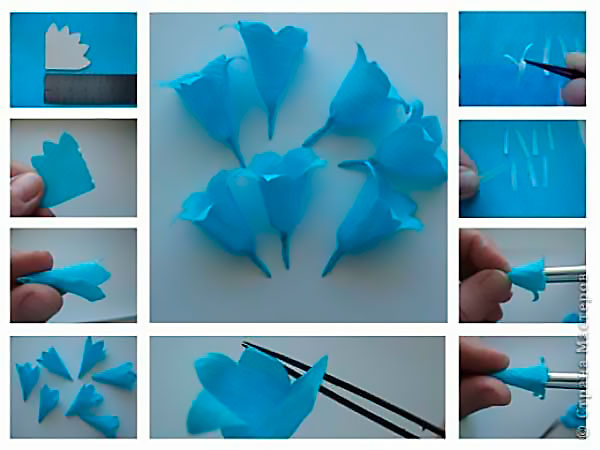
Bell
The bell master class is very simple and straightforward. Cut out the workpiece according to the first photo. Glue the edges of it, and gently straighten the ends. To make everything look natural, make the middle of several oblong stamens, which will need to be glued inside the flower.
By the way, it will be great to make a decoration of packaging for March 8 or just a spring birthday from such bells.
Lilies of the valley
Well, or something similar. For one flower, take a long rectangle and peel back the edge of it, as in the photo. Cut the wide part so that you get many small stripes. Using scissors, twist the stripes (for this you just need to run the sharp side of the scissors along these stripes, slightly pressing the blade against them).
To prevent the flower from falling apart, take a rod around which wind a green strip. Then from above, begin to gently twist the "flower" part, previously coated with glue. Lay the layers tightly so that no greenery appears from under them.
But it is not at all difficult to make green leaves - for them, simply fold a rectangle of green paper with an accordion and cut off the edges with a "triangle". When unfolded, you get a lot of green leaves ready to be glued to the base.

Poppy
Now we use corrugated paper. Cut out about ten teardrop-shaped petals from it. Stretch the wide part so that the blanks resemble mushrooms.
Take a thin wire and wrap some paper around it - this will be the core. Wind the petals onto this core so that each slightly overlaps the previous one. When everything is ready, the structure can be pulled down at the bottom so that it does not disintegrate.
The master class shows how this flower can be attached to a festive cap, but believe me, a poppy will look great on a gift box.

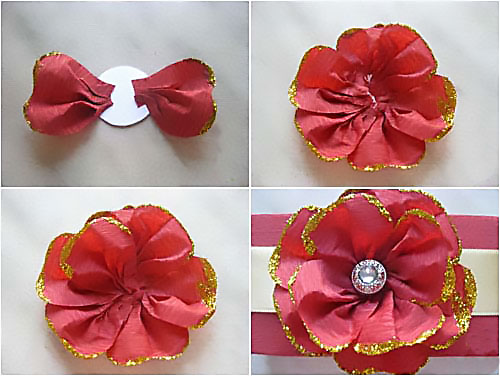
Red flower
What is his species affiliation? No associations came to mind. But this is not the point - to create it you need about ten petals (by the way, corrugated paper is used). Their shape is almost teardrop-shaped. but with a cut end.
Cut a base circle out of thick cardboard. Glue all the petals in layers to this circle, slightly crushing (doubting? God, how is it right: _D) the bases, thus forming folds - then the flower will be more voluminous and "fluffy". Decorate the center with a button or bead.
Such a flower, by the way, will look great from soft felt - so it will gain durability. And if you attach the base for the brooch on the back, then you get two in one - the decoration of the gift and the gift itself.
Extravaganza of color
There are only two flowers here, but due to the bright combinations, a very unusual effect is obtained. Take the crepe paper again, cut out a circle and fold it into a "doll" shape. Cut a "skirt" to it, which you wrap around the doll. Attach the petals on top, gluing them in a circle. Glue two wide leaves at the base.
The second flower is quite simple - cut the fringe and twist it in several layers. The flowers are very simple, they can make a very interesting gift arrangement.
Unseen flower
To prepare the base for this flower, I advise you to look here - here for the second Christmas tree, the base is created in the same way. But then the differences begin - each of the corners must be wrapped with a thick wire or knitting needle so that a spiral is obtained.
You can leave such a structure alone, but I suggest that you connect several (say, three) pieces using the existing spirals - the wow effect is ensured. Then you can also experiment - connect elements with spirals into unprecedented structures.
Tip: Going to a Japanese-style party? Then make such a flower of a very large size and take it with you - it will serve as an excellent decoration for the chandelier.

Pion
“Pio-, pio-, peonies are given by a new acquaintance ...” - words from the song of the underground group “My Michelle” (lately I have often listened to it, inspired by it). We will be making from corrugated paper. You will need five sizes of petals, about five copies of each (appearance as in the photo).
Stretch the petals so that you get a semblance of a wave (for both large and small). Then, from the same corrugated paper, form a stamen by rolling the paper with further compaction. You can do this with a wire skewer, or without it.
Glue the petals on the finished stamen, overlapping each subsequent previous one. Do not pull the petal too tightly. In the end, all that remains is to cut the green leaves and stick them around the peony.

4 in 1: dandelion, carnation, aster, chamomile
All these wonderful creations of nature are made according to the same principle - cutting the edge of the strip, from which the flower will be made. The final shape of the flower also depends on the shape of the cut. Keep in mind that some require a core, while others do not.
Please note: despite the very simple design, the flowers are very realistic. If the production time is very short, then this is ideal.
Experiment and discover your unprecedented plants - be sure to tell us what happened.

Roses made of paper
Magic roses are some of my favorite flowers
Rose with twisted edge
The main difficulty here is to carefully twist the edge of the corrugated paper, straightening the folds. Make sure that the folds are even. Now twist the strip so that the layers fit snugly against each other. At the end, fasten with a thread, cut off the excess.

Simple rosette
Need to make a plant in five minutes? Then this rose is for you! Just cut out a circle in which to draw a spiral. Cut out the spiral as in the photo and twist the rose, starting from the longest link of the spiral (the central part will serve as the base).

Big rose
Even gigantic, if you follow exactly this size. Heart petals stretch and overlap each other in a circle with glue fixing. At the end, green petals are attached. Of course, the flower does not have to be made as large as in the photo - start from your preferences.
Twisted paper rose
Once I have already described this way of creating a rose (here is the second). The principle is exactly the same, but the dimensions of the triangles obtained by twisting must be the same along the entire length of the ribbon, otherwise the flower will not be very neat.
Once she even made a Rosemary doll, which took part in the city exhibition. Her whole body was covered with roses made just in this way (the roses were from ribbons, really).

Clover
I will only show you how to make the base for the four leaf clover. To do this, take a square of paper and fold it in half lengthwise and in half again. Bend the ends towards the center. Cut a heart out of the resulting design. The result will be exactly what we wanted - a happy flower.

Nameless
No matter how puffed up I was, I could not give an intelligible name. As a result, the friend remained just a beautiful flower, reminiscent of the motives of kanzashi (the Japanese art of making jewelry from satin ribbons).
The beginning here is the same as in clover. But after folding the edges, you will need to bend the ends so that the length of the bent part is equal to the length of the visible side in the middle. Then these parts are straightened and their edges are already bent so that the sides are even. They are bent again and glued together to form three stamens. There should be three such petals.
Most of all, such a flower is suitable for decorating a gift in the Japanese style.

And again aster
This time, you already need to glue the petals along the edge until you reach the desired volume. Decorate the center as you wish, or simply fill in as many petals as possible.

On this I declare a large flower review closed. I hope you have found exactly the option that will help you decorate your gift the coolest. See you soon, subscribe and share with your friends!
Best regards, Anastasia Skoreeva
Almost everyone loves flowers. They serve both as decoration and ideal as a gift. But, what if, for one reason or another, you cannot have fresh flowers in your house? And the soul asks for beauty and strives for comfort ... Then my simple and useful advice can help you. I will show you how to make a paper flower with your own hands.
Of course, you can easily buy fake flowers at the store. However, trust me, self-created, they will bring more joy. 🙂
I will offer you not too simple, but also not very complicated options for paper flowers.
How to make a daffodil flower out of paper
This flower is quite simple to make. You will need: a sheet of white, yellow and green paper, scissors, glue, a ruler, a pencil, a thin brush (for twisting the petals), medium-thick wire, beads.
On a white sheet, draw several squares with a side of 5 cm. Cut out. From the middle of each side to the center we measure 2 cm. Draw lines. We make incisions. 
These are the blanks. For each daffodil, you need two of these squares.
Take a thin brush or pencil and wind opposite petals, as shown in the next two pictures - 3 and 4.

We do the same with the two remaining petals.
We make a blank from the next square.
The petals overlap each other in the manner shown in fig. 6.

We will make the middle out of yellow paper. To do this, cut off the rectangle and fold it in half. The resulting double-sided strip is folded with an accordion (Fig. 7). We glue our middle to the center of the future flower (Fig. 8).
We make a puncture in the center with a wire and secure the end with a bead (Fig. 9). Cut the green paper strips to create the stem. We wrap the wire with them (Fig. 10).

We fold the green leaf in half, glue it, draw a leaf for our flower. Cut out and attach to the finished stem (Fig. 11-12).
Our daffodil is ready.
How to make a star flower out of paper
To make this flower, take a sheet of A4 colored paper, any color you like, scissors and glue. To decorate and give the flower shine and charm, you can use finely chopped Christmas tree rain, beads, rhinestones, pebbles, etc.

Cut the sheet into 6 squares. These will be the blanks for our petals.


It turns out just such a rhombus (Fig. 3). Fold the upper triangular parts in half, even along the lower edge of the figure (Fig. 4-5).
We straighten these turns (Fig. 5) so that the lower edge is in the middle of the resulting figures (Fig. 5-6-7).

We bend the sharp tops towards ourselves (Fig. 8). The result is triangles turned upside down with an acute angle (Fig. 9). We also fold them in half (Fig. 10-11).

Glue the finished figure with the sides indicated by arrows (Fig. 11). We do the same with the remaining 5 squares. The resulting cones are petals for a flower (Fig. 12).
We smear the center of each cone with glue and dip in finely chopped rain or sparkles (fig. 13). We glue all the cones together (fig. 14).

For even more charm, you can decorate your flower with rhinestones, sequins or beads. Get creative.
I have got such flowers (fig. 15).
How to make a volumetric multi-colored flower out of paper
For this flower, you will need the same materials as in the previous version, as well as cardboard and compasses. You can take double-sided paper and then your flower will be even brighter than mine.

Take several colored sheets and cut into squares from them.
Roll each square with a cone-shaped tube.
You should have a lot of colorful cones. Their number and size will depend only on how large and voluminous you want to make the flower.

Draw a circle on the cardboard. Cut it out. The size of the circle also depends on the size of the flower. In my opinion, you do not need to make it too big, as the flower will turn out to be huge and it will take a long time to create it.
So, the circle was cut out. We begin to make the first ball of petals.
We take the cones of the color we need and glue them next to each other along the bottom of the circle (Fig. 1).

We decorate to your liking. I pasted metal strasses on each petal, and transparent beads on one row. Inside the top ball and in the center, I inserted black mother-of-pearl beads.

And here's what I did.

Making paper flowers is a great way to express yourself. There are a huge number of models, from the simplest to very complex ones.
Try it and you will create your own masterpieces. We showed you several ways to make a paper flower. As you have seen, they are not overly complicated. Get your little ones involved. Such an activity has a good effect on the development of imagination and artistic taste, and also fosters accuracy and perseverance in children. By the way, you don't have to limit yourself to creating paper flowers. For example, boys can create, or. And girls -.
Remember the main thing - flowers created by your hands are especially valuable and expensive, because a piece of your soul and heart is embedded in them.
Be creative! Create! Imagine! Let your life be filled with beauty! Well, in conclusion, the traditional question: do you think, in sufficient detail and in an accessible manner, we talked about how to make a flower out of paper, or is not everything clear? Or maybe you know more interesting and easier ways? Or tell us about others? Share in the comments.
Do you need to complement the interior of the house or please your loved ones? Paper flowers will perfectly cope with this, which will be able to decorate your hearth for a long time and will never fade.
This decor element can be used to decorate both a banquet table and a living room; it will also be a pleasant addition to a gift.

Let's look at popular examples of making paper flowers and consider a photo of paper flowers.

Flowers from coffee filters
To do this, you will need:
- Colored aluminum wire.
- Paints.
- New coffee filters.
- Pliers.

If you do not have coffee filters at hand, corrugated paper in the shape of a circle will come to your rescue.
- To create one copy, you need to take about 5-10 filter sheets, depending on how voluminous the paper flower you want to make.
- Gather all the pieces of paper and fold them in half several times.
- The edges of the filter can be wavy cut to add similarity to real colors.
- Then, we divide the filters into two halves, those that will be the upper ones are shortened by 2-3 cm, so the bud will be more realistic.
- Fold all the cut sheets on the table, so that the smaller ones are on top. We pierce the centers of all filters with a wire. We stretch it halfway, bend it and again pierce the filters at a distance of 5 mm.
- We fix the wire by twisting it.
- We twist and squeeze each "petal". We do these maneuvers with each sheet.
- To prevent the bud from disintegrating, we wrap the base with the remains of the wire.
- We hide the wire behind the green adhesive tape.
It is not difficult to paint the filters, as they are perfectly saturated with paint. To color the flowers, simply pour any food coloring into the water and soak the bud in it. Your product is ready.

Paper rose
Would need:
- Bamboo sticks.
- A thread.
- Corrugated paper (red, pink or yellow).
- Green adhesive tape.

The complexity of this design is to beautifully and neatly wrap the edges of the corrugated paper, while straightening the folds, making them even.

We twist the strip so that the tiers are tightly leaning against each other. Then we string the bud on a bamboo stick, fasten it with a thread, winding it around.

Optionally, wrap the bamboo stick with adhesive tape. We make several roses out of paper to collect a lush bouquet.
Asters from old magazines
For this you need:
- Bamboo sticks for decorative items (green can be used).
- Glue stick.
- Unnecessary magazines.
- Small scissors.
- Green adhesive tape.

Cut out the brightest and most colorful pages from the magazine. Then we bend them in half, and the halves towards the center. We start cutting the fringe where the folds begin, while leaving 10 mm to the base.

Then we wrap a bamboo stick with the resulting colored strip, and fix the base with adhesive tape. We make the bud voluminous by loosening the fringe. Wrap the stick completely with duct tape. We repeat the manipulations with each flower.
Corrugated hyacinths
To make this kind of corrugated paper flower, you will need:
- Bamboo sticks or skewers.
- Glue stick, hot glue.
- Corrugated paper.
- Food grade toothpicks.
- Scissors.

We cut several colored strips of paper. We make a border on each strip.

We wind the resulting border on a toothpick, make a kind of serpentine.

We make buds and wrap them on sticks and fasten with glue. We wrap the "stem" with green adhesive tape, cut out the leaves if possible and fasten them.
Note!

Calla with own hands
You will need:
- Double-sided colored paper.
- Stamen (made from polymer clay).
- Wire.
- Hot glue.

We cut out a heart from paper, put a homemade stamen into it. Glue the edges of the heart over the stamen.

We wrap the edges to make the calla more realistic.

Flowers of this style are suitable for decorating a gift, postcard, and a bouquet of such flowers will delight every girl with its beauty.

Paper peonies
For a lush peony you will need:
- Corrugated paper of different colors.
- Scissors.
- Sticks.
- Paper clips.

Stages of work:
Note!

- We cut pieces of paper in different colors. We make an "accordion" out of them. We do this with each color.
- We make it so that each previous strip is 5-6mm shorter than the next.
- We make the corners of each "accordion" triangular.
- Find the middle of the strip and fold them together.
- With the help of aluminum wire we connect all the "accordions" in the middle.
- Fold back the edges to form petals.
- We attach the buds to the sticks.

Paper poppy
You will need:
- Thin corrugated paper.
- Bamboo sticks.
- A thread.
- Green duct tape.

Cut into approximately 10 teardrop-shaped petals. Stretch the folds so that each petal looks like a fungus.

We wind a small amount of paper on bamboo sticks - the core. We attach the main petals on top of the core. We wrap the resulting bud with a thread. We mask the sticks with adhesive tape.

DIY photo of paper flowers


Note!


Paper flowers can be used for interior decoration, decor and even as a gift! Let's try to learn how to make volumetric paper flowers with our own hands, see examples and photos of beautiful finished works, and also watch a master class for beginners.
Simple products
The easiest way to make flowers is from colored paper - it can be corrugated or ordinary, and if you plan to make strictly decorative flowers, you can take paper with a mother-of-pearl or metallic effect. Do not make a tulip or a rose as your first experiment - try something very, very simple for a start.Decorative crafts

In order to make simple and spectacular flowers you will need:
- double-sided colored paper (corrugated paper is also suitable);
- thin wire;
- sharp scissors and a marking pencil.
For beginners, the easiest way is to do the following: fold colored paper several times so that you get a stack of squares of about 6 * 6. Then, with a pencil, mark on the upper square with a pencil the shape of future buds - it can be a smooth rounded shape, regular circles, or in general what your imagination tells you.
Then, with scissors, you need to carefully cut the stack in the shape of the marked sepal and disassemble it into its components - for each flower you need three to five blanks. The wire must be cut into pieces of about 15-25 centimeters, twisted on one side so that a decorative center is obtained, then the previously obtained "petals" are put on each wire, after which a stand is made in the lower part of the wire (a stable ring is twisted).
You can decorate a table for a holiday with such crafts, or use them for a photo shoot or interior decor, or you can simply attach them to the wall in the nursery or in the hall near the mirror - a good mood is guaranteed.
Or here's a simple option:


From what is at hand
For the manufacture of these products, old magazines or newspapers are used. Thus, you can make large flowers out of paper - the technique is simple, and paper crafts are quite effective.
What you need:
- unnecessary magazines (absolutely any);
- green sticky tape;
- sharp scissors;
- large barbecue skewers;
- paper glue or regular hot melt glue.
 By the way, these recommendations can be used for beginners too - they are done quite easily. If you want to make such flowers with children, then make sure that they have safe scissors, or cut the fringe yourself.

Decorative flower garlands
Do you want to make gorgeous garlands? Use giant paper flowers for them. By the way, making paper flowers with your own hands for garlands is very simple - you only need beautiful spectacular paper and a little skill. You will not need any patterns of flowers for cutting, or schemes, the main task of such large products is to look bright, unusual and attractive, large paper flowers do not have to be realistic.
What you need:
- scissors;
- corrugated paper of two or three colors (it is better to take bright and light);
- thread or fishing line;
- stapler or glue.
The size of the rectangles is chosen independently, you just need to remember that the flowers will be of the same diameter as the rectangle along the narrow side.
Each stack is collected in an accordion (look at the photo how to make flowers from such accordions, if the description is not too clear).

Each accordion of five sheets of paper must be stapled in the center with a stapler or glued with a paper ring. It is best to round the edges of the accordion - cut something like a petal.
Now each blank needs to be turned into a bud - straighten the buds from the accordions you made. The accordions need to be straightened in different directions, and you will see how you get beautiful flowers out of paper in just a few seconds.
Then cut the line or thread to the desired length and string the buds - your garland is ready.


Another version of the garland:

Bouquets for decoration
Do you want to make a bouquet of flowers out of paper? See the photo:Want to learn how to make a tulip? Watch the video and below for step-by-step photos of how to make tulips in different ways.
Useful information and a few step-by-step workshops
At the very end of the article, download color schemes and templates for cutting. By the way, if you want to make origami out of paper, then it is best to use special double-sided paper.Watch a detailed master class on how to make flowers and plants using the origami technique from paper - this is not only interesting, but also quite difficult, so do not wait for perfectly made flowers right away, you will have to try a little to get paper flowers with your own hands.
Also, flower stencils will come in handy if you will make large paper flowers of complex shapes - it is more convenient to collect the same tulip or rose from a special shape of petals.

Try to make large paper ones - just collect a huge rosebud from this master class (see below for a photo of how to make flowers lush and beautiful).
Here are the large color templates for paper cutting:

And here are the step-by-step photos:
How to make flowers for children? Try to minimize any risks - for example, keep children away from adult scissors, prepare the wire beforehand, and make sure the children are disciplined.
Learn how to make paper flowers with your own hands using coffee filters or napkins - a thin and fragile napkin looks almost like a real petal, you just need to shape it and collect the bud.
This video explains how to make a paper flower for beginners.
A few inspiring photos - see how beautifully you can decorate your holiday with camellias or roses.

Try to make voluminous flowers out of paper with your own hands using cardboard or thick paper - even a child can handle this technique.

Another option for a simple flower:

Leaf templates:


Learn how to make paper flowers master class on paper soaking technique - such items look almost like real ones!
Now you know several ways how you can make spectacular and expressive flowers from colored or even ordinary glossy paper, which means you can easily assemble a chic bouquet, make accessories for a photo shoot, or even just decorate a hall for a holiday.


Use diagrams to make a tulip or other flowers - you need to print and cut them, and then circle them like a pattern.
Templates of leaves and petals for different flowers:


If you want to show your imagination, then try to tint the finished products with a thin brush in watercolor technique - the streaked flowers will look even more elegant and interesting.


