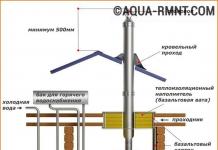
Today it is hard to imagine, but once the hearths in the houses did not have chimneys. The products of combustion were collected in the room and went outside through the portage window under the ceiling. At the end of the furnace, the hearth was extinguished and the hole was closed with a bundle of hay. Over time, stoves were improved, and special devices were created to remove smoke - chimneys. Operating experience led to the constant improvement of devices, the complexity of the structure and increased reliability. A real revolution in the design of combustion products removal systems occurred with the advent of light heat-resistant materials - thin-walled metal pipes.
Scope of tubular metal chimneys
The advantages of using such materials are in several points:
- Light weight. For chimneys, electric-welded pipes with a wall thickness of 0.5–1.5 mm are used. The total load of this design allows it to be used for all types of stoves, including metal baths, brick closed and open samples, slow burning in greenhouses and residential premises, as well as for other types of heat sources.
- Tubular devices do not require the arrangement of special supporting structures in the form of foundations.
- Long service life. For galvanized pipes, it is 10–20 years, and manufacturers of stainless steel products declare durability for 100 years. Of course, there is no actual data on this issue.
- The ease of installation of a chimney from pipes makes it easy to cope with this task even for a person with minimal skills of a home master.

The device of a steel chimney for a sauna stove is quite simple.
The limiting factor in the use of steel pipes is their cost, but this only applies to stainless pipes.
Video: what you need to know about metal chimneys
Types of steel pipes for chimneys
A specialized hardware store offers a wide range of steel pipes, which differ in purpose:

Types of chimneys
On the basis of the components used, these devices can be conditionally divided as follows:
- single;
- multilayer.
The materials used for their manufacture are particularly durable and highly corrosion resistant to acid condensate. A clean surface contributes to the complete removal of moisture and soot from the smoke channel.
Very often single pipe constructions are used. Such technical solutions are used to adapt old chimneys to new heating equipment. Pipes for them are made square, oval or round. For their production, austenitic stainless steel is used. Enamelled pipes are also produced, but they are not widely used because they are sensitive to mechanical stress.

Single chimney needs extra protection
When installing a single chimney, one should be guided by the fire safety rule, which requires a distance of at least 1 m from the nearest wall of combustible materials.
Two-layer designs have their advantages. The thermal insulation layer between the walls of such a chimney reduces the cooling of the inner pipe, resulting in less condensate. The inner pipe is made of high quality steel, since the condensate has an acid reaction and other material, including galvanized steel, will not be able to work for a long time in such conditions.

Double layer chimney already insulated
Such chimneys are placed at a distance of at least 20 cm from the walls of combustible materials. If this cannot be avoided, then the wall is sheathed with metal with a substrate. It is made from a refractory material, such as asbestos sheet.
According to the installation method, chimneys are:
- Internal. Such a design can rise vertically from the furnace through the internal ceilings and the roofing pie. Its main drawback is that condensate flows directly into the furnace, increasing its concentration in the flue gases. The result can be an unpleasant pungent smell in the room and accelerated wear of the chimney.
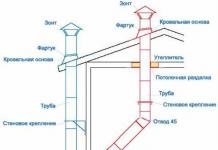
- outdoor. With this design, the chimney is removed from the furnace horizontally through the wall. For this, two knees are used, which can have an angle of rotation of 30, 45, 60 or 90 degrees. In this case, the outer one looks like a tee, and at the bottom there is a container for collecting condensate. The vertical part of the chimney is installed parallel to the wall, the pipe is attached to it with brackets and clamps.
Components
It is impossible to assemble the chimney without the use of fittings. They are designed for:
- implementation of contours of engineering systems;
- changes in the direction of the pipeline;
- transition to another diameter;
- traction adjustment;
- condensate collection;
- protect the top end from precipitation, leaves, debris and nesting birds.

Additional elements for assembling a chimney from pipes must be used
Using these structural elements, you can assemble a chimney of any configuration with your own hands. The permissible length of horizontal sections is not more than 1 m, otherwise the thrust will be greatly weakened.
Calculation of the parameters of the chimney
The basis for calculating the height and diameter of the chimney is the power indicator.
The height of the chimney directly affects the performance of the boiler or furnace. For household appliances, it is 5 m. This characteristic is provided for by the requirements of SNiP for stoves in residential buildings. The measurement is carried out from the grate of the device to the cap. At a lower height, the natural draft in the furnace will not ensure efficient combustion of the fuel, it will smoke and not produce the optimal amount of heat. However, the possibility of increasing the height is limited. Experiencing the natural resistance of the pipe walls, the air will slow down if the channel is too long, which will also lead to a decrease in thrust.
Rules for selecting the length of the chimney
For a private house, the calculation of the height of the chimney is based on certain rules:
- The pipe must be at least 5 m.
- Exceeding the end of the chimney above a conventionally flat roof by at least 50 cm.
- For a pitched roof, a pipe whose axis is not further than 1.5 m from the ridge, and if there are superstructures, then from their highest point, the excess value is 0.5 m.
- When the distance to the ridge is 1.5–3.0 m, the end of the pipe should not be lower than the level of the ridge.
- When removing the chimney at a distance of more than 3 m from the ridge, in particular, for outdoor installation, the angle between the horizon and the conditional straight line between the ridge and the end of the pipe must be at least 10 degrees.

The height of the pipe depends on its location.
When choosing a place for the chimney outlet through the roof, it should be borne in mind that it should not be near skylights and other similar devices in order to avoid creating fire hazards.
Calculation of the section of the chimney
The following procedure for determining the size of the channel is valid for a circular section. It is the optimal form, since the flue gases do not move in a monolithic straight jet, but the flow is swirled, and they move in a spiral. In rectangular channels, vortices are formed at the corners, which slow down the movement of gases. To calculate the cross section, the result should be multiplied by 1.5.
You will need the following initial data:
- Furnace power, that is, the amount of heat generated by the device per unit time at full load.
- The flue gas temperature at the outlet of the furnace is usually taken in the range of 150–200 degrees.
- The speed of movement of gases through the channel (is 2 m / s).
- Chimney height.
- The value of natural draft (is 4 MPa per 1 m of the smoke channel).
The dependence of the size of the chimney section on the volume of fuel burned is obvious.

Smoke does not move in a straight line
To perform the calculation, you need to use the converted circle area formula: D 2 \u003d 4 x S * Pi, where D is the diameter of the smoke channel, S is the cross-sectional area, Pi is the number pi equal to 3.14.
To calculate the cross-sectional area, it is necessary to determine the gas volume at the place of their exit from the furnace into the chimney. This value is calculated depending on the volume of fuel burned and is determined from the ratio V gas \u003d B x V top x (1 + t / 273) / 3600, where V gas is the volume of gases, B is the amount of fuel burned, V top is a tabular coefficient, which can be found in GOST 2127, t is the temperature of the gases at the outlet of the furnace, a value usually taken in the range of 150–200 degrees.
The cross-sectional area is determined by the ratio of the volume of passing gases to the speed of its movement, that is, according to the formula S \u003d V gas / W. In the final version, the desired value is determined by the ratio D 2 = V gas x4 / PixW.
Having made the necessary calculations, you will get the result - the diameter of the chimney should be 17 cm. This ratio is true for a furnace in which 10 kg of fuel burns per hour with a moisture content of 25%.
The calculation is made for cases when non-standard heating units are used. If the power of the device is known, it is enough to apply the parameters of the chimney recommended by specialists:
- for devices with power up to 3.5 kW - 140 x 140 mm;
- at 3.5–5.0 kW - 140 x 200 mm;
- at a power of 5.0–70 kV - 200 x 270 mm.
For chimneys of circular cross section, its area should not be less than the calculated value of a rectangular one.
Video: how to calculate a chimney for a solid fuel boiler
Materials and tools for making a chimney
Before proceeding with the purchase of parts, fasteners and tools to perform this work, you need to decide on the design of the device and complete a draft design, an integral part of which is the material sheet, which lists all the necessary details. By adding the cost of materials to this list, you will get an estimate of costs.

The device is mounted from the bottom up, that is, from the furnace to the head, for which you will need:

The list of tools is small and may look like this:
- drill with drills for concrete and wood;
- jigsaw;
- screwdriver or wrench for installing fasteners;
- plastic inserts (dowels) for mounting brackets;
- hammer.
Depending on the design of the chimney, other tools may be needed, this will become clear when drawing up a draft design.
Do-it-yourself chimney installation
The degree of readiness of the details of a metal chimney for installation is so high that its assembly is a sequential execution of a number of elementary operations that do not require any special skills or special knowledge.
The whole process might look like this:

If it is planned to pass the chimney through the ceiling and roofing cake, the same technology for protecting structures is used as for the wall.
On a pitched roof on a smoker, an umbrella is arranged to protect the opening in the roof from precipitation.

All joints of the chimney with the wall and roof must be insulated
The installation process is greatly simplified when using sandwich pipes, since the temperature on their surface is much lower than on single pipes.
It is necessary to pay attention to the design feature of the pipes for chimneys. Docking is provided by seats created during production, therefore, during installation, it is necessary to correctly orient them in space. When installing multilayer pipes, the layers of internal insulation also close.
A significant advantage of assembling steel chimneys is that no welding is involved.
Video: do-it-yourself sandwich chimney installation
Chimney insulation
This operation is performed only if single pipes were used. It is necessary to reduce the intensity of condensation and protect combustible structures from exposure to high temperatures.
Basalt wool is the best material for this purpose, since it is absolutely non-combustible and does not emit harmful fumes under fire conditions. It is also used in the manufacture of multilayer pipes.

Insulation of a metal chimney may not always be required
An insulating layer of aluminum foil must be mounted on top of the insulation, and its installation starts from the bottom up with an overlap of 10-12 cm turns. This order ensures that the joints are oriented downwards, which does not allow water to penetrate into the heat-insulating layer.
Operation features
Metal chimneys, having a lot of undoubted advantages, need increased attention both during assembly and during operation:

Chimney service
With a properly made chimney, especially if it is made of stainless steel, the main operation for caring for it is to clean the internal surface of soot.
Causes of soot formation
Combustion is the reaction of fuel oxidation with atmospheric oxygen. If it is insufficient, soot is released, adhering to the walls of the chimney. Really, the occurrence of conditions under which the smoke channel is clogged in just a few months:
- The lack of an oxidizer in the furnace can be caused by deliberately reducing the draft by manipulating the damper in order to achieve slow burning or even smoldering of the fuel, which can quickly lead to negative consequences.
- Another firebox mistake should be considered the use of raw firewood. Moisture prevents intensive combustion of the fuel, and a large amount of soot is formed.
- The use of resinous firewood, the combustion of which is accompanied by the release of soot, should be considered an unfavorable factor. Of course, it is too expensive to heat stoves with oak or ash, but you should strive to use firewood from non-resinous tree species.
- It is strictly not recommended to burn garbage in the oven, especially plastic bags or bottles for the same reasons.
- Particularly unfavorable is the use of plywood, chipboard and other materials for the manufacture of which synthetic adhesives are used for burning waste. With such fuel, clogging of the chimney with soot occurs most quickly.
Ways to clean the chimney from soot
There are several, including:

You can avoid constant fuss with soot by special preparation of firewood. To do this, you need to arrange an extensive, well-ventilated woodshed with a supply of fuel for several years, and use them only when they are well dried.
The hearth, which is designed to provide a comfortable stay in the house, will become a source of constant concern and grief if the system for removing smoke from the living space is not designed correctly and does not work well. Therefore, before starting installation work, it is recommended to carefully study all the information and prepare.
The chimney is a very important part of the design of the bath. It is in the past that the times were left when the stove was heated in black, with a special art that allowed the smoke to smoke only the walls. But with modern sauna stoves, you absolutely cannot do without a chimney: after all, it is he who removes the products of the combustion process of wood fuel due to the draft of natural origin.
It's simple: clean air enters the furnace, and gases go outside. But in the process, when you build a chimney with your own hands or install an acquired one, you will encounter considerable difficulties. And we'll help you sort it all out!
It is absolutely natural that so many bathhouse owners are looking for how to make a chimney correctly and strive to figure it out on their own - after all, such an installation in the country costs almost a thousand dollars. Therefore, if you decide to take on everything yourself - take it, just carefully read this article first.
What is a standard chimney made of?
There are many classifications of chimneys: internal and external, single-circuit and double-circuit, and ... But the most important thing, no matter what kind of chimney you want to assemble and install in your steam room, there are certain rules that you need to know.
So, some bathhouse owners who are far from construction are sure that the chimney device is quite simple and consists of only a few pipes connected in a special way. And all sorts of "extra" devices and elements really seem superfluous to them. In fact, there is nothing unnecessary in the chimney - take away a couple of elements, and problems will not keep you waiting. And therefore, studying the question of how to make a chimney correctly, we will begin by getting acquainted with its main elements and their purpose.
The ideal chimney is a strictly horizontal design. But in practice, everything often turns out to be much more complicated - the pipe goes straight, then horizontally through the wall, then straight again ... And also through the ceiling and roof. For which there are a variety of elbows, tees and branch pipes.

So what is knee? The chimney cannot always pass through the ceiling of the second floor strictly vertically - a beam, for example, can interfere with it. And it needs to be bypassed - and for this, knees with a variety of angles are used. If a horizontal pipe section comes from the furnace, then it should be mounted on an elbow or tee. If you use the knee, think about how you will clean it later, and you will have to clean it.
A more versatile version of the knee - tee, in it, unlike the first option, a cleaning element is also provided. This is a special removable glass at the bottom or its equivalent. The only rule is that the tee and pipes must fit perfectly to each other and be absolutely hermetically connected so that smoke cannot penetrate into the interior of the bath through gaps that are invisible to the eye.
Further, in order for the chimney to pass safely through the wooden covering of the second floor of the bath, an element such as pass pipe . It all looks like this: we cut a hole in the ceiling, put a pipe, isolate it well and bring the pipe out. The same is the case with the roof - a branch pipe is also used for it, only at an angle.

Used in the installation of a chimney and brackets- These are special devices that hold the pipes and they do not fall. Fix the chimney correctly with wall brackets every two meters.
And finally roof cutting - an element that allows you to tightly hold the pipe through the roof of the bath. So that neither rain nor melting snow gets into the attic or the second floor. Roof cutting should not be replaced with dubious materials, and even more so with sealant, if the bath is still sitting down - all this will eventually collapse, fall off, and sometimes, unfortunately, ignite.
Important! When purchasing a chimney and its equipment, be sure to check the certificate, and this is not the same as a simple list of what exactly the products consist of. Be careful!
We install a chimney in the bath ourselves
Why is it so important that the chimney works correctly? Firstly, combustion products can not only ruin the furniture and finishes of the steam room, but also seriously affect health.
So, any chimney installation is always made according to one of these principles:
- By smoke - when a tee is installed in the system that removes condensate
- For condensate - when such a tee is not used.
That is, from the furnace the chimney goes “through condensate”, and after the tee - “through smoke”.
Stage I. Chimney design
First of all, choose the right project for your chimney, preferably with a specialist. And the starting point should be the stove that you install in the bath - each of them has its own requirements, and each works according to its own principle.
Now carefully inspect the ceiling, note where the beams are. This way you will know whether you will get a straight chimney, or with bends and transitions. But remember that the horizontal parts always reduce traction a little, and they also accumulate soot in themselves well.

Stage II. We collect the chimney
If you are unable to assemble the pipe directly at a height, assemble it on the ground. The weight, of course, will still be the same, and therefore in this case you cannot do without a hinge, which can be welded with a pin and iron. And it is convenient to raise the pipe to a height with the help of a horn and stretch marks.
All joints of pipes, tees and elbows must be well fastened with clamps. We fasten the tees themselves using a support bracket.

Stage III. Passage through the roof
As we have already said, the chimney is led through using a special cut, which must be selected in accordance with the angle of the roof - 15-35 ° or 35-55 °.
Next, we accurately determine the place where exactly the pipe will pass, mark the size and cut out the opening from the inside. After that - in the roof, and we remove the pipe. From the inside, we protect the place of the chimney passage with the help of a roof sheet, and from the outside we put a roof cut. The angle of inclination is adjusted by the conical part of the cutting, and we wind the edges of its sheet under the roof ridge or under the edge of the roof - as you can.
We install insulation along the walls of the pipe - these can be foil mats made of basalt, for example. Moreover, it is necessary to isolate the inner cavity of the pipe.
Stage IV. Finishing the chimney installation
Now we attach an adjustable apron to the pipe to seal the joint and increase the chimney to the desired length, covering it with a metal umbrella to protect it from atmospheric precipitation.
And here is the last one. Those parts of the chimney that may be subject to corrosion must be coated with heat-resistant paint, and the joints of the clamps must be sealed.

Fire safety comes first!
Now let's look at the main rules that you must remember when building a chimney yourself:
- Rule number 1. No joints with other pipes!
- Rule number 2. The chimney must not have a horizontal section longer than one meter.
- Rule number 3. It is impossible for the chimney to come into contact with any other communication, especially a gas pipeline or electrical wiring.
- Rule number 4. At least twice during the heating season, the sauna chimney must be cleaned.
- Rule number 5. The chimney must go beyond the roof by at least half a meter.
And the most important fire safety criterion is the distance from the surface of the chimney pipe to flammable building structures.

And, finally, with regard to the traction force and the correct operation of the chimney, here the main role is played by the diameter and height, namely, their ratio. And it all depends on what kind of stove you purchased, what power it is, and how high the roof of the bath is.
The chimney in a classic Russian bath has its own requirements - the maximum heat resistance of the material and the minimum of turns with bends. Follow clear instructions, do not show ingenuity and trust professionals in everything - and the hot heart of the bath will work properly for decades!
Reading 9 min. Views 1.2k.
Installing a fireplace or gas boiler is necessarily accompanied by the construction of a chimney. Its self-manufacturing must comply with all design rules and criteria for the safety of equipment operation.
Proper installation will allow not only to fully remove combustion products, but also save fuel. The construction of the chimney should be treated with increased responsibility, since the accumulation of carbon monoxide can lead not only to intoxication, but also to death.
Brick chimneys are gradually becoming a thing of the past, giving way to modern technologies. Structures made of high-strength steel pipes, which allow you to assemble a chimney of the required shape from its individual parts, are considered more convenient and allow you to work without the involvement of professionals.
The presence of both straight and rotary parts makes it possible to assemble the chimney according to the principle of the designer. In addition to the simplicity of the device, steel pipes have a number of advantages due to which they are widely used.

The simplest way to install a steel chimney is a direct design. It implies the exit of the chimney through the roof.
This installation option is the cheapest, but it is also the most fire hazardous. The disadvantages also include the need to cut through the roof and occupy a usable area in the room.

Attached or external way to install the chimney is the most progressive.
It consists in removing the pipe through a hole in the wall of the building. The chimney runs along the outer side of the wall, and is attached to it with brackets.
This method is slightly more expensive than a direct chimney, but it is more convenient to maintain and is less fire hazardous.

For the construction of chimneys, various materials are used, the most popular of which are brick and ceramics. At the same time, their main disadvantages are the high cost and the need to build a foundation.

At the end of the last century, asbestos pipes began to be massively used. They have an affordable cost, but at the same time they have a number of disadvantages: asbestos is not resistant to precipitation and temperature changes; is an environmentally hazardous material, constant contact with which can lead to the formation of cancerous tumors, which excludes the possibility of installing an asbestos pipe inside the building.
Advantages of steel pipes
The above designs of chimneys are gradually becoming a thing of the past, losing ground to modern technologies. Stainless steel constructions allow you to assemble a chimney of the required shape from its individual parts without the involvement of professionals.
In addition to ease of installation, stainless steel chimneys have the following advantages:
- aesthetic appearance;
- lack of formation of condensate;
- long period of operation;
- high level of fire safety;
- affordable cost;
- the design does not require the construction of a foundation;
- the possibility of subsequent warming.
The option of such an installation is optimal in terms of price-quality.
Types of modern steel pipes
There are two main types:

- are used either indoors or inserted into a brick casing, due to which they are sometimes called liners. Used to remove smoke from gas, solid fuel or oil-fired boilers. A variety of single-walled chimneys are flexible chimneys, which are a corrugated pipe with a thin wall.
The advantages of such pipes are low cost and ease of installation, but their service life is not long.

- consist of an outer shell that is resistant to corrosion and an inner metal tube that can withstand high temperatures. The space between the pipes is filled with insulation, which can be mineral wool.
Such a pipe is suitable for any boilers, has a long service life and the cost is higher than a single-wall chimney.
It is double-walled chimneys that are most popular and can be performed independently.
For the manufacture of a double-walled chimney, two pipes of different diameters are used, the space between which is filled with basalt wool, with a layer of 3 to 10 cm.

Steel chimneys have high strength characteristics, are durable and resistant to corrosion. Inside the pipe has a smooth surface, which prevents soot and ash from settling on it.
The chimney is made of a special steel grade that does not burn out and does not deform.
Steel is able to quickly warm up and cool down when heated and turned off the heater. Repeated heating and cooling cycles do not affect the performance or appearance of the chimney in any way.
Do-it-yourself chimney device features

A significant disadvantage of both square and rectangular chimneys is the presence of local turbulences that impede the movement of the main gas flow. The round shape will avoid this drawback and is recognized as the best among analogues of other geometries.

The chimney inside the building is represented by a horizontal part that connects the body of the pipe to the boiler gate using standard adapters with crimp collars.
If the chimney is constructed in a straight line, then on a horizontal section there should be a hole for cleaning the chimney from soot, as convenient as possible for maintenance.
In the case of the attached version, the revision is located outside the building.
The exit of the chimney through the wall, roof and floors must be carried out using sleeves and refractory materials.
The chimney may provide for turns in one direction or another. For this, home-made swivel knees or other shaped parts can be used:
- The elbow consists of two welded pipes. Can be installed in vertical and horizontal sections, and should be flat for best traction, with a turn of more than 900;
- Elbow 900 is used at the point of connection of the boiler pipe to the main chimney.
For self-manufacturing of swivel elbows, they resort to welding two pipes, previously cut at the required angle. With a cut of 600, the turning angle will be 1200.
Varieties of shaped elements

Shaped items include:
- bends are turning angles. Moreover, the industry has established production of both round and square or rectangular bends;
- transitions allow you to connect round pipes of different diameters or connect different sections;
- tees can be with an exit at a right angle or at 450, 300, while the diameter of the outlet pipe may differ from the main one;
- crosses of different sections, can be flat or offset;
- nipples (couplings) are used to connect the elements of the chimney. When installing it, special sealants are used;
- plug;
- Umbrellas can be round T-shaped in any standard familiar form. Used for weather protection.

Having planned the design and assembled all the components, you can proceed with the installation of the chimney.
- the chimney should not be crossed by other communication systems;
- all work is carried out from the boiler to the chimney;
- all connections "sit down" on a special sealant that can withstand temperatures up to 10,000;
- clamps are used on all clutches;
- passage pipes made of non-combustible materials are installed in the ceilings, the presence of a sleeve must be provided in the wall;
- horizontal sections should be less than one meter;
- the chimney is fixed to the wall using a support bracket, which makes the pipe stable and motionless;
- brackets should be placed at a distance of 1.5 meters from each other;
- directly on the slope of the roof around the pipe, a roof cutting is installed and an umbrella is placed over the chimney.
- in the presence of a roof made of combustible materials, the pipe must protrude at least 120 cm above the roof level, the presence of a spark arrester is mandatory;
- in the presence of a roof made of non-combustible materials, the protrusion must be at least 60 cm.
Basic requirements for chimneys

- it is impossible to connect several installations to one chimney;
- the chimney must be airtight to exclude the possibility of gas leakage;
- must not have roughness or unevenness of the inner wall, which may interfere with traction;
- the material must be resistant to condensate;
- the chimney must be warm (insulated);
- the wall thickness of the chimney for a gas boiler is at least 0.6 mm, for liquid fuels at least 0.8 mm, and for solid fuel boilers from 1 mm;
- the diameter of the chimney must be selected for each heater individually and be in the range from 100 to 300 mm;
- all installation work must ensure maximum safety.
Work technology
- necessary turning angles are welded.
- work should begin by connecting the boiler to the adapter leading to the chimney;
- if the chimney is led through the wall, then you need to cut a hole with a slightly larger diameter than the pipe itself. This gap is used to install a sleeve that protects the wall from the temperature effects of the chimney;
- the distance between the sleeve and the pipe is filled with expanded clay or asbestos;
- if the chimney is discharged through the roof, then the floor material should be protected with galvanized steel with a layer of insulation. For this, a hole of a larger diameter is also cut into which the material is installed;
- when crossing ceilings or roofs, the chimney is fixed with a support plate or support ring.
- During the assembly of the structure, sealant and clamps are used.

- chimney cleaning should be carried out at least 2 times a year;
- the channel should not have sharp bends and defects of the inner surface;
- the thermal insulation of the chimney must prevent reaching the "dew point";
- there should be no soot on the outside of the chimney;
- pipe connections should not be located at the intersections of the chimney with walls and ceilings;
- it is forbidden to place horizontal sections and holes for cleaning the chimney in the attic;
- Good draft and absence of condensate will be ensured by a correctly selected pipe diameter. To determine it, you can use the documentation for heating equipment or calculate it yourself. According to the norms, the diameter of the pipe must exceed 8 cm2 per 1 kW of the power of the heater.
- For the manufacture of a double-walled chimney, it is better to take the inner pipe with a thicker wall, this will provide additional chimney service time.

Pipe insulation is necessary for two reasons:
- for the best traction. It deteriorates in a rapidly cooling chimney;
- to prevent the formation of condensate, which contributes to the destruction and corrosion of the chimney.
Modern boilers operate with periodic shutdowns, which leads to cyclic cooling of the chimney, and consequently the formation of condensate and a deterioration in draft. The insulation allows the chimney to be in a thermos state during the shutdown of the boiler.
How to insulate the outside of the chimney
Basalt wool has high refractory properties and is used as a chimney insulation.
Chimney insulation consists in wrapping it with several layers of basalt wool. Cotton wool can be fastened with special clamps or knitting wire. The layers of wool must be waterproofed. For insulation, you can use stainless steel or galvanized sheets. The sheets are a box made using self-tapping screws.
A larger diameter pipe can also act as a waterproofing box. The end of the pipe should also be protected from moisture by putting a ring on it, which can be made independently.
Summing up the material, we can say that:
- a steel pipe chimney pushes away analogues from other materials due to its physical, chemical and operational characteristics;
- the simplicity of the device and the absence of the need for a foundation allows you to save on material and pay for hired workers;
- The best option for the device is considered to be the attached design of a double-walled pipe. Such a chimney is as safe as possible and initially insulated.
Each residential or even country house, bath, not connected to the central heating system, is supplied with a heat generating device. To remove the products of combustion of fuel in the furnace from the interior, a smoke exhaust channel is connected to them. The most affordable option is a galvanized chimney; in hardware stores, the price of 1 m of a pipe made of this material is about 110 rubles. If you add to this the cost of rotary elements, deflector and brackets, installation will cost a tidy sum. However, in this article we will tell you how to cut costs by 60% and how to make a chimney from a steel pipe with your own hands.
The advantage of shop models of galvanized steel chimneys is that manufacturers produce a wide range of sizes. In addition, among the factory products you can find double-circuit, equipped with thermal insulation, corrugated, with increased flexibility and single-circuit. When making a homemade chimney, you have to limit yourself to only single-circuit pipes. In order for the smoke exhaust system to work effectively, the following parameters should be taken into account:
Important! A sheet of galvanized steel measuring 2500x125 mm in construction stores costs about 600 r, with proper cutting, 8.75 m of a pipe with a diameter of 100 mm is obtained from one sheet, the cost of 1 m is approximately 68 rubles, which gives 60% savings!
Manufacturing
To make a pipe from a sheet of galvanized steel, you will need a rubber or wooden mallet of sufficient weight to bend the metal. In the process of work, scissors for cutting metal, a long ruler, a scriber for marking, a corner and a “gun” for bending are used. The bending process is as follows:


Note! The chimney device requires rotary parts, which are made by cutting straight pipes at an angle. If the pipes are cut at an angle of 75 degrees, then when joining, a turn of 150 degrees is obtained, if at an angle of 45 degrees - a turn of 90 degrees. To improve the efficiency of a homemade chimney, it is wrapped with non-combustible thermal insulation material.
Advantages
With the advent of a large number of factory products for assembling galvanized steel chimneys, the need to make pipes with your own hands has decreased. However, homemade pipes allow you to reduce costs and choose the ideal diameter. In addition, they are used to equip gutters, so the ability to make pipes with your own hands is useful in everyday life. Metal chimneys in comparison with others have the following advantages:
- A light weight. Smoke exhaust channels made of homemade galvanized pipes weigh much less than brick or ceramic ones. Therefore, it is not necessary to equip a foundation, the cost of pouring which exceeds the cost of material and installation work.
- Fire safety. According to building codes, steel chimneys are completely safe in terms of fire. High quality metal can withstand heating up to 900 degrees, so it is suitable even for solid fuel stoves and fireplaces.
- Low cost. Steel chimneys are the most democratic way of organizing smoke removal, the installation cost is several times lower than the installation of brick and ceramic counterparts.
- Easy assembly. A chimney made of galvanized steel is assembled without difficulty with your own hands according to the instructions, which saves money spent on hiring professional workers.

Important! The efficiency of smoke removal depends on the correct assembly of the chimney. Experienced craftsmen advise choosing a predominantly vertical configuration with the least number of turns. Each rotary element is an obstacle in the way of smoke, reducing the traction force.
Assembly rules
To properly assemble a chimney made of galvanized steel, you must first mark out the layout and laying of the pipe. From this drawing, determine how many pipes are needed and cut into sections of the required length. Assembly is performed as follows:


Note! The smoke exhaust channel is brought to the roof at a distance of 30-50 cm from the ridge. To ensure the level of traction, the skate should be 50 cm higher. Incorrect placement on the roof can cause back draft or wind backwater.
Video instruction
In order for your home to function properly, it is important to provide for all the details during construction. The installation of a metal chimney can be done by specialists, but such services are not cheap, but all the rules and nuances will be observed. But really do it yourself. We will tell you how to do all the work correctly.
The main condition for accurate installation is to know how the air jets are distributed when the temperature in the house rises. If the installation of steel pipes is incorrect, then smoke will occur, carbon monoxide will enter the room or reverse draft will occur.
A homemade chimney can be made by any novice builder. It is only necessary to prepare well: to study the properties of steel, its advantages and disadvantages, the rules for installing the structure. All work must be carried out with increased attention, since any little thing can cause smoke in the room, which will lead to very detrimental consequences.
How to choose a pipe
Today, chimneys are represented by a complex design, therefore, before installation, it is important to carefully select the material in order to install it correctly in the future.
The result of the chimney will depend on:
How much fuel is consumed;
boiler efficiency;
profitability;
safety;
type of oven installed.
What are the advantages of steel chimneys:
1. There is a smooth surface inside the pipe, so soot and soot will not accumulate (which cannot be said about the brick chimney system).
2. They are installed in a bath in a steam room or in their own home.
3. It is not required to install reinforced concrete columns or build a foundation.
4. Mounting structure will not interfere with weather conditions.
5. A small amount of condensate will form if the installation and insulation were carried out correctly (often this applies to the chimney, which is installed on the stove in the bath).
6. It has high resistance to outgoing gases.
7. Good durability.
8. Long service life.
9. Budget price (steel is much cheaper than brick).
10. All requirements for fire safety.
Before choosing a chimney, you need to understand what requirements it must meet:
The size of the chimney channel must be such that combustion products are removed;
a separate chimney is selected for each furnace;
select a section on the chimney pipe less than the area of the chimney pipe;
the steel from which the pipe is made is of high quality, protected from corrosion, the walls are not thinner than 5 mm;
a pocket is made in the chimney, with its help the chimney channel is cleaned of soot;
this channel contains more than 3 turns, the diameter of the pipe is equal to the angle of rounding of the turns;
the height of the pipe must be the same as the ventilation height.
How to properly install a chimney from steel pipes with your own hands
Before installing a steel pipe, you must familiarize yourself with some rules for such work.
If the equipment is gas, then the pipe is mounted vertically. The assembly of the pipe takes place from the bottom to the top. If the product goes from the boiler to the chimney, then it is short and does not have bends. The pipe must be at least 5 m long. To create normal traction, you need to correlate its diameter to height. Where the chimney is laid horizontally, it should be kept as far away as possible from gas pipes and electrical wiring, which are no more than one meter long. Only one heater is connected to one chimney channel.
Consider the installation of a chimney step by step
 Outside the pipe is taken out only through the wall or roof. In the case when the pipe passes through the wall, an opening is cut under it, the area of \u200b\u200bwhich will be slightly larger than the cross section of the pipe. This is necessary in order to insert a sleeve into the wall, which prevents the destruction of the stone due to overheating. Fix the long chimney with brackets, this must be done both from the outside and from the inside. This will protect it from deflections due to winds and precipitation.
The chimney will pass through the ceiling and roof, so they are thermally insulated. This must be done, if only because the lower part of the pipe is adjacent to the boiler, and the heating is very strong.
How to Perform Turns and Tilts
How correctly the turns are made will depend on the rate of passage of smoke through the pipe and the retention of heat in the house. A steel pipe is much easier to mount than a brick one.
It will be necessary to make three different angles:
The angle is 75 degrees, we cut it evenly, this is necessary to connect the parts, the angle of which is 150 degrees (pieces of the pipe are joined diagonally);
when cutting an angle of 60 degrees, you can make a joint with an angle of 120 degrees;
if the pipe is cut at an angle of 45 degrees, then a right angle turn is made.
Let's collect all the information together and combine it in a brief instruction:
1. A chimney is mounted to the roof from the stove or boiler.
2. We assemble all the links with each other sequentially.
3. For fire safety, insert the pipes into each other, the depth should be at least half the diameter of the pipe. So moisture will not get inside.
4. Near the base of the pipe, you need to make a pocket so that you can clean it.
5. We fix all joints with clamps.
6. After one and a half meters, each time fix the pipe with brackets.
7. To protect the coating from overheating, insert pieces of galvanized steel.
As you can see, installing a chimney pipe is not so difficult. The main thing is to take into account all the rules before starting work, select a pipe and prepare all the necessary parts and tools. It is important to follow the rules that directly relate to fire safety.
There are no related posts.


