Hello everyone!
Boys and girls, as well as their parents, ShkolaLa again invites you to the creative workshop! Let's let our hands enjoy the creative process and find out how a charming hedgehog is made from a pine cone and plasticine. Not just one, but a whole team! And then we'll take them for a walk.
Let's start by preparing everything you need.
We will need:
- Pine cones (spruce cones are also suitable, but pine hedgehogs will make more prickly ones).
- Ordinary plasticine.

We first washed and dried our cones, and then, using a hard brush, coated them with acrylic varnish. But this is not at all necessary. It's just that when the buds are patched up, they look prettier.

How to make a hedgehog's face? Very simple. Take a small piece of plasticine and mold a cone, and then slightly lift the tip of the cone (future nose) up. Then glue the face to the blunt end of the pine cone.

And this photo shows how to make legs. Just roll two small identical sausages and stick them where the hedgehog's tummy will be.

From the same plasticine as the muzzle, mold two small cakes. These will be the ears. Attach them to the hedgehog's head. The eyes and nose can be made from beads, pieces of cardboard or buckwheat. We used black peppercorns for these purposes.

The hedgehog is ready! Side view. One word: “Handsome!!!”

It's sad to live alone. That's why we made friends for our hedgehog. It turned out to be a whole team!

As you know, hedgehogs are hardworking people. They wear something on their needles all the time. Why are ours worse? We supplemented the craft with mushrooms and apples. It immediately became more fun! Both for us and for the prickly forest dwellers.

Since the fall, there have been birch twigs on the balcony. We found them in the park and decided to take them home. They thought: “They might come in handy.” So they came in handy) These are knots for us, but real logs for hedgehogs!

We connect the sticks to each other. We tie them with white woolen thread.

We decorate the logs with leaves, spikelets, and rowan berries. At the same time, we hide the threads with which we tied them together.

Let's send our prickly team for a walk! We plant on logs. And Done!
There is no shame in taking such a craft to school when you need to build something from natural material.
We hope you enjoyed our master class. And you too will try to make these wonderful animals. The main thing is to do everything step by step and then you will definitely succeed!
To get inspired, watch a good old cartoon)
And you can even make it from plasticine!
We will be waiting for your feedback in the comments to the article)
We wish you pleasant creativity and are off to make new interesting crafts!
All the best to you!
Such cute and funny Hedgehogs are the favorites of all children and adults, the heroes of numerous children's fairy tales and animated films. It is the images of Hedgehogs that are most often chosen by manufacturers of children's toys, because they always evoke tenderness and a smile.
The news portal “site” in this article has prepared for you several simple master classes of Hedgehog crafts that you can do together with your child.
Ready-made homemade Hedgehogs will be excellent children's toys, heroes of fairy tales invented by you, or objects that will decorate a children's table, bookshelves or windowsill.
How to make a Hedgehog craft?
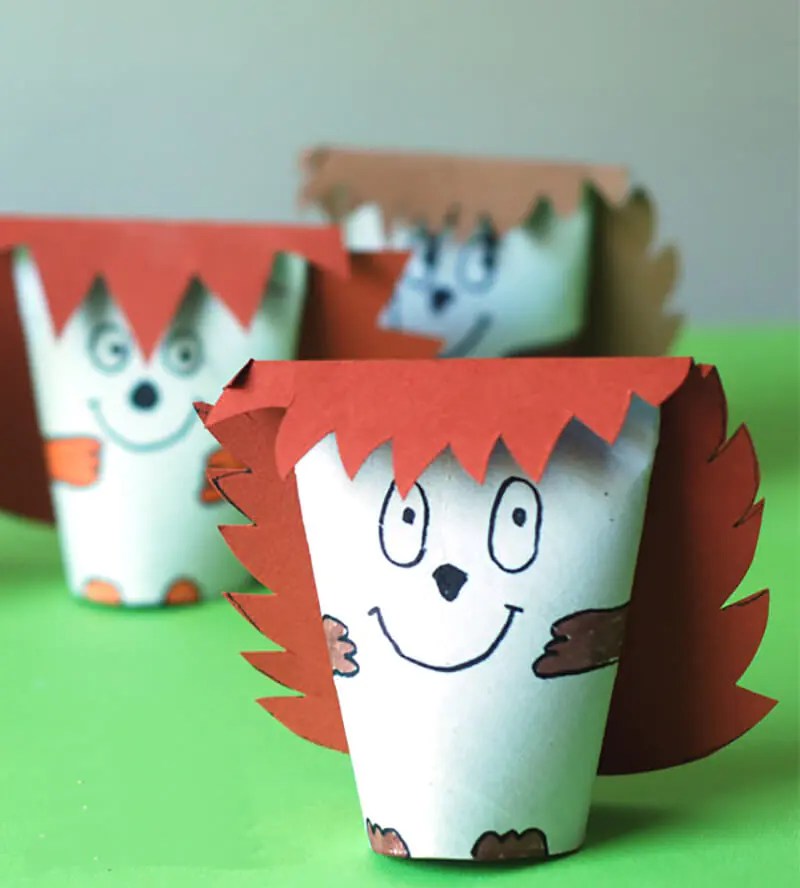
Hedgehog made from a toilet paper roll
To create such a sweet and unusual crafts You will need the following materials: a cardboard toilet paper roll, a sheet of brown construction paper, a stapler.

Print out the finished hedgehog thorns template on a piece of brown paper.

Carefully cut out the hedgehog needles from the paper.
Staple the upper part of the cardboard sleeve in two places.
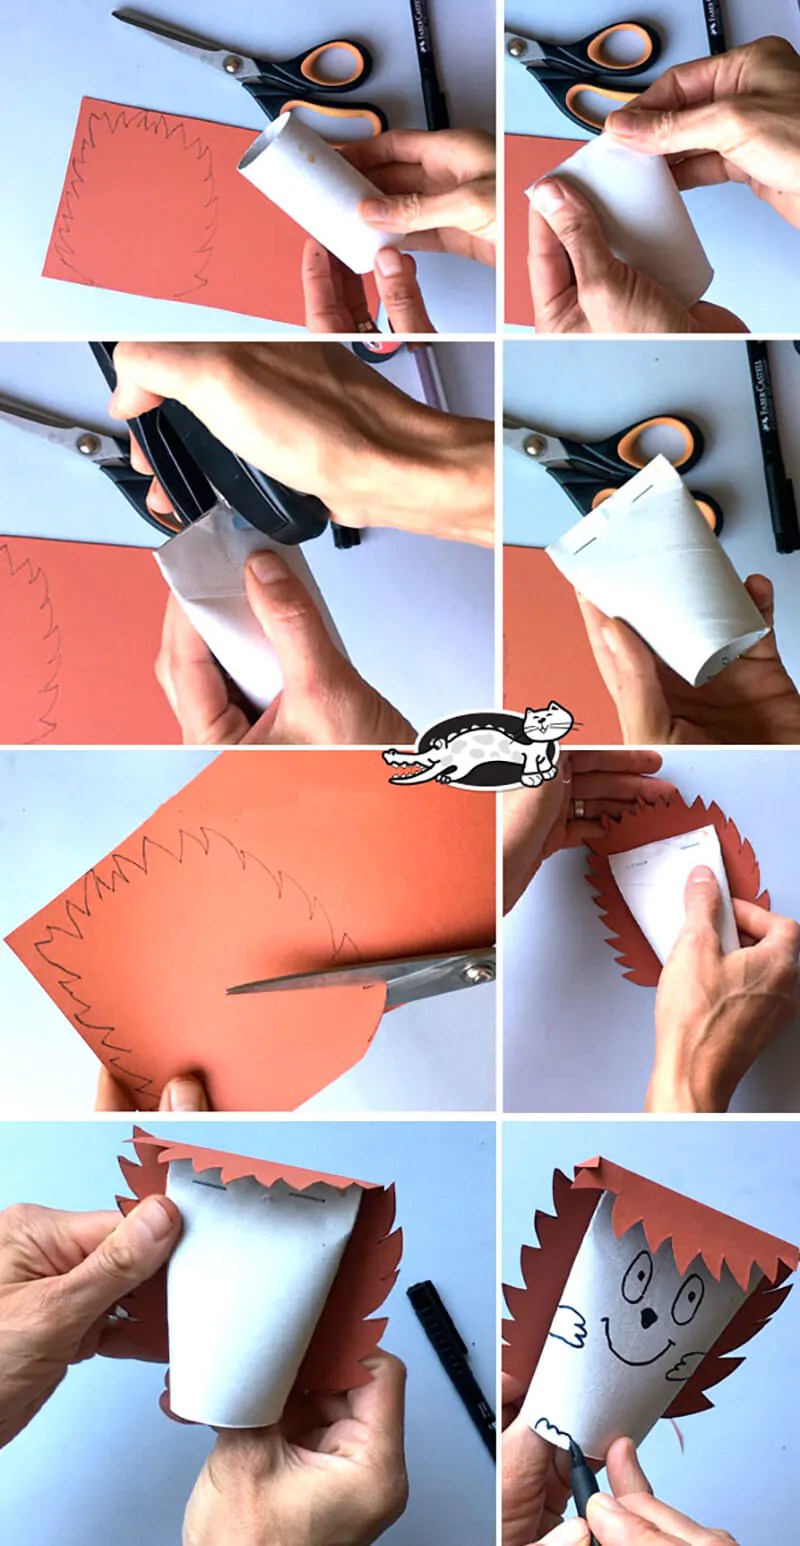
Glue the cut out hedgehog needles to the cardboard sleeve.
Draw eyes, a nose, a smile and paws on the hedgehog with a black marker.
Autumn craft Hedgehog
Children's craft Hedgehog

In autumn, all forest dwellers stock up on all sorts of goodies for the winter in the form of mushrooms, nuts and berries. Hedgehogs are no exception. We invite you to make this bright autumn Hedgehog craft with your own hands.
To create this craft you will need: a sheet of white paper, a sheet of brown paper, glue and scissors.
Print ready-made templates on sheets of paper: the body and face of a hedgehog and its needles.
Using scissors, carefully cut out the pieces.
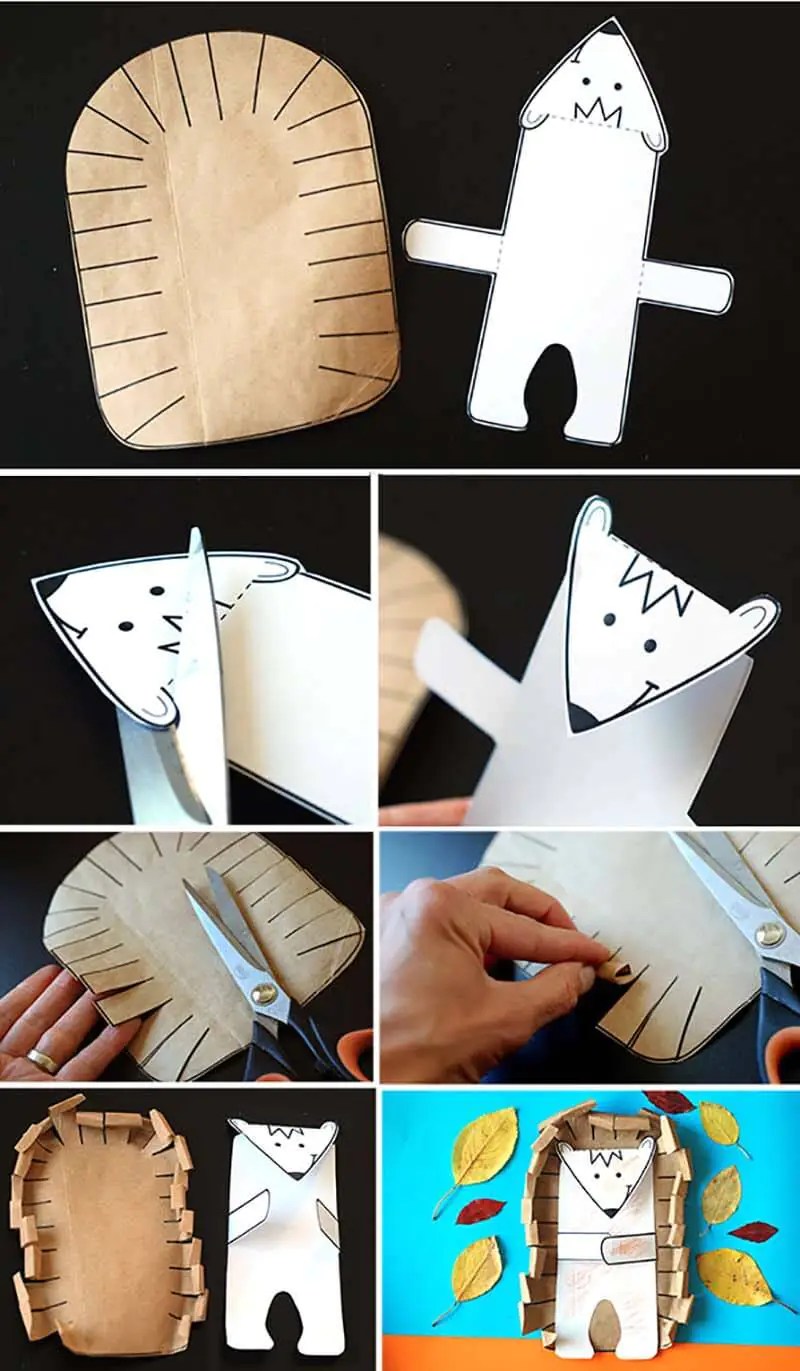
Fold all the pieces along the dotted lines. Cut the needles into thin strips and wrap them with a pencil or by hand.
Glue the parts together.
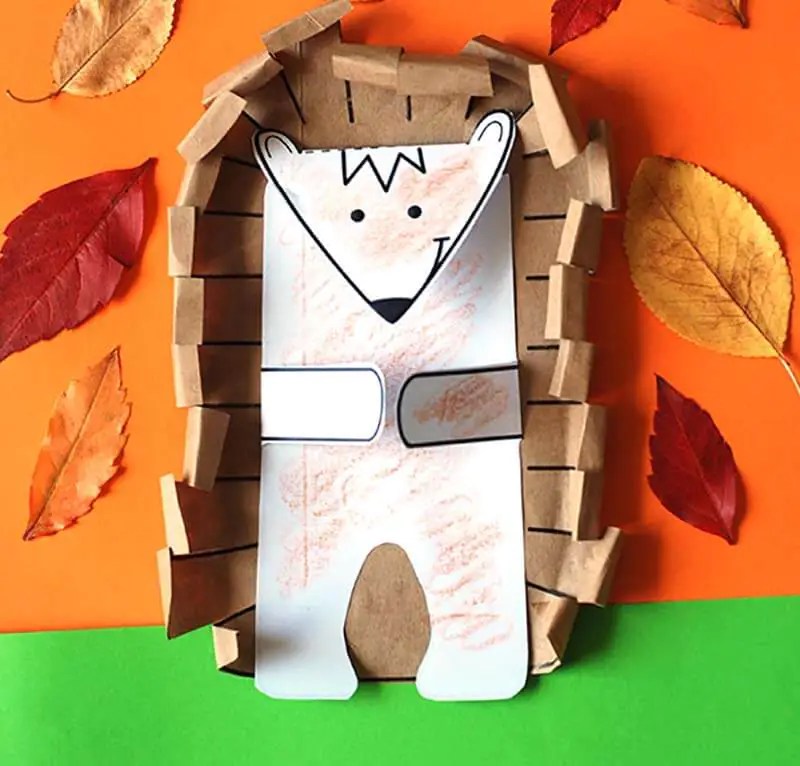
Color the Hedgehog with colored pencils.
Children's craft Hedgehog
Autumn craft Hedgehog

To make such a cute children's craft, you will need: cardboard, wooden clothespins and paints.

Print the finished stencil and transfer it to cardboard. Cut out the hedgehog blank.

So charming colorful hedgehogs can be made from a small piece of plasticine and a few spaghetti.

Creative people will definitely like it original idea DIY crafts in the shape of an adorable hedgehog. In addition, in the process of creating it you can use various techniques and materials. Make your creativity a family hobby, because joint activities unites and unites.
As a result, a hedgehog craft made with love will definitely turn out not at all prickly, but on the contrary, sweet and kind. You can get ideas and study instructions on how to make a hedgehog with your own hands on the appropriate Internet resources. But let’s get acquainted with some of them right now.

Handmade hedgehog from coffee beans
Both adults and children can make a hedgehog with their own hands using available materials. The simplest and most affordable tools and materials are suitable for this: scissors, PVA glue or glue gun, a stationery knife, half a plastic ball of small diameter, twine, coffee beans and paint brown, a brush, a sheet of cardboard, a piece of foam, black beads, a couple of cinnamon sticks and dried orange or lemon slices.

To create a hedgehog with the aroma of cinnamon and coffee with your own hands, the instructions for its step-by-step production will help you:
- first, a base is made from a plastic half of a ball (you can make two crafts from a whole ball);
- a pointed muzzle of an animal is cut out of a piece of polystyrene foam;
- a circle is cut out of cardboard corresponding to the diameter of half the base ball;
- using glue, the muzzle and the cardboard circle are fixed to the bottom of the plastic base;
- the muzzle and cardboard circle are wrapped in a circle with twine, and the base is covered with brown paint;
- Next, coffee beans are glued, acting as needles. The grains are glued from the middle of the workpiece, first in one direction, then in the other, so that symmetry is maintained and the product turns out neat;
- Finally, attach the beady eyes to the muzzle, and decorate the needle-like coat with a vanilla stick and a circle of dried citrus, as in the photo of the hedgehog craft.

Such a fragrant gift will be a pleasant surprise for any occasion. In addition, a coffee hedgehog in tandem with a money bouquet will look very original.


Cute hedgehog made of cones
While walking among the coniferous trees, collect several cones that will be useful to you to create your next hedgehog. The child will also like this idea. This means you can safely begin to implement your plans. For this you will need: black and beige plasticine (or polymer clay), an open medium-sized cone, black beads, PVA glue, toothpicks, a brush and blush.

Video detailed master class How to make a beautiful hedgehog, you can look on the Internet or use our tips for step-by-step implementation of the craft:
- brown plasticine needs to be kneaded thoroughly, since it is easier to work with plastic material;
- then form a ball and secure it in a cone shape on the flat bottom of the cone in the form of a muzzle, and the cone will be a body. Pull the pointed edge of the muzzle cone slightly up and attach a small black ball to the tip to make the nose funny;
- Next you need to make ears and paws using brown plasticine. Grooves made with a toothpick will help make the paws and ears more realistic. Fix the paws securely, because the stability of the craft depends on this;
- draw a mouth with a toothpick, rouge the cheeks to make the hedgehog come to life;
- Attach a plasticine mushroom or a juicy apple, an acorn or a yellow leaf to the needles.

Your craft is ready, please your friends or loved ones with it.

Candy hedgehog
TO simple crafts in the shape of a hedgehog for children is an option made from candy. It’s easy to make even for children, especially if you need a gift for your mother or grandmother on March 8 or a birthday.

For this you will need: foil, sweets in bright wrappers such as truffles, wrapping paper, wooden skewers, scissors, tape, an awl.


The procedure for creating a craft is as follows:
- form a foil base with a pointed nose and a thick body so that it is easy to fix the sweet load;
- From wrapping paper of different colors (brown, transparent, yellow) make a fluffy coat with needles from skewers. To do this, cut the wrapping paper into squares of different sizes. Take the candy, wrap it in a transparent square with the corners up, then fix the skewer and tie a colored square to it, also with the corners up, so that the fur coat turns out to be slightly prickly;
- use an awl to make holes and insert skewers into them; for greater reliability of the structure, drop glue into the holes;
- arrange the composition; in addition to sweets, you can use fresh or hand-made flowers as decoration.

You will find the best hedgehog-themed crafts in various variations on our website.

Photo crafts hedgehog


Pay attention! 


Pay attention! 

DIY hedgehog can be made from a wide variety of materials and in the most various techniques. Both children and adults really like this animal, which is why we have put together an excellent selection of master classes on how to make such a funny character.
DIY hedgehog made from natural material
From chestnutsTo make such a craft, you will need to prepare a chestnut in a green spiky “peel” - about a third should be cut off from it so that the chestnut itself can be seen. Then make a sharp muzzle from brown plasticine and attach it to the chestnut; make eyes from black and white plastic mass. To complete the picture, you can lay rowan branches and autumn leaves on the needles.
DIY hedgehog made from pine cones
DIY craft from pine cones - hedgehog
Roll beige plasticine into balls - one large, two medium and two small. The largest one is useful for forming the cone-shaped head of the animal, while bending the tip of the figure slightly upward so that the animal ends up with a more playful appearance. Make the hind legs from medium balls, and the front legs from small balls. Make finger notches on the paws using a toothpick.
Attach all these parts to a regular pine cone, do not forget to then give the animal eyes, a mouth and a nose.

You can decorate your personal plot with a simple craft. It is necessary to prepare a cement mortar and coat a plastic bottle with it. Cover the neck so that it resembles a hedgehog’s muzzle. Until the solution has completely hardened, it is necessary to stud the entire body with pine or fir cones. Draw eyes and a mouth on the muzzle; you can put a small pebble in place of the nose.
DIY hedgehog craft - florik
The funny name “florik” hides an excellent toy that will give your home a piece of spring and allow your child to become better acquainted with the awakening of nature.
Take a thick, brightly colored sock (new, of course, without holes or scuffs), and pour a small amount of soil inside. As a result, you will get the lower part of the hedgehog craft. Then mix the soil with oat seeds or lawn grass, fill the rest of the sock with this mixture (the result will be the head and back of a floral hedgehog).
Tie the sock with an elastic band or thick thread, trim off the excess fabric. Place the “homemade product” on a plastic plate, with the tied part “looking” down. Using your hands, stretch out the muzzle a little, and slightly round the sides. Well, then just pour water over the florika - try not to overdo it with liquid.
Of course, the craft will look more attractive if you additionally decorate it with eyes and a nose - for this purpose you can use buttons or tailor’s pins.
In order for the grass to germinate, you need to place the craft in a warm and bright place, and do not forget about timely watering. When the sprouts make their way through the fabric, the florist will need to be turned first with one side or the other towards the sun so that the grass grows evenly.
DIY hedgehog - photo:

How to make a hedgehog with your own hands for a baby
We all know that children at an early age explore the world every minute, which is why be sure to sew a cute educational toy for your baby - a hedgehog with ribbons.
The first thing you should do is make a pattern on paper, and the size of the parts can be any, it all depends on what size you want to sew the toy. Transfer the pattern details onto fabric and cut them out. First, stitch the body and face of the hedgehog.
Prepare several ribbons of different colors, which will act as needles. It’s very good if the color of the ribbons matches not only each other, but also the fabric of the toy itself.
Place the halves of the toy inside with their right sides, and place pieces of ribbons inside, folded in such a way as to form loops. Baste with thread or secure with pins. Sew the halves together along the back, leaving the tummy area unsewn.
Sew the legs, turn the parts inside out, iron them and stuff them with some kind of filler, for example, holofiber. Then insert the pieces inside the tummy and baste. Now it’s time to sew up the belly (don’t forget to leave a hole between the legs). Turn the product inside out and iron it. Through the hole you left, fill the toy with holofiber.

Sew buttons that will act as eyes. Well, if you want the hedgehog toy to be absolutely safe for the baby, then you should embroider the eyes, as well as the nose.
The final step will be to sew up the hole in the tummy using a hidden seam. So you have a wonderful toy with educational elements!
You can sew another one, also very cute.

The costume of this funny forest animal will be in demand at any masquerade, be it New Year or an autumn holiday. We invite you to master a very easy version of the costume that even a novice craftswoman can master.
The basis for the masquerade attire will be a jumpsuit with a hood of a suitable color. It is to this that the spines and ears will be attached.
You should be very picky when choosing fabric for sewing; you can give preference to any material, but still, fleece will be optimal for such needlework, because it holds its shape perfectly, but at the same time is quite soft and pleasant to the body.
First of all, you need to make the details of the ears, for the inner ear you will need two parts, for the outer ear - four. Sew the darts on the base pieces. Sew the inner eyelet to the outer one, to its front part. Fold inside out, stitch and turn inside out, then sew the ear to the hood.
When the ears are ready, you can move on to the spines. For them, you should take three stripes of different colors - they should be long enough, but at the same time have different widths. One triple stripe will act as a row of spines and will extend from the head to approximately the lower back. You will need to first measure the length of strips you need using a measuring tape. Make a stylized fringe from each ribbon, cutting each thorn at an angle.
Sew the three strips together and then sew them to the overalls. Continue these steps until the entire hood is covered with fleece “spines”.
As you can see, sewing such a fancy dress costume is quite simple, and the child looks simply unsurpassed in it.
Do it together with your baby.

Every child will certainly enjoy this sweet craft. The first step is to take a sheet of penoplex and cut out a rectangle with sides of 10 and 20 cm. The body of the animal will have a length of 12.5 cm, the remainder of 7.5 cm is its head.
Draw the body with a pencil or pen so that you can easily cut off excess material. Round the corners using a utility knife. The unevenness will need to be sanded - for this purpose you can use such a non-trivial tool as a nail file. Of course, if you have sandpaper, it's better to take it.
In order to form a nose, you should glue a piece of penoplex. It should also be sanded with sandpaper or a nail file.
Cover the animal's body with golden corrugated paper(of course, you can take the material in the color you like). Stick candies into it - you can take sucking ones like lollipop, or you can attach regular ones to wooden skewers in advance. Fill the gaps between the candies with organza or similar fabric. To decorate your “makeshift”, use everything you have at hand - apples, mushrooms, berries, etc.
The very last step will be gluing the eyes, as well as drawing the eyebrows and nose with black acrylic paint.
Feel free - this is a very exciting activity.
Fruity option
A candy composition will certainly attract the attention of the children, but a fruit composition will not only be very tasty, but also healthy. So fruit hedgehog You can decorate a festive children's table.

Take a pear and, using kitchen scissors, cut off its tail. Having already taken a knife, cut off part of the peel on the fruit - this place will play the role of the animal’s nose. The pear should also be trimmed from below - this will help the fruit not to roll.
String quiche-mish grapes onto wooden toothpicks (you can use other varieties of grapes, but this one is seedless and kids really like it).
Now, starting from the central row and moving to the side rows, you should stick all the toothpicks into the flesh of the pear, but do not touch the cleaned area.

Cut a piece from a black olive and place it on the tip of the pear - this will be the nose, or you can make eyes using dry cloves.
Make them and make a great gift.
DIY autumn hedgehog
Autumn is the time for exhibitions in kindergartens and schools. We offer you simple master class for making squash.

Place the oblong zucchini on a stand (a couple of plasticine blocks will play its role), stick a lot of toothpicks - needles - into it. Now all that remains is to make the animal’s face from a plastic mass; use buttons as eyes and nose.
What do you think?
Application
Children really like this type of creativity; in addition, they also like the preparatory stage - assembling leaves. Then the natural material will need to be dried - this can be done either in the old way, by placing foliage between book pages, or by ironing.
On a sheet of beige or yellow paper, draw your main character, of course, especially highlight the nose and eyes, but you don’t need to draw the needles - let the body remain “naked.” Cut out the drawing and fix it on a cardboard sheet.

Apply glue to the image of the body - the adhesive composition should be distributed evenly. Well, now cover the body with “needles” - leaves of very different shapes and sizes, glue them one by one, so that the result is beautiful composition. By the end, all that remains is to paint over the details of the muzzle with a black felt-tip pen.
Craft from waste material"Hedgehogs"
DIY master class “Hedgehogs”
Master class for older children preschool age, teachers, parents.
Target: Developing children's artistic and creative abilities, manual skills, imagination, supporting children's imagination and independence when making crafts.
Required material: plastic bottle, two caps plastic bottles, pine cones, Moment glue or polyurethane foam, plasticine.
Step-by-step manufacturing process:
1. Glue cones (hedgehog needles) onto a plastic bottle using glue or foam. We glue each cone separately, pressing it firmly to the bottle.
.jpg)
.jpg)
.jpg)
2. Then cover the bottle cap (the hedgehog’s nose) with black plasticine.
.jpg)
3. For 2 covers white glue pieces of black plasticine to create eyes.
.jpg)
4. Glue them to the bottle using glue (foam).
.jpg)
5. Then put berries and mushrooms molded from plasticine on the “needles”.
.jpg)
6. So that the hedgehog doesn’t get bored, let’s make a hedgehog. We will need plasticine and seeds.
.jpg)
7. We make a small hedgehog from plasticine, we make needles from seeds, eyes and a nose from black plasticine.
.jpg)
8. Our hedgehogs are ready.
.jpg)
.jpg)
A hedgehog made from cones and plastic bottles can look like this.
.jpg)


