If you decide to get an aquarium, then you need to think in advance what is needed for its normal functioning. Ready-made equipment can be purchased without any problems at a specialized store. But often the cost of the tank and additional elements to it is very high. This article will tell you how to do external filter for an aquarium with your own hands, and what you need for this.
Types of water regulators
One of the most important elements Every aquarium has a filter. It not only purifies water, but also removes soluble medications, circulates fluid and fills it with oxygen. There are several types of installations. There are external and internal filters. There are also bottom regulators. They look like a plate with a certain number of holes through which water circulates. This installation is easy to install and very effective. However, you can only put it in a new tank.
According to the principle of operation, filters for cleaning aquariums are divided into biological, mechanical, and chemical. The latter work on the principle of absorption. Used as a filler activated carbon. Special adsorbents are often used to remove nitrates. They rid water of ammonia and other harmful substances. The most popular are flotators.
It is easiest to make a mechanical external filter for an aquarium with your own hands. This is a kind of container made of material through which water passes. The regulator cleans the liquid from turbidity, algae, etc. It must be changed frequently so that the decomposing mass does not poison the water in the aquarium. This type of filter works on its own simple principle- it removes debris from the water.
Biological external filters for an aquarium (reviews about them are very positive) are some kind of pumps. They ensure constant circulation of water. The installation consists of a sponge with nitrifying bacteria and a gravel substrate. If you do not know how to install a filter in an aquarium correctly, it is better to contact a specialist. He will take into account that the pump must drive through itself 3 times more water than is present in the tank. Most often it is installed inside the aquarium. When replacing the pump, do not leave a sponge inside the container - all bacteria may die.
Differences between internal and external regulators
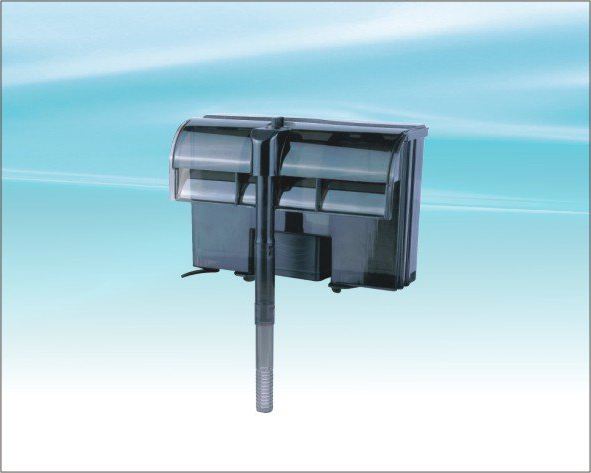
Before installing a filter in the aquarium, you need to decide which one to choose. Internal installations are attached to the glass with suction cups. External - located outside. They draw water through a tube that is immersed in the aquarium. Comparing the characteristics of filters, I would like to note that external regulators look preferable for the following reasons:
- the quality of cleaning is much better;
- the filter does not take up space inside the tank;
- underwater world without internal structure looks much more aesthetically pleasing.
Also, the external filter is easy to maintain. Cleaning and rinsing do not need to be done in the shortest possible time. Such a regulator does not require a specific type of filter material. Can be used different components and place them in separate baskets or litter containers. The effectiveness of an external filter has been proven by aquarists for a long time. Due to the uniform distribution of water and large area filter materials, the cleaning process occurs with the highest quality. To install it, you do not need to lift the lid of the fish tank, it does not damage general view aquarium To turn off the system, it is enough to simply turn off the taps, while the internal installation will have to be removed directly from the tank, which will cause anxiety to its inhabitants.
Device diagram
Before installing a filter in the aquarium, you need to decide on the design of the future regulator. It is better to create a cylindrical cleaner. In a vertical section from top to bottom, the filter looks like this: an internal pump, a biofilter, foam rubber and a rigid mesh partition. An electric pump circulates water. It enters the lower part of the regulator through a tube and passes through the filter elements. Next, the water bypasses the pump and returns back to the tank, already purified. This filter for an aquarium (200 liters) is perfect.
Tools and equipment
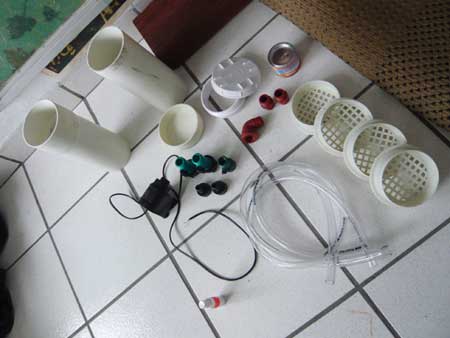
Even a beginner can make an external filter for an aquarium with his own hands. But this will require certain tools and materials:
- pump for pumping water;
- Mayevsky tap for releasing remaining air;
- tap on the outlet pipe;
- nuts;
- plastic sewer pipe (60 cm);
- rubber cuff for pipe joints if there is no solid pipe;
- union;
- two plugs for the ends of the pipe (on the top of the filter and the bottom);
- wrenches;
- FUM tape for creating sealing threaded connections.
Do-it-yourself external filter for an aquarium: assembly
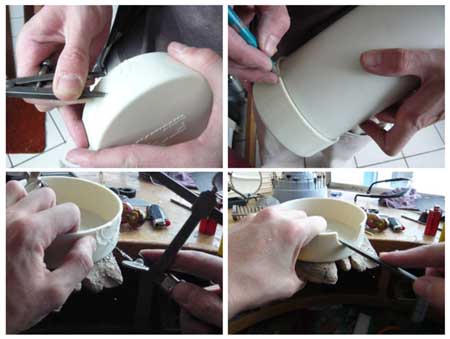
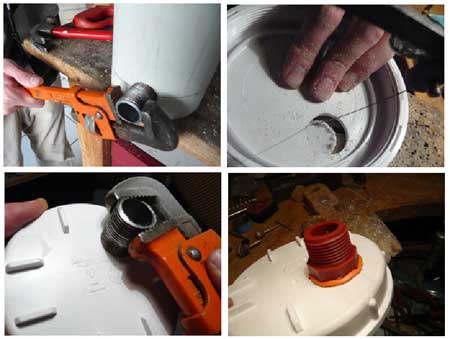
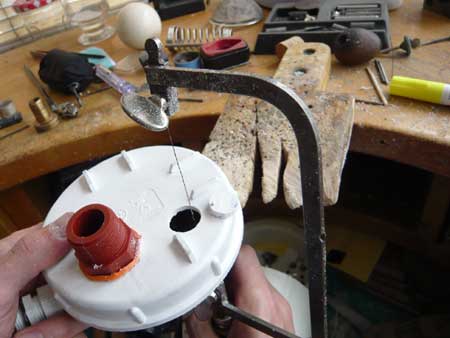
As a basis, you can use a pump from a previous submersible filter. First, make a hole in the bottom of the pipe. Its size should be equal to the diameter of the fitting. It should screw tightly into the hole. A homemade aquarium filter must be sealed. The thread of the fitting is wrapped with tape, and using a nut it is screwed in from the inside. Some advise lubricating the connecting elements with silicone for additional sealing. The entrance hole can be made freer using available means.
Homemade cap from plastic bottle, in which holes are made, will be an excellent assistant in this matter. Some people use CDs with drilled holes for this.
A cap with a mesh is placed at the bottom of the filter, and a piece of foam rubber is placed on top. A biofilter with ceramic filler is placed on it. It can be purchased at any aquarium store. Place another layer of foam rubber on top and again filler.
Due to the fact that the pump is secured with a fitting and a reinforced hose, it fits tightly. Threaded connections and pipe outlets must be sealed. You can install a switch where the wire breaks. Pipe joints and plugs are soldered using an electric burner. You can check the system for leaks. If the seams are leaking, it is better to resolder them.
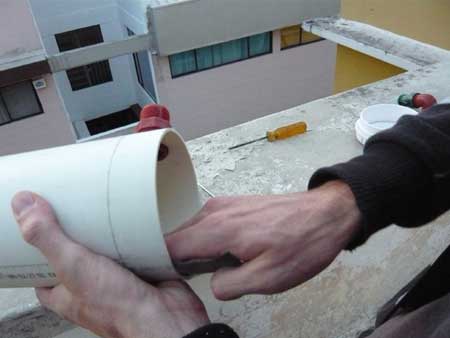
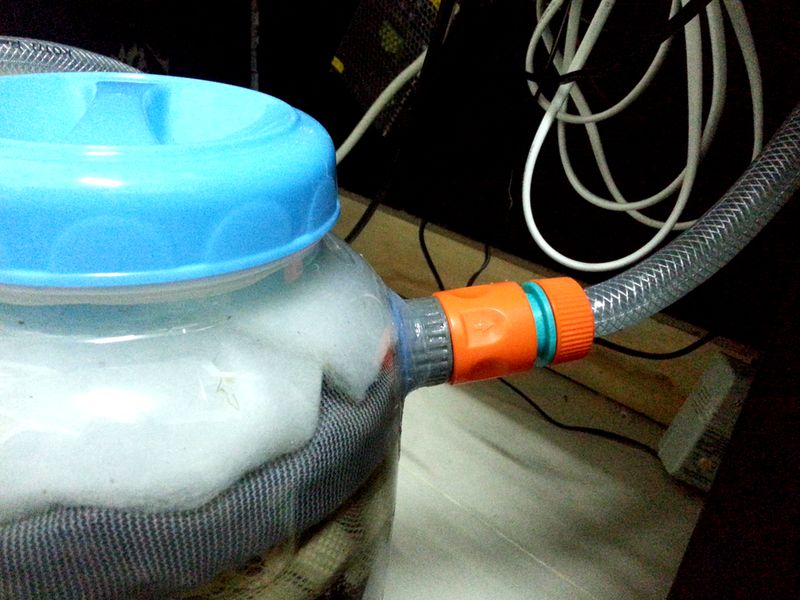
You can use a glass tube to collect water. It needs to be fixed on the back wall of the aquarium with a suction cup so that the lower edge rests on the ground. The pipe can be hung on the wall of the tank - there it will be almost invisible.
A homemade aquarium filter needs to be checked several times. In case of leaks, defects must be repaired immediately. It is advisable to observe the installation.
Assembling a filter for an aquarium yourself is very profitable - for all the materials you will pay no more than 600 rubles, whereas in a store such an installation costs from 1,500 rubles. Fans of the underwater world and its inhabitants save a lot on this. And really, why spend extra money when anyone can make a filter for an aquarium?
Characteristics
If you made an external purifier according to the instructions above, it will have the following characteristics:
- Volume - 3 liters.
- Pipe diameter - 10 cm.
- Height - 42 cm.
- Throughput - 5 l/min.
How to clean the device yourself?
A homemade filter will not need cleaning yet for a long time. If the installation has been in operation for a long time, you can clean it yourself. To do this, you need to disconnect the filter from the power supply and flush the system of dirt and mucus. For convenience, it is better to use several types of filter material. Mechanical cleaners should be washed at least once a week.
![]()
Common mistakes
It often happens that you cannot assemble the filter yourself. If the unit does not fit tightly into the housing, then most likely the filtration baskets are overfilled or incorrectly installed. Sometimes the drainage holes are not aligned correctly. It happens that the rubber gaskets do not fit into their grooves.
The causes of filter leakage can be:
- The device head clamps are not tightly closed. This can happen due to the usual carelessness of the master. The human factor takes place in any field of activity. It is not difficult to fix the problem - just tighten the clamps more tightly.
- Gasket/seal contaminated. Of course, this will not happen in a newly assembled filter, but this happens in operating installations. The rubber seals must be cleaned of mucus and dirt, preferably lubricated with Vaseline or another substance. To avoid this problem, it is important to check the system status once a month.
- The gasket is not inserted correctly.
If the external filter does not work, the first thing to check is whether the system is connected to the mains. It often happens that someone accidentally pulls the plug from the socket. If this does not help and the filter does not work, you need to check the condition of the pump or rotor. Sometimes a pebble or snail shell interferes with the normal functioning of parts. If the system is not pumping water, it may simply not be there. Without fluid, the external filter will not work. Before filling with water, the unit must be disconnected from the power supply. If the filter has reduced power, the system tubes and hoses may be dirty. You need to check their appearance, see if they are twisted. Contaminated filter materials can also interfere with efficient operation.
There are two types of filters: external and internal. How to choose the one that is right for your case?
First of all, pay attention to the size of your aquarium. If it is big enough, then there is not much difference. But usually we have only limited areas in which to place either a small or medium-sized aquarium. It is in this case that it would be appropriate to use an external filter.
Unlike the internal one, the external filter is not installed directly into the aquarium, but outside it. This helps to save a lot of space.
The external filter does not take up space in the aquarium and does not spoil its overall appearance
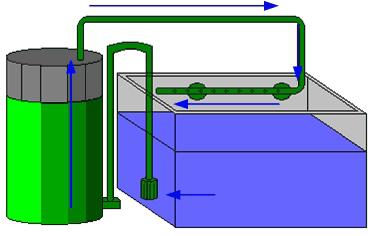
The operation of such a device is as follows: water from the aquarium enters the device, passes through the filter elements, and then returns back to the fish.
An external filter has the following advantages:
- it does not take up useful space inside the aquarium;
- the contents of the aquarium look more aesthetically pleasing without such devices;
- Filter media purify water better.
Of course, among the huge range of such devices, you can choose the one that suits all your needs. But their prices are also too high. So why not take the opportunity to make an external filter yourself? This idea is easy to implement. It turns out that everything you need can be easily purchased in stores and on the market, and the assembly and installation work itself is simple enough that even a beginner can handle it.
How to care for an aquarium filter?
For the filter to work properly, it needs to be cleaned regularly. clean. Otherwise, it will begin to work worse, and then completely pollute the aquatic environment (the latter applies to internal filters).
The smaller the filter area and the larger the water volume, the more often the filter needs to be cleaned.
To determine how often you should clean the filter, you should not only carefully read the manufacturer’s instructions, but also observe the filter in operation. If it starts to work weaker, then it’s time to wash it. Small filters may require weekly cleaning, while larger models may require one cleaning every 2 months.
In order not to destroy the colony beneficial bacteria, wash the filter with water room temperature and don't do it too carefully. In addition, you should not wash the filter if you change the water in the aquarium, add new fish, or introduce new food, otherwise you will upset the established balance in the aquarium.
Replacing the washcloth in the filter - one more important point. You shouldn't do this too often. Wait until it begins to lose its filtering ability and shape. In addition, in the internal filter, the washcloth consists of several parts, and only one of them needs to be changed at a time, so that subsequently beneficial bacteria from the “old” parts quickly spread to the new ones.
Remember that the filter in the aquarium must work constantly and without interruption, so choose a suitable model responsibly and do not chase the cheapest option. Stop your choice on quality equipment, which has proven itself and will serve you for a long time.
Homemade external filter for an aquarium.
Being an aquarium hobbyist with little experience, I came to the conclusion that internal filter It doesn't do its job in my aquarium. And only the inhabitants of my aquarium suffered from frequent filter maintenance.
 Having studied the information on filters, I came to the conclusion that the clear and correct solution is to use an external filter. Biofiltration is extremely effective, and no method of water purification can even partially replace it.
The composition of water purified by an external filter is approximately similar to water from slow-flowing natural reservoirs. With a weekly refreshment of a third of the volume of the main aquarium, it can be considered that the ichthyofauna and hydroflora are contained practically in a flowing natural water- hence all the successes achieved in systems with biofiltration.
The bad news for me was that the cost of the external filter turned out to be commensurate with the cost of the aquarium itself.
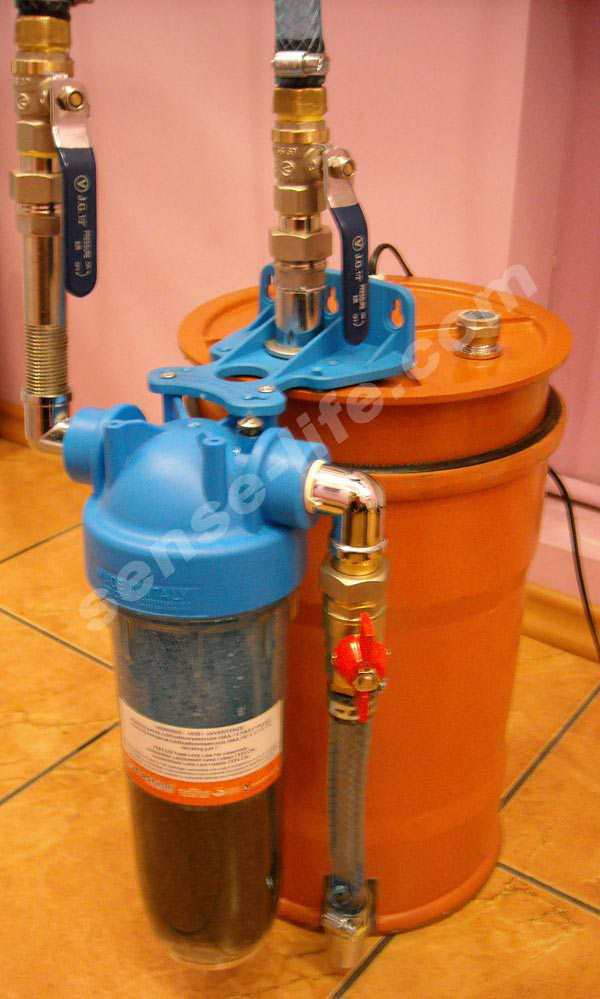
Having become familiar with the design of external filters, I decided to make my own analogue of the external Eheim filter.
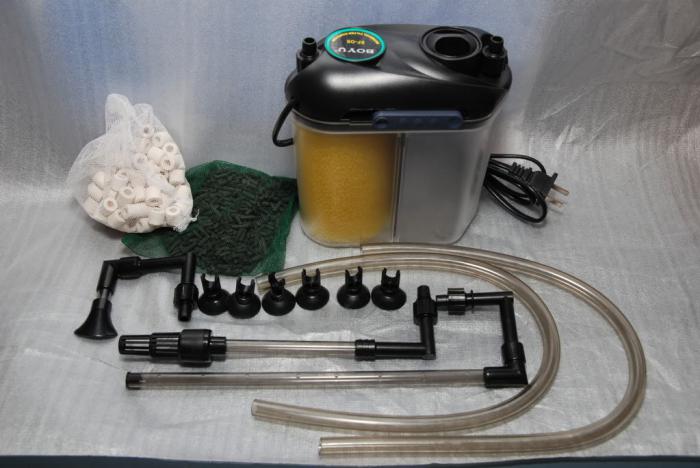
To make a homemade external filter, we purchased:
— Pump (fountain pump), RESUN, made in China, 30 W, 2000 l/h.
— PVC coupling for sewer pipe d=200 mm. + 2 plugs for it,
- taps, angles, bends, etc.,
— PVC pipe d=20 mm. for receiving and supplying water to a 4 m aquarium,
- flask from a household filter,
— filter fillers.
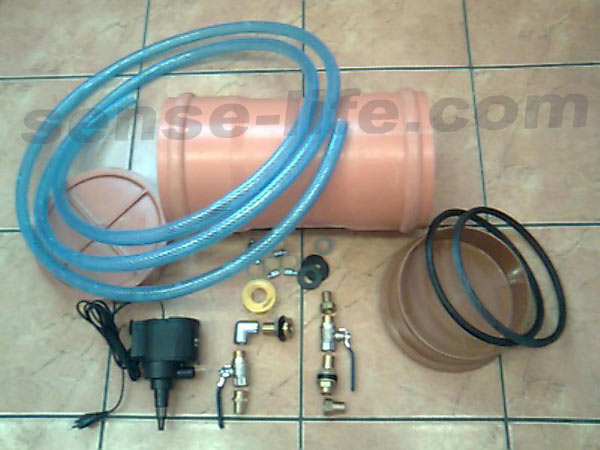
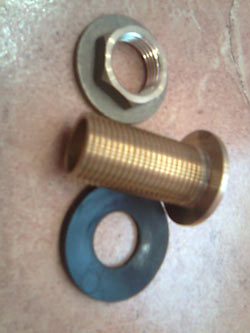
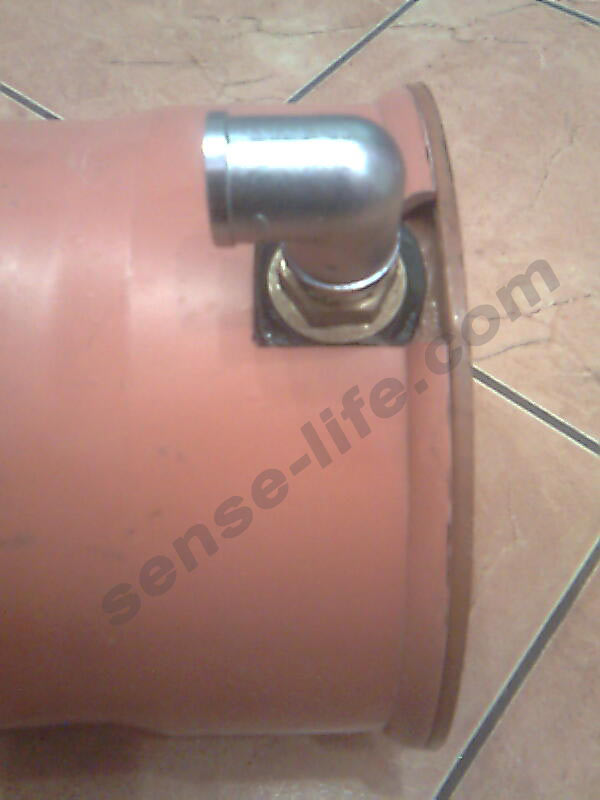
To insert into the plugs, fittings of the following design were used.
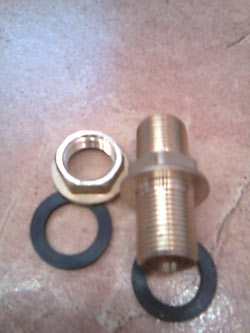
I chose this pump due to the fact that the filter has many kinks in the tubes and the final performance eventually dropped by half.

I drilled holes in the top and bottom plugs for supplying and pumping out water. When installing the fittings, I used rubber gaskets with the additional use of silicone sealant.
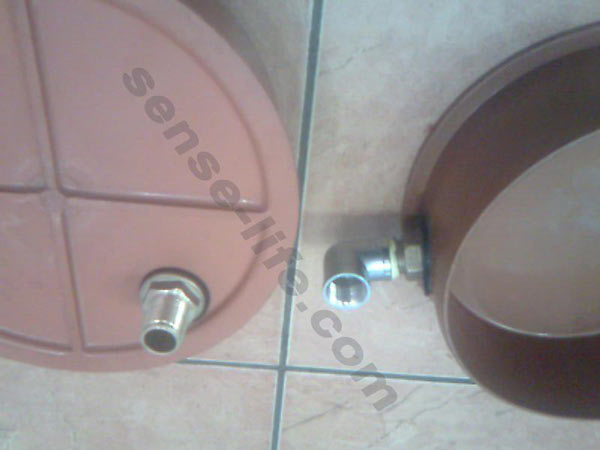
I tried to insert the plugs into the coupling with sealing rubber bands and I couldn’t do it, it was too tight. Realizing that even if I manage to insert the plug, I won’t be able to pull it out. Based on this, I cut off the edges of the coupling so that when disassembling the filter, if anything happens, you can remove the rubber band and thereby depressurize the filter. At the bottom of the coupling I made a seat for the inlet fitting.

The cut edge of the coupling will later be installed inside the coupling and will hold the mesh.
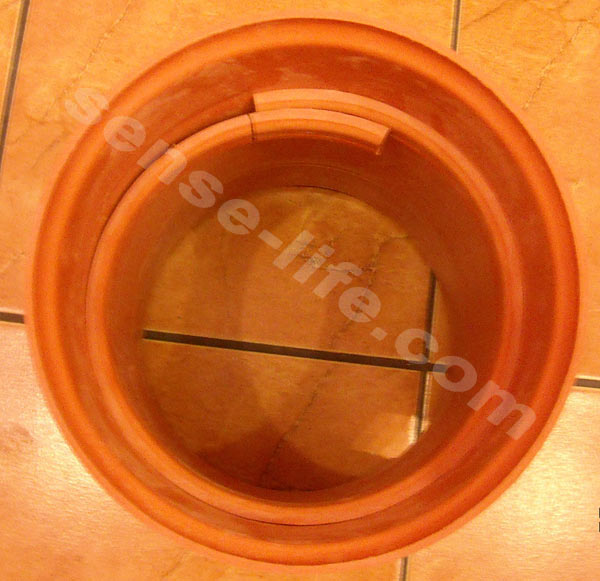
A mesh is installed in the lower plug above the level of the fitting. To do this, I had to beat up the vegetable drawer.
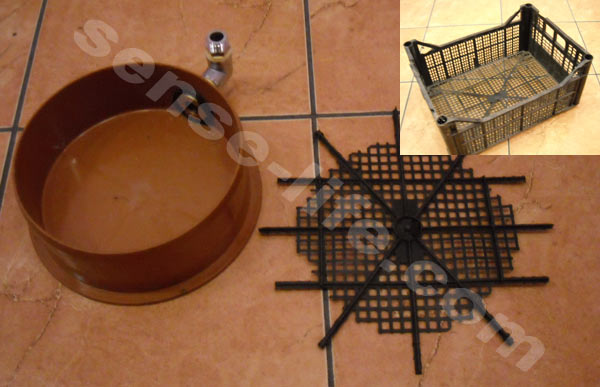
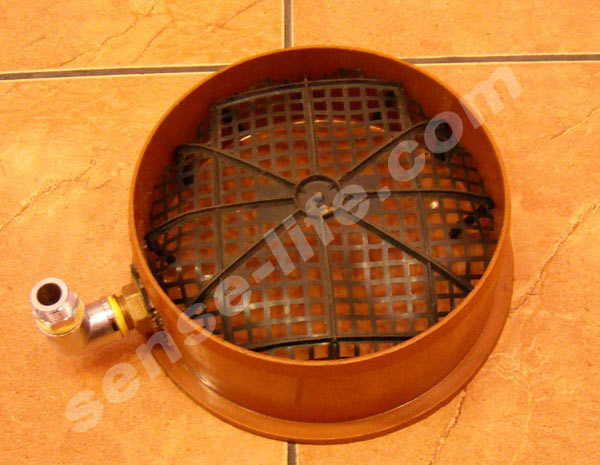
After this, with a clear conscience, we can install the lower plug into the coupling. Since sealing gum will not be used here, be sure to coat the entire area of the plug with silicone. And after installing the plug, we additionally coat the joints inside and outside with sealant.
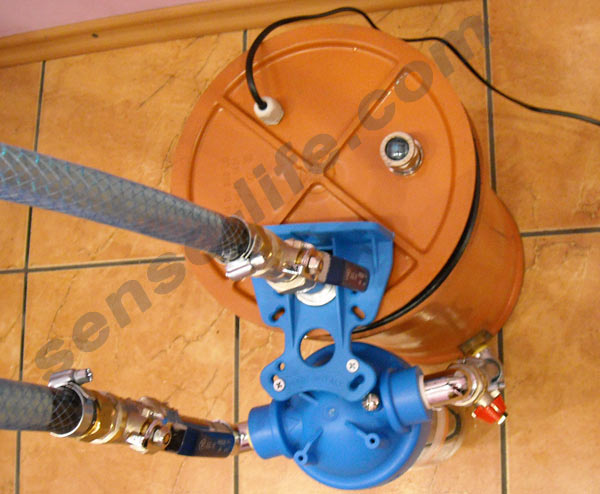
I additionally drilled a hole in the lid for the power cable and air vent. There was no need to attach the pump to the plug; it was already securely secured using a piece of hose and a power cord.

To seal the power cord, I used a fitting similar to the one used in street lamps. I installed a switch in place of the broken wire.

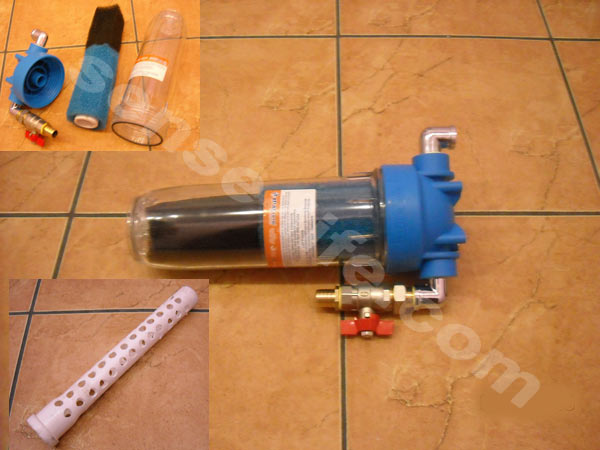
Under the inlet pipe, I installed a bracket for attaching a household filter flask, which will serve as a pre-filter for rough cleaning. It would be possible to do without it, but then you would have to install a sponge on the inlet pipe directly in the aquarium, or wash the canister every month (in my plans, the canister will be washed at least once every 6 months).
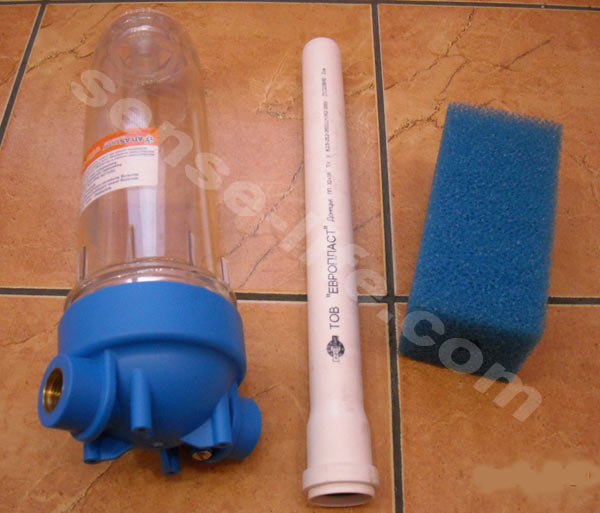
For the production of pred. sewer filter needed PVC pipe d=32 mm. In which many holes were drilled. It could be used, additionally, in the previous one. activated carbon or zeolite filter, but first I decided to make do with a foam sponge.
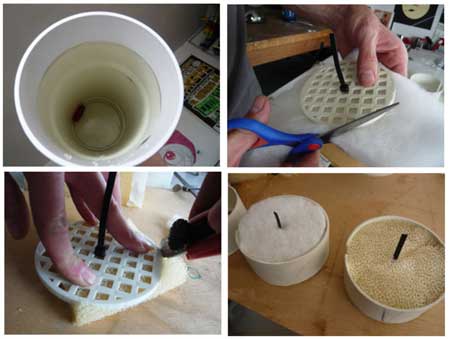
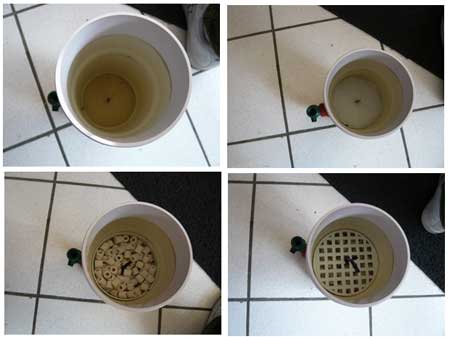
When all the filter parts are assembled, we begin filling with fillers.
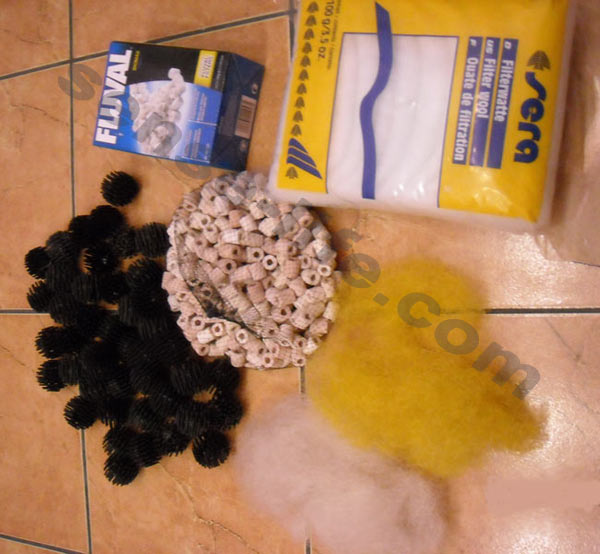
1 layer. First of all, we arrange the material for coarse filtration at the bottom. Foam rubber with a large cell is most suitable for these purposes. But unfortunately I was unable to find sheet foam rubber for aquariums of a suitable size. And instead he used what looked like a wad of fishing line.
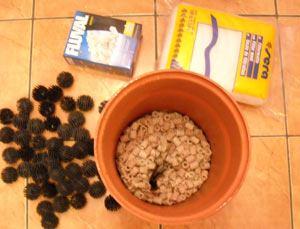
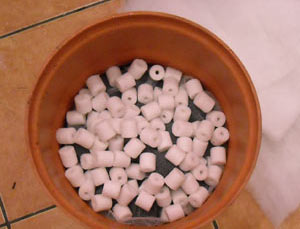
2nd layer. Fill with ceramic rings. The purpose of their use in a filter is to branch water flows and uniformly distribute its current over the entire transverse area of the filter material.
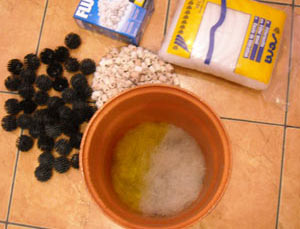
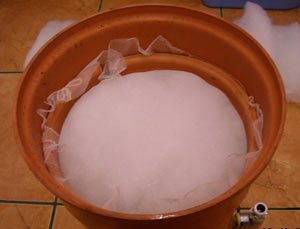
3 layer. We lay a layer of foam rubber with a small cell. In my case, padding polyester was used.
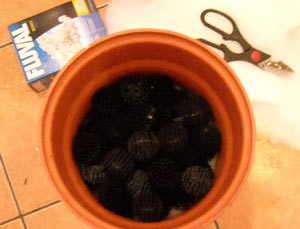
4 layer. We fill the substrate with “bio balls” for colonies of nitrifying bacteria. All the mysteries of the nitrogen cycle take place in this section. Here heterotrophs, nitrifiers, and denitrifiers coexist peacefully, regularly fulfilling the duties assigned to them; The working volume of the chamber should be 4/5 of the capacity of the biofilter housing. Expanded clay (preferably crushed) can be used as a substrate for bacteria because it has a porous structure.

5 layer. It's not required, but I decided to add FLUVAL substrate. Outwardly, it looks like ceramic rings, only the material has a porous structure. If you take a ring in your hand, plug the hole on one side with your finger, and blow into it on the other, then all the air will come out through the micropores
6 layer. The final layer, directly in front of the outlet intake hole (i.e. in front of the filter pump), should be placed with synthetic padding. It will protect the rotor from dirt particles getting into it.
The homemade external filter for the aquarium is ready, the assembly was successful. Testing showed that the pump performed quite well, although the performance characteristics of the pump turned out to be 2 times less. The top cover is not fully installed due to the strong tight fixation of the sealing rubber. If you close the lid all the way, it is quite possible that you will not open the filter again.
Filter maintenance boils down to cleaning the prefilter as it gets dirty. Opening and washing the canister after half a year. I would like to note that only ceramics and foam rubber need to be washed in the filter, and always with aquarium water. The substrate is washed only as needed.
The first time after startup, a homemade external filter actually works only as a mechanical one. Beneficial bacteria have not yet colonized the substrate. Dirt fills the filter, which reduces its performance. The water pressure gradually drops. But there is also a reverse process. Dirt is food for bacteria. They break down the organic substances that accumulate here and process them into nitrate, i.e. The biological self-cleaning of the filter begins.
Complete colonization of the substrate with colonies of beneficial bacteria occurs in 2-4 weeks. And then it all depends on which process will take over - pollution or self-cleaning. If the former, then the filter will continue to get dirty. Not as intense as the first two weeks, but inevitable. When the filter performance drops below 30% of the maximum, it must be cleaned and restarted, otherwise the so-called. “tipping over” is a violation biological processes, as a result of which toxic substances are produced and released into the aquarium.
If self-cleaning takes over, then the filter, on the contrary, is gradually freed from dirt and the productivity that has fallen to 50-70% of the maximum is restored. Theoretically, after this the filter should work forever. In practice, productivity is not fully restored, and over time, stagnant zones still form inside the canister. Therefore, I recommend cleaning it from time to time, even if the water pressure is strong.
In addition, I would like to note that all metal parts must be free of lubricant. Because a drop of oil can spoil a ton of water and thereby destroy all your inhabitants. For this reason, it is advisable to use plastic parts (fittings, corners, taps), which in turn are much cheaper than metal ones.
P.S. I later replaced the hoses with corrugated ones (which are used to drain the washing machine), since PVC hoses easily wrinkled and thereby blocked the access of water.
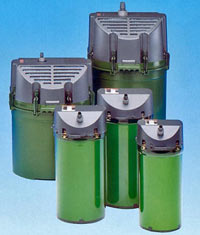
The external canister filter is the highest performing and most efficient aquarium filter. Since purchasing a canister aquarium filter costs a decent amount of money, aquarists tend to make the filter themselves, using inexpensive fillers and components that are easily purchased at hardware stores.
I bring to your attention detailed step by step instructions for self-production of an external canister filter. You can find out what an external filter is.
The design of the filter is interesting because the author of the filter did not use rare and expensive materials. All components are purchased at plumbing stores and regular hardware stores. If you are not a fan of aquarium brands, then your savings will be 50-60% of the price of a branded aquarium filter.
I should note that the advantage of this design is the possibility of easy modernization for greater productivity.
How to make an aquarium filter
So. To create a filter you will need the following materials:
- 1 meter piece of 160 mm PVC pipe
- 1 PVC cover
- 1 PVC screw cap
- 4 PVC gratings
- PVC glue
- 1 L-shaped tube
- 2 two half-meter flexible tubes
- 2 Regular garden valves
- 1 valve
- 1 Filter material
- Sealant
- 2 hose adapters
- 1 Pump 700 l/h
- 1 Thick flexible hose
- 1 Hands, one pair
Making a filter
Make water inlet holes by cutting semi-circular holes in the bottom cover to attach the one-way inlet valve.
Then make a hole for releasing water from the filter on the top cover, where we install the outlet valve using seals and sealants.
We glue the PVC parts together, having previously cleaned and sanded them a little.
Make a hole to compress the canister filter
![]()
To attach filter materials, we use PVC gratings. We cut 3 pieces of pipe, 6 cm each, reduce the diameter of the pipe and glue in PVC gratings. Reduction is necessary in order to fit the housing of the external canister filter.

We attach the pump to the top cover and connect it to the valve.
We put and attach filter media into the previously glued baskets.
We put homemade fillers inside the filter. First we lay the sponge, then the fiber and bioceramics. You can use any other filter media that your aquarium requires.
We connect the hoses with the valves. The water supply valve is one-way and prevents water from escaping back into the aquarium.
Fill the homemade filter with water and leave it for 24 hours to test the tightness.
We connect our homemade external filter to the aquarium. Two weeks later: the flight is normal.
How the filter works
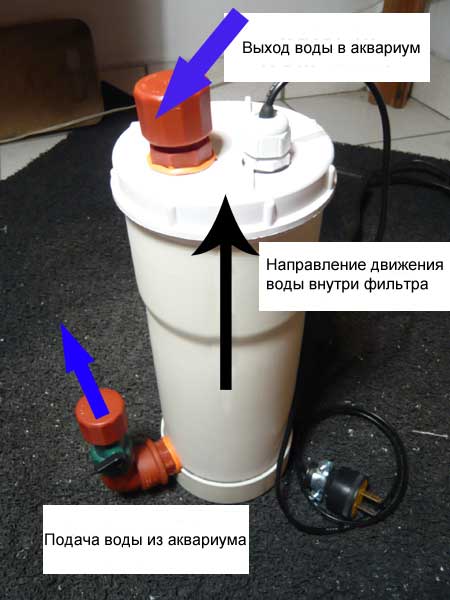
Water from the aquarium is supplied to the bottom valve of the canister filter. As the filter fills and the pump compresses, the aquarium water passes through the filter media and enters the filter outlet valve, from where it returns to the aquarium.
As you can see, nothing complicated and easy to repeat.
When a fish pestilence begins in an aquarium, the owner’s first reaction is to run to the aqua store in search of a remedy for this disease and misfortune. But, by doing this they only worsen the already unstable situation in the aquarium, and the dying of the fish begins to occur faster....
The question, of course, is interesting for a novice aquarist. There is a lot of data on the Internet, often incorrect, explaining how many fish can be put into an aquarium, based on the displacement of this aquarium. Beginners, having picked up such data, release fish and have no idea how overpopulated their aquarium is....
Every aquarium should have a filtration system that will purify the water, ensuring the health of the fish and plants. As you know, the waste that the inhabitants of a reservoir leave behind, as well as food residues and suspended soil particles are very harmful to fish. Uneaten food oxidizes, turning into toxic ammonia. To ensure that the water undergoes all stages of purification in a timely manner, it is better to make an external filter for the aquarium with your own hands. It will prevent the appearance of harmful substances that can poison living beings.
Quickly navigate to the article
How to design an external filter?
Before making your own aquarium filter, you should understand how the filtration system works. Biological filtration in an aquarium is a process by which ammonium is converted into nitrites, then into nitrates. Biofiltration is carried out thanks to beneficial microorganisms that live in the aquatic environment. This process depends on the amount of oxygen absorbed, so it is important to maintain a constant supply of aeration in the tank using a filter and compressor.
See how a homemade external filter made from plastic bottles works.
To make an external biological filter with your own hands, you should prepare the following materials:
- A plastic bottle from mineral water volume 0.5 l;
- A plastic tube with the diameter of the neck of this bottle;
- Sintepon;
- Compressor and hose for it;
- Aquarium pebbles with a diameter of up to 5 mm.
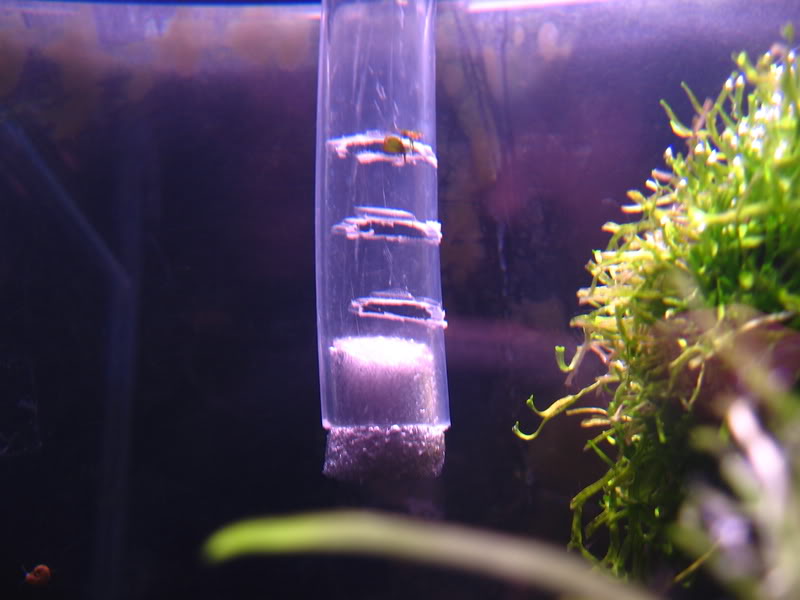
The plastic bottle must be divided into 2 parts so that it produces fragments of different sizes. You should have a cup with a neck and a large bottom. The bowl should be directed with the neck side up and firmly seated in the bottom. In the outer circle of the bowl, you need to make several openings through which water can flow into the filter. The recommended diameter of the openings is 3-4 mm, their arrangement is in 2 rows, 4-6 holes in each.

Next, the tube should be inserted into the neck of the bowl so that it fits tightly into it. After the procedure, you should not notice any gaps or holes between the tube and the neck. The length of the tube itself is selected taking into account the protrusion above the structure by 2-3 cm. However, it should not touch the bottom of the bottle. If the step is done incorrectly, water will not be able to flow into the mechanism.
Take gravel and pour it on top of the bowl in a layer of 6 cm, and cover it with a piece of padding polyester. Install the hose from the aerator in the tube and secure it. When the mechanism is ready, it needs to be placed in the aquarium. Then you should turn on the compressor so that the filter can begin to do its job. Beneficial microorganisms will appear in the operating equipment, which will convert ammonia into nitrates, which forms a useful microbiological environment in the water.
How does a handmade external filter work?
A homemade external filter is designed on the basis of aerolifting: air bubbles that come from the compressor rise to the tube from which they flow upward, and lower the water flow from the filter with them. Clean and oxygenated water enters the upper compartment of the glass and passes through the gravel. Next, water enters the bowl through the hole, goes down the tube, and enters the reservoir. The synthetic winterizer here functions as a mechanical filter. This material prevents the process of silting of the gravel substrate.
Chemically and mechanically purifies water. It is better to install such structures in large aquarium volume 200-400 liters. For larger aquariums with a capacity of 500-1000 liters, you will need several of these devices. Branded external water purification systems are expensive, so it’s better to make them yourself. The materials are inexpensive and accessible to everyone.
Another way to make an external filter
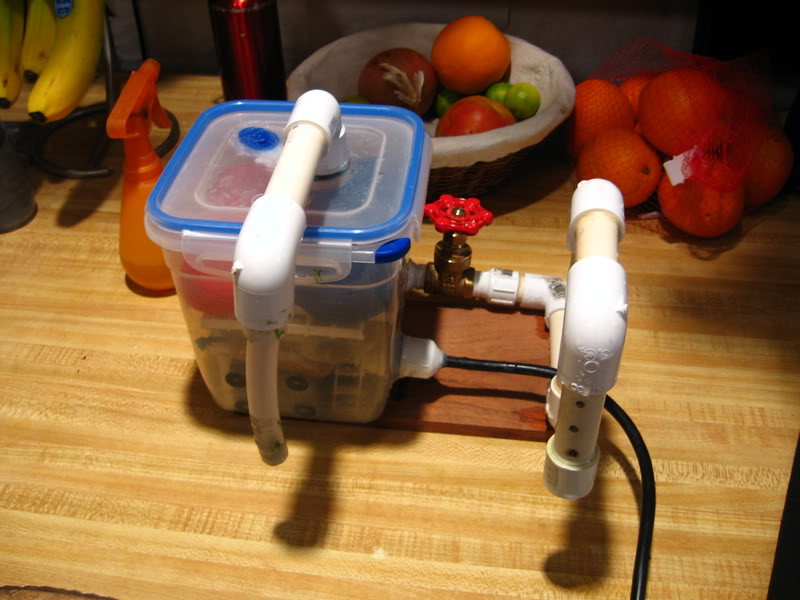
For the next external filter you need to prepare the following parts:
- A plastic container with a tight-fitting lid (you can take a box for storing cereals);
- Sponge or thick material with a porous structure;
- Sealed water pump and fitting for attaching to the container lid;
- Material for biological filtration (medical cotton wool, ceramic granules);
- Several suction cups, resin with sticky texture.
See how to make an external filter with your own hands.
Instructions for making a filter:
- You need to take a thin file and make cuts along the entire perimeter of the lower compartment of the plastic container. The cuts will let water through.
- Place a sponge in this plastic container and cotton wool or another element for biofiltration on it.
- Make holes on the container lid that will correspond to the diameter of the pump fitting.
- Insert the fitting into the hole made and secure it with resin or aquarium silicone.
- A pump should be screwed onto the fitting, which can create pressure inside the container.
- Several household suction cups should be attached to the wider side of the container.
- The internal filtration system can be considered complete. Suction cups will be able to hold the device on the wall of the aquarium.
Such a homemade filter can be mounted not on the wall, but placed on the ground of the tank. The soil will also play the role of a biological filter. A plastic nozzle in the form of a long tube extending outward can be attached to the sediment outlet. Then, after purification, the water will be saturated with oxygen.
Instead of a small plastic container, you can use a plastic canister or a canister made of stainless, non-toxic metal. This design is suitable for large aquariums; large cassettes and cartridges with filtration elements can be placed in it. Homemade filters need to be serviced at the same intervals as branded ones.
If the filter is leaking, check all its elements:
- Are the mechanism clamps tightly closed? Perhaps you were careless in securing the parts with glue or resin. The problem can be solved by re-fastening the clamps.
- While the filter is running, the sponge or suction cup may become dirty. Mucus and debris can be cleaned with water. Check the cleanliness of the structure monthly.
- Damage to the plastic container, which will have to be replaced when remaking the filter itself.
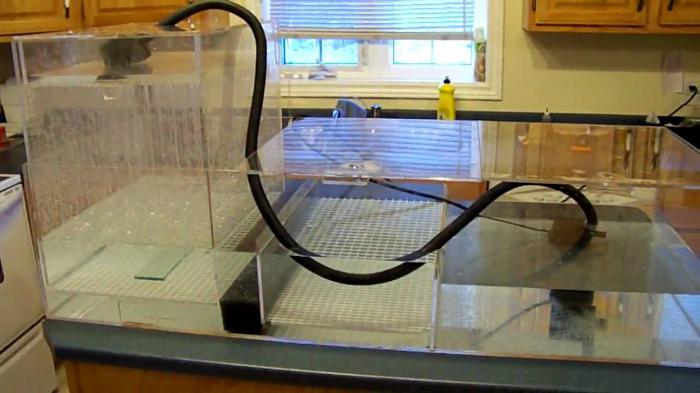
The issue of choosing a filter for an aquarium is always quite acute. Especially if it's small aquarium- about 10 liters... Even special miniature filters take up quite a lot of space in it and spoil the picture of the underwater world with their alienness.
Of course, there is nothing wrong with this if the aquarium is used as a temporary one - a spawning tank, a nursery, a quarantine tank... But if we decide to make a nanoaquarium-aquascape, then the problem emerges in all its glory.
The solution is to use an external filter (external filter). But…
Firstly, external filters are by no means cheap.
And secondly, they are designed for large aquariums and the flow of water that is created by such a filter will simply wash away our entire scape. Storm in a teacup...
There's only one thing left to do - make it small DIY external filter.
This thing is already working successfully for me and in this material I share with you the method of making this device.
We will need a container for food products with a hermetically sealed lid, hose, cable entries (glands), submersible pump and filter element (sponge).
A little more detail.
You should start by choosing a pump.
Attention should be paid to such a characteristic as the height to which the pump raises water. Please remember that the manufacturer indicates maximum height of the water column. Those. Even if the upper end of the hose is open, the water will not rise higher!
Those. if you plan to install the filter, for example, 30 cm below the top of the aquarium, then you need to choose a pump that can raise the water by at least 50 cm. Otherwise, it will not be able to circulate water.
The choice of pump determines the choice of container (filter housing) - it must fit in it - and hoses. To be precise, the output hose, but I think it makes sense to put the same ones at the inlet and outlet. You need to choose a hose with a diameter suitable for the pump outlet.
In turn, the diameter of the hose determines the choice of cable entries.
However, in any case, these inputs must have a degree of protection of IP68. Then there is no need to worry about leaks.
Actually, choosing “spare parts” is the most difficult thing.
In my case ( aquarium 10 liters, the filter is standing next to it on the shelf) a Chinese pump HAILEA HX-800 with a power of 3 W with a water rise height of 50 cm and an outlet tube diameter of 9 mm came up.
The hose, accordingly, was purchased 9/12 mm (1 meter was enough for me). The cable glands fit PG-13.5 (2 pieces - for inlet and outlet hoses) and PG-7 (1 piece for pump wire output).
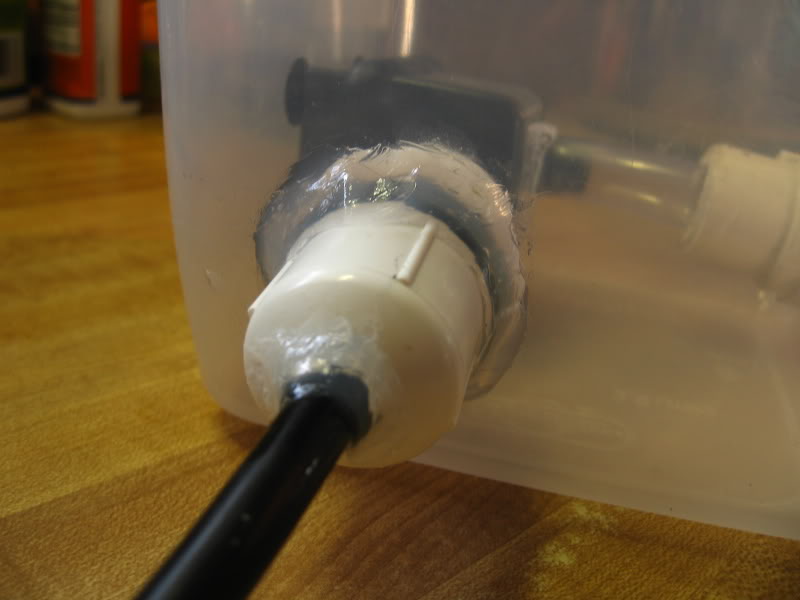
After everything has been purchased, we make three holes in the container (after placing the pump in it and figuring out where it is best to arrange the entrance and exit) and fix the seals in them. There is no need to tighten the thread too much, otherwise the sealing gasket will break and leak.
The next step is to barbarously cut the pump wire in half. The fact is that the plug does not fit into the seal, even if it cracks...!
We install the pump in a container, push the wire out and fix it in the gland, and build a switch into the cut of the wire (which should be on the outside!). Well, or we do a regular twist.
We insert and secure the inlet and outlet tubes into the seals (the outlet tube, of course, is put on the pump outlet).
Here, in fact, ours is ready homemade external filter. All that remains is to fill it with water and check the tightness.
After testing, cut to size and place in a container. filter element, pour water into it, close the lid and secure the free ends of the inlet and outlet hoses in the aquarium with suction cups.
Such a minimalistic external filter quite successfully copes with its responsibilities in nano aquarium.
If desired, you can improve the design by adding a neck for filling with water, a flute at the outlet, special fillers for filters, etc.
Did you like the article? Was it useful? Give Google a plus sign!


 Leo born in the year of the Rabbit")


