By the way, they can also be made in different ways.
Spring has come and I wanted to pick out interesting and beautiful options creating tulips from paper with children. Moreover, there are a lot of simple techniques with ready-made diagrams and templates.
And I talk about how to make such beauty in this article.
DIY paper tulips using origami technique: 4 step-by-step instructions
Origami is a very popular technique. It captivates because it allows you to create so many different crafts without using scissors and glue. And also develops fine motor skills, finger sensitivity and attentiveness.
Flowers can also be made using this technique. Moreover, they can be completely different. I have prepared 4 diagrams for you, following which you can fold a tulip.

So, for work you will need a sheet of paper. Its shape should be square.
If you are making such a craft for the first time, I advise you to take a large sheet of paper so that you can make a test version and understand the scheme.

Using double-sided sheets you can make a whole bouquet of bright flowers.

If you couldn’t figure out the diagram, even though it’s detailed, then watch the video, in which a craftswoman creates a flower. She shows each step in detail and slowly, I think you will definitely succeed.
Now let's move on to easier options. For example, a panel made of such paper tulips looks very spring-like.

They are made very simply. Therefore, immediately prepare squares of the desired colors with sides of 3 centimeters.

Another simple option for younger children. Under the supervision of their parents, they will definitely be able to repeat this simple scheme. A flower made according to this pattern looks good in applications where cardboard is used as a basis.

The fourth diagram is provided so that you can make this kind of craft.

Paper tulips are voluminous and look unusual.

For good fixation, use glue. Of course, you can do without it, but we want to attach our buds to the surface. Therefore, I advise you to glue both ends. Also, if the ends hold well, the convex front side will not dangle.

I would like to introduce you to the technique of modular origami. Its meaning is that first many identical parts are made according to the same pattern, and then they are inserted into each other, creating the necessary shape.

This type of origami is not for everyone, because it involves painstaking small work. But I know that some masters create entire paintings using this technique.
How to make paper tulips with your own hands quickly and easily?
There are a lot of options for creating such a tulip. For this article I selected light options, but despite this, the products turn out to be very decent. Especially if you approach creativity with imagination and stock up on different scraps of wallpaper or backgrounds for creativity in advance.
For example, such flowers are created very simply.

Manufacturing process:
1. You need to cut out the parts according to this template.

2. First, take one large part, glue a rod to its lower part, it can also be made of paper.
3. Glue the second part on top. This way we beautifully hid the tip of the stem.

4. Glue the remaining parts on top of each other.

What do you think of the idea? This application is also suitable for children in kindergartens.
Another option for a simple craft that your kids will definitely love for its brightness.

Manufacturing process:
1. Take a square sheet of double-sided paper. Find its diagonals and middle, as we do in origami.

2. We make cuts along the perpendiculars to the middle of the side.

3. And bend the upper ends, forming a petal.

4. We do this four times, because a square has four corners, so the tulip has four petals.

5. Roll up tubes from a green strip; take the length of the strip to be 10 centimeters. Secure the edge with glue so that the tube does not unravel.

6. Cut one end into five parts and bend it.

7. Glue the upper parts of the stem to the bud. PVA glue will do the job perfectly.

These are the flowers we got. All that remains is to insert them into the vase. Here its role is played by a bee made from a toilet paper roll.
You can use a paper towel or foil roll.

If you use additional materials, you will get a more original craft. For example, in this version we used fluffy wire as stems.

For one bud you need to cut out four parts. You can draw them by hand or use the template I provided below. All parts are folded to the front side in the middle. And then the wrong sides are glued together for all four parts.

The diagram shows this process in detail.
Now see how to hide the end of the wire. It can be glued before you finish forming the bud, or you can do it after, if you leave an un-glued space at the bottom.

That's all, you can give the bouquet.
The following flowers look very delicate. They are glued at the edges, and the bud looks as if it has not yet opened.

Manufacturing process:
1. For this craft you need three parts: 1 blank with six leaves, a second with four and a circle that forms the middle.

2. A flower is assembled from a circle, then a part with four petals is strung on a wire.
3. And these layers are covered by the part that has six of them.
The more you twist the edges of the outer part, the more closed the bud will be.
I also suggest getting acquainted with an unusual option for creating tulips, which is shown in the video.
What do you think of the idea? These tulips have an unusual shape, but I think your kids will also be happy with this craft.
Master class of corrugated paper flowers with candies
Corrugated paper allows you to create very realistic products. It easily takes different shapes, stretches and twists. Now there is a whole direction for working with it, but most often it is used in creating gift flowers from sweets.
Today I have prepared a very clear master class for you so that you can make such a cute bouquet for your loved ones.

One tulip requires six parts.
Take any tasty and round candies.
1. We did everything so that the petals will be stretched in width, so they become concave and better cover the candy.
2. For the stem, take a wire, then we will wrap it with a thin strip of green corrugated paper.

3. The candy is attached to the wire with hot glue, and the tatem is already wrapped with petals.
4. We also fix them with glue. The more petals you make, the more closed the bud will be.
Corrugated paper holds its shape well, so it can be curved. You will need this to make the leaves.
You can also make such a postcard with your own hands. Where the main composition is also made of flowers with sweets.

To prevent the ends of the candy wrapper from peeking out from the bud, glue the upper end to the candy with tape.
You will need:
- wire,
- delicious sweets,
- hot glue,
- sheets of white and yellow paper
- pencil
- scissors
- corrugated paper in green, pink and purple colors.

1. We fix the candy on a wire, because here we have few leaves and they may not hold the treat inside.
2. We begin to wrap it in petals.
3. Then we cut off a thin long strip of green corrugated paper and begin to carefully wrap the wire so that there are no gaps.
4. The edges should always be fixed with glue.
5. Leaves are added during the process of wrapping the stem.

6. For beauty, curl the tips of the leaves a little with your fingers.
7. Our flowers are ready, let’s do the decoration. We draw the basket in the same shape as shown in the photo. For this we will need a pencil and a yellow sheet of paper.

8. Glue this cut out piece around the perimeter to the white sheet base. We do not apply glue to the middle so that there is a pocket left. You can put sasal or cobweb inside. You can do without it.

9. Trying on flowers. If they turn out to be too high, then simply bend the rod.

Now all that's left is to find the decor. To do this, use sequins, braid or lace. In general, any finish will do.
Step by step we make a three-dimensional applique from colored paper
Volumetric applications are always somewhat more difficult to make than flat ones. But they look more impressive and interesting. I'll show you today interesting option quickly creating a voluminous tulip bud with your own hands. A lot can be done with this technique. interesting crafts, which will not even be similar to each other.

Manufacturing process:
1. So, for this envelope you need to cut out five identical parts. Remember, we have already cut out these above in the article.

2. Find the middle of each part and run your finger along it well.

3. Now we fasten the two edges of two different parts with a stapler. And we will repeat this for the remaining three blanks. We have one bud ready.

4. Take a baking napkin, fold its edges and glue it to the base sheet.
5. We fix the leaves on it, which have an elongated shape and are also folded lengthwise in the middle.
6. And attach the bud to the leaves.

You can use the same technology to make a very simple application.

Or a bud like this with a twist. Due to its structure, it can easily fit into any fold. It can also curl up if you decide to close the applique.

Or it can become a self-sufficient element in a Valentine card or.

You can even create several buds of different sizes and colors.

For all voluminous crafts, it is better to take double-sided paper. This way the white edge won’t be visible if your edges suddenly don’t match.
This paper is available in all office supply stores and creative departments.
My daughter will love this low-growing tulip. I think it won't be difficult to do it.


By the way, it is subtly noted here that from below, most of the leaves of these flowers, regardless of color, have a pale yellow base.
Schemes and templates for cutting for children
And, of course, in order for all the crafts to turn out neat and even, it is better to stock up on a template in advance. I have found the most common options in creativity so that you do not waste time searching.
So, this tulip can be made if you simply print the template on paper or transfer it by hand.

This flower requires at least three parts. Each of them is folded inward in half so that the front part is concave. And glue all the wrong sides together, aligning the edges.

An interesting idea for tulips, it can also be repeated.

This version of the scheme is suitable for her.

Now I’ll show you how to correctly cut a straight part.
1. Fold the rectangular piece of paper in half.
2. Find the fold and draw a contour on one side.
4. You use scissors to cut out the bent part along the lines and unfold the workpiece.

You can use this template for applications.

To create volume, you need to bend the side parts of the parts cut according to the bottom diagram. A cool idea that allows those for whom it is difficult to comprehend the origami technique not to use it.

These are basic diagrams and templates, but based on them you can create an unlimited number of crafts.
All the ideas are very simple and beautiful, I'm sure you will find suitable option for yourself! Add the article to bookmarks so that you can always quickly find it and draw the tulip template.
Good afternoon Today we will tell you a wonderful master class for parents and educators- a joint craft for the little ones! Let's create a beautiful and bright applique with tulips - postcard for Birthday or March 8th. Let's imagine two options: one very simple for kids (2 - 5 years old) and the second for older children (5 - 8 years old).
Paper tulips applique.
Option #1
Next option greeting card, this is more complicated - we suggest doing it together with an older child (5-8 years old). To create this very interesting and unusual application - postcards you will need: 
- Colored and white paper (5 colors: white and red for buds, light green for stems, light green and dark green for leaves, and light blue or dark blue for a bright background)
- Scissors
- Template for petals and leaves.
1. We make applique elements from the template presented below. Three large ones made of white paper, in the shape of a tulip bud. Three red petals, three white petals. Six pieces of slightly curved petals. For leaves: six dark green and six light green.

2. First, we cut out three large elements - these are tulip buds, three red petals, three white petals and six slightly curved petals.

3. Then we cut out the elements for the leaves: six dark green and six light green. Moreover, dark green ones should be several millimeters larger than light green ones.

4. Let's take scissors. Along the outer edges of the white elements of the petals, it is necessary to make a fringe, that is, small thin cuts.

5. Now we take glue and carefully glue the curved red petals to the large white buds, and the red ones to the white petals (here you should also pay attention that the red petals are slightly smaller than the white ones).

6. We look at the picture - it should look like this.

7. We complete the work on the bud: we connect the petal to the large bud - we put it under and glue it in the middle from the bottom.

8. These are the buds we got at this stage.

9. Now let's start creating the leaves: apply glue only to the edge and glue the light green leaves onto the dark green ones.

10. We take the base of the postcard, a blue A4 sheet, and place all the applique elements on it. Preliminarily look and try on how the flowers will be located on the sheet, then glue. First the stems, then the buds of the stem on top and the leaves below.
11. Design your gift in an original way: you can put it in a frame, you can stick decorative tape around the edges as a frame, or you can make a frame out of colored paper.

Congratulations! Wonderful and beautiful postcard- the gift is ready! Let the child give a postcard to his mother, grandmother or teacher! Such a gift from a child will be received with warmth, touching and will definitely be liked.
Applique tulips made of colored paper.
Option No. 2
1.
To bring the simplest postcard to life you will need: 
- Colored paper (5 colors: three different colors for the buds, green for the stems, and one more for the vase)
- White paper: base for applique
- Scissors
2. Let's take colored paper and first cut out the tulip buds. To do this, we suggest folding a colored piece of paper in half and cutting out a semi-oval shape on one side and with three teeth on the other side. From green paper, cut out strips about one centimeter wide (attach the first cut strip to the bud; if the size is good, use it as a template for the other two strips). Just like the buds, we cut out a vase - folding a colored sheet in half to make a proportional vase.

3. Now we’ll make an application with the child. Place a vase in the center of the card. We place stems under it and tulip buds on top of the stems. Then carefully apply glue and glue the applique elements one by one: first the stems, then the vase, then the tulip buds.

Congratulations! A cute card made by a child’s hands is waiting to be solemnly presented!
Hello everyone, hello!! How are you feeling?! Today I have something very fun and sublime, and such that I want to surprise and please the people close to me. And what could be better than a bright bouquet of flowers!! Agree that anyone will be pleased to receive such a gift with or without reason.
What if the flowers are not real, but made of paper?? I think this will be very useful. After all, there are now so many ways to make such lovely bouquets that you can’t even tell them apart from the real ones, but they won’t fade and will delight the eye for a long time.
And I want to devote today’s topic to creating flowers from paper, but not all, namely tulips. After all, these beautiful buds are very popular and are always given on the first days of spring, congratulated on March 8, or simply given to girls, mothers and grandmothers.
In this collection you will find different ways paper tulips will be interesting for both children and adults!!
We will start, as always, with the most simple ways making flower souvenirs. I note that for crafts you will need a minimum of materials, usually sheets of colored paper, in some cases scissors and glue.
Well, let's get to work. And let's try to make a very simple flower. The folding scheme is simple, even preschool children can handle it.
To make this craft, use double-sided colored paper.
Manufacturing process:
1. Take a rhombus as a basis. Fold it in half to make a triangle (Fig. 1)
Try to lay the corners evenly on top of each other, and make the folds clear and sharp.
2. Fold the right corner so that it slightly crosses the center line. (Fig.2)

3. Now also, but on the right side, fold the left side. (Fig. 3) Bend the lower triangle back. (Fig.4)
4. To make a flower stem, take a green diamond. Bend it in half and unfold it. Fold the right and left sides towards the center line. (Fig.1)

5. Fold the workpiece in half again. (Fig. 2) Bend the lower part obliquely to the left. (Fig. 3) Glue the leg with the bud. (Fig. 4) Your tulip is ready!!
It is best to glue such work onto colored cardboard, making a composition of several flowers.
Well, since we’re talking about applique, I’ll show you a couple of works on this topic.
- Cut out 5 bud blanks and stick them on top of each other in the middle, bending the petals up.

- Or place it in a frame to create a whole picture.

- Here's an interesting cutout option.

- Well, this is the simplest applique, we cut out the details and glued them on.

- But interesting idea tulips in a vase-mug. You can write a congratulation inside, it will be a spring card.

- Volume appliqué option.

- Templates for your work, save and print.

- Awesome bouquets made of corrugated paper. How to make such flowers, read below.


And now for you another master class on making everyone’s favorite flowers. Everything, as always, is brilliantly simple and beautiful. To work you will need red and green paper and glue.

Manufacturing process:
1. Make a square out of red paper, fold it diagonally and open it. Now bend each corner towards the center.

2. Bend the inner corners to the outer sides of the square.

3. Fold the piece in half so that all corners form an even row of petals.

4. Roll our product into a cone.

5. Now bend the corner of the base twice in one direction.

6. Bend the sides towards each other.

7. Glue the finished tulips with their stems.

8. Make a stem with a leaf according to the model below:

This is what the finished craft looks like.

Now the most famous option for making a tulip using the origami technique. We all did these when we were kids. I think that such a craft is very successful, because it is voluminous and looks like it’s alive.

Well, quickly pick up some colored paper and start folding it according to the instructions.
Manufacturing process:
- Make a square from an A4 sheet.
- Fold the piece in half once.
- Now diagonally twice.
- You should have a workpiece in such a way that the longitudinal folds go inward and meet each other.
- The result is a triangular figure with folds inside.
- Fold the corners of the top layer up.
- Turn the shape over and repeat step #5.
- The slices should now meet in the middle.
- Bend the right corner to form a diamond with a fold in the center.
- Turn the figure over and repeat step #6. All corners should face up.
- Fold the right corner towards the center. And fold the left corner overlapping so that it completely covers the right corner. Turn the product over and repeat step #8. Tuck one corner into the other. Flip the shape over and repeat this step.
- Inflate the bud.
- Bend back the petals.
- Make a stem and connect it to the flower.

How cute and romantic they are!! Do you agree with me?!

By the way, you can also fold such a cute basket. It makes a great gift.

An easy and quick way to make a tulip from colored paper
Here's another great type of souvenir. Anyone can do the job, the difficulties are minimal. You will need green and red or yellow paper. First we will make the stem, and then the bud itself. It’s also better to do not a single version, but a massive one, it looks much more impressive.

Manufacturing process:
- Stem
- Take green leaf paper and cut out a 21 by 21 square. Fold the bottom sides towards the middle.
- Next, fold the top sides towards the middle.
- Now fold the bottom sides towards the middle again.
- Bend the resulting workpiece in half horizontally, then vertically.
- Pull out the stem.

- Flower
- Take red paper and cut out two 10 by 10 squares.
- Fold one of the squares diagonally and fold the bottom corners up. The result is a bud.
- Make a flower from the second square in the same way.

- Assembly
- Glue one flower on this side of the stem, and the second on the other side.
- Make several tulips to make a real bouquet and tie with a satin ribbon.


I didn’t even think that you could create something like this out of plain paper!!
Video for beginners on how to make a tulip
Well, now a detailed video on our topic, since not everyone understands the diagrams. Therefore, watch and repeat after the teacher, you will definitely succeed, even if you are new to this matter.
Red paper tulip made from A4 paper
Have you noticed that for some reason buds made in red colors are more popular?! I'm wondering why...Probably just like that!! 😀
In general, there is one more option for you to manufacture our product. I advise you to take thicker paper or thin cardboard.
We will need: green and red paper, scissors, ruler, glue stick.
Manufacturing process:
- Make a 12 by 12 square from red paper.
- Fold the resulting square in half, while pressing the side well. Straighten the workpiece and fold it on the other side, and then from one corner to the other and the second corner. You should see criss-cross and diagonal folds on the square.
- Using scissors, cut more than half of the fold along the four sides, but not all the way.
- Now glue the cut side overlapping onto the second. Do this procedure with all cut areas. As a result, you should have a bud.
- Take green A4 paper and cut it into three even pieces. We will need one such part.
- Roll the prepared paper into a narrow tube, starting from the wide part, and glue the end side together. Cut one end of the stem into several strips and bend them, if necessary, trim them.
- Connect the stem and bud with glue.
- These are the voluminous flowers you get. If you wish, you can also make and glue a leaf.
Corrugated paper tulips with candies
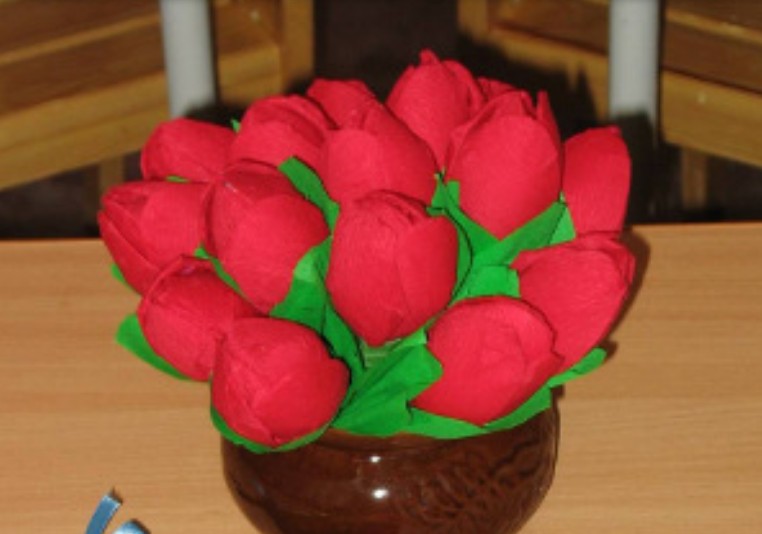
We come to the most interesting part. I think this collection will appeal to adults, although children can cope with such work. We will make real bouquets from corrugated paper, and even with sweets. I definitely wouldn't refuse this!!
- Flowers in a vase
You will need: candy, wire, corrugated or crepe paper, glue, vase.
Manufacturing process:
- Cut six ovals of the same size from paper.
- Use your fingers to stretch the edges widthwise.
- Then, using rubbing movements, we create a base for fastening.
- There should be a tube at the bottom of the petal.
- Place the candy inside and glue all the petals together. Collect a bouquet.

- Cute bouquet
You will need: corrugated paper, wire, candy, gift wrapping, ribbon.
Manufacturing process:
- From corrugated paper you need to cut 6 strips 15 cm long and 4 cm wide.
- Fold each strip in half and twist at the fold.
- Equate the stripes one to one.
- At the bottom, roll the petal into a tube.
- Glue the flowers onto the wire, while stringing candies onto it. Wrap the wire in green paper and place the bouquet in a gift wrap and tie with ribbon.

- Tulips made from plastic spoons and corrugated paper.
You will need: glue, scissors, tape, plastic spoons, corrugated paper.

Manufacturing process:
- To make one flower you will need 5 plastic spoons.
- Cut out rectangles from red paper and wrap the spoons.
- Fold the two pieces together and secure with tape.
- Next, attach three more.
- Wrap the stem with green corrugation.
- Make some flowers, cut and glue the leaves, and then assemble a bouquet.

And here are some more photos of design options for corrugated work:


Flower folding patterns using origami technique for children
Finally, I have prepared for you patterns for folding tulips and templates for cutting out appliques. Therefore, print out and make cards, they will be very convenient to work with.
- Classic tulip


- Interesting open flower

- Flowers in a vase

- Tulip with stem

- And again the traditional folding pattern

- The option we did above

- Well, a couple of templates for cutting


I’m calling it a day for today, but I promise to continue the floral theme. So come in, don't get lost. I wish everyone a spring mood, radiant sun and gifts!!
Natalya Nikolaevna Fedorova
Hello dear colleagues, I would like to present to your attention an application with origami elements “Tulips in a Vase” made by children of senior preschool age.
Software tasks:
Improve applicative technique (cut out symmetrical images from paper folded in half).
Introduce children to a new way of making flowers in origami style.
Practice the ability to create an overall composition, harmoniously placing your craft.
Develop eye and fine motor skills.
To cultivate artistic taste, love and respect for nature.

Materials and equipment:
Colored paper: 3 squares 6x6 cm of different colors for flowers, 3 squares 3x3 cm green for petals, strips for stems, rectangle blue color for a vase.
Scissors
Glue stick

Cut a vase from a blue rectangle folded in half.

Glue the vase and stems onto the cardboard. Then we cut out the leaves. To do this, we fold the green squares into a triangle and cut them with an arc.

This is what happened. Now let's start with the flowers, which we will make using the origami technique.

We fold a square sheet of 6x6 cm in red, yellow, orange colors diagonally and place the top up.
We bend the lower right and left corners towards the center, overlapping each other so that the corners protrude beyond the base of the triangle.
Now we bend the corners back
The tulip flower is ready.

Glue the flowers.

Our work is ready.


Thank you for your attention!
Publications on the topic:
The long-awaited spring has arrived, and with it our favorite holiday, March 8, is approaching. It's International Women's Day. It is celebrated.
It's already mid-March, spring is behind us holidays dedicated to international women's day March 8. Lots of impressions.
Hello, guests of my page! I would like to invite you to an applique lesson with children 4-5 years old. Theme of the lesson: "A willow sprig in a vase."
Master class "Tulips for Mom." Our website presents many crafts for the spring holiday of March 8th. There are especially many different options.
Tasks. Teach children to make a flower from several paper shapes. Beautifully combining them in color, shape, size. Repeat training to work with.
The air of March is blue, filled with the sky, and from uninvited feelings there is no time for sleep at night. Three beautiful flowers with a hidden feeling - White tulips.
Have a good and bright day everyone! Very soon, in a month, the first flowers will appear, I suggest not to wait for this and make your own flowers from paper. After all, you can give such lovely gifts of nature without a reason, but if you need a reason, then don’t forget to congratulate your mothers and grandmothers on March 8 or Happy Mother’s Day, because it is on these days that such crafts are always given.
Let them be paper, but they can be presented so cool and superbly that they will look even better than alive, and even more so they can stand on a table or shelf for a single year. And this certainly makes me happy. Take a look at this picture, do you like it? If yes, then I showed you step by step how you can do this.
In my opinion, today’s theme will always be popular, because this is the most beautiful and delicate souvenir that you can give for any occasion. So, I suggest you hang out with me for a while))).
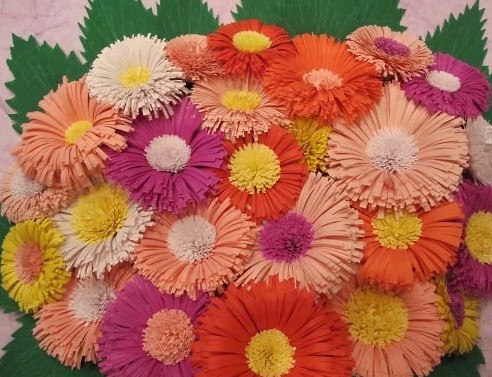
Souvenirs that carry something unusual look unrealistically beautiful and original. I suggest starting with the seemingly simplest option, but just look at who. This is a daisy, but not simple and not fabulous, but with wishes, how nice it would be to give one, don’t you think?
Moreover, you can download ready-made templates directly from this site and print them on a printer. This is a very cool souvenir that will hook anyone. You can give it for any occasion, such as a birthday or Teacher's Day.
We will need:
- office sheets of different colors - 5 pcs.
- glue stick
- double sided tape
- rhinestones
- templates
- satin ribbon
- scissors
Stages of work:
1. Start by deciding on the shape of the flower. I suggest taking this seven-flowered flower. Print the blanks on the printer. The first template will be like in this picture, I will send all the rest to you by email, just write your comment below (there are 10 in total), or you can come up with your own words or messages.

2. These are handsome, now take scissors, or you can use a stationery knife and cut along the contour.

3. These are the cute and funny preparations you will get.

4. Cut out a circle of cardboard with a diameter of 5 cm and place the first flower and a satin ribbon and drop glue into the middle or smear it if you are using a pencil. So gradually glue everything.
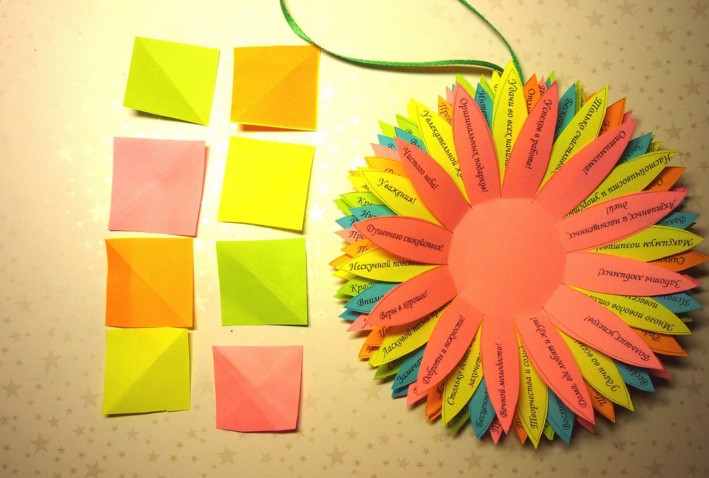
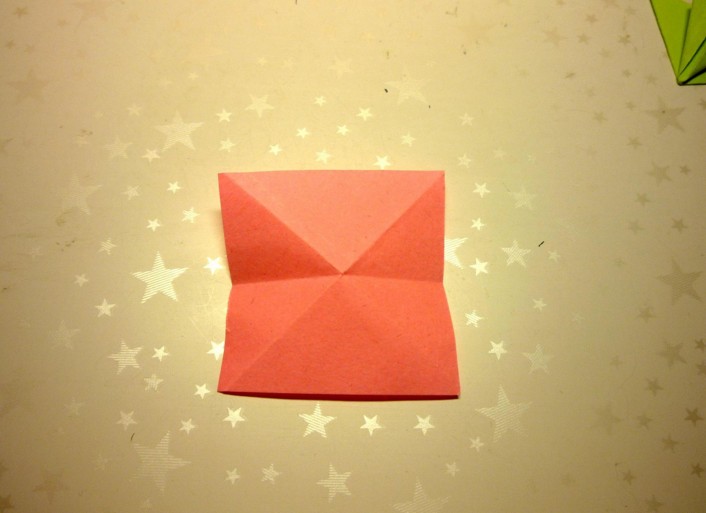
5. Now all that remains is to decorate the middle beautifully. To do this, take a square, approximately 3.5x3.5 cm. Bend it like this.
6. Then make a triangle as if you were making a frog.
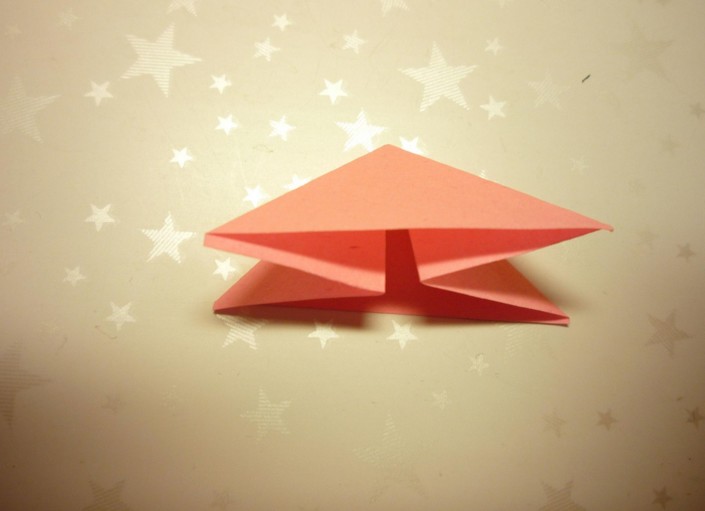
7. Fold the ends forward.

8. These are the butterflies you will get.
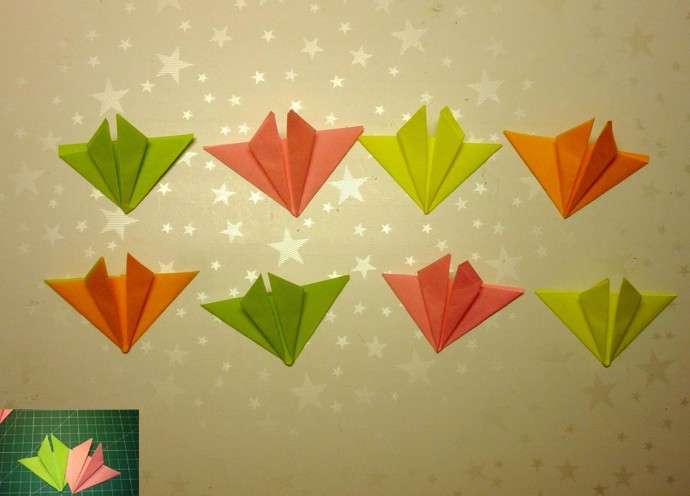
9. Which all that remains is to connect, glue to each other, and cover the middle with something interesting, for example, a bead or rhinestones. The result is a very original and unique craft, the person for whom you made it will definitely like it.

The most common and easy, especially for children, is the figure-of-eight flower using a hole punch and buttons.

Undoubtedly, the king of all flowers are roses, how to make them, to be honest, there are a great many options. I will write about this in more detail someday. Now take this masterpiece as a basis.

Or here’s a sample, you need to draw 5 flowers from largest to smallest, and then arrange this thing in a vase.

I know many of you will be looking for roses, because these are the flowers that are customary to give in most cases. Well, here's your first briefing. Take corrugated paper and make petals out of it. First, cut out the strip, then fold it like an accordion and round the edges. After this, you should twist it onto a stem, which could be a stick or something similar.

Also decorate the stick with green corrugated paper.
You can make such a wonderful creation from plain paper, but it is better to use crepe paper or corrugated paper. Draw the spiral yourself in a circle, cut it with a knife, and then wind it onto a pencil or crochet hook.

Or use this usual scheme, you can do this in 5 minutes.


Their work steps are absolutely simple. Remember how you made bookmarks in childhood, the system is approximately the same))).

The flowers themselves can also be twisted to make them look more interesting, as if they had truly bloomed.

In general, quite a lot of models can be composed and made from paper, the main thing is depending on the shape of the petal.

Notice these features yourself and you can make daisies, chrysanthemums, dahlias, and even carnations, take a look at the following pictures. You can see petal templates for cutting out.


Or do you prefer lilies with peonies?

What kind of flower is this? Did you guess it?

You can make such a charmer in the form of a brooch).

Snowdrops, as we know, are the first to please us. Moreover, you can make the flowers themselves from pumpkin seeds.

And of course, I couldn’t pass by foamiran, use this material too.

Dandelions follow them. Make them from regular napkins using a stapler.

This bright option would also be an excellent solution to surprise everyone.

They remind me of asters.
This view completely captivated me, I fell in love with it at first sight. It really looks like a living or real dahlia.

You can make primrose. You will need squares, from which you need to make figures that look like triangles.

Also roll the other side to form a triangle and a petal for the future bud. Then glue them together. Make the stem and leaves.

The next option looks great, as if it were real.

Making crafts from A4 sheet
Not so often, but still you have to make such products from ordinary large sheets. Of course, you can use such luxurious crafts anywhere; they look especially good if you decorate walls or a hall with them, that is, use them in the interior of premises.
Each leaf is a large petal that you will have to paint in the desired color.

Larger flower options can also be made in the form of a rose. Initially, you will need to use a template.

And then follow all the steps presented step by step.
Video on how to make paper flowers quickly and easily
You won’t believe it, but you can quite simply and in a matter of minutes twist a gorgeous bouquet, watch this video and you will also learn this interesting activity:
Master class on folding paper tulips
At some point in our childhood, we all folded different figures and used origami. I remember during labor lessons I really liked this activity. The tulip is usually done using this technique. It turns out voluminous and looks like the original.

You can also make an open type bud.

Or take another idea from corrugated paper and hide a candy in a bud. No one will refuse such a gift, that's for sure!

And here’s another great idea with disposable spoons. This gift can be given for a birthday or even a wedding.
Stages of work:
1. Prepare everything you need for work, all components are shown in this picture.

2. Cut scarlet rectangles from corrugated paper and then wrap the spoon in this material, as if slightly twisting it on a stick.

3. What does it look like? Of course, for the petals.

4. Mask the stick with green paper, while stacking the spoons towards each other (4 pieces) to form a stem and a bud. Then cut the leaves into a specific shape.

5. Place the craft in a pot or cup. You can tie a bow or some other pattern.

Step-by-step instructions for beginners on how to make a flower for mom
Now let's learn how to make the simplest option, because for some the previous ones will seem very complicated, then this present will come to your aid.

We will need:
- square paper - 2 sheets

Stages of work:
1. Take a sheet of paper and fold it in half to form a triangle. Then again.

Then draw semicircular lines like you see in this illustration. Cut out according to the sample and follow further instructions.
2. Unfold, open the workpiece and glue a couple of strips to the middle.

This option is suitable for the youngest, for example preschoolers.
But with schoolchildren you can do something even more difficult. The meaning is the same, just bend the petals and glue them differently.

You can also make a red poppy or take a different color, but for this work you will need more wire.

I am very much in love with asters, do you love them?

Want to know how these can be made?
We will need:
- old magazine
- scissors
- kebab sticks

1. Take the magazine apart into pages, fold each page in half, then again and again.

2. Take scissors and cut with grass. To make a fringe.

3. Afterwards, wrap this beauty on a stick.

4. After this, fluff the product. Cover the stick with green paper.

Something similar can be done to a teacher or, for example, an aunt or grandmother.
1. You will also need napkins and corrugated paper, plus you will also need a disposable glass or a jar of sour cream.

2. Since the flowers will be large, you can make them smaller, take a napkin and fold it in half, then in half again, and again. Secure the middle with thread or a stapler.

Cut the petals with scissors and give them shape.
3. Now prepare a glass, cover it with corrugated paper, push crumpled newspaper or unnecessary paper inside, also cover it with corrugation and let it out as if it were grass.

4. There should be 10-12 pieces, it all depends on your abilities.

5. Using glue, attach the resulting flowers to the base. Quite modest, but at the same time bright and stylish, such a gift will please anyone, especially women or girls.

Learning to make voluminous flowers
What kind of crafts are not made of these days? They even adapted egg molds for this work. It’s a shock to me how and when it could have occurred to anyone, but it came and conquered everyone. At first it looks unattractive, but then it turns out amazing masterpieces.

The sample is painted with paint and placed on a wire or stick.

A wonderful souvenir, as they say, made from improvised means, and how beautiful and funny it looks.

You will agree that with such voluminous flowers you can quite easily and quickly decorate any interior of a room or hall, making it irresistible and unforgettable.
You can also use this chic flower garland.

After this, put each workpiece on a fishing line or thread.

You can also make unforgettable creations from paper bags.

Using the origami technique, you can fold and then glue the parts.
And the coolest volumetric look, which I really liked and I advise everyone to do it, is this one:
Do you like calla lilies? Then take note of this master class.
You can even make a masterpiece out of ordinary newspapers.

By the way, you can even do Pansies together with children.

Interesting gift idea Roses with sweets
I once showed you how you can make roses and hide candy in them, remember? Look how gorgeous the bouquet turned out, and we presented it for Valentine’s Day, if you forgot, I’ll remind you.

I also give you this diagram to help you.

You can easily jump in and follow the step-by-step instructions.
Or use this video, you can’t do without roses:
That's all for me, I wish you inspiration and great work. Come visit me more often, join my group in contact, write your reviews and comments. Good luck and see you again! Bye!
Sincerely, Ekaterina Mantsurova


 Leo born in the year of the Rabbit")


