For a home craftsman who does not have a construction education or experience, it becomes relevant to know why a wooden floor creaks, usually after several years of use. The reason is the lack of stable geometry of the structure, loosening of its individual elements, leading to a decrease in strength.
The structure of a wooden floor (subfloor or floor covering) is completely repairable, so you can get rid of squeaks in any case, but using various technologies.
Before you remove the creaking of a wooden floor in an apartment or house on your own, you need to understand the causes of sounds. Creaking occurs due to friction of individual structural elements with each other:

Finally, logs or beams can rot in certain areas; part of the boardwalk attached to them touches adjacent boards attached to sections of the beam, which has retained its spatial geometry.
Important! If the floor creaks due to the boards bending underfoot (they touch each other), then major repairs (dismantling) of the boardwalk will be required. You will have to either reduce the pitch of the lags or increase the thickness of the board.
There are several ways to get rid of squeaking, depending on the purpose of the floor (finishing from tongue-and-groove boards or edged boards of the subfloor), its design and the hardware used (nail or self-tapping screw).
Remedies
To get rid of the creaking of a wooden floor on your own, you need to restore its structure according to technology:
- any lumber can change geometry (drying out, warping) when humidity changes, so treatment with an antiseptic and periodic impregnation with the same liquid during operation is necessary;
- the logs must be firmly fixed to the base, and the boards must be tightly pressed to them with self-tapping screws or nails with a screw notch;
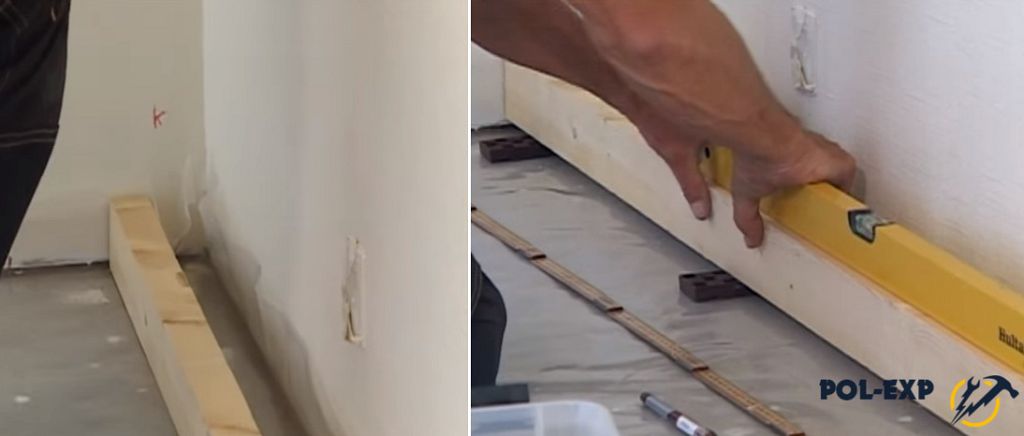
- To level the logs horizontally, it is prohibited to use wooden wedges; you should use TWO polymer wedges with a corrugated surface in the set;
- the pitch of laying the logs should be calculated depending on the operational loads and the thickness of the sub/finish floor board in order to avoid critical deflections;
- each board must be fastened with two screws to one joist to ensure a stable position in the transverse direction.
Advice! The most difficult option is considered to be dismantling the flooring and re-laying it after inspection of the lumber. In order not to completely open the floors to provide access to rotten bars, holes and hatches can be cut out.
In other words, all methods of getting rid of creaking floorboards come down to additional fixation of wooden elements to each other with screws, pins or wedging. Less commonly, the internal cavity is foamed to provide a large supporting surface, or sheet materials are laid on top of the boardwalk, distributing point loads evenly over its entire area.
Fixation with self-tapping screws/anchors
If the home craftsman does not know what to do to eliminate the squeak, the method of additionally fixing the boards to the joists is most often intuitively used. This scheme is only suitable for fully preserved joists with normal support on the base. If the logs are hanging on the boards (the wedges have flown out, the lumber has dried out) or are partially rotten, this technology will not bring results.
In addition, when fixing the flooring elements, you should take into account the features of the hardware:
- a self-tapping screw with an incomplete thread - presses the tongue against the joists without a gap, since the smooth part “falls” into the hole made by the threaded part of the hardware;
- self-tapping screw with full thread - rigidly fixes the position of the board relative to the joist with the existing gap, since the engagement force is very high, both inside the wood of the joist and the board.
Therefore, there are three ways to fix plank flooring elements with self-tapping screws:

Important! The last two methods are less reliable compared to the first, therefore they are used in emergency cases.
It is impossible to recess screw heads into hard wood; it is necessary to make a “sunk hole” with a countersink. To do this, you can use a similar self-tapping screw, cutting off the head with a hand engraver (1.5 - 2 cm in length) and using the same tool to make inclined notches like a milling cutter.
Cover tightening
The flooring boards are laid close to each other and have a thickness of 2–5 cm. Therefore, by compressing the dried material with each other in separate areas, you can increase the rigidity of the horizontal structure and eliminate squeaking without additional costs. There are two methods for this:

Important! In both cases, existing nails or screws must be removed from the boards before screeding to allow horizontal movement of the deck elements.
Wedging
If the defective area is located far from the wall, it is difficult to tighten wooden floors using the previous method. Therefore, the flooring boards are wedged in place using the following technology:
- the floorboard is sanded;
- a strip of the required width and length is selected, its lower edge is sharpened with a wedge;
- the lath is coated with PVA glue and driven in with a wooden mallet;
- the upper plane is processed with a plane, then polished.

As a result, the boards are pressed tightly against each other, pointwise applied loads are distributed over a large surface, the lamellas stop “walking,” and sounds disappear.
Foaming and injection
If the base on which the logs are laid is sufficiently strong, experts recommend the following method to eliminate squeaking in the boardwalk:
- a through hole with a diameter of 5 – 6 mm is drilled in the board;
- through it, the internal cavity near the defective area is filled between the lags with polyurethane foam;
- After drying, the foam turns into a supporting pad, dramatically increasing the support area.

The technique is suitable for emergency cases, but is not highly reliable for a number of reasons:
- when loads are applied, the foam shrinks under the board, the creaking returns after a while;
- filling closed cavities is fraught with the risk of the floor covering/subfloor sticking out, since it is necessary to leave at least 1/3 of the space for secondary expansion of the foam when hardening;
Important! Unlike insulating a house, it is better to use household polyurethane foam for floors. Its density is higher, and the thermal insulation characteristics in this case do not matter.
The extrusion method is more reliable when, instead of mounting foam, the cavity is filled with an adhesive composition that hardens in air (epoxy and polymer resins).

But this method is suitable for filling small cavities, since epoxy glue is quite expensive.
Plywood flooring, chipboard
Another, but with many limitations, way to eliminate the creaking of a wooden floor inside a home is sheet flooring:

The main disadvantages of the technology are:
- if the plywood joint is on a creaking board, this will only aggravate the situation;
- wood-containing boards are expensive and increase the repair budget;
- plywood and chipboard are not facing materials, so additional decoration will be required.
Therefore, plywood flooring is used to eliminate the creaking of boardwalks extremely rarely.
Dowel fastening
The veneered boards are joined lengthwise in adjacent rows using interlocking joints. The edged board does not have a tongue, so its geometry is more susceptible to changes when humidity changes. Therefore, information on how to make a dowel connection to correct the indicated defect is useful for the home craftsman:
- a blind hole is made in adjacent boards at 45 degrees;
- a cylindrical wooden part - the dowel is coated with glue and driven into this hole;
- the operation is repeated in the opposite direction, as in the lower diagram;
- After the glue has dried, the dowels are cut along the plane of the board.

Important! The quality of the joint depends on the immobility of the boards relative to each other at the time of drilling.
Replacing boards and joists
In case of significant physical wear and tear, it is necessary to replace all lumber so that joists and boards do not creak:

This is the most expensive option; you will need to remove all the furniture from the room and dismantle the trim.
Preventing squeaks when laying wood floors
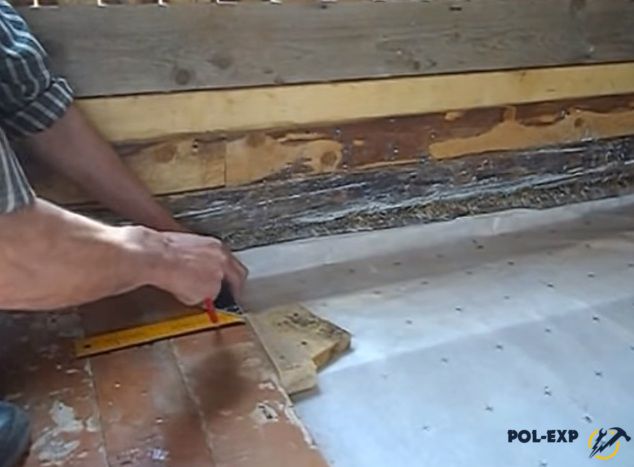
You can avoid the occurrence of unpleasant sounds from friction of wood against wood or metal at the stage of installing the boardwalk. To do this, it is enough to lay absorbent material on top of the joists and use adjustable floor technology.
Soundproofing by joists
The home handyman will not have to disassemble the boardwalk if you cut off the logs from the edged/tongue board:

At the same time, the acoustics of the ceiling will be further improved and protection from getting wet will be provided.
Adjustable floor technology
Without experience, figuring out why a tongue-and-groove flooring board or subfloor turned out creaky is very difficult. Therefore, manufacturers produce an adjustable floor system in which the likelihood of third-party sounds is reduced:
- the logs are mounted on studs passed through the block;
- with carving they are set at a single horizontal level;
- the protruding threaded part is cut off with an angle grinder.

Lumber absorbs less moisture, natural ventilation is provided, and there is no rigid fixation of wood to concrete. Even if boards incorrectly fixed to the joists begin to creak, repairing the defective areas is much easier, since there is no need to open the entire floor.
Thus, the characteristic creaking of the boardwalk can be eliminated with your own hands by additionally screwing in self-tapping screws, foaming the internal space underneath, wedging, or other specified methods.
Advice! If you need repairmen, there is a very convenient service for selecting them. Just send in the form below a detailed description of the work that needs to be performed and you will receive proposals with prices from construction teams and companies by email. You can see reviews about each of them and photographs with examples of work. It's FREE and there's no obligation.
Creaking floorboards are the most common problem in homes with wood floors. Its appearance can be caused by various reasons, and it occurs not only in old houses, but also in new buildings. To get rid of an annoying sound, it is not at all necessary to undertake large-scale repairs: there are several simple methods that will help quickly and at minimal cost eliminate any squeaks. First, you need to establish exactly why the boards are fastened together, and only then choose a way to strengthen the wooden floor.
In new floors, creaking usually appears due to violations of installation technology or the use of low-quality wood for joists and flooring.

Old floors usually begin to creak due to wear of individual structural elements, shrinkage of the wood or the base itself.

The most common reasons are:
- weak fastening of boards– if nails or screws of a smaller size than necessary are used, very soon such fixation weakens and the boards come off the joists. In addition, metal fasteners rust, become thinner, and their caps come off;
- no gap around the perimeter of the room– fluctuations in temperature and humidity cause expansion of the material, and if the boards are laid without a gap from the wall, they swell in waves, begin to rub against each other and creak;
- drying out of the tree– over time, the boards dry out and move freely on the nails, making squeaks. The joists also dry out, the gaps between them and the boards increase, the floor begins to sag;
- logs are not leveled– due to differences in height when laying the covering, deflections are formed and, as a result, the floor creaks underfoot. The same thing happens if leveling pads made of soft materials are placed under the joists. Under loads, such pads are compressed, decrease in size and lead to subsidence of the structure;
- raw wood– drying of the material after installation leads to deformation of the joists and boards, loosening of fasteners, and friction between floor elements.


In old buildings, creaking wooden floors may occur due to subsidence of the foundation, which affects all elements of the structure. In such situations, simply strengthening the boards is not enough, and the only correct solution is a major overhaul.

How to identify the cause of a squeak
To effectively eliminate the problem, you must correctly determine the cause of creaking floors. To do this, you need to inspect the places where creaking is heard, check the tightness of the connections by pressing hard. If there is movement of the nails or individual floorboards are “walking,” the problem lies in loose fasteners. If the boards are firmly knocked down, but the flooring sags when pressed, this indicates deformation of the joists or subsidence of the soil under the base.

A building level or rule will help you find the problem area: creaking usually occurs in places of greatest differences in height. In this case, it is best to remove a couple of floorboards and look under the flooring: this way you can accurately assess the condition of the joists, the degree of their wear, and the quality of the rough foundation.

Creaks near the wall are often caused by incorrectly fastened or dried out skirting boards. Inspect them carefully, pressing your hand in several places, check whether nails come out of them when pressed, and whether there are cracks in the material. To make sure there is a gap between the boards and the wall, you should carefully remove one of the plinth fragments.

Methods for eliminating squeaks
So, when the reason is determined, you can choose the optimal method of strengthening the floor. There are several effective methods that have long been tested in practice by home craftsmen.
| Ways to strengthen the structure | Causes of squeaking | Peculiarities |
|---|---|---|
| Small gaps in the flooring, loose end connections | Minimum labor costs and financial investments with high efficiency |
| Gaps between the subfloor and joists | The method is expensive, but very reliable |
| Loose connection of floorboards to joists | Economical and fast method, no need to spend a lot of effort |
| Worn material, drying of floorboards, presence of large cracks and other damage | The method is time-consuming and labor-intensive, but it allows you to effectively eliminate squeaks and other defects |
| The presence of wide cracks in the flooring as a result of drying out | The method is effective and durable, but requires some experience and physical effort |
| Small gaps in the floor, loose fit of elements | Expensive, but quick and easy. The method allows you to remove squeaking for a maximum of 3 years |
| Deflections of boards due to large distances between joists | Easy to implement, but not suitable for high traffic areas |


We strengthen the floor with our own hands
You can strengthen the floor using any of the listed methods yourself, since this does not require special knowledge and it is enough to be able to handle tools. Let's look at popular strengthening options in detail.
Using dowels or wedges
This method is great for cases where the flooring is still strong and smooth, but small gaps have appeared between the floorboards. There are two options to solve the problem.
Reinforcement with wedges. Wedges are cut from wooden slats to fit the gaps in the floor. Use a knife or spatula blade to clear the cracks of debris and vacuum them. Wet cleaning cannot be done - the wood must be absolutely dry. The wedges are coated with wood glue on all sides and driven tightly into the cracks. If there are gaps or small depressions at the edges, they need to be filled with glue mixed with sawdust in a ratio of 1:4. Now you need to wait until the glue dries, remove all excess with a plane, and thoroughly sand the surface. Finally, apply a water-repellent primer and repaint the floor.


Reinforcement with dowels. At the joints of the floorboards, in the place of the gap, holes are drilled through both boards at an angle of 45 degrees. The drill is selected according to the diameter of the dowels. The resulting dust and shavings are removed, the dowels are covered with glue and driven into the holes until they stop. After drying, the protruding parts of the dowels are cut off, the repaired areas are cleaned and smoothed with wood putty.

Anchors
If the creaking appears due to a loose connection of the joists to the rough base, the optimal solution is to strengthen the structure with anchors. To do this you will need:
- roulette;
- drill with a crown and a wood drill bit;
- anchor bolts and key;
- putty.
Step 1. In the room, remove the baseboards and sweep away dust and debris.

Find areas where the floor sags. Now you need to determine the location of the logs under the boards and measure the distance to the concrete screed. The joists are easy to find by looking at the nails - they run in rows across the floorboards. Stepping about 5 cm to the side, drill a small through hole in the board and push a piece of wire through until its end rests on the concrete. Measure the length of the wire and add 3-4 cm to the result.

Advice. If the nails are hidden under putty and a layer of paint, a regular magnet will help you find them. By running a magnet across the floor surface, you can easily identify a row of fasteners and establish the location of the joist.
Step 2. Along the nail fastening line, drill through the joist through the floorboard in several places and deepen it into the screed by 35-40 mm. The holes are made according to the diameter of the anchor bolt.
Step 3. Place a bit on the drill and drill a hole in the floorboard for the head of the bolt, clean it of dust.
Step 4. The bolts are inserted and tightened with a wrench until they stop, tightly tightening the floorboard and joist to the base.

Step 5. Small cracks in the boards are sealed with an adhesive mixture with sawdust, and recesses for bolt heads are sealed with wood putty.
As a rule, such strengthening helps to permanently remove creaks and sagging of the floor. On top of the boards you can lay chipboard, OSB, plywood or lay linoleum.
Pulling the floor with self-tapping screws
To tightly connect the flooring with the joists, you need to use self-tapping screws slightly shorter than the total thickness of the floorboard and joists. To determine this thickness, you should dismantle part of the plinth and take measurements through the gap. It’s even more convenient to do this through a hole in the floor by removing one of the boards. Measurements are taken from the surface of the flooring to the rough foundation on which the joists rest.
To work you will need:
- screwdriver or drill;
- wood screws with a diameter of 3.5 mm;
- waterproof putty;
- tape measure and pencil;
- hammer.
Advice. For a quality connection, you need to choose self-tapping screws whose threads do not reach the head. Such fasteners allow you to tightly tighten logs and boards together, unlike standard self-tapping screws.

Step 1. In areas where the flooring walks underfoot, the location of the joists is determined by the nails. If the boards are covered with plywood or chipboard on top, you need to remove the baseboard from one of the walls to see the ends of the joists and mark lines on the floor surface. If the logs are not visible from under the boards, you should do it differently.
Since the boards are laid perpendicular to the joists, you need to look at which side the ends of the floorboards are on, step back a few centimeters and drill a through hole. If the drill easily passed through the floorboard, make several more holes, moving further and further from the wall in a straight line until the tool rests on the joist. Mark this point with a pencil, then determine the location of the adjacent log in the same way. As a rule, they are laid in increments of 40-60 cm. Having found it, they put another mark and measure the distance between them. Once you know the installation step, finding the remaining logs will not be difficult.

Step 2. Along each joist you need to drill holes every 10-15 cm. In order not to get lost and miss the beam, it is best to mark it. Having found the location of the outermost joist at one end of the room, determine it in the same way at the opposite wall, and then connect the marks with a straight line. The remaining lines are drawn parallel to the first at the required distance.

The drill should not be placed perpendicular to the board, but at an angle, and it should enter through the floorboard into the joist to about ¾ of its thickness. To prevent the fasteners from coming loose in a short time, the diameter of the drill must be smaller than the diameter of the screws.
Step 3. The holes are cleaned of wood dust and self-tapping screws are screwed in, deepening their heads into the floorboards by 1-2 mm. There is no need to remove old nails if they are held tight enough. The caps protruding above the floorboards should be hammered in with a hammer and sunk into the wood using a hammer. Loose or rusted nails must be removed, and a self-tapping screw must be screwed in nearby.

Step 4. Take wood putty and carefully apply it to the boards with a spatula, covering the recesses from the fasteners. After drying, these areas are sanded with sandpaper, dusted, and primed. Now all that remains is to paint the floor or lay the finishing coat.

Video - Quick floor repair
If the floor creaks due to wear and tear, the methods described above will not have any effect. More radical measures are needed here, that is, re-building the floor. To work, you will need a standard set of tools: tape measure, level, nail puller, hammer, drill, screwdriver.
Step 1. The baseboards are dismantled first, then the boards are removed one by one using a nail puller. To prevent the tool from leaving dents on the floorboards, it is recommended to use small wooden pads. Since most of the boards will be laid back, for convenience you should number them on the back. Each floorboard is carefully inspected, all nails are removed, and carefully stacked on top of each other. Severely damaged boards are discarded; there is no point in putting them back in place.


Step 2. After dismantling the flooring, they begin to check the joists and rough foundation. If there are cracks in the screed, they need to be opened and sealed with fresh mortar. Dry or rotten joists are removed, the rest are checked with a level and, if necessary, leveled with pads.
Step 3. After removing debris and dust, proceed to installation of the coating. The floorboards are laid one by one on the joists, guided by the numbers indicated. A 10-15 mm wide indentation must be made from the wall. Self-tapping screws can be screwed into holes left by nails, but only if they are not broken. Screw in the fasteners at an angle to the board, so the connection will be more reliable.


Lay the floorboards, hammer them down with a mallet, and secure them with self-tapping screws


Step 4. If the paint on the floorboards has worn off in places and the appearance of the coating leaves much to be desired, you can treat the surface with a sander. The treatment is performed at least twice, first using sandpaper with coarse grains, then with fine grains. This will allow you to achieve maximum smoothness of the coating and refresh it.
Step 5. After sanding, the floor must be vacuumed and a layer of protective primer with antiseptic properties must be applied. Now the surface can be painted or varnished.
Video - How to varnish a wooden floor
Often the boards dry out so that wide gaps form between them. At the same time, the floorboards still remain quite strong and even, and there is no particular need to change them. In such a situation, you need to compact the flooring by fitting the old boards to each other and adding a few new ones. You can connect boards in different ways; we will look at one of the most accessible and simple methods.
To work you will need:
- screwdriver;
- mallet;
- several wedges carved from wood;
- tablet;
- small trim timber;
- wood screws.
Step 1. Carefully dismantle the baseboards and remove the nails from the floorboards. Deformed or cracked boards are discarded, as they can break into pieces when being pulled together.
Step 2. The outermost board from the wall is laid on the joists, leaving a mandatory gap of 10 mm. Secure the floorboard by screwing in the screws at an angle to the surface. You can use nail holes if they are not broken.
Step 3. Several more floorboards are laid using the tongue-and-groove joining method.

Step 4. Take a wedge, place the narrow side against the floorboard, and press it on the side with a piece of wood. The block should lie on the joist. After making sure that the wedge is tightly adjacent to the board, the block is secured to the joist with two wood cutters.

Step 5. The wedges are secured in two or three places, depending on the length of the board. Make the distance between the wedges as equal as possible so that the flooring is fused evenly. Next, take a plank, place it against the end of the wedge and hammer it with a mallet. Having finished with one wedge, move on to the second and so on.


Step 6. Having completed the tamping, take a screwdriver and fix all the laid floorboards to the joists with self-tapping screws - 2 on each joist.


Step 7 Continue laying the flooring. Carefully unscrew the screws from the support block, remove the wedge, and lay the next 5-7 floorboards. Again, apply the wedge to the outer board, secure it with a block and repeat the steps described above.

When all the boards are laid and joined together, there will be a wide gap between the flooring and the wall, into which 2-3 more floorboards will fit. They are laid in the same way, having previously been adjusted to size, and screwed to the joists with self-tapping screws.
Video - Method of tightening floor boards
Foam filling
If the coating does not need serious repairs and the boards are not held together tightly, you can use foam. Everything is very simple here:
- the floor is cleaned of debris and dust, the gaps between the boards are cleared;
- take a balloon with polyurethane foam, insert the end of the tube into the slot and blow it out;
- Having filled all the gaps, allow the foam to dry, after which the excess is carefully cut off flush with the surface.
If plywood is laid on top of the boards, the areas where creaking is heard are drilled through in several places and blown out in the same way. After cutting off the dried foam, the treated areas are cleaned and wiped from dust. After this, all that remains is to paint the floor or lay the finishing coating.


Prices for polyurethane foam "Macroflex"
macroflex polyurethane foam
Screw supports
The easiest way to strengthen sagging boards is with self-tapping screws, but only on the condition that the load on the floor is not intense. It should be noted that this method of strengthening is only suitable for floors on a concrete screed. If the logs are installed on the ground, the screws will not be able to serve as reliable support for the boards, as they will fail and the creaking will only intensify.
How is strengthening performed:
- identify sagging boards;
- using the heads of the nails as a guide, mark the location of the joists with chalk;
- drill a hole in the center of the deflection at the same distance from both lags;
- screw in the self-tapping screw and cover the recess from the head with putty.

The number of screws per deflection depends on the distance between the lags: up to 40 cm, one fastener is enough, from 40 to 50 cm - 2 screws, more than 60 cm - 3 screws. It is better to cut off the sharp ends of the hardware with a grinder so that under load they rub less on the concrete.
Video - How to strengthen a wooden floor so it doesn't creak
Wood can be considered the second covering for the floor of a man-made home (historical justice requires that primacy be given to the skins of killed animals). But, despite such a venerable age, wooden flooring remains one of the most popular, durable and stylish floor coverings today.
Most often, the floor creaks because the wood is drying out or an old nail has come out.
However, like all creations of nature and products of human hands, it is not eternal. In practice, this means that in order to extend its service life, you need to monitor its condition and make timely repairs. Moreover, the floor, like no other part of the house, is subjected to intense loads every day and hour.
Why does a wooden floor squeak?

Repairing the floor with glue and a syringe.
The first sign indicating that not everything is in order with the floor is a creaking sound that appears in it. Many owners, out of frivolity, do not pay due attention to it, believing that they are dealing with the natural aging process of wood.
They are partly right. There may be several reasons for the creaking that appears, but they all indicate structural problems with the floor. Among the most likely causes of creaking, the most common are: drying out of boards or joists (as a result of which they decrease in size); loose nails; insufficient compensation gap between the floor boards and the wall or its absence.
The floor will also creak when, during its construction, too large a step was taken between the joists or boards of insufficient thickness were laid. In both cases, the boards will sag, making an unpleasant creaking sound. Also, the cause of squeaking can be fluctuations in air humidity in the room and gross violations of the rules for using the floor.

You can eliminate squeaking by pouring foam under the floor.
Correctly determining the cause of a squeaking floor is very important, since this determines how to repair it. After all, creaking and creaking are different. For an experienced person, the creaking from the friction of a board against a protruding nail is noticeably different from the creaking of boards against joists or against each other.
In most cases, creaking occurs from poor quality or loose fastening of boards to joists. At the same time, the boards begin to rub against the joists or against each other, producing an unpleasant squeak.
If the cause of the creaking is lags, then in order to eliminate the cause, they need to be at least leveled, and if their condition is too bad, then completely changed. In both of these cases, you cannot do without opening the floor. But if the joists are in order and the creaking of the floor is caused by other reasons, then you can try to eliminate it without dismantling the boards. There are several ways to do this.
Filling with polyurethane foam
This method can be used when the underground space is small, up to 9 cm. Spray foam is released into the gaps between the floorboards in an amount sufficient to fill the underground space with foam. The foam, expanding and hardening, knits and fixes the boards, giving the floor additional rigidity.
But this method has two significant nuances. Firstly, polyurethane foam is not a cheap pleasure, so it requires significant financial costs. Secondly, this method can only be considered as a temporary measure. Indeed, during the operation of a floor repaired in this way, the polyurethane foam will compact and sag, helping to weaken the overall rigidity of the floor. Once this happens, the squeak will return.
Approximately the same result and for the same time can be obtained if, instead of polyurethane foam, you pour talc or graphite powder into the cracks.
Knocking wedges

You can eliminate the squeak by placing wooden wedges between the floor boards.
To eliminate squeaking from the friction of the boards against each other, wooden wedges are used. To complete this work you will need:
- hammer or mallet;
- doboynik
To eliminate creaking, you need to drive wooden spacer wedges into the cracks between the boards. The wedges must first be made from thin wooden slats, each wedge will be 10-15 cm in length. The wedges are installed in increments of 15-20 cm, and it is very important that the driven wedges do not protrude above the level of the field. To prevent the floorboards from squeezing the hammered wedges out of the crack over time, they must be coated with glue: wood glue or PVA immediately before hammering.
If the targets between the boards are too small to drive wedges into, you can alternatively use homemade putty by mixing sawdust with PVA glue just before work and filling the cracks with this mixture using a metal spatula.
Upholstery with self-tapping screws

Self-tapping screws are used if the floor creaks between the covering and the joists.
This method is used only when the creaking area is between the board and the joists. The main difficulty here is to find the logs, especially if the boards are covered with a layer of paint. To find them, you will have to dismantle the floor skirting boards on both sides, and then, using long thin metal rods, mark their location. To do this, the rods need to be inserted into the floor in the center of the joist, and if this is impossible due to the concrete base, then directly into the joist, connecting them with a marking cord.
Self-tapping screws should be taken 2-3 cm less than the total thickness of the joists and floor boards. To determine the required length, use a ruler to measure the thickness of the logs and the thickness of the boards and summarize the results. Using the cord as a guide, you need to screw 2-3 self-tapping screws into each board closer to the center of the joist, and you need to recess them into the board as much as possible.
Old nails, if they fit tightly and their heads do not protrude above the floor surface, can be left, otherwise it is better to remove them. This method is simple, cheap and effective, but it is only suitable for one case out of 10, since the remaining 90% of cases of floor squeaks occur in walk-through areas.
Once you start strengthening creaking boards with self-tapping screws, it is better not to limit yourself to just them and screw self-tapping screws into all the floorboards.
After all, the nail enters the wood, splitting it. Initially, the split layers try to connect and hold the nail tightly. But over time, the fastening weakens, partly because the split areas lose their elasticity, and partly because the nails themselves decrease in diameter. Self-tapping screws do not split, but are screwed into a layer of wood, so they are much more practical than nails in terms of durability and strength of the connection.
To perform this repair you will need:
- drill;
- screwdriver;
- nail puller;
- long thin metal rods (minimum 2);
- cord or fishing line;
- ruler.
Laying plywood or chipboard

Laying sheets of thick plywood over a wooden covering is done to eliminate squeaking.
A good way to eliminate squeaks caused by insufficient thickness of boards or wide spacing of joists is to lay sheets of plywood or fiberboard over the wooden covering. It can only be used if the floor surface is flat. Sheets of plywood must be at least 12 mm thick, since a thinner sheet will sag when walking and put pressure on the base of the boards, thereby not eliminating the squeaking problem.
To perform this method of floor repair you will need:
- hacksaw;
- drill;
- screwdriver or screwdriver.
Plywood or chipboard is laid on top of wooden boards and fastened to them with self-tapping screws in increments of 15-20 cm. In this case, it is better to lay sheets of plywood or chipboard at an angle to the already laid boards. If all technological operations are performed correctly, then you can forget about problems with squeaking for a long time.
How to eliminate squeaking chipboard floors
First you need to pinpoint the area of the floor that is creaking. This area must be cleared of furniture and the flooring removed. The area should be marked with chalk, drawing a square with sides of 15-20 cm on the floor, and then cut it out with a grinder or circular saw. You can use a jigsaw for this, but it will take longer.
Using a tape measure or ruler, measure the distance from the base of the floor to the bottom of the chipboard. Then 4 wooden blocks are cut out with a length of 12-16 cm and a thickness equal to the measured distance minus 2-3 mm. The cut bars are driven under the chipboard in all 4 corners of the square, performing the function of a kind of mini-logs and eliminating possible deflections. Finally, you need to put the cut piece of chipboard in place, fix it with self-tapping screws to the hammered wooden blocks and lay the floor covering. The floor in the place of such repair will not creak for a very long time.
To perform such repairs you will need:
- grinder, circular saw or jigsaw;
- hammer;
- drill;
- screwdriver or screwdriver.
The creaking of each floorboard must be approached individually. After all, sometimes it is enough to sink the nails a little deeper to eliminate the cause of the squeak. And it is not at all necessary to carry out an expensive floor overhaul or a complete replacement of floorboards if you see that the floor surface is in good condition, but in some places an unpleasant squeak has appeared. In this case, it is quite possible to get by with cosmetic repairs, and, most importantly, the floor repaired in this way will reliably serve you for many years to come.
Wood flooring is a great option for your home.
The technology for laying it on the ground has some flaws, including the creaking inherent in wooden flooring material.
There are some other defects that each person can eliminate independently.
In old houses in France, locals love and appreciate the creaking of the wooden floor, but in most cases people are annoyed due to this defect.
Therefore, everyone strives to make a wooden floor without flaws, so that you can calmly walk on it without disturbing anyone.
Defects in wooden floors:
- creak;
- rotting of boards and subsequent breakage;
- old paint peels off in large areas;
- unevenness;
- drying out and cracking, as well as debris getting into the cracks between the boards.
Unevenness
Quite often, a wooden floor has uneven surfaces and is covered with waves.
Of course, walking on such a surface cannot be pleasant.
An alternative option for leveling the floor involves using a special wood screed or installing a new covering.
If the surface waves are not too large, then you can use acrylic sealant.
Rotting of boards, formation of cracks
Rotten boards must be removed, after which new ones must be installed in their place, or a new covering must be installed.
Lack of ventilation is the main cause of rotting of boards, and therefore wooden floors on the ground are made with ventilation space.
Drying and cracking of floor boards
If the gaps between the boards are small (5-6 millimeters), then they can be filled with acrylic sealant.
Ordinary white sealant can be used for painting.
If your plans in the near future do not include painting, then it is possible to select a sealant by color.
Peeling old paint
Most likely, the surface of the boards in the presence of such a defect was painted with low-quality paint, or there was cement dust or gypsum putty on the floor.
The optimal solution in this case would be to level the floors using wood screed or install a new floor, which is much more difficult and financially expensive.
Creaking floors: causes and solutions
This floor defect often occurs when the boards are adjacent to the joists or when the joists “play.”
The problem of creaking floors is quite common and is more significant for many people than other defects of the type of floor in question.
In essence, the creaking of boards is a sound that arises from friction between materials.
The reasons for the formation of floor squeaks are very diverse:
- broken groove or ridge;
- peeling of parquet from the base;
- scattering of parquet;
- parquet splitting;
- nails and screws coming out of their sockets;
- movement of the logs and ends of the boards relative to each other;
- loosening of screws and nails;
- no gap at the walls.
Elimination of this defect will depend on the cause of the unpleasant sound.
Below is a list of steps to eliminate creaking wooden boards:
- wedge tamping;
- filling with polyurethane foam;
- use of metal anchors;
- installation of plywood on the surface;
- attraction with self-tapping screws;
- tightening the floor.
no one has canceled yet. Don't know how to make them? Our site will help!
This one will tell you how to make a beautiful self-leveling 3D floor with your own hands. Don't miss this unique opportunity to create a chic floor!
You can view several beautiful photos of laminate laid diagonally.
Preparing for work
The preparatory stage includes preparing the necessary tools.
To eliminate the squeak you will need only a few tools:
- drill;
- hammer;
- nails;
- nail puller;
- sawdust;
- floor paint.
After collecting all the necessary tools and materials, you can begin to work on eliminating the squeak.
The procedure must be performed correctly, otherwise there is a risk of not getting the desired result.
Operating procedure
We present to your attention an interesting video from which you will learn how to eliminate this nasty creaking wooden floor.
Enjoy watching!
Below is an algorithm of actions to solve this problem:
- First, you should determine the exact place where the boards are creaking, for which it will be enough to walk on the floor.
- After identifying a weak point in the floor, you should accurately determine whether the entire board or a specific section of it is creaking.
- After identifying the creaking area, you will need to make sure that there are no communications underneath it.
- Next, a drill is used, through which a hole is drilled through the board into the beam on one side of the floorboard.
- A nail is driven into the hole or a screw is screwed in (the second option is better than the first).
- The head of the screw or nail is recessed into the board.
- One more time you need to walk along the floorboard, while listening to whether it creaks or not. If necessary, screw in the screw from the opposite side.
- Similar work is done with other creaking floorboards.
- You can use wooden wedges if the previous steps did not work properly. Wedges are installed in the gaps between floorboards and joists.
- To fix grooved boards, screws with countersunk heads are used. If the nails are nailed in such a way that the heads are not visible, lift one board using a nail puller.
- Graphite sand is poured into the area where the defect is formed, that is, into the crack. You can also use talcum powder or drive wooden wedges into the gap between the boards.
- If the boards creak due to deformation (due to dampness and temperature changes), it is permissible to use a paste made from fine sawdust and floor paint.
This method of eliminating squeaks does not require opening the coating, and therefore is quite profitable and economical for the owner’s wallet.
Drawing conclusions
- A justified step is to remove all nails and use screws instead.
- If you need to screw in a large number of screws, it is better to use an electric screwdriver (to save effort and time).
- To find nails under a thick layer of paint, you can use an ordinary magnet.
The creaking of a wooden floor prevents you from moving freely around your apartment or house.
This unpleasant sound can be so intense that it can irritate the nervous system of even a person with a stable psyche.
Therefore, it is still worth eliminating such defects.
In contact with
Wooden floors, whether parquet or planks, begin to creak over time. There may be several reasons for this, but one thing is clear: the creaking is annoying and needs to be eliminated. Let's try to figure out why floors creak and ways to get rid of this problem.
The reasons for this phenomenon are as follows:
- Violations of lumber drying technology. Over time, residual moisture evaporates and the wood changes its shape. As a result, cracks and crevices appear. During operation, the floorboards rub against each other, causing a creaking sound.
- Excessive distances between plank floor joists. The load on the floorboards causes the boards to sag and they end up rubbing against each other.
- When constructing the floor, thin boards were used (the thickness of which was less than 40 mm), which were unable to withstand the load placed on them.
- Wear of the varnish coating of the parquet can cause the parquet to dry out and destroy the adhesive. Subsequently, the parquet joints become less durable.
- When laying panel parquet and sheet flooring material, no compensation gap was left along the walls. Expanding with increasing air humidity, the wood material warps and creaks.
- The nails used to nail the floorboards no longer hold them in place due to the drying of the wood.
- Wear or swelling of floorboards due to dampness.
- There is no layer of heat and sound insulation between the joists. Mineral wool slabs can significantly reduce noise.
What to do if your parquet floor creaks
There are two ways to repair parquet floors. The first involves a complete re-laying of parquet flooring in compliance with all the rules. But this method will require large physical or material costs (if you invite specialists). The second method is simpler and is done as follows:
A slight creaking may disappear after sanding and filling the cracks with putty mixed with fine sawdust. The varnish will additionally secure the surface. As a result, the parquet flooring will lie closer to each other.
Another way to eliminate parquet squeaks involves using a cement or plaster mixture. The process can be described step by step as follows:
- In the parquet flooring, which “sags” when walking, we drill a through hole with a diameter of 6–8 mm.
- Prepare liquid cement mortar or plaster mixture. Their consistency should be such that the composition can be drawn up and squeezed out through a medical syringe.
- Pour the solution into the hole, allowing air to escape. It is necessary to fill until all the voids under the parquet flooring are filled.
- The solution should be allowed to harden completely before continuing to use the floor.
- The hole must be masked with wood putty of a suitable color.
Important: before drilling and filling the voids under the next parquet elements with mortar, you need to make sure that this repair method is effective by observing the first plank. It is possible that the parquet will have to be completely re-laid.
If your wooden plank floor creaks
This is usually done in country houses. If a wooden floor creaks, what should you do? First of all, you should stock up on the necessary set of tools. To work you will need:
- drill or screwdriver with drill function;
- jigsaw;
- hammer;
- self-tapping screws;
- sawdust;
- nail puller
It is necessary to establish the reason why the creaking is heard. Replacing nails with self-tapping screws often helps. The latter are screwed in next to the holes left after removing the nails.

The number of screws may be greater than the number of nails. If the floors in the apartment creak even after the work has been done, then there are other reasons. Let's look at ways to eliminate defects.


How to eliminate creaking floors in an old house
Previously, the following floor arrangement was often used: slag (in the form of filler) was poured on top of a wooden floor made of thick boards, on which brick pillars-supports were installed (at a distance of about 1.5 m). On top of the posts - roofing felt or roofing felt in two layers, then - logs and finished floor boards.
It is impossible to pull the finished floor board to the ceiling with anchors: the length of the anchors is not enough. To get rid of the squeak, we proceed as follows.
- We purchase large format plywood sheets with a thickness of at least 15 mm in the required quantity.
- We lay a polyurethane foam backing on top of the floor: it will prevent the plywood from knocking on the boards while walking.
- Cover the area of the floor that is subject to the greatest load with a large sheet of plywood.
- We fasten the plywood to the finished floor boards with a large number of self-tapping screws, screwed in at a distance of 100-150 mm from each other. In this case, in the place where the board base deflects, one longitudinal row of screws is screwed in, and in the convex place - two rows of screws located on both sides of the ridge. In the same way, plywood is attached along the walls of the room.
- The self-tapping screws must be recessed into the plywood sheet so that their heads do not interfere with the installation of laminate or other floor covering.
In the case of further tiling of the floor with ceramic tiles, gypsum fiber sheet is used. This material is laid in two layers using special glue. Elastic adhesive is applied and spread with a notched trowel, after which the laid sheet of gypsum fiber board is tightened with self-tapping screws. For the second row of gypsum fiber boards, longer screws should be used.

This method is cheaper than completely replacing the plank floor; in addition, it eliminates the need to dismantle light interior partitions mounted on planks.
What to do if chipboard floors squeak
This phenomenon manifests itself in the case of laying sheet material without gaps between the sheets and along the walls. The gaps should be widened using a circular saw carefully. In this case, you need to make sure that there are no nails or screws in the path of the saw.
Another reason for squeaking chipboard floors may be insufficient thickness of the material. Another row of chipboard or plywood should be laid. It is important that the distance between the logs does not exceed 600 mm. Otherwise, you will have to disassemble the floor (in whole or in part) and lay additional logs.
Local repair of chipboard floors can be carried out as follows.
- We determine the area where the floor sags the most and remove the floor covering.
- Using a jigsaw or circular saw, cut out a square with sides 0.5 - 0.6 m.
- We place the bars tightly under the chipboard so that its edges remain in the area cleared of sheet material.
- We install the chipboard fragment in place and fasten it with self-tapping screws.
- Fill the seam at the cut site with putty.
- We lay the flooring.
Finally, we suggest you watch the training video.


 The most popular pencil case in the USSR")


