If you notice that water is constantly leaking from the tank into the toilet, you need to immediately find a solution to this problem, since the noise will interfere with sleep at night, and rust will soon form on the toilet itself. In addition, the readings of the water meter will also not be particularly encouraging.
Let's try to figure out the reasons why the water flows, because further actions depend on it. After that, we will consider several possible options for how to fix a leak in the toilet with your own hands.
Breakdown detection
Experts do not dare to say for sure that the toilet is leaking for one reason and the solution to the problem is also the same. Each reason may have its own characteristics depending on the design. However, the “classical” construction is still the most widespread, so it is better to consider the definition of the current problem on it.
The first place without a doubt can be assigned to the overflow of the toilet, which is due to the fact that excess water leaves through the overflow. The problem in this case is the following:
- Over time, the rubber gasket can deform, that is, the rubber loses its former elasticity, due to which there is a loose overlap and the toilet bowl leaks.
- Poorly pressed gasket to the outlet of the drain valve also does not hold water. It is not necessary that the gasket is deformed or has lost its elasticity - it just does not press enough against the toilet part - that is why water flows.
- The pin that holds the float in the valve body can rust or wear out.
- The tank often leaks due to a crack in the body.
If the toilet cistern does not flow, but the problem still occurs, it may be the bolts that hold the cistern and the toilet directly. During the operation of the structure, quite often the bolts rust, and the plastic ones burst, which is why water leaks.
In third place in terms of prevalence is the cause associated with a rubber pear. The problem is that over time, this part of the toilet may lose its elasticity, becoming more rigid. As a result, the pear cannot take the necessary shape to retain water after flushing.

Another problem may lie in the malfunction of the drain tank itself due to the displacement of the float lever or its skew. The reasons for these factors are as follows:
- a hole has formed through which water flows into the float;
- after a long use of the toilet, the lever itself may shift;
- Repairs were made with low quality parts.
The reasons for the constant flow of water in the toilet can be eliminated with some effort.
Fixing toilet overflow and bolt problems
The most common problem that causes water to flow in the toilet is overflowing the tank. So let's start with a simple experiment.
We remove the cover. After that, you should slightly raise the float. If this helped and the tank bowl does not overflow, then the search for the problem at this stage is completed. It is enough to pull the float lever a little so that the water stops flowing earlier.
Another option is that the water continues to leak. Perhaps the problem is in the valve, so it should be carefully examined. Initially, spend time on the pin that secures the float lever in the valve - it should be in place and solid. Otherwise, you will have to replace it with a piece of thick copper wire. At this stage, you need to inspect the hole into which it is attached, because with an increase in its size, you will have to completely change the entire valve.
And the last possible option, when, after the above inspections and even actions, water still flows in the toilet, this is a worn valve gasket. It will not be possible to purchase it separately, so the question regarding the culpability of a cracked valve or gasket loses its practical value.

But what if the water in the tank is less than the overflow level, but the toilet itself is leaking? Quite often, such a description has the problem of the unfitness of the bolt, which tightens the shelf and the toilet. This, as a rule, is inherent in older models of structures, where manufacturers still used steel bolts. Of course, over time, the bolts deteriorate under the influence of water, so they should be replaced periodically.
The process itself implies the following:
- Shutting off the water supply.
- Removing the cover.
- Tank emptying.
- Disconnecting the flexible hose.
- Loosening bolts.
- Tilt the tank to remove the shelf from the cuff.
- We eliminate excess liquid and lay the tank on a flat surface.
Upon completion of the repair, the structure must be reassembled. It is important to tighten the new bolts not tight, since the material of the toilet bowl is quite fragile.
Replacement or repair of a pear or float
If the toilet is leaking due to the loss of elasticity of the rubber pear, which regulates the water supply with the button, it should either be replaced or repaired. To do this, you first need to unscrew this part (counterclockwise, but when viewed from above, the position changes to the opposite) and disconnect from the stem. When buying a new such part, you should choose the softest one, otherwise this problem will arise again, and quite soon.
If it is not possible to buy a new rubber bulb, it can be repaired for a while. To do this, simply attach a small weight to the rod, which will pull the pear to the saddle, respectively, after flushing, the water will not drain. Any weighty nut or washer is suitable as a load.
When water constantly drains due to a malfunction of the float in the tank, it can also be replaced with a new one. If a small hole is found in the float that is leaking liquid, an alternative, more economical option is to plug the hole with polyethylene or fused plastic. It should be borne in mind that such repair work will not eliminate the breakdown itself, but only postpone its solution for a while. Therefore, it is better to do everything right right away.
Proper plumbing work is a good mood and budget savings. However, it is not always possible to avoid leakage of water in the toilet after flushing. Unnecessarily leaking water from the tank is an excessive consumption of water. If water constantly flows in the toilet - what to do? You can cope on your own without resorting to the help of specialists, but for this you need to know the algorithm for determining the trouble, as well as ways to eliminate it. We will consider them in this article.
Why is the tank leaking?
Leakage of water from the toilet bowl means that the device of the plumbing fixture is faulty. This is evidenced by the following facts:
- There is a constant sound of water entering the toilet bowl between flushes.
- Cold water condensate collects on the pipes.
- A rusty coating appears.
- The numbers on the cold water meter are significantly higher than usual.
Initially, the correct installation of plumbing equipment can help to avoid such inconvenience.
Important! Breakdowns that occur in the future can be completely eliminated on their own, if you familiarize yourself with the options for the causes and methods of repair.
The principle of operation of the toilet
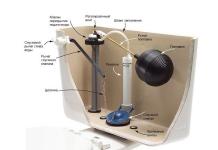
Why is water running and how to quickly fix a broken toilet? Before determining the cause of a toilet barrel malfunction, it is worth remembering the principles of operation of the device:
- Water enters the tank from the water pipe.
- The tank is filled by lifting the float up.
- Having reached a certain volume, the liquid closes the drain valve and further filling with liquid stops.
- By pressing the button when flushing (pulling the chain or lever), the valve opens, and the water flows into the toilet bowl.
- Then the filling process is repeated, however, in the event of a breakdown, the toilet bowl leaks, preventing the liquid from reaching the shut-off valve, or vice versa - it can overflow through the float.
Causes of failure
Before proceeding with the elimination of the breakdown and finding out why water is constantly pouring, it is necessary to understand its possible causes, and there may be several.
Wrong installation
As a rule, new plumbing products, which were installed incorrectly, begin to flow within the first six months after installation.
You can find out why it is leaking water and eliminate the cause of the problem by disassembling the device yourself and inspecting it for visible flaws and cracks. You should also check the operation of the shut-off valve and correct it.
Disruption of the drain device
After a long time of use, plumbing fittings wear out, reminding themselves of breakdowns. Also, troubles can arise earlier if poor quality tank fittings were used during the installation of plumbing.
To understand why water is constantly flowing in the toilet, what to do, you should close the water supply that is connected to the tank and watch the leak:
- If the water leaves when the water supply is turned off, then the problem lies in the drain valve. This may be due to build-up of salt deposits from water, blockages, or normal wear and tear. You can eliminate such a breakdown by arranging a cleaning in the tank with the removal of accidental debris or plaque.
- If the water remains in the tank and does not drain into the bowl, then the reason lies in the incorrectly adjusted float or in the blockage of the automatic water system. In this case, it is worth trying to adjust the pressure of the water supply.
Find and fix damage
The leakage of the drain device can occur in different ways, so you need to initially decide how exactly the water flows:
- Leaks through overflow.
- Leaks between bowl and tank.
- The leak occurs before the overflow begins.
- The water leaves through the overflow.
- Along with plum.
The toilet bowl overflows, and excess water overflows through the overflow - this problem can occur for several reasons:
- Mechanical damage to the valve body - such a breakdown can be with plastic fittings. Deformation or weak pressing of the gasket.
- Wear on the pin that holds the automatic drain lever.
- Float lever offset.
Important! Before proceeding with the repair, it is necessary to prepare the following: wire cutters, gloves, pliers and new elements to replace the old ones. Also, don't forget to turn off the water supply.
Lever offset
Lever misalignment is the most common cause of leakage. To fix the problem, it is enough to return the lever to its original position - strictly horizontally, below the pipe connection.
To eliminate other leaks through the overflow, proceed as follows:
- Remove the tank lid.
- Try adjusting the float by raising it a few millimeters.
- If the leak has stopped, then replace the float axis or straighten it (metal axis).
Important! Turn the float lever slightly to shut off the water earlier.
If the flow continues when the float is raised, then pay attention to the valve. The pin in its composition may wear out, so it must be replaced with a new one or copper wire should be used as an alternative. In the place where the stud is attached, there must be a tight connection, as well as the complete absence of holes.
Important! If the leakage continues with the valve gasket tightly pressed, then the mechanism will have to be completely replaced.

Water leaks to overflow (video)
If the water constantly flows, reaching or not reaching the overflow, then most likely the bolt that tightens the shelf and the toilet has rusted or cracked.
It is worth once again making sure that the water flows to the overflow level by carefully inspecting the fittings, if necessary, replacing several bolts or even the entire set of fittings.
Important! It is advisable to give preference to fittings made of brass. Steel should be discarded because it is less durable.
The solution involves disassembling the tank completely. So, proceed as follows:
- Shut off the plumbing.
- Empty the tank reservoir.
- Shut off the water supply.
- Unscrew the bolts that hold the toilet to the shelf.
- Cut off rusty bolts.
- Tilt the tank back, remove the shelf and place it on a flat surface.
- In addition to the float and valve, disassemble all the parts with the help of keys and pliers.
- During reassembly, replace all bolts with new ones.
- Also replace or reanimate rubber gaskets with sealant.
- Fix the tank with a shelf using plastic bolts. Roll up the cuff towards the toilet and carefully put it on the shelf.
Important! If necessary, tighten the shelf with a thick copper wire or a clamp, since it can also begin to leak over time, losing elasticity.
The pear is loose
If the previous options are excluded, and the water still flows without reaching the overflow level, then another option should be considered. The rubber pear plays the role of a membrane, opening and closing the flow of water. But rubber products, in constant contact with water, eventually lose their elasticity and do not fit tightly, which is why water leaks.
To fix this problem, you need to replace the pear. To do this, unscrew it from the threaded rod counterclockwise. When buying a new pear, you should pay attention to a softer option, since such a product will last longer.
Important! The problem can be solved temporarily by using an additional weight, tying it to the lifting rod. Such a body kit will help to press the rubber bulb more tightly to the saddle, which will help eliminate the leak. Any heavy nut can be used as a load.
footage
Understand the issue, the toilet bowl with the button is flowing - what to do maybe not even a specialist. Initially, it is necessary to exclude all options for simple breakdowns, and only after that you can proceed to the analysis of the plumbing product to eliminate more complex problems.
In our article today, we will talk about the main causes of a toilet cistern leak, as well as tell you about troubleshooting methods.
Causes
The detected problems with the toilet, which began to flow in certain places, are caused by three reasons. Sometimes individually, and sometimes they provoke a breakdown by joint efforts:
- When installing new plumbing, installation and assembly errors are often made.
- During long-term operation, the tank flows due to failed or worn structural elements, fittings. Natural breakdowns usually occur only three years after installation.
- Mechanical damage, violation of operating recommendations. This is for you sharp pulls on the levers, strong pressing of the buttons, random blows and so on.
Now consider several types of leaks separately.

Leak types
When draining
- After pressing the drain button, leaks may occur. This indicates the need to check the design of the drainage system. Often the cause is a malfunctioning shut-off valve. Grasp it with your hand, press lightly. If this helps, then the valve simply did not fit snugly against the surface. Replace the old valve gasket with a good quality new one and you're done.
- The drain key is displaced, the position of the height regulator is violated. In such situations, the valve is located higher than the drain hole. The formed gap leads to leakage. Correct the knob a little, try to return the button to its original position. To do this, you need to tighten the fasteners with which the tank is attached to the pipe or the plumbing product itself.
- Water leaks due to a loose nut attached to the outside of the bottom. The reason is simple - the tightness is broken. Most likely, replacing the gasket or installing a new nut with a high quality gasket will help.
Remember, if the breakdown is minor and caused by a seal failure, then use simple sealants. For more serious problems, replace damaged tank elements.

If it flows through the overflow
First of all, correct the lever of the float system, and also check the condition of the valve and the float itself. Water is sometimes not held inside the tank, but flows directly into the bowl through the overflow. It is possible that the lever has moved from its original position, or there has been a skew.
Related article: Choosing entrance street doors
See if there is liquid in the float. Often it is because of this that a leak occurs through overflows. If it really is there, then the float is out of order. Bringing it back to life is simple:
- Remove the float;
- Pour out the accumulated water;
- Dry properly, even with a hair dryer, which will speed up the process;
- Eliminate cracks and holes through which water got inside. For this, epoxy glue is useful. If you add a little supercement to it, the quality of the repair will be even higher;
- Put the element back in place.
If the float system valve is out of order, the easiest way is to replace it with a new one. It's not hard to do this:
- Release all liquid from the water tank;
- Disconnect the fitting using a wrench. It connects the valve to the water supply system, that is, the water supply;
- Remove the lever, but be careful not to damage other elements;
- Remove the inner as well as the outer nut that holds the lever;
- Remove the float valve;
- Install the new element using the fixing nuts;
- Fill the reservoir with liquid;
- Fix the lever in the correct position;
- Do a test drain, which will determine if you did everything right.

In case of problems with the siphon membrane, it must be replaced. Solve the problem by applying glue, sealants will not work. Buy a new membrane, and similar to the old one. Remove it, find a similar one in a plumbing supply store. To repair, follow the simple instructions:
- Drain the water so that nothing remains in the drain tank;
- Using a rope, tie the float arm to a crossbar. The element must be securely fixed;
- The crossbar can be any plank, piece of wood, placed instead of the tank lid;
- Remove the nut connecting the flush pipe and reservoir;
- Slightly loosen the other nut by unscrewing it from the siphon. It is located at the base of the container;
- Carefully disconnect the siphon from the lever and pull it out;
- Now take a new membrane and put it in its rightful place;
- Assemble the entire system in reverse order.
Between cistern and toilet
- Check the condition of the cuff. It will have to be corrected or tightened using a clamp. Do not overtighten the bolts, but at the same time, do not make the fasteners too loose.
- If there is a corrugated section on the cuff, they are sometimes displaced from their original position. Clamps or plumbing insulation will help to return to the place. The latter option will give a temporary result, because the collar is the best solution.
- The reason for this type of leak may be a weak fastening of the tank and shelf. Check that the nuts and bolts are firmly tightened. Brass bolts are eternal, while metal counterparts lose their original characteristics over time.
- If the previous option did not work, take a closer look at the gaskets on the tank. Unscrew all nuts, bolts, inspect the condition of the gaskets. Replacing them is not difficult and not expensive.
- If the shelf is damaged, you will not help with clamps and sealants. A complete replacement of the shelf or even the tank will be required.
Related article: Problems in the operation of the gas column

From tank to floor
The primary reason is poorly tightened or deformed bolts over time and under the influence of moisture:
- If they are loose but the fasteners are new, just use the appropriate tool to tighten the fasteners.
- If the quality of the fasteners is lost, they must be changed. Shut off the water, drain the remaining water, partially dismantle the fittings in order to have more or less convenient access to the bolt heads. After removing the old ones, replace them with new ones, not forgetting the rubber seals.
It will not be superfluous to use sealants at the joints. This is generally a useful thing to solve many problems of leaks. Relying solely on gaskets and seals is not worth it, since even the highest quality products do not always cope with the loads. An additional measure of protection in the form of a sealant will extend the life of the plumbing and make your life easier.

Other causes of leakage
This is not a complete list of possible leaks that result from the operation of toilets. Let's name a few more of them, as well as ways to eliminate them:
- The flush button does not work. Here you will need to remove the cover and check the condition of the drain system. Often the stem from the drain comes off, as does the pressure gate valve. You just need to put them in their place. Check the button for dirt, clean the accumulated dirt and put it back. Problem solved.
- High level of noise when collecting water. The plumbing system may have a different pressure. If it is high, then increased pressure is created on the float valve and the element cannot cope with the load. As a result, increased noise. Replace a valve that can cope with such a set, or mount a stabilization valve.
If the tank is leaking due to the formation of condensate, then you need to find out the cause and eliminate it:
- It is necessary to repair the intake and exhaust valves. If it is broken, water goes into the toilet, heats up to room temperature. At the same time, cold water comes out of the water supply, which creates condensate;
- It is necessary to reduce the volume of the drain. This is true for regularly operated toilets. It is recommended to replace the conventional drain button with a double one, where one will drain a smaller volume of liquid, and the second a larger one;
- Eliminate high humidity in the room itself. If it is a combined bathroom, it will be more difficult. You can put an electric heated towel rail, plus be sure to provide an effective ventilation system.


