Recently, poultry farming has become increasingly popular. Chickens allow you not only to have domestic eggs all year round, but also meat. Chicken feathers can be used as filler for feather pillows and blankets. However, in order not to run into serious problems, you should think carefully about this idea at the initial stage, paying special attention to the construction of the chicken coop.

How to choose the right option?
A well-built chicken coop for laying hens is not a barn, but a separate, small, warm building, with the most correct and closest to natural conditions for keeping and breeding poultry. The right “house” is comfortable not only for chickens. The owner can easily clean up, feed and care for the animals.
An ideal option would be a chicken coop consisting of 2 parts. The first is represented by a closed, comfortable room, and the second by an aviary fenced with a special net for walking birds. You can also purchase or make portable chicken coop models yourself, however, they are not suitable for keeping a large number of laying hens.

When designing an individual chicken coop, it is necessary to take into account the following subtleties:
- thermal insulation is necessary, especially when keeping birds all year round;
- the safety of the building must be high, this will prevent the loss of chickens and eggs due to attacks by predators;
- ventilation is needed to ventilate the chicken coop and provide a constant supply of fresh air, however, there must be no draft, otherwise many animal diseases cannot be avoided;
- To increase the production of eggs by chickens, it is necessary to organize artificial lighting at some time of the day.
Nevertheless, there are no strict rules in the construction of a pen for chickens and everyone can independently design an object suitable in size for 500, 1000, 10 or 200 birds.


Device and drawings
Setting up a chicken coop yourself is not very difficult and even a beginner can do it. First of all, you should decide on the plan for the future construction and draw up a schematic drawing with dimensions. You can take ready-made drawings, however, it is better to prepare them yourself based on individual requirements and dimensions.
When determining the size, you should take into account the maximum number of birds you plan to keep, and base your calculations on this figure. It is optimal to house 4 chickens per square meter.


When the design of the future chicken coop has been determined, you need to prepare the materials:
- gravel, water, sand, formwork, concrete and metal mesh;
- gas block, brick or log house;
- floor boards;
- slate or roofing felt;
- insulation (for example, isover);
- plywood for interior design;
- windows (can be made independently, can be ordered individually from specialized companies);
- ventilation;
- netting for pens;
- wires and lamps;
- dimmer or 2 switches;
- hardware.
All necessary materials can be purchased at any hardware store. The internal arrangement of the chicken coop depends on individual needs, but it must have perches, feeders, nests and equipped feeding areas.


How to build it correctly?
The work plan must be adhered to which looks like this:
- choice of location;
- foundation installation;
- floorboard flooring;
- walling;
- roofing;
- insertion of windows and ventilation device;
- work on the internal improvement of the chicken coop.
Having prepared the drawings and all the necessary materials and tools, you can begin to build a chicken coop with your own hands. Particular attention should be paid to the choice of location for the construction of a building. It should be located on a hill, away from excess humidity and drafts.


The foundation begins with preparing the soil. To do this, the top layer of earth is removed (20-30 cm) and covered with gravel and sand. The formwork is prepared, a metal mesh is laid on it and concrete is poured. This type of foundation is the most solid, although other support options can be used. The floor is covered with boards; if desired, you can pour a small (up to 10 centimeters) layer of expanded clay under the floor. This will insulate the room and make the temperature in it more comfortable for the hens.
Walls can be built from various materials. If the walls are built from logs, then there is no need for additional insulation; they already maintain a fairly comfortable temperature. It is better to insulate brick or aerated concrete walls both outside and inside.


The roof of most chicken coop designs is gable. This allows moisture not to linger on it. The roof can also be insulated by placing isover or mineral wool under slate or tiles. The number of windows in the building is calculated from the proportion of 1 to 12, in relation to the floor area. It is advisable to add mosquito nets to the windows, which will prevent insects from entering the chicken coop.
Ventilation holes are installed in the wall and allow for proper circulation of fresh air. After completing all external work, you can begin decorating the chicken coop interior.


How to arrange it inside?
Equipping the chicken coop from the inside is one of the most critical stages of construction. First of all, you should decide on a list of what must be in a proper chicken coop and this is:
- sleeping places;
- nests;
- feeding cups;
- container for water procedures;
- place for walking.
Separately, you should deal with lighting. The main thing in the arrangement of wires and lamps is to place them as high as possible to avoid injury to the birds. The fixing elements must be securely fastened and have no sharp accessible parts so that the chickens do not get hurt by them. When arranging lighting, you should know one feature of domestic laying hens - they are very poorly oriented in the dark, and if you suddenly remove the light from them, not all of them will be able to settle down for the night and will fall asleep in an uncomfortable position on the floor. First, the main light is turned off, and then, after the chickens have settled in their places, they are turned off completely. Therefore, you need to provide a main bright light and an additional one with a dim lamp, or install a dimmer that allows you to smoothly adjust the light intensity.


The sleeping place is represented in the chicken coop as a roost. This is a universal object that birds use not only for rest, but also for sleep. According to some data, domestic chickens spend about half of their lives on the roost, so it should be comfortable and safe.
Perches are made from wooden blocks and even branches of large trees.
The sleeping place must meet the following requirements.
- Strength. A crossbar that is too thin may break under the weight of the birds, causing injury to them.
- Safety. Before installation, the handle must be processed with a plane and, if necessary, brought to smoothness using sandpaper. All sharp corners must be removed, otherwise the birds may damage their paws and become “de-legged”.
- Sufficient planting area. In the warm season and off-season, one chicken should have at least 20 centimeters. In the cold season, this figure is reduced in order to place the hens closer together so that they do not freeze.
The installation of plastic structures is not justified, since plastic does not have the environmental friendliness and strength of wood and can injure birds if broken with sharp edges.

To install the nest, you should choose a convenient and spacious place. The egg production of chickens will depend on the correctness and convenience of installing this item in the chicken coop. They need to be located in secluded corners where daylight does not penetrate. The nest can be made from a wooden or plastic box of a suitable size. For an adult chicken, it is better to take a nest of 40x60 centimeters.
A thick layer of straw is laid inside the nests and changed regularly. It is not recommended to place these structures under perches - the chickens will shit and endlessly pollute the straw inside.

The feeding area can be arranged in 2 ways.
- Feed can be poured to chickens in a certain place, directly on the litter. Thus, the natural need of birds to scurry around in search of food is satisfied. The only condition is to locate the feeding area as far as possible from the active habitats of the chickens.
- Arrangement of special feeders. You can either make them yourself from improvised containers or purchase them in a specialized store. But this method has a number of disadvantages. Chickens are not very tidy creatures and like to dig into their food, so you will have to clean this “kitchen” very often. Birds are also quarrelsome and often cannot share food, which can ultimately result in a fight and an overturned feeder.
Water containers are a must in the chicken coop. It is better to give preference to modern automatic drinkers, which supply new portions of water as needed.


In order for chickens to lay eggs and be healthy, they need fresh air and sun, and therefore a specially equipped pen for walking. You should not send domestic chickens to “free-float” around the yard, as they can make a lot of mess and injure themselves in a short time. And if you have a garden, then it’s better not to let birds near it at all, because they will peck, eat and dig up everything around. But keeping birds indoors, without walking, is fraught with serious health problems.

To equip the correct pen, you should do this:
- on the side of the door - the entrance to the chicken house - a walking area is fenced off with a net;
- posts are dug in around the perimeter and a metal mesh is attached to them;
- make the fastening carefully, avoiding the formation of sharp edges that could harm the bird;
- be sure to bury the net 40 centimeters into the ground. This measure will protect the chickens from predators who can dig a passage into the pen;
- the height of the fence is 200 centimeters. Domestic chickens are excellent flyers over short distances and will easily jump over fences 150 and even 170 cm high.
To build a house for laying hens yourself, you will not need a lot of expenses and special knowledge and skills in the field of construction. However, you should take into account the characteristics of these birds, then you will be able to create favorable conditions for them to live and reproduce.
For information on what should be in a chicken coop for laying hens, see the following video.
If you decide to start poultry farming, at the beginning of your journey you need to build and properly equip a poultry house. It is important to choose the most suitable type of structure and its location. This stage is fundamental to running a successful poultry business. Many farmers decide to build a chicken coop with their own hands. How to do this - read our article.
What design option will turn out on a farm depends not only on the desire and imagination of its owner. It is important to take into account the climatic conditions of the area in which you plan to raise chickens. The main thing remains one thing - to create comfortable conditions for the bird. Let's take a closer look at the main differences between common types of chicken coops.
Stationary, multi-tiered and mobile chicken coops
Based on the type of construction, bird houses are divided into the following types.
- Stationary– ordinary chicken coops, permanent buildings built for the permanent residence of chickens in one place at any time of the year;

- Multi-tiered- no different from a stationary chicken coop, except for the larger number of floors. Due to the presence of additional space in a relatively small area, it is possible to efficiently maintain a large number of poultry.


- Mobile– in mobile chicken coops, as a rule, they contain a small number of chickens, a maximum of 10 heads. This combined structure looks like a hut on wheels, inside which chickens can hide from rain and wind. The booth is located under a metal mesh cover that extends far beyond its boundaries, forming a walking area.


We present a table of the advantages of each type of chicken coop.
| stationary | multi-tiered | mobile |
|---|---|---|
|
|
|
The main advantages of mobile chicken coops are the ability to renew feed for poultry while grazing and ease of cleaning - if necessary, the building can be moved closer to the reservoir. There are many options for mobile chicken coops.
Portable using boards
The simplest option, resembling a box in shape. A pair of boards are attached to the bottom of the chicken coop, with the help of which you can change the location of the structure at any time.
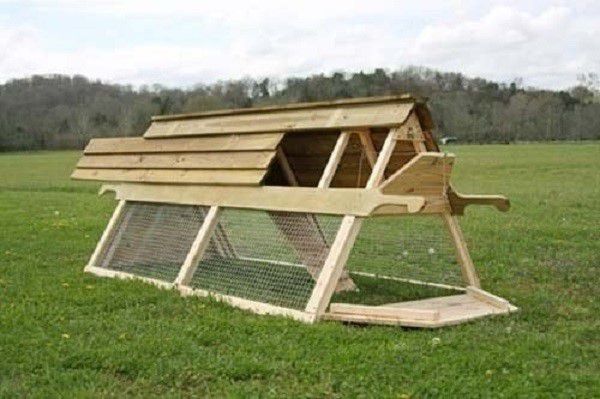
Due to the semicircular shape, the overall weight of the structure is reduced and its mobility is increased. One of the most popular options for mobile chicken coops.

Chicken coop - wheelbarrow
A mesh box on wheels that can be easily transported by one person from place to place. This usually does not have an additional part for overnight roosting, so it is used either in conjunction with a regular chicken coop, or in the southern regions.

Monumental construction. Includes a spacious hen house connected to a bottomless run. It will be convenient for those farmers who need to transport poultry over long distances for any purpose.

Chicken coop on roller wheels
You literally won't get far with a chicken coop like this. It can be moved, but only over short distances, for example, within one’s own area.

Types of walking
In addition to differences in the design of chicken coops, they are also classified according to the type of run. According to this criterion, the poultry house can be built in the following options:


Prices for chain-link mesh for enclosure fencing
Rabitz
Capacity
The size of the future chicken coop directly depends on the number of birds expected to be kept. So the minimum area in which up to 5 chickens can be housed is 3 square meters. If, for example, 20 chickens are kept, then the dimensions of the room will be approximately 5-6 meters in length and 2-3 in width. Accordingly, the more chickens, the larger the area.

It is also important to take into account that when the egg hatching season begins, the number of individuals will increase.
Note! Different breeds and crosses of chickens differ in character and, therefore, requirements for living conditions. Active, temperamental birds need more space.
Season of content
In accordance with the seasons of the year during which you plan to keep the birds, chicken coop designs are divided into:
- winter;
- summer
Those who plan to keep poultry year-round need to take care of having a warm chicken coop. This design is called winter. It assumes the presence of a heating system necessary to maintain a comfortable temperature level in the room. Additionally, the chicken coop is insulated with thermal insulation of walls, ceilings, floors, doors and windows.

The summer design of the chicken coop is used for keeping and breeding poultry only in the warm season. Often clapboard or plywood is used for its construction.
Polycarbonate is a light material, both in weight and in installation, that even an inexperienced builder can work with. Read on to find out how to build a polycarbonate chicken coop with your own hands: step-by-step instructions, photos of chicken coops, useful videos.

Breeding direction
As you know, chickens are bred to produce one of two products: meat or eggs. The type of chicken that lives in the chicken coop also depends on the type of target product. Meat and egg breeds of chickens require different conditions for keeping.
Broiler chickens are bred specifically to produce meat. They are characterized by early maturity and large mass. Find out what breeds and crosses of chickens are classified as meat, how to properly feed chickens to gain weight and how to keep them.

Chicken coop for egg hens
Organizing a chicken coop for egg-laying hens requires the presence of a modular structure. It is distinguished by its large size, which allows birds to move freely around the internal territory. There is no need to use cages in such designs. Laying hens feel good on comfortable perches and nests. In addition, the structure needs to be insulated, since the temperature regime for laying hens must be stable even in winter frosts.

Chicken coop for meat breeds
The structure is called a prefabricated structure and is suitable for seasonal use. The dimensions of the structure are small. The territory of the chickens is limited so that they walk as little as possible, eat more often and more. Most often, enclosures intended for birds to walk around are not made for meat chickens. The size of the nests and the total area of the structure are significantly smaller than the previous one.


How to choose a place?
An important step is choosing the location of the future structure. It also determines what the final version of the chicken coop will be. To determine the location correctly, it is recommended to use the following principles.
- Choose a site that is located on a hill to place the chicken coop, since the location in the lowlands prevents the birds from free range. This is due to the fact that moisture evaporates more slowly, as does the snow cover, which disappears much later than on the rest of the site.
- The structure must be correctly oriented relative to the cardinal directions.

- If the shape of the building is rectangular, then stick to the western direction. The best option for installing a chicken coop is to place it so that the windows face south and the doors face east. The egg production of a bird depends on the length of daylight hours, so providing the room with light through windows on the south side will be very useful.
- Maintain a neutral temperature. Birds do not like temperatures that are too high or low. If the microclimate in the chicken coop reaches a temperature level of +25°C, then you can notice a decrease in productivity, and if you add another 5 degrees to this level, then this promises a cessation of reproduction.
- It is important for birds to be in a calm state. To do this, the building is located in that part of the site where no one will disturb them. A good option is to erect a hedge around the house to give the birds a sense of security.

- The area is calculated taking into account the number of birds. 1 square meter of construction allows for 1-2 chickens to live. If you need to breed birds in winter, keep in mind that you will need a warm room with a vestibule, which will serve for additional insulation of the chicken house. It prevents cold air currents from entering the room with birds.
Video - How to build a chicken coop for the winter
Consider the process of building a simple chicken coop
Building a chicken coop designed for year-round living of chickens is not easy. This requires certain skill and construction experience. If you understand the principle of constructing a structure, after some time you will be able to build another one or improve the first one. For example, a bird house for one season is built in a similar way, only without insulation measures. As for the construction of a building for several dozen chickens, the best option would be to build a winter stationary chicken coop with an open or closed type of run. The last moment is chosen based on the farmer’s capabilities.
The construction process has several stages, each with its own characteristics and nuances.

Planning
Start planning, calculating area and determining construction zones. If it is intended to equip a poultry house for 20 or more individuals, then it is necessary to calculate the area value based on the established standard. It involves placing 2-3 chickens per square meter. It is worth remembering that the minimum building area must be at least 3 m2.

Having determined the parameters of the room in which the birds will spend the night and spend the whole winter, it is necessary to calculate the size of the enclosure. Based on the fact that there is 1-2 m2 per individual, 20 chickens will need 25 m2. Accordingly, for a warm house the dimensions will be 4x4 (m), for a walking area 4x6 (m).

It is best to use drawings made yourself or taken from the Internet at the planning stage. This stage is quite important, regardless of the size of the structure. It is recommended that the drawing be drawn up in detail and clearly. This will allow you to arrange all the details of the future object as conveniently and competently as possible. When calculating the area, it is necessary to start based on the above parameters.


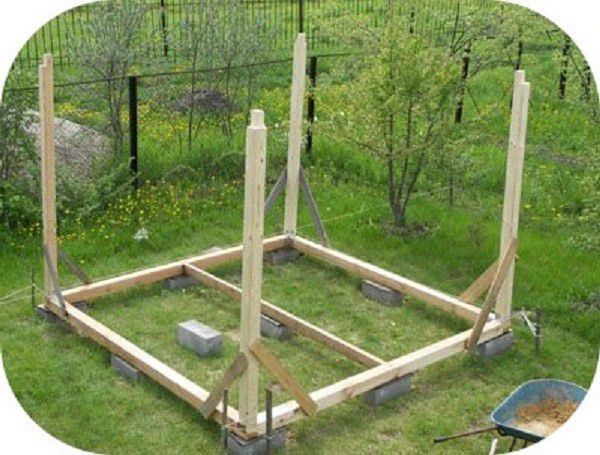
Foundation
When starting work, you need to decide what type of foundation will be built. There are two options:

To build a winter poultry house, it is preferable to choose a columnar type of foundation. It is constructed quickly, since there is no need to wait for the concrete to dry in the case of a monolithic structure. In addition, the columnar type of base has the following list of advantages.
- The filling process is quite simple and convenient.
- This type of foundation allows for ventilation under the floor. It is necessary to protect the premises from rodents.
- Allows you to save money and extend the operational life of a poultry house constructed from wooden material.
In any case, the farmer will choose the type of foundation based on his capabilities and the individual characteristics of the site.
Video - Foundation for a chicken coop
Making a columnar structure
| Photo | Step, description |
|---|---|
 | Step 1. Using rope and metal rods, mark the area where the chicken coop will be located. To do this, you need to hammer the rods at points along the entire perimeter and stretch a rope between them. The rope should be pulled flush with the ground. |
 | Step 2. Starting from the markings, the top layer of soil is excavated. In the corners of the markings, recesses are dug, which are necessary for installing the foundation pillars. It is necessary to dig about 70 centimeters deep, the width of the recesses is 50 centimeters. The pipes should be located at a distance of 1 meter from each other. |
 | Step 3. Using a rope, install the hydraulic level, the value of which is 25 centimeters. |
 | Step 4. We pour sand combined with gravel into each of the recesses. The thickness of the layer is 10 cm. After this, we lay bricks or stones, which are filled with pre-prepared cement mortar. After this, we lay the next batch of stones across, while raising the foundation pipes to the level marked with the rope. |
 | Step 5. We fill the remaining space between the pillars of brick and soil using gravel. After all, the area under the future structure is covered with the same gravel. |

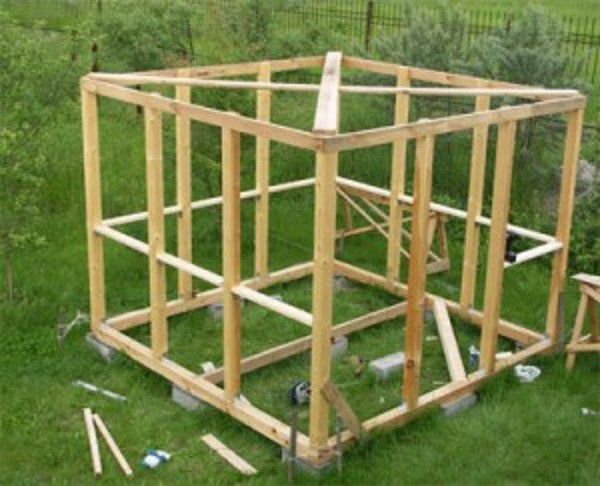
Walls
When choosing the material from which the walls of the chicken coop will be constructed, it is necessary to take into account their thermal conductivity and strength. The most durable materials include cinder block, brick and stone. But such materials are not suitable for maintaining a stable temperature inside the chicken coop. In winter, they will cool down too quickly, which will lead to the need for additional heating. The most rational choice is considered to be wooden beams.
| Photo | Step, description |
|---|---|
 | Step 1. We cover the junction of the foundation and future walls with waterproofing material, for example, roofing felt, and securely screw the material using metal fasteners. |
 | Step 2. Next, along the perimeter of the entire foundation we lay a lining beam, the thickness of which is approximately 100x100 millimeters. At the corners of the future wall we connect the timber using long nails. |
 | Step 3. On top of the backing beam we lay glued or ordinary blanks for the walls using the corner cutting technology, the diagram of which is shown in the picture. We connect them at the joints with dowels as follows: the beam located on top is stitched through, and the bottom one only halfway. |
 | Step 4. Bring the height of the laid walls to the desired size and complete the laying by laying another layer of waterproofing. Now you can start building the roof. |
Prices for various types of timber
Roof
To build a roof, you can use the following step-by-step guide.
| Photo | Step, description |
|---|---|
 | Step 1. A double layer of roofing material is laid on the constructed base of the walls. Insulation - flax-jute fabric - is laid in the space between the crowns. After the walls are erected to a level of 1.8 meters, they begin to attach the ceiling beams. |
 | Step 2. Then the ceiling joists are laid, the cross-section of which is 150x100 millimeters, and it is necessary to maintain a distance during installation of 50 centimeters. |
 | Step 3. The ceiling is made of boards or plywood overlaid on joists. Insulation made of mineral wool or polystyrene foam is attached to them. |
 | Step 4. Next, a simple rafter system is erected and a roof covering, for example, slate or profile, is laid. |
An alternative instruction for building a roof is shown in the figure below.


It is best to choose a gable roof type for a chicken coop. This will allow you to store both bedding material and feed in the so-called attic. In addition, the design of the gable roof allows for additional insulation of the entire building.
Video - How to cover a roof in a chicken coop
Floor
Let's start laying the floor in the chicken coop.
 | Step 1. To begin with, we lay an edged board on top of the foundation, the edges tightly adjacent to each other. |
 | Step 2. On top of the boardwalk we lay beams and a layer of insulation, which can be mineral wool or cork material. |
 | Step 3. On top of the beams and insulation we lay out a second layer of boards, this time tongue-and-groove. We hammer the flooring with nails and use insulation to close the resulting gaps between the floor and the walls. We stuff wooden slats or plastic baseboards on top. That's it, the heated floor in the chicken coop is ready! |

The insulation inside the floor structure can be covered with a layer of moisture-proofing material, and the tongue and groove boards can be covered with plywood to prevent them from rotting from chicken feces.
Ventilation
It is necessary to install a ventilation system to allow fresh air flows into the room, which will relieve the chicken coop of unpleasant odors and make the temperature comfortable.

To construct ventilation, two wooden boxes are used. They are mounted on opposite walls of the chicken coop. In this case, it is better to place one channel at a distance of 50 cm from the ceiling, and the second directly under the ceiling. Additionally, special dampers are constructed, which are necessary to control the incoming air masses.
Prices for ventilation units
Ventilation units
Insulating the chicken coop
A very extensive stage is finishing the room with insulating materials. Insulation may be needed both during the initial construction process and to provide heat to a ready-made, operating poultry house. Initially, choose the material that will be used for the work. With regards to walls and floors, they mainly choose polystyrene foam, sawdust or mineral wool. For the roof, foam boards are a good option.

Wall insulation
The process of insulating a chicken coop begins with determining the location of the material. It can be placed outside or inside the poultry house. The best option is to carry out insulation from the outside, as this will provide a good barrier to cold air flows and will not allow them to penetrate deep into the walls. Insulation is carried out according to the following instructions.
| Photo | Step, description |
|---|---|
| Step 1. In the case when the material for insulation is secured outside the room, it is necessary to install plywood sheets on the constructed frame. They are secured from the inside, while it is necessary to leave openings for windows and doors. |
| Step 2. If the insulation is laid on the outer surface of the structure, then the material is laid between the frame beams. In this case, the best option would be to use mineral wool or foam boards. |
| Step 3. If polystyrene foam is used, then the remaining gaps between the wooden frame of the structure and the insulating material are sealed using polyurethane foam. |
| Step 4. When constructing a frame on which mineral wool will be attached, it is recommended to maintain the distance between the beams, leaving it so that it is 5 centimeters less than the width of the insulation. |
| Step 5. After laying the insulating material, a vapor barrier film is rolled out on top of it using staples. After this, wooden slats are installed to the frame beams. |
| Step 6. We proceed to the stage of covering with decorative materials. Often, fitted boards are used for these purposes. If there is a need to maintain the overall style of the site and its design, then you can use vinyl siding panels. |


Ceiling insulation
| Photo | Description | |
|---|---|---|
| Step 1. Plywood sheets are attached to the floor beam, which is drawn from the rafters, on the upper side of the surface. You can use moisture-resistant drywall instead of plywood. | Step 3. On top of this layer, boards or plywood are fixed, depending on the farmer's preferences. |

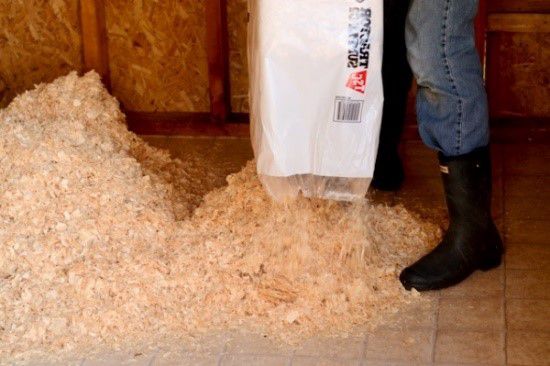
Floor insulation is carried out by creating a 10 cm layer of bedding material. To do this, use shavings, sawdust and straw mixed with quicklime. In some cases, peat or foliage can be used. Keeping the compost mixture in the coop will provide increased heat generation.
In our article, what else can be done to maintain comfortable conditions for birds in winter: insulating windows and doors, installing heating systems. And you will read what to feed chickens in winter to maintain egg production.
How to set up a chicken coop?
Its productivity and well-being depend on the comfortably created conditions for the bird. There are several points that must be taken into account when arranging a poultry house.
- An important point is the space for walking. It is fenced with a mesh, and the best option would be to use a plastic name;
- Perches and perches. These devices are necessary for the bird to rest. It is recommended to position the perches so that they are at the same height.
- The perches should be positioned in such a way that sunlight can reach them.
- Long boxes filled with dry varieties of feed are suitable as feeders for the poultry house. For wet food, it is best to use narrow boxes made of metal or wood. It is advisable to place them under sheds or in a house - this will protect the food from bad weather.
- An ash bath for birds to bathe should be located next to the house.
- In the open part of the poultry house, it is necessary to construct a small canopy under which the birds can shelter from the heat or rain;
- The water container should be deep, and it is important to ensure that the water is always fresh and clean.

How to set up a chicken coop?
When arranging a chicken coop, it is necessary to take into account many little things - from lighting, ventilation and heating to perches, feeders and drinkers. In order not to forget anything, read Also on our website you will find information on how to do and.
Prices for a nest for laying hens
Nest for laying hens
Lighting
This point deserves special attention, since the healthy life of birds depends on the equipped lighting system. In this process, it is important to consider that chickens do not see very well in the dark. This means that you cannot turn off the lights completely in the evening. The lamps turn off only after all the chickens have settled into their roosts.
The young generation of chickens needs constant bright light, but over time and the development of chickens, the brightness of the lighting is reduced.
Lighting is the most important element of a chicken coop.
In addition, you can build a system that will smoothly turn off the lighting. This is preferable because turning the lights on and off suddenly frightens the chickens.

Video - How to build a chicken coop with your own hands
Let's sum it up
Building and equipping a high-quality chicken coop is not so easy, however, if desired, anyone can cope with this task. Read the article carefully and follow the instructions, you will definitely build the chicken coop of your dreams!
If you are thinking about building a chicken coop for 100 birds with your own hands, it means that you already have experience with unpretentious laying hens. Setting up a large poultry house with the existing skills will not be too difficult. From the article you will learn about all the nuances that distinguish the arrangement of a chicken coop for 5-10 birds from a large farm poultry house.
Types of chicken coops
Depending on the method of organizing the life of laying hens, poultry farmers distinguish between:
Free range
This option is common in villages: chickens spend the night and winter in a common small building, but can roam throughout the entire farm territory. This option can be convenient if the area of the personal plot is large enough and the farm yard is completely fenced off from the vegetable garden, flower beds, etc. The chickens are in the most natural environment possible, receive natural vitamins and minerals, and have good immunity due to fresh air and activity. But with a population of 100 chickens, it will be quite difficult to keep track of everyone and protect them from birds of prey. In addition, there is a growing risk that laying hens will leave eggs in places not intended for this purpose.
With an aviary
Most poultry farmers consider such conditions optimal for laying hens. The chickens spend the night, eat and winter in a spacious poultry house, but in warm weather they walk a lot in a specially fenced area. This provides the bird with the activity it needs, giving it the opportunity to satisfy its instincts, which, in turn, helps improve immunity and egg production. But the bird will not be able to receive natural vitamins and mineral supplements in the required quantity in the aviary, so the poultry house must have separate feeders for greens, mixed feed and minerals.
With cells
This option for placing laying hens is close to the conditions of a poultry farm. After all, the greater the number of chickens in the chicken coop, the more important the possibility of automation becomes. Therefore, if in a poultry house for 100 heads chickens can still visit the enclosure, then in farms with a large number of birds this becomes unprofitable and dangerous. To walk 200–500 chickens, an area of 50–130 m2 is required, otherwise the birds will conflict and fight with each other. It’s easier to set up a chicken coop with cages, a system of automated drinkers, feed supply and an egg duct in each cell. But be prepared for the fact that laying hens will live much less than their free sisters, will be less resistant to diseases, and will require specialized feed high in vitamins and minerals.
If you are not yet ready to set up a mini-poultry farm at home, you should limit yourself to 100 or even 50 chickens. The best option would be a chicken coop with an aviary for 100 birds. Considering that the number of chickens is growing very quickly, such a poultry house will become relevant even for the owner of 30–50 chickens.
General requirements for a chicken coop
In order for poultry to remain healthy and breed consistently, their housing must comply with the standards.
There is a group of requirements on which the convenience of the owner depends.
If you want your chickens to be healthy, grow quickly, and lay eggs often, you shouldn't skimp on the size of their home.
Photo ideas for exterior decoration
On a site with pink flower beds and a classic house, a romantic white poultry house looks just right. A chicken coop made of unpainted wood looks organic in the garden. If you paint the façade of the poultry house in contrasting colors, it will look much more attractive. This chicken coop will seem appropriate next to a half-timbered house. A summer aviary for chickens. , reminiscent of a bungalow, can be assembled from the remains of the construction of the main house
We determine the size and structure with drawings
According to established standards, per 1 m2 of poultry house there should be 4 laying hens or 3 broilers (if the chickens roam freely around the premises) or 7–10 chickens in cages (depending on the breed). Thus, for a herd of 100 heads, you will need a building with an internal area of 15 to 35 m2 (including the vestibule).
Experienced poultry farmers recommend equipping a room of about 30 m2 for such a large flock, and it should be divided into two separate zones, each containing 50 birds. This is safer for chickens in case of illness, and more convenient for feeding and cleaning.
Designation on the drawing:
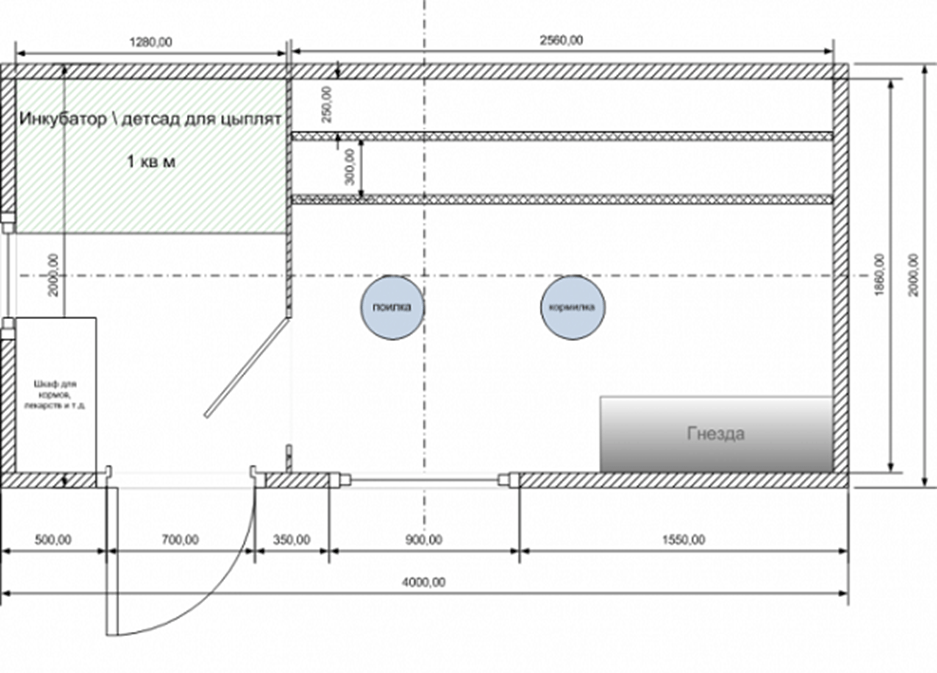
III - department for adult chickens.
One of the rooms of a large poultry house can be used to raise chickens from your own incubator. Based on the norm of 14 chicks per 1 m2 of space, up to 170 birds can be kept in a room measuring 12 m2. As they grow, most of the livestock will need to be resettled.
The area for walking chickens, which is usually equipped next to the poultry house, should be 2-3 times larger than the area of the chicken coop itself. It can be either stationary, taking into account a person’s height, or in the form of low, portable tunnels. The first option will require more attention from the owners, since the birds will quickly trample down the grass growing on the spot, they will have to constantly be fed with green stuff and remove droppings from this area as well. Mobile tunnels will provide chickens with a more natural living environment, but they will need to be moved regularly as resources in the chosen location become depleted.
When building a poultry house for 100 chickens, most farmers prefer a building design with a pitched roof. This chicken coop is easy to install and maintain and is relatively inexpensive.
Selecting materials for construction
The final selection of materials depends on the financial capabilities of the owner, the planned speed of construction, available construction products and one’s own skills.
Foundation
A chicken coop is a low and light structure, so there is no need to equip it with a monolithic slab or strip foundation; a pile foundation will be sufficient. Support piles can be made from scrap materials:
Each of these options will ensure sufficient stability of the structure; you just need to choose the material that is cheaper in your region.
Walls
The walls of the poultry house must be windproof, since chickens do not tolerate drafts well. It is also desirable that they retain heat well and are installed as quickly and easily as possible. Most often, farmers prefer the following construction options:
Frame structure
The frame of the house is constructed from pine or spruce timber, which is then sheathed inside and out, and insulation is installed between the layers of sheathing. For interior decoration, it is better to choose the most natural materials possible: wooden boards (poor quality with knots), plywood (thin). Many farmers use OSB, corrugated sheets, and tin sheets. Exterior finishing depends on the type of main house and the desired decorative effect; everything can be used here - from scraps of old boards to siding. The main thing is to decorate the lower part of the house with wear-resistant material so that the chickens do not get to the insulation. To insulate a chicken coop you can use: sawdust, a mixture of sawdust and foam chips, foam sheets, stone or mineral wool (it is necessary to protect the wool with membranes from water and steam). A frame chicken coop is built very quickly, even if only two people are involved in the installation.
Log house
If in your region the most accessible materials are logs or beams, you can use the old-fashioned construction technology. Such a poultry house will turn out to be as natural as possible; it will not require additional costs for insulation. But here you need to be especially careful when choosing its location, arranging electrical wiring and heating, in order to comply with all fire safety standards.
Capital building
A capital chicken coop is the most reliable, costly and labor-intensive. It can last many times longer than a frame one, but expanding or refurbishing it as the population grows will be much more difficult. You can build a permanent poultry house from any available materials: brick, limestone blocks, foam blocks, stone. After this, the walls will need to be plastered and insulated from the outside, otherwise the birds will freeze in winter. Making a permanent chicken coop is beneficial if you already have an unnecessary barn and want to place laying hens in it. In this case, you will simply need to add a window, paint the walls with lime whitewash and equip perches.
The final choice of material is again dictated by the conditions of your region, the characteristics of the site and the number of available workers. Thus, a frame poultry house can be built by a married couple in 2–3 weeks. But if you need a real mini-poultry farm, you should hire workers and equip a large chicken coop.
Roof
The roof of the poultry house is most often made of a single-slope or gable roof. Flat roofs are not popular among chicken coop owners, since they have to spend more money on waterproofing them and more time on snow removal.
As for the material for the external finishing of the roof, it also depends on the type of the main house and other outbuildings. Here, by the way, the remains of soft bitumen tiles, metal tiles, corrugated sheets, slate, sheet metal, and ondulin will come in handy.
If you hem the ceiling inside the chicken coop, the resulting under-roof space can be used for insulation and storage of things. In the simplest case, hay or bags of sawdust are placed there, which are used for bedding as needed. If desired, you can build a full-fledged insulated pie from layers of vapor barrier, insulation (mineral wool, stone wool, polystyrene foam), waterproofing and sheathing (boards, plywood, OSB).
In order for the chickens to lay eggs well, the windows of the poultry house should face the sunny direction.
We build a frame chicken coop for 100 chickens with our own hands according to the drawings
Required tools:
The complete list of necessary devices depends on the building materials you choose.
Step-by-step construction instructions
Let's look at the construction process using the example of a frame chicken coop measuring 4x7.5 m.
Now the chicken coop is almost ready, all that remains is to equip the interior space for the birds to live comfortably.
Setting up the room
Designation on the drawing:
I - storage compartment for farm equipment and feed supplies.
II - department of raising chickens.
III - department for adult chickens.
The sleeping area for chickens is ordinary wooden poles with a cross-section of 45–50 mm, round or rounded on one side. Their total length for 100 birds should be about 4 m, so that the birds can comfortably settle in a dense group in winter or more freely in summer. The poles are not placed directly above each other, but offset so that droppings from the upper floors do not fall on the lower hens. The minimum distance between the perch slats is 50 cm. Some owners place the perches at the same height so that the chicken community does not stratify into weak and strong. Below you can place a tray for collecting litter, which will facilitate cleaning and allow you to fully use the floor space. An approach board should lead to the perches, which will help heavy adult birds climb up.
Under the perches it is convenient to place feeders with mineral supplements, which chickens need for the normal formation of eggshells. In the section for young animals, it is worth hanging a heating lamp there so that the chickens get used to going to bed in this part of the coop.
Nests for laying hens, boxes with straw, are installed in the darkest and most secluded place of the poultry house. It is advisable to raise them 10–20 cm above the ground, but not higher, so that the birds can easily climb into the nest.
The main feeder (for mixed feed) is usually placed closer to the center of the room so that each chicken has free access to it. But it is better to make a drinking bowl and a feeder with grain near the wall in order to secure a tank with a large supply of liquid and food on the wall.
It is advisable to cover the floor with a thick layer of sawdust, especially if you are not sure of the quality of its insulation. Chickens feel less comfortable on a hard surface, and it becomes more difficult to clean up after them.
Now your chicken coop is completely ready for birds to live in the summer and off-season.
Getting ready for winter
For those who built a frame poultry house using the described technology, all the walls, floor and ceiling of the chicken coop are reliably insulated. If you doubt that chickens will be able to maintain a room temperature of 12–14 o C only due to the heat of their bodies, you should help them.
To begin, create a warm bedding at the end of autumn by covering the floor with slaked lime, and then with a 7 cm thick layer of a mixture of sawdust, straw and peat. Gradually mixing with manure, it will begin to compost and release heat. In cold weather, the litter will need to be turned up and new mixture added, so it should be prepared in advance. In spring, the litter will be an excellent fertilizer for the beds.
During the winter, it is also worth covering the ventilation holes and ventilating the chicken coop yourself. If the windows in the building are not plastic, their joints should be covered with masking tape or a transparent film should be secured to the window. The hole for laying hens is also insulated in the same way.
Additionally, in frosty times, instead of lighting lamps, infrared lamps are screwed into the sockets. It is advisable to lengthen the wire so that it can be lowered 1–1.2 m above the floor level. Such lamps provide less light than usual, but for chickens such lighting will be pleasant and comfortable.
If everything is done correctly, you will not need additional measures for insulation and heating of the poultry house.
Now you can definitely set up a comfortable chicken coop for 100 birds without extra costs and construction errors. All that remains is to collect the materials and get to work.
Add a comment
It’s not enough to build a good barn for chickens; you also need to equip it: secure perches, make nests, install/hang drinking bowls and feeders. But you need to do this in such a way that it is convenient for you to serve the poultry house. In reality, chickens don't care how beautiful their nests are. They fit perfectly on the floor. It will be inconvenient for you to collect eggs from the floor, and they can peck at them. Therefore, we make the arrangement of the chicken coop so that it is more convenient for you.
Perches
First of all, you need to equip the chicken coop inside with perches. This is a round or oval stick - a tree branch, a shovel handle, a planed block, etc., fixed at some height above the floor.
On average, they take about 20-25 cm of perch length per chicken. They are attached to the wall at a distance of 25-30 cm, one perch from the other - at a distance of 35-40 cm. You can make multi-tiered ones, but there will be fights for the highest place. Please note that all dimensions are approximate only and are necessary for reference purposes. Everything is selected more according to location: different breeds and chicken coops, and their owners too.
To make cleaning easier, a shield made of some smooth material is installed at a distance of 20 cm below the perch. Litter accumulates on it, so choose a smooth surface: it will be easier to sweep away.

The question remains: at what height should the perch, and therefore the shield, be made? It is most convenient to clean it in a cart. It should fit under the shield so that you can dump the droppings directly into the wheelbarrow with a hoe. For the flood, the height of the shield is determined by the height of your car, and above the shield there will already be perch slats. And again, choose the height of the chicken perch so that cleaning is convenient.
Nests
The second required element in arranging a chicken coop is nests. They will lay on the floor, but the eggs will be dirty, and they may even peck. According to the norms, one nest is made for three hens. But in fact, it turns out that no matter how many of them you do, they choose one or two, maximum three, and stand in line. The rest are exactly the same, standing empty next to each other. From time to time their tastes change, they begin to rush to others... From all this it follows that you can safely count 5-6 heads per nest, half will still be empty.
It is better to place the nests so that it is convenient for you to pick up the eggs, i.e. hang on the wall. So that the bird can safely get there, they make ladders - an inclined board with perches/sticks nailed across it. The same ladders are made for perches. If the nests are placed close to the perches and at approximately the same level, they will move back and forth. Quite convenient.

You can make such civil nests
If possible, make sure that the back side of the nests faces the corridor, if there is one. A door is made on the back side. Then to pick up the eggs you don’t need to go into the pen - open the doors and collect them.

Chickens also love to rush in the dark, or at least in dim light. That’s why the entrance is made small, and so that they don’t sit inside for a long time, sleep and shit, the roof is made with a strong slope (in the photo).
You can simply arrange or hang the boxes along the wall, but organize the darkening by placing a partition in front of the nests. In general, it is difficult to predict their behavior. It happens that they simply ignore the nests, rush anywhere. Then a stencil or mock-up can help: cut out an egg from white paper and place it in the nest. It can help: they will rush there.
Several nests in different designs in the photo below. These are all real chicken coops, you can take them into service.
Plastic is very practical: it’s easy to wash, it’s inexpensive, you can do a lot of things, and chickens really love these plastic nests. Place more hay in them and they will fly. The space below can be used for perches or an IR lamp can be hung on the bottom to make a solarium.
In the nest you always use your hands with caution: you never know what the chickens laid there... It is much more convenient and safer when the eggs are rolled into a special compartment - the egg receptacle. The main catch in this device is to choose the angle of the floor and the flexible material so that the egg moves it away and stops before it reaches the wall. To soften the "landing" sawdust is poured onto the bottom.

Since the eggs roll up and the bird does not see them, they may refuse to lay eggs in such nests. In this case, you can make a dummy egg - from thick foam plastic in full size or cut out a stencil from paper - and glue it to the bottom. It almost always works.
Chicken cages
Sometimes the bird is kept in cages. But this is for industrial or semi-industrial maintenance. With this method of cultivation, a large number of birds live in a small area. A drawing of a cage for chickens with dimensions is posted below.

Broiler cage drawing with dimensions
All sizes are according to the standards, and there is no need to invent anything. This is the minimum that laying hens need. And what can come out of such cells is in the photo below.

Watch the video to see how to make broiler cages from wood. Everything is described in great detail: what, for what, what sizes, how to assemble and what is needed for this. Really useful.
Drinkers and feeders
Setting up a chicken coop is unthinkable without drinking bowls and feeders. Moreover, they should be there too. There are periodic and bunker feeders. Periodic - this is when you came, poured out the amount of food and that’s it. Until the next feeding they stand empty.

Climbing in and digging around is a favorite thing
Bunker feeding is when there is a decent supply of feed, which is constantly poured into some container. Both have their drawbacks: periodic ones require you to go to the chicken coop every time and add grain, and the birds crowd around and fight for the best place, which sometimes leads to the feeder being overturned.
If you have a bunker feeder, you need to go much less often, but it is possible to overfeed the bird, which is a disaster for laying hens. Therefore, either the laying hens are given a large walk or only broilers are fed in this way.
There are many designs of periodic feeders, but not all of them allow you to use feed economically. The easiest way is to pour the food into a bowl or container. But, if there is at least some opportunity, the chickens begin to rake up the food, spilling it out and then trampling it down. I have to throw it away. And such feeders allow you not only to dig into the food, but also to climb into the feeder with your feet. Therefore they need to be improved. To do this, install wire dividers on the container. Feed consumption decreases sharply: it is more difficult to rake it out.

You can make, for example, another similar feeder (or drinking bowl), which is conveniently attached or placed against the wall. It is probably easier to weld it from metal, although there are craftsmen who can make something similar from wood.

There are some interesting ideas. For example, an economical auto-feeder is assembled from an old car disk, a basin of suitable diameter and a plastic water bottle with a capacity of 5-10 liters.

Look for a disk of the type shown in the photo: with a large number of small holes along the outer edge. In the middle, cut a hole the size of the neck of the bottle. Cut out the bottom of the bottle cap, leaving only the threaded ring. The feed mixture is poured into the bottle, a disk is put on it, and the cut-off lid is pressed against it. Feed is poured into a basin and a structure is installed on top.

In order not to disassemble the feeder every time when you need to add food to the bottle, you can cut the bottom, making it like a lid. Then the bottle itself can be secured more seriously: fixation with the thread from the cap is not very reliable. But such an improvement does not allow rummaging in the stern, and no one will climb into the basin.
You can make a feeder from a piece of plastic sewer pipe. Holes with a diameter of about 7 cm are cut out on both sides. They do not have to be made round at all - square or rectangular ones will also work. A corner is installed at the ends at a 90 ° socket upwards and along a small piece of pipe: food can be poured here.


A simple but spacious bunker feeder is a decent chest with a folding bar attached at the bottom. In the open position, food is poured onto it.
Another option for an economical feeder is made from plastic sewer pipes. But this is already a bunker structure: there is a decent supply. The design is simple, and consumption is reduced.
An even more interesting design of the chicken feeder in the video: with a lid. To open it, you need to jump on it.
Another option is a bunker feeder made of PVC pipes and a plastic water bottle.
Homemade drinking bowls for chickens
It's almost the same story with drinking bowls. Only here is water splashed, which, when mixed with droppings, gives an exceptionally persistent odor, as well as dirt. All this does not contribute to easier and faster cleaning. Therefore, the choice of drinkers is no less important than the feeders.
The simplest option for a small number of birds - up to 15 pieces - is siphon drinkers. They have legs and allow you to save water. If the legs are designed well, even a chicken flying onto the top will not knock them over.

Siphon drinkers - factory-made and homemade from a plastic bottle
Factory drinking bowls, of course, look more attractive, but a homemade version is almost free, and they work no worse. In the photo you see a simple home-made siphon drinker for chickens: a support was nailed in the corner - a piece of board with a hole cut out for the neck. On top there is a fastening system and a load so that it does not get knocked down. A hole is cut into the former bottom of the bottle into which water is poured. The whole trick here is to choose the distance at which to install the water tank: so that it is not too little or too much.
Cup drinkers are convenient when growing in cages, as they are conveniently attached to the net. But no one bothers to hang a piece of mesh, say, on the wall or come up with another mount.

They allow you to water the birds without splashing. Water is fed into the cup, it bends under the influence of gravity, blocking the flow. They drank the water, the cup rose, the water flows again. A hose is connected to the side fitting, the second end of which is in a container with water, which should be above the level of the drinkers. Convenient and economical.

Nipple drinkers for chickens. These are small devices, a few centimeters in size. A cone-shaped stainless steel rod is inserted into the plastic case.

These nipples are screwed into plastic pipes into which water is supplied. A hole of the required diameter is drilled, a thread is cut and the nipple is screwed in. When you press the rod, a few drops of water appear. The chickens peck at the rod, drinking the drops that appear. The main disadvantage of this method is the drops that fall on the floor. To prevent this from happening, a special drip catcher is placed under each drinker. It simply snaps onto the pipe.
Despite their miniature size, these small drinking bowls cost a lot, especially if they are high-quality - read - imported. Ours are, of course, cheaper, but they break faster.

And the rest are different cups and basins into which water is simply poured. Their disadvantage is that birds often turn them over, and the water in them quickly gets dirty.
There are also interesting ideas from homemade ones. For example, such a pipe drinking bowl is shown in the photo. In a piece of plastic pipe, the water level is controlled by a float mechanism from the toilet cistern. Three drinking bowls are attached to the pipes.

The video demonstrates a drinking bowl with auto-filling.
If you want to arrange the chicken coop, you can arrange it in such a way as to minimize the need for its maintenance. In this case, the bird will bring not only income, but also pleasure: it is always pleasant to look at objects made with your own hands, but keeping a bird in a chicken coop without “direct” hands is difficult and expensive.
It is no secret to many that the comfort of keeping affects the health of chickens, especially in winter. Comfort in a chicken coop is created by proper lighting, ventilation, sufficient space for walking, convenient location of nests, feeders and drinkers. All this together allows birds to lay eggs in larger quantities. Therefore, during the cold period it is necessary to build a warm room for chickens, the independent construction of which will not be difficult.
Is it really necessary to build a warm chicken coop?
From the end of autumn to the first month of spring, unfavorable conditions for chickens begin, which creates difficulties for poultry owners.
If in spring and summer the chicken is active: it moves, digs in the ground, bathes in water, then in winter, due to many factors, its activity decreases.
The summer chicken coop does not require additional insulation and lighting
When temperatures drop and daylight hours shorten, birds' ability to lay eggs decreases or even stops completely. That’s why it’s so important to make a chicken coop that will provide:
- temperature level of at least 12 degrees and low humidity;
- artificial lighting - to increase daylight hours;
- the presence of low perches and egg-laying sites;
- the internal area of the room is 1 m2 for 1–7 individuals (depending on the breed).
Meeting these requirements will allow poultry to comfortably overwinter without losing weight and laying eggs daily.
A properly built chicken coop can significantly increase the egg production of birds.
Options for warm chicken coops for the winter
A standard chicken coop is a utility room, next to which there is a place for birds to walk.
The site has a fence made of chain-link mesh with small cells that protects the chickens from predators. If the farm has no more than one and a half dozen birds, then this is an ideal option. It is possible to arrange a chicken coop with a greater level of comfort, with external and internal walking areas, but then it will take up a large area. This option is not suitable for small plots of land.
The winter chicken coop is built on a foundation on which a thick wooden floor is laid, and the walking area is covered with a roof.
Considering the number of individuals, the following types of chicken coops are used:
- From 10 to 15 individuals - a mini-chicken coop up to 10 m2 with a walking area of 4 m2. Such an area will ensure free movement of both adult birds and young animals in the case of breeding chicks. It is also required to be equipped with a window and a ventilation grill.
The mini-chicken coop is equipped with a covered run and a box for collecting eggs.
- From 20 to 30 individuals - a full-fledged room up to 20 m2, a height of 1.8 m and a walking area of 6 m2. These dimensions allow you to build a perch in several tiers and install up to 7 nests. If the area of your personal plot is sufficient, then it is better to build a chicken coop with a vestibule: it will provide the required temperature in the main room in winter.
It is advisable to build a winter chicken coop with a vestibule to protect chickens from drafts
- More than 50 individuals - a room of about 40 2, up to 2 meters high and a walking area of 12 m 2. Such a chicken coop requires additional thermal insulation, ventilation and installation of heating equipment. It is better to place the perches opposite the windows, and the nests (up to 10 pieces) in the back of the room.
Large chicken coops are built on high stilts, and the walking area is made under the premises
If the area of the personal plot allows, then the chicken coop will be equipped in a completely enclosed room, inside of which there will be a walking area, which will prevent the birds from hypothermia and ensure their free movement even at low air temperatures in winter.
The winter poultry house can be completely enclosed, providing the chickens with a warm place to roam
When you need a chicken coop at minimal cost, there is an option to build it like a dugout. The height of the walls does not exceed 0.5 m, and for insulation they are covered with earth. The roof is also insulated. The southern wall is equipped with windows with multi-layer glass. And the fallen snow additionally provides thermal insulation.
Another low-cost option is a poultry house made using frame technology: from small-section timber, sheathed with plywood sheets, OSB, planed boards. Thermal insulation material is laid between them; its thickness depends on the climate. To protect against rodents, the insulation is covered with a metal mesh. This increases costs, but subsequently removing rodents is even more expensive. During construction, it is better to follow the rules for constructing frame houses.
In winter, it is mandatory to regulate the humidity level in the chicken coop, which is ensured by installing ventilation.
Video: fully autonomous warm poultry house on stilts (with bottom rung)
Material selection
The best option for a warm poultry house is wood. During frame construction, the timber is covered with dense rows of OSB sheets, hiding the cracks. When construction is carried out using brick or cinder block, good thermal insulation is necessary, since brick has a high level of thermal conductivity. What material will be used for the chicken coop depends on preferences and financial capabilities.
An insufficiently insulated roof will become a source of heat loss and increased humidity in the room, and the cost of heating the chicken coop will increase. For insulation, it is recommended to line the inside with foam plastic or felt. A permanent roof is made over the winter walking area - a continuation of the roof of the chicken coop itself.
For the winter period, it is preferable to have a chicken coop with a gable roof so that snow does not accumulate on it.
Wood is often used in the construction of poultry house walls due to its environmental friendliness and low thermal conductivity. Even if the frame is erected from metal, it is better to use plank cladding.
The metal frame is always sheathed with wood so that the desired temperature balance is maintained indoors in winter.
To facilitate constant cleaning inside the chicken coop, its floor is made by pouring concrete. The service life of such a floor is long, but it requires good thermal insulation so that the birds do not freeze. In winter, the wooden floor is additionally treated with special moisture-resistant compounds, and the top is covered with a thick layer of straw and hay bedding.
The floor in the chicken coop can be made of concrete, but be sure to cover it with a thick layer of straw
To give the entire structure of the chicken coop rigidity and strength, to avoid distortions of the walls and the appearance of gaps, as well as to raise the walls themselves above the ground, a light strip foundation is used. This also helps keep you warm in winter.
The following materials are used to build a main wall:
- Shell rock is a porous limestone of natural origin with a low level of thermal conductivity. Most suitable for building a chicken coop for 25–30 birds. The standard size of the block is 18x18x38 cm. It is laid using the technology of laying foam blocks or cinder blocks.
Walls made of shell rock are erected quickly and retain heat well
- Foam concrete is a common material that is harmless to health. There are no restrictions on the size of the building. The optimal material for wall construction is D400 foam concrete, the block size of which is 20x30x60 centimeters. The thickness of the masonry is determined by the climate of the area.
You can build a chicken coop from foam concrete very quickly, following masonry technology
- Brick is a building material with a low level of thermal conductivity and is durable. It is optimal to build large chicken coops from brick. The brick can be either solid or hollow.
The brick walls of the chicken coop can be lined with boards from the inside
Taking into account the service life of the chicken coop, the material from which the walls will be built is determined. For a novice poultry farmer, wood and plywood are the best choices. Over time, you can dismantle the structure or, conversely, add additional space. But if you are breeding a large number of poultry and building a chicken coop for a long time, then it is better to choose brick or foam concrete. You will also definitely need thermal insulation - foam sheets, mineral wool rolls or other modern material.
For the purpose of thermal insulation of the structure, natural insulating materials are also used: the walls are insulated with straw and hay, and the floor and ceiling are insulated with coarse expanded clay. There is only one negative side to the use of such insulation in comparison with modern materials - these insulation have high thermal conductivity, which requires their use in large quantities. And this is difficult when building a poultry house.
Detailed characteristics of modern building materials for thermal insulation:
- Polystyrene foam is a material with good insulation properties. Has a cellular structure. Thermal conductivity is only 0.047 W/mK, which is lower than that of foam concrete, brick and wool. Sold in sheets of different sizes. Easy to attach. The main disadvantage is that it is susceptible to damage by rodents. To solve this problem, the foam is sheathed with sheets of plywood or OSB.
Polystyrene foam has good thermal insulation characteristics and is often used as wall insulation
- Mineral wool - has heat and sound insulation properties. Has a fibrous structure. Thermal conductivity is slightly greater than that of polystyrene foam, but it is not susceptible to damage by rodents. It is recommended to apply together with a moisture-proof and windproof film.
Mineral wool is resistant to damage by rodents, but absorbs moisture from the environment
- Extruded polystyrene foam is a material with a closed cellular structure, produced by polystyrene foaming. It has a long service life and excellent insulating characteristics. Its properties surpass almost all existing thermal insulation materials.
Expanded polystyrene has a long service life, but if used indoors for a long time, it causes harm to health through the respiratory system
- Stizol is a foamed polyethylene. It has high thermal insulation and sound insulation properties, is not susceptible to moisture, and is durable. Produced on the basis of metallized film, foil or non-woven fabric. The optimal thickness for use is about 1 mm.
Stizol is used in construction as sheet insulation.
When choosing insulation, it is important to consider how much area it will cover. If the structure is small, use stizol or any polyethylene foam material. For structures accommodating 50 or more birds, it is advisable to combine materials: if the wall is insulated with expanded polystyrene, then the floors are insulated with expanded clay. And when minimal construction costs are required, polystyrene foam and mineral wool are used.
When creating a project to build a chicken coop, you need to determine in what place the insulation will be installed: if it is planned as interior decoration, then when making calculations you need to increase the overall dimensions of the structure by the thickness of the material being laid.
Video: warm chicken coop with your own hands in 4 days
Preparatory work
The width of the foundation being laid should slightly exceed the thickness of the future wall. In this case, the wall is installed exactly in the center of the foundation. A concrete foundation will additionally provide thermal insulation and provide protection from:
- exposure to moisture on wooden structural elements, increasing the service life of the building;
- access to the chicken coop for predators and rodents, which can easily dig a hole underground.
There are other possible ways to protect against uninvited predators getting inside:
- make a foundation up to 30 cm high;
- place the structure on concrete pillars, raising the floor to a height of 25 cm from the ground;
- cover the walls with metal sheets, burying one edge of the sheet to a depth of 35 cm.
On the schematic image of the chicken coop you need to indicate the location of all parts of the building and internal equipment
During construction, it is imperative to install several windows on the south side of the chicken coop for natural light. But they should not be a source of draft.
Since in winter, chickens try to be as close to each other as possible, their placement is organized based on the rule: 1 m2 - for 4–7 individuals. If a meat breed is grown: 1 m 2 - for 3 individuals. For laying hens: 2.5 m 2 - for 10 individuals. The height of the room in this case is not more than 1.8 m.
The size of the chicken coop depends on the number of birds
For self-building a warm chicken coop, you will need the following:
- poultry house project with exact drawings and dimensions;
- building materials for the installation of formwork and pouring the foundation;
- locksmith and construction tools;
- building materials for the construction of a birdhouse.
Video: tricks in building and arranging a winter chicken coop
Self-made chicken coop: step by step instructions
At the very beginning of construction, markings are made for the foundation (base) of the chicken coop using wooden pegs and a rope stretched between them. The foundation of the fencing of the walking area is carried out at the same time as the foundation of the chicken coop.
Base
Sequence of work:
- A trench is dug for the foundation. The structure of the chicken coop does not have much mass, so the foundation is made of strip or columnar to a depth of no more than 45 cm. However, the use of a columnar foundation will lead to high costs for thermal insulation of floors.
The foundation for a chicken coop can be strip or columnar.
- At the bottom of the trench, rubble is poured and compacted first, and then sand, creating a so-called pillow (the thickness of the total layer should not exceed 5–10 cm).
- The formwork is being installed for pouring the foundation. The height of the formwork is equal to the height of the foundation. The upper edge of the formwork serves to level the poured concrete.
It is necessary to make the foundation according to all the rules so that it does not warp and crack after drying
- Reinforcement is laid inside the formwork and tied at the corners with steel wire.
- Concrete is poured into the formwork, leveled over the surface until cement laitance is formed and covered with a film. During the week, it must be watered daily with water to prevent cracks from appearing.
After 20–28 days, when the foundation has gained the required strength, you can begin to build the chicken coop structure. A layer of waterproofing is laid on top of the foundation to protect the structure from moisture.
Floor
From the place above which the floor of the chicken coop will be located, the top layer of soil is removed, then sand is poured there and compacted, and a layer of expanded clay is laid as insulation. A mesh is rolled out over the expanded clay and a screed is made using cement mortar. The thickness of the floor screed should be at least 2 cm. For several days, while the screed hardens, you need to water it with water. It is recommended to make the screed with a slope of several degrees, which will ensure free flow of water when cleaning inside the chicken coop.
For comfortable living of chickens, the floors in the chicken coop are covered with boards.
The arrangement of the walking area is carried out in different ways: either it is poured with concrete or covered with boards.
Sawdust, straw, and hay are used as bedding. Usually, during the cold period, the litter does not change, and each time a new dry layer is poured on top of it. This is how natural floor heating is obtained due to warm manure mixed with dry bedding.
Another option for arranging a walking area is to preserve the natural ground, which will allow the bird to search for insects, seeds and stones in the future.
You need to think in advance what kind of floor there will be in the bird walking area.
Frame
The sequence of work is as follows:

Roof
A sheathing made of unedged boards or sheets of plywood is nailed to the rafters. A special vapor barrier film or polyethylene is laid and secured along the sheathing. The film is spread in overlapping layers, and the seams are sealed with adhesive tape. Thermal insulation material (mineral wool board) is laid on it, and covered with waterproofing on top.
Most often, the roof of a chicken coop is made pitched due to the simplicity of its construction.
Next, through the waterproofing, transverse strips are nailed to the rafters with the required spacing, which depends on the type and size of the roofing material. If a soft roof is used, then plywood or OSB sheets must be laid on top of the slats, along which roofing material spreads. If slate is used, then wood cladding is not needed.
After completion of the roofing work, the frame and internal wall cladding are insulated.
Insulation of walls and floors
The work is carried out in the following sequence:

Polyurethane foam is also sometimes used as a thermal insulation material. But for its installation, specialists with equipment are involved, with the help of which this insulation is applied to the surface of the walls. The use of polyurethane foam is expensive, but the application process is not labor-intensive and provides maximum protection from the cold.
You can sheathe the outside of a winter chicken coop with edged boards or other facade material, except plastic, since it does not tolerate severe frosts well.
A concrete floor, even with an expanded clay cushion, does not ensure heat retention inside the chicken coop in winter. For this purpose, the floors are additionally insulated.
You can lay infrared film on the floor and use a cement mortar screed on it. This heating system operates both periodically and regularly, ensuring the desired temperature in the chicken coop. Or you can use a less expensive option: cover the floor with wooden panels. These shields are boards tightly fitted to each other, attached to the joists. In winter, plant litter up to 15 cm thick is laid on them to increase floor insulation, and in summer they are removed from the chicken coop, cleaned and disinfected.
The arrangement of the chicken coop should be such that the birds are comfortable both in winter and in summer.
Sometimes electric heating devices are placed on the walls inside the chicken coop, and the installation sites are protected with heat-resistant material. But more often infrared lamps are suspended from the ceiling.
Lighting
The design of the poultry house must have windows. Despite the fact that they are a source of heat loss, their presence cannot be abandoned, since the supply of sunlight is required to maintain the health of the birds. Therefore, triple glazing is built into the windows, and a mesh is installed on the glass for the safety of birds.
In winter, it is imperative to ensure that the daylight hours are at least 14 hours. This is done with the help of artificial lighting. And when installing an automatic on/off system, you get rid of the unnecessary hassle of maintenance, although you will spend additional money on it.
Lighting devices can serve as heating, but must be safe for birds
At first, individual individuals will roost for the night directly on the floor. This is not dangerous if the floor is insulated and covered with shavings or hay. Over time, the birds will get used to and with the onset of darkness they will begin to move to the perch. But you can do it differently: wake the birds early in the morning, turning on the lighting for this, and allow them to fall asleep at sunset.
Ventilation
In a warm chicken coop, a ventilation device is required to vent excess moisture. To do this, a piece of plastic pipeline is installed in the ceiling, which rises 1 meter above the roof. So ventilation will be carried out naturally due to the existing pressure drop. If the air flow is weak, then additionally at the floor level (away from the nests) another channel is made, which must be closed with a grate. And the damper installed on it will allow you to regulate the ventilation speed. You can also install an electric fan in the wall.
The ideal humidity level is 65%. A decrease or increase in this indicator adversely affects the activity and health of the bird. To increase humidity, it is enough to install a container with water, and to reduce it, install a hood and hang an infrared lamp: it dries surfaces well.
The chicken coop must be equipped with ventilation so that the birds do not get cold from rising humidity.
Making perches
The perch is made of timber with a cross-section of approximately 4x4 cm or 6x4 cm.
All corners are ground into a rounded shape, and the surface is cleaned to a smooth state so that the birds do not injure their paws. You can also use a tree branch as a perch.
If several perches are installed, then the distance between adjacent planks should be about 30 cm in width and 20 cm in height. For convenience, a small ladder is attached to the lower perch.
Perches are mounted either between two walls, or in the form of a ladder installed across the room
To install perches, you must:
- Determine the place and height of the perch installation - attach one or more planks near the window at a height of 0.5–0.7 m from the floor level.
- Measure the width of the chicken coop and cut off the required amount of timber.
- On opposite walls, nail pieces of board 0.5 m each with grooves cut out for perches.
- Place perches in the grooves and secure with self-tapping screws.
Nests for laying eggs are made in the form of a half-open box, assembled from timber, boards or plywood. And sometimes ready-made plastic boxes are used as nests. If the nests rise to a certain height, then they are mounted on supports.
A ladder is provided to the nests for ease of movement of birds.
Video: do-it-yourself warm chicken coop
Tips for setting up a chicken coop in cellars or basements
There are some features of arranging a chicken coop in the basement:
- Use of bedding - sawdust or hay is used. Bedding from sawdust is replaced once every 6–7 days, from hay - once every 3–4 days.
- Lighting - an electric lamp with LEDs with a power of more than 5 W is mounted. Using a lamp, the required length of daylight hours is ensured: the longer it is, the more chickens will lay eggs.
- Insulation - use cotton wool or any roll insulation with a thickness of at least 5 cm. The use of a waterproofing film is mandatory.
- Ventilation - intake and exhaust ducts are installed. Direct ventilation of the premises is carried out periodically.
- Internal arrangement - the nests are made of timber covered with plywood. One nest is used for several chickens and is approximately 40x40 cm. The perches are attached at a height of at least 50 centimeters. It is allowed to connect the perch and nest by placing a board between them.
There are certain rules for arranging a winter chicken coop that must be followed.
Care after winter: how to treat walls
Sanitation of the poultry house is carried out annually with the onset of warm weather. This prevents the spread of infectious diseases among chickens.
During disinfection the following is carried out:
- Cleaning - all surfaces of walls, ceiling, floor, perches and nests are cleaned of dirt with a stiff brush and broom, and then washed with a solution of soda ash in hot water.
- Surface treatment - special products are used (a two percent solution of caustic soda or a four percent xylonaft emulsion). When preparing solutions, you should strictly adhere to the recipe and be sure to use personal protective equipment.
After processing, allow the chicken coop to dry completely for 5-6 hours, carefully ventilating the room.
There is always an opportunity to work on decorating the chicken coop
The construction of a chicken coop is a simple task and can be completely solved independently, without involving the services of third-party specialists. It is only necessary to study this manual well, as well as read the advice of other people involved in poultry breeding.


