Gone are the days when horses were the only thing means of transportation. Although their work has been completely replaced by machines, horses still remain the best helpers. In the Russian hinterland they are still successfully used for economic needs. Plowing the garden, bringing in firewood, hay and other loads - this work can be done perfectly by a harnessed horse. She won't be scared muddy roads and impassability, as well as any bad weather. In the village, it will always be easy for a horse cart to deliver the necessary cargo from anywhere.
How to properly harness a horse to a Russian cart
 Before you understand how to harness a horse, you will need to familiarize yourself with the harness in detail. This will help you better understand the purpose of each item and quickly learn how to harness a horse. The main parts of the Russian arc harness:
- Bridle – used to control a cart with a horse;
- Yoke - designed to transmit traction from the horse to the cart after harnessing;
- Saddle – supports the harness in weight;
- A girth is a device that holds the saddle;
- Harness - a set of harness straps that do not allow the clamp to fly off when the cart moves backwards;
- The saddle is a kind of harness strap that passes through the saddle and is attached to the shafts;
- Underbelly - the word itself says that the belt passes under the belly of the horse after harnessing the horses;
- Arc in the harness – serves to firmly connect the harness between the clamp and the shafts;
- Reins - intended for remote control of a horse from a cart.
Gallery: Russian horse cart (25 photos)


How to properly harness a horse to a cart
 Before harnessing the horse, you need to put on a collar, which, according to the rules, is hung on the horse’s neck with the pincers up and turned over. Straighten the harness and let the back part through under the animal's tail. Next, put on the bridle, and then the saddle so that it lies behind the withers after the collar. It is not recommended to tighten the straps too much. A hand should pass between them and the animal’s body. Otherwise, these belts, after harnessing, will strongly rub the skin, which can adversely affect the animal’s hair.
When all the actions are completed, the horse is taken by the bridle and brought to the cart so that it ends up between the shafts. After this one grab the tug on the clamp with your hand, and the second one raises the shaft and places it on the tug. One end of the arc is inserted into its loop, and the other is thrown over the animal’s neck. On the other hand, in the same way we raise the shaft and connect it to the arc through the tug. Once the arc installation is complete, the clamp must be tightened. We wrap the strap around the pliers and use our knee to tighten it, and then the saddle strap. Next, we throw the bridle over the horse’s head, and thread the end into the ring on the bow and tie it well. Finally, the reins are fastened to the bits so that they pass over the tugs.
How to make a wooden horse cart
Making wooden wheels
 Initially, parts of horse-drawn carts were made of wood. Because this is the cheapest way building a horse carriage. First they started building the wheels. These are the parts of a horse-drawn cart that can withstand the heaviest loads. Only strong tree species are suitable for their construction. The most common and fairly durable material that is used everywhere for these purposes is birch. The design of wooden wheels consists of the following parts:
- Hub;
- Iron bushing;
- Knitting needles;
- Bars;
- Metal hoop.
The first step is to build the hub. From a round birch log with a thickness of at least 25 cm, a block 20 cm long is sawed off. A hole is drilled in the center of it, into which a metal sleeve is inserted. And on the outside, using a chisel, they hollow out nests for the knitting needles, which are also made from strong wood. For their construction I use t small cylindrical or faceted birch rods, one end of which is fitted to the grooves in the hub. Next, we begin to manufacture the rim bars. First, the workpieces are cut to size, and then square holes are hollowed out for the knitting needles. One side is left straight, and the opposite side is rounded, which when assembled forms outer wheel rim.
To make it stronger and more durable, an iron hoop is installed on top. It is made from a metal strip, which is cut to size and rolled into a ring, and the ends are connected with rivets or using a welding machine. After this, all the individual parts are assembled into a set and secured with a hoop. Holes are drilled through the rim bars into which the bolts are inserted and tightened tightly. It is best to use them with a countersunk head, as when the cart moves on asphalt, vibration and noise from the protruding heads of the metal bolts will increase.
How to make a rear axle and kingpin for a cart with your own hands
 The design of the Russian horse cart has two axles. The rear one is fixedly attached to the cart, and the front one is movable and rotates on a pivot joint. This is necessary so that when turning the cart does not tip over on its side. Previously, axles were completely forged in a forge, but today it is possible to make them your own hands from component parts. For axles, it is necessary to choose strong metal so that they will bear a large load. Otherwise, the rubbing parts of the axles at the junction with the wheel will quickly wear out.
There is no single model for the design of a Russian cart, so you can come up with a method for making axles yourself. Let's consider the simplest option from the usual and most common materials. Since the rear axle has a simpler design, let's start with it. An ordinary Russian cart is built 1.5 meters wide and 3 meters long. According to this size the rear the axis will be one and a half meters. To do this, you need to find a durable pipe; it is better to choose a thick-walled one. Its internal diameter must match the wheel hubs.
You will also need to find or make it yourself using small metal rods. They should fit easily into the pipe and into the wheel hubs, but without much clearance. If it is large, then during muddy roads or bad weather a lot of dirt will get there, which will quickly render the rubbing parts of the wheels and axles unusable. First, the rods must be marked for drilling. To do this, insert one end into the pipe, and put a wheel on the other. On the protruding rod, mark the drilling point for the cotter pin with chalk. Then carefully remove the wheel and mark the position of the pin in the pipe.
Using the mark made, we drill a hole for the cotter pin, and in the pipe through the rod for the bolts, which must be inserted and tightened tightly. This design is good because in case of breakage or wear, the pins will be easy to replace. When the rods are installed at both ends of the pipe, you should prepare small wooden beam. It must be made of such a size that it fits between the wheels. Next, the axle is laid evenly on it and drilled through the beam in several places. Then long bolts are inserted into these holes and tightened tightly. At this point, the construction of the rear support of the cart can be considered complete.
Construction of the front axle from a horse cart
All construction of the front axle is no different from the previous work, right down to the installation of timber. But in addition to everything, she will need to do additional rotating device. To do this, find the middle of the axle and drill a hole for the kingpin. It is easy to make from the same metal rod as the rods. At the drilling site, the pipe will lose its strength. To strengthen it, you need to weld two strong washers on both sides to the exit holes, as well as two ears for the shafts. Then find and attach the same block, as well as on the rear axle.
How to make shafts for a horse cart with your own hands
 After this, you should make even shafts, which are easy to find in a birch forest, cut them down, remove the birch bark and dry them. It is worth noting that the trunks of felled trees should be slightly thicker. During drying, they will begin to shrink and, as a result, will be much larger. thinner than regular samples. In extreme cases, they can then be trimmed a little with an ax and trimmed with a plane. To attach the shafts to the front axle, you will first need to make the ears. Next, drill holes in the shafts for the bolts, insert ears and screw tightly.
Construction of a platform for a horse cart
To build the site you will need a beam 3 meters long. A hole is drilled in the front part, a kingpin is inserted and connected to the front axle. Insert cotter pins with washers, and the other end of the beam is firmly bolted to the rear axle. Next, you need to build a platform on the cart. To do this, cut boards 3 meters long and lay them on the ground to create a flat area of 1.5x3. Then boards are nailed across it for rigidity, turned over, placed on a cart and firmly secured with nails or screws. To make the sides, boards are nailed along the edges of the platform in the form of a box and the horse cart is ready for work.
How to make a horse collar with your own hands
- Claws;
- Guzhi;
- Khomutina.
 A collar is a Russian harness that is put on the horse's head when harnessed. All horses are different and it is advisable for each to have an individual collar made. This simple device is easy to make by hand yourself. First you need measure the horse's neck near the withers and add 6 cm. The easiest way to make pliers is from birch, and then find tugs and nail them with nails or screws. To prevent the collar from rubbing the horse's chest, it is necessary to make a collar, that is, cover the claws with soft material in the form of a pillow. Felt is usually used for the inner layer, and the top is covered with soft natural leather. The work is very simple and even a teenager can do it with his own hands.
Attention, TODAY only!
Almost every horse breeder in the village knows how to make a horse cart with his own hands. It is impossible to imagine village life without a horse - the main assistant in the household - making hay, transporting heavy loads, and simply driving off-road in the summer and through the snow in the winter.
To solve all the above problems, a cart is needed. The cart, as a type, can also be used on the farm, but more often it is used for entertainment purposes, photography, etc.
A cart is a cart that is harnessed to horses. A horse-drawn cart is an independent type of transport that can move on public roads in places permitted for this by traffic rules.
There are several types of horse carts:
- drogues;
- shelves;
- cart;
- carriage - decorative cart, cart.
A drog is a cart without a body. Shelf is an obsolete name for a flat-floored cart used to transport large loads. A cart is a small cart with a seat and a sawhorse - a place for the driver to use the reins.
By definition, a cart is a wheeled carriage with a plank body, a vehicle to which a horse is harnessed. There are a great many types of carts. Let's consider only the most basic ones.
Plank bottom on wheels
Purpose
Depending on the purpose, horse carts are divided into:
- passenger;
- cargo;
- combat;
- specialized.
Among the passenger carriages, in turn, there are:
- - covered wagon.
- Stagecoach is a multi-seat carriage, passenger or mail.
- A wagon is a cart that serves as a dwelling for nomads.
- A stroller is a small-sized carriage that has an open top.
- A britzka is a semi-open carriage.
Among the cargo carts for horses are:
- Arba is a two-wheeled cart.
- A cart is a four-wheeled cart. If the cart is covered, it is called a van.
- A wagon is a large, long cart.
Types of battle wagons:
- chariot;
- cart.
Specialized carts are divided into:
- field kitchen;
- mobile church;
- mobile medical station.
It should be noted that no matter what type of cart the master plans to make, the base of the cart will always be approximately the same. First you need to make a flat flooring on the base of the frame, and only then think about the appearance of the cart. Whether it will be a cart, carriage or carriage - the inventor will decide later, turning his fantasies and imagination into reality.
The main components of the cart are the ride and the body. The move is all the mechanisms that set the cart in motion. The body is the vehicle itself and its components.
Move
Main elements of the move:
- Front and rear axles.
- Wheels.
- The struts - front and rear - act as shock absorbers.
- Dissolution is an element that connects the axles and allows you to change the length of the cart.
- Shafts.
 Freight cart diagram
 An important step in making a horse cart with your own hands is to decide for what purpose it will be used. The choice of material will directly depend on this. Moreover, if the cart is supposed to be made of wood, it makes sense to use dry hardwood. Pine is not the best option for this. If the cart will be used in most cases to transport heavy loads, it is better to use durable materials - metal, etc. For a pleasure cart, you can use modern lightweight materials - plastic, etc.
 Car elements
 In order to answer the question: “How to make a horse cart yourself,” the master only needs to spend some time, think about the image of the future cart and decide on the choice of the necessary material. Spare parts and elements of a car, motorcycle, bicycle or stroller can be used here.
The main step in the process of creating a wagon is to decide on its size. In the old days, craftsmen adhered to approximately the following proportions: width - 1.5 m, length of the cart - 3 m.
 Sizing
 The main load-bearing element of the cart is the frame. A welded frame made of a metal profile will be very functional. The frame consists of longitudinal elements and cross members. In accordance with the size of the frame profile, it is necessary to select the bars to which the decking - the cart platform - will be attached.
The front and rear struts are welded to the frame, and the upper and lower turntables are attached to the front strut (bottom) and the front axle (top), respectively. The turning circles must be separated using an oiled felt circle - the function of a sliding bearing when turning will be ensured.
 Metal frame
 It is convenient to make the axles of the cart from a metal pipe of small diameter, but you can also use a wooden beam, in the ends of which you need to make holes of the required length. The pins will be inserted into these holes later. Washers are put on the axle. The wheels are secured to the studs using nuts.
 Wheel with axle
 Wheels for a cart should be selected based on the purpose of using the cart.
Making a body is a creative process, a flight of imagination of the master. A horse cart made with your own hands is a unique masterpiece that absorbs the whole soul and inner world of the inventor.
The life of a modern rural resident involves running a household. And the horse, as the main assistant, still successfully competes with such a technical unit as a tractor. Harvesting hay, collecting milk, transporting building materials, or simply moving off-road is not possible without a cart. It can be harnessed both with light and light harnesses. This article will discuss a very important issue - how to make a horse cart with your own hands.
A cart is a cart that draws cattle and horses. A cart is often called a horse-drawn carriage. This type of transport has every right to move on public roads, where traffic rules do not prohibit it.
There are several types of horse carts:
- drogues;
- shelves;
- cart.
A drog is a cart without a body. As a rule, this is a fairly long cart. Shelf is a rather outdated name for a cart that has a flat floor and is used for transporting large items. A cart is a small carriage that has a seat, as well as a goat - a place where the driver sits.
Droggy
It should be noted that there are also decorative carts - carriages. Mainly used for walking, photography, etc.
Travel and body are the main components of a horse cart. The stroke is all the elements of the mechanism that set the cart in motion. The body is the actual trailer or cart and its components.
 Swivel unit
 In past times, all elements of the cart were predominantly wooden. Even the wheels were made of wood. Today, thanks to great opportunities, many parts of the cart are made of metal.
Move
A move consists of the following elements:
- Axles – front and rear. On each axis there are so-called superstructures that strengthen the axis.
- There are two wheels on the front axle and two on the rear axle. It should be noted that often the front wheels have a smaller radius relative to the rear wheels.
- The struts - front and rear - functionally act as shock absorbers.
- Dissolution is an element that provides connection between the axes. The dissolution is attached to the racks, on the one hand, tightly, on the other - with the possibility of adjustment, which allows you to change the length of the cart by changing the distance between the axles.
- Shafts are attached to the front axle.
Before you start making a cart with your own hands, you should decide for what purposes it will be used, since, for example, to make hay it is necessary to make the elements of the cart from lumber, and the choice of wood will be important in this matter. Typically, well-dried hardwoods are used for these purposes. Pine is not suitable for this.
If the horse cart will be used primarily for transporting large heavy loads, it is necessary to use durable materials, such as metal, etc. To independently manufacture a cart used for pleasure purposes, you can use decorative materials, for example, plastic.
 Metal material
 For an inventor who loves to make things with his own hands, it will not be difficult to answer the question: “How to make a cart for a horse”? This task can be done by anyone who is willing to spend some time, think a little about the solution and find the necessary material, for example, unnecessary household items from a car, bicycle or old stroller.
Dimensions
An important point in this matter is the size of the cart. Our ancestors adhered to approximately this dimensional ratio - cart length - 3 m, width - 1.5 m. Height can vary from 0.5 m to 0.7 m. You can trust the experience of the times and take these dimensions of the cart as a basis.
- The main load-bearing element of the future structure is the frame. Thanks to the modern abundance of materials, it will be convenient to make a welded metal frame from a U-shaped profile. The frame consists of spars (longitudinal elements) and cross members. According to the size of the frame profile, it is necessary to select and insert bars, to which the flooring will then be attached - the loading platform of the cart.
 U-shaped frame
 - The racks, front and rear, are welded to the frame. In turn, the upper turntable is welded to the front pillar (bottom), and the lower turntable is welded to the front axle (top). An oiled felt disc is placed between the turntables. This whole structure works as a sliding bearing when turning.
- The axles of the cart can be made of metal - a small diameter pipe is ideal. A wooden beam is also suitable for these purposes. In this case, holes of sufficient length should be made at the ends of the beam into which the pins will be inserted. Washers are put on the axle, and the wheels are secured to the studs with nuts.
- The choice of wheels for a cart depends on the purpose for which the cart will be used. Therefore, you can use wheels from an old bicycle, motorcycle or trailer that is no longer needed on the farm.
 Wheel selection
 - Shafts are attached to the front axle of the cart.
- Making a body is a process that directly depends on the imagination of the craftsman. The most versatile is a cart in the form of a platform - for comfortable transportation of goods. The base can be equipped with folding sides or removable. If you intend to transport passengers, you can equip the structure with soft seats.
It is difficult to imagine village life in the outback of our country without a faithful and reliable assistant - without a horse. Therefore, here you will need both a cart and a sleigh for the horse in winter, when it gets snowy. You can bring cargo on horseback, firewood from the forest, plow your garden, and just go to the market off-road. Previously, almost every village had a cart and sleigh maker. And today you will have to either buy them or make them yourself, which we will talk about in our article.
[Hide]
How to make a cart?
A horse cart is a separate type of horse-drawn transport and has several types. That is why you need to immediately decide, before making it yourself, for what purposes and what type of cart you need. If this is exclusively the work of transporting goods, then it will be enough to have a dray or a cart of the type of platform, that is, without sides with a regular flat bottom. If you need to transport hay and other materials on a cart and use it as a vehicle, then you need to do it with sides.
It is also worth immediately foreseeing how many horses you will harness to the cart. The fact is that a single-horse and a double-horse cart differ in nature and manufacture. Single-horse in Russia has shafts and an arc, and double-horse has a drawbar. If you make the Ukrainian version, then a drawbar cart or cart is used for both one horse and a pair. Note that it is easier to make a drawbar cart with your own hands than an arc cart.
Important points
Before you start making it, you should know a little about the design of the cart and its main parts. So, the main element of any cart is its chassis. And these are two axles (front and rear), wheels and the frame itself on which the body or platform is mounted. There are also struts that act as shock absorbers. In this case, the rear axle is made stationary, that is, without movement, and the front axle is turning, due to this the rotation will be carried out.
The next important elements are the shafts in a curved one-horse cart or the drawbar in a double-horse cart (Ukrainian cart). The shafts and drawbar are attached to the front axle, as they allow the front wheels to turn. It is advisable to make the frame welded metal, since the entire load of the cart will go on it. The cart itself is made of wood.
As for the sizes, previously the standard cart width was about 1.5 meters and the length was 3 meters. The height depends on your desire and the size of the horse, but the standard is from 0.5 to 0.7 meters.
Tools and materials
- Wooden boards;
- welded frame and wheel axles;
- welding machine;
- 4 wheels (car or motorcycle);
- metal pipes or U-shaped profile;
- nails;
- hammer;
- woodworking tools (saw, hacksaw, sandpaper, sander);
- other tools as needed;
- blueprints.
Step-by-step instruction
- First of all, we need to make the chassis of the cart. This, as we have already said, is a welded solid frame and wheel axles. If you have never dealt with welding, you will have to turn to the experts. The frame and axles can be made of solid metal from a profile or from thick-walled pipes.
- We make a rear stationary axle and a front rotating one on a pin on two fixed washers.
- Before completing the front axle, we decide on the type of cart. If it is a drawbar, then we make a special holder for the drawbar. The shafts are made welded to the front axle on a special holder. That is, the shafts should not be removable, but movable to the sides and even up and down - due to the holder. They can also be mounted on brackets and reinforced with special cords - wire rod with a diameter of 10-12 mm, which is attached to the shaft and the front axle.
- We complete the chassis by installing wheels and, if necessary, brakes.
- Now you can move on to the base of the cart - the body. If we are making a platform, then everything is simple - we cut the boards to the required length and width and knock them together into one platform, attaching them to the frame. If there are sides, then first we make 4 longitudinal poles, onto which we then nail vertically inclined slats. We immediately attach the side sides to the frame, and make the front and rear sides removable for greater ease of use of the cart at work.
- As for shafts, they can be made either metal from pipes or wood. The drawbar, as a rule, is made only of wood.
- For the convenience of sitting in a cart, you can make a bench in the back or even attach soft seats.
- If you plan to go on the highway, you need to attach reflectors to the rear of the finished homemade cart.
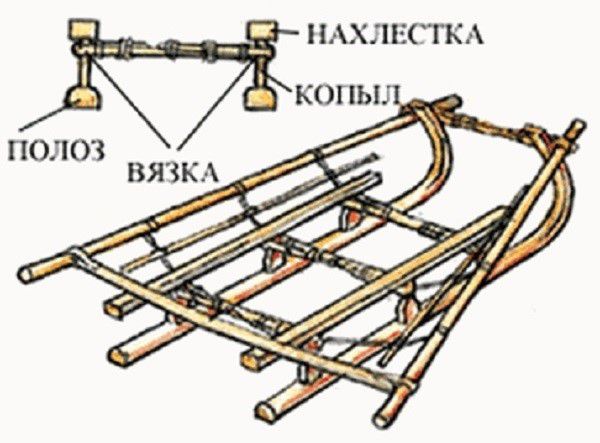
Arc
- The arc is a special part of the shaft cart, which will have to be worked on if there is no ready-made one. It is made from elm or willow wood, as the material must be strong and flexible. In the old days, oak, birch and hazel were also used.
- A homemade arc harvesting should be cut in early spring, when the sap is just beginning to move in the tree. The blank itself for the arc is taken with a thickness of 8 to 12 cm and a length of 1.5 to 1.8 m.
- It is better to bend the arc in a special machine (arc), placing the edges in the recesses. Before work, the wood is first soaked in cold water, and half an hour before work is steamed with boiling water for greater flexibility. If the wood bends badly, it is steamed several times.
After complete bending, the edges of the arc are tied with a tight rope and the tree is allowed to dry and take the desired shape - about 45 days. How to do this at home, watch Oleg Moskalenko’s video.
Making a sleigh with your own hands
Anyone can buy a sled, but it will not be affordable for everyone, since their cost is quite considerable. Well, all that remains is to do it yourself. Moreover, sleighs were people's favorite transport. Watch the video by pashinkirill about this.
Tools and materials
Before making a sleigh for a horse, you need to decide what material the most important part will be made of - the runners. They can be metal or wood. If you want to make it from wood, you will need special skills and knowledge in preparing the wood and bending it. It’s easier with metal; here you only need to forge the runners in the workshop.
- Wooden boards;
- plywood;
- sheets of metal;
- corners or metal profile;
- metal pipes;
- varnish, paint;
- woodworking tools;
- other tools as needed;
- blueprints.
Step-by-step instruction
- The very first and most difficult thing is the runners. We will make them metal - it’s easier that way. Stainless or ordinary carbon steel will do. It is better to make the runners forged flat from a solid sheet of metal, but there is also the practice of using pipes. But to bend them you will need helpers.
- When the runners are ready, we move on to the base - the crossbars and racks, which are located on both sides. They can be made from pipes or profiles. All parts will need to be welded.
- An important part of the sled is the brakes. When the runners are ready, we make them in the simplest way - block runners in the form of rubber with a lever. This will be both the running brake and the parking brake.
- We weld metal plates to the front part, onto which the shafts will then be attached.
- When the chassis is ready, we make the body of the sleigh out of wood - this is how your imagination will work. Of course, drawings are made first. Afterwards, the bottom and inside can be covered with plywood and even a soft material can be attached on top for convenience, for example, leatherette or felt.
- Lastly, we attach the wooden shafts and that’s it – the sleigh for the horse with your own hands is ready!
Photo gallery
The request returned an empty result.Video “How a sleigh is made”
An interesting video about how sleighs and horse harnesses were made to secure the sleigh in the old days.
Sorry, there are no surveys available at this time.
A business using retro vehicles is a real goldmine for farmers who keep or breed horses. These stunning animals have not been used for hard work in the fields for a long time, but they can generate additional income by taking tourists around the picturesque streets of the city. In this article we will tell you how to make a carriage with your own hands, drawings are included.
There are several types of horse carts popular in Russia that can be made at home:
- cart;
- sled;
- carriage or carriage.
Let's take a closer look at how to make each of the above vehicles.

Use of horse carts
Let's start with something simple. The cart has long been used in villages as the main means of transportation for several passengers, and also as a device for transporting large cargo. When our grandparents were young, they sometimes met in the city, most often at markets, where peasants brought crops from their gardens or livestock for sale.
Today, such a curiosity can be found very rarely in cities and only in an “elegant” version. A simple, small-sized vehicle is often hitched to ponies in parks to give children rides.

![]()
A horse carriage is perfect as transport for a rustic wedding.
Any vehicle, be it a sleigh, a carriage or a cart, will not move without a horse. It is important to know how to harness a horse correctly - because it determines whether the animal will be comfortable in the harness, and, therefore, its performance. Let's figure out what a harness consists of and what harnessing rules exist.
Required tools and materials
In the process of making a cart, you will need the following tools and materials:

Prices for popular models of milling machines
Milling machine
Making a cart
The design of a simple cart is divided into several main elements:
- frame;
- hanging part.
Let's consider the manufacture of each of the components.

Making an axis
| Step | Description |
|---|---|
| Strong wood is usually used as a material for making carts. So, first of all, prepare a meter-long wooden beam, the width and height of which are equal to each other and amount to 10 centimeters. Be sure to check that the wood used for the axle does not rot or crumble. Poor quality material can lead to unexpected breakdown of the cart, and as a result, injury to the passenger and horse. |
| Determine how much of the timber will be on the bottom of the cart. Mill a groove along the entire bottom of the wooden piece; it is needed to install the metal axle inside. Then drill a hole exactly in the middle of the piece of wood, going all the way through. The hole diameter is 20 millimeters. During the assembly of the cart, a kingpin is installed in it - a special metal pin with parameters M20x200. |
| Now you need to make flat metal circles with a diameter of 30 centimeters. Use centimeter metal sheets as the starting material. In the middle of each “pancake”, cut a hole with a diameter of 22 millimeters. The resulting parts will take on the role of a rotating device; in two of them it is necessary to make additional mounting holes. |
| Coming from the bottom of the beam, insert the kingpin into the middle hole. We fix it on each side and install a metal axis and flat circles into the beam. Congratulations, you have just designed the front axle of your future cart yourself. |


The axle for the rear of the cart is made similarly to the front, but without using a kingpin and a metal “pancake” in the design.
Making a frame
| Step | Description |
|---|---|
| To construct the frame, use a second wooden beam, the length of which is 3 meters. The width and height of the part correspond to the previous parameters and are 10x10 centimeters. |
| At one end of the prepared part we attach the previously assembled rotating mechanism, at the other we install another wooden beam, which is 10 centimeters wide, 10 centimeters high and 3 centimeters long. Then we attach the rear axle part to the frame. A small block compensates for the level of distance between the axles and is necessary for the proper functioning of the vehicle. |
| It is necessary to give the resulting wooden structure rigidity. For this purpose, use boards that are 5 centimeters wide, 13 centimeters high and 2.515 meters long. When giving products the desired shape and parameters, monitor the exact correspondence of the received and required sizes. |


Prices for various types of timber
Mounted part
| Step | Description |
|---|---|
| The hinged part primarily includes the bottom of our cart. It is assembled from a set of boards, with a width of 2.5 centimeters, a height of 10 centimeters and a length of 50 centimeters. They are superimposed on the frame frame and boards that give rigidity and are bolted to the middle beam. |
| We fasten two long boards along the edges of the assembled bottom. The width of each board is 2.5 centimeters, height – 10 centimeters and length – 2.8 meters. |
| From a sheet of high-quality plywood we cut out the ends of the future cart, the thickness of which will be approximately 2-3 centimeters. We securely attach the parts to the assembled frame. Then we screw two sanded, wide boards to both ends on each side. |


Prices for moisture-resistant plywood
Moisture-resistant plywood
So, we have a real, strong cart. Decorate it with additional details and turn it into a fairy-tale carriage.
One of the most important elements of the harness is the collar. It was he who at one time made it possible to improve the performance characteristics of horses and transport not only people, but also heavy loads. Read in what a clamp consists of, what types of clamps there are and how to choose the right one for your horse.

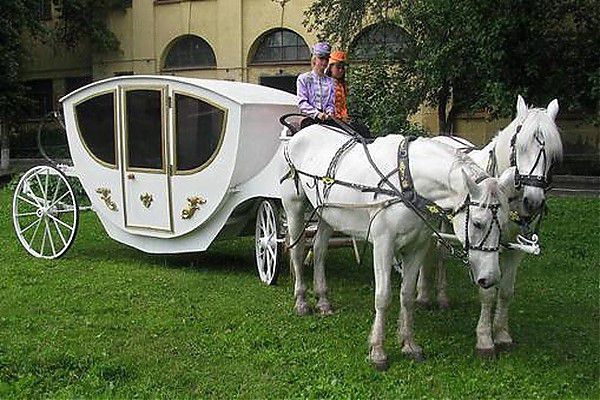
Using a carriage
Now let's move on to a more complex version of a horse carriage - an elegant carriage or carriage. This type of retro transport is far from rural romance, as the emphasis is on its elegant appearance. A very popular transport not only for city horseback rides for couples in love, but also for weddings, where it can act as a key element of a themed photo zone for newlyweds and guests.

Necessary materials
To make a strong and beautiful carriage, you need to prepare the following materials and tools:
- wooden beams;
- moisture-resistant plywood;
- bolts and nuts;
- clamps;
- plastic;
- foam;
- fabric for upholstery of crew elements;
- persistent paint and varnish liquids for building materials;
- glue;
- drill;
- jigsaw;
- sandpaper;
- circular saw;
- roulette;
- file.
Making a carriage body from plywood with your own hands
As a material for the body of the future carriage, choose moisture-resistant plywood for outdoor products. Mark the future elements of the carriage body on sheets of plywood using a black marker.
It should be said that the parameters of the carriage depend on the desired shape and size, however, even the smallest cabin for two people will be about 1200 millimeters in length and width and 1600 millimeters in height.
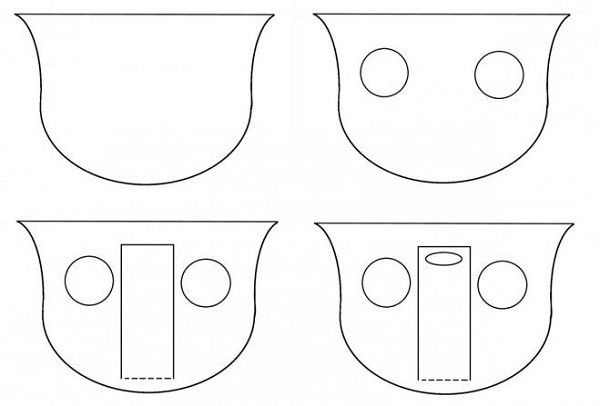
Start cutting out the shapes according to the applied markings using an electric circular saw. As a result of sawing, you should have four parts. Make two of them a little smaller than the remaining ones. We will connect them with larger parts in order to later support the back and front walls of the carriage on something.
After you receive the blanks, use a jigsaw to carefully cut out holes for windows and doors. In order for the jigsaw to easily enter the plywood sheet, drill small holes with a drill at the site of the future entry of the blade.

Let's connect the larger and smaller pieces together using construction glue and bolts screwed in from the outside. Allow the glue between the panels to dry and cure before tightening the bolts. To do this, squeeze them with clamps and leave them for a while.

Let's start cutting out the floor and ceiling of the carriage. The plywood ceiling panel can also be 9 millimeters, but the bottom should be made of durable and thick fabric.
These elements are fastened to the side parts of the carriage using spacers - it’s smoother this way. The components of the cart should be glued with construction glue, and also bolted together.

If you decide to make a large crew for several people, add additional stiffeners. They can be made from wood or metal.
Step 5. Once the floor and ceiling of the carriage are attached, measure the resulting distance between the walls, as well as the distance from the floor to the ceiling. This will give you the parameters of the rear and front walls of the vehicle. If desired, cut out small windows in them or leave the canvas intact. It is preferable to make a window in the front wall so that while using the carriage, passengers do not have to convey directions to the coachman along the route through the side window, raising their voices.

To make the fastening edges of the carriage bend easily, make cuts along the entire length of the edge at small intervals.
Video - How to make a carriage
Making a frame
Now that the body is ready, let's move on to making the frame.
The size of this element of the carriage is determined based on the dimensions of the body. The components of the frame should be cut out from a thick sheet of plywood, at least 21 millimeters wide. Two parts of the frame are cut from it, similar to the form shown in the figure.

After cutting is done, sand the surface of the parts to make it smooth.
Note! The body must fit snugly into the frame recess. Carry out cutting carefully. If you accidentally cut off an extra centimeter, don’t skimp and make a new part.

Let's start making the luggage part of the crew. For each side part of the frame, we cut out the lining according to the presented drawing. Use the drawing of the manufactured frame as a guide to the shape. The material for the sides is also thick plywood.

Once the sides are made, secure them to the inside of the frame using bolts or glue. You can use these construction devices in a comprehensive manner.
The part for the bottom of the rear of the cart is cut out from the remains of plywood, one side of it should be beveled at an angle of 45 degrees, as shown in the figure.

Using a drill, we make holes in the side parts. This must be done at an angle of 90 degrees. To make it even, use a special bracket.
Then replace the bottom of the carriage and fit it onto the frame using an equal number of screws for each side.

Do not forget to glue the joints of the parts to give the structure additional strength. To make gluing as effective as possible, tighten the parts with clamps.
Now we prepare the coachman's place. It is produced by analogy with the luggage compartment floor. A part is cut out of a sheet of plywood, on which parallel cuts are made approximately 6 millimeters deep. A second sheet is glued to it at an angle, the size ideally fitting inside the carriage frame. After the glue has dried, screw the sheets together with a few screws.
Then we make a footrest from sawn plywood boards. We glue the boards with their side parts to each other and install them in place.

Step 5. We are preparing the seat itself for the cab driver. Here the flight of your imagination is not limited by anything. First, we make the “skeleton” of the future chair, focusing on the drawing, and then we put plywood boards on the frame. The lower part of the seat can be made wide to make sitting comfortable.

Making the coachman's seat is the easiest part of the process.
To make the design look more impressive, install carved armrests.

Step 6. Let's start creating windows and door curtains. Thin, transparent plastic acts as window plates. This material is sold in rolls.
Interesting advice. To straighten rolled plastic, place it in boiling water and straighten it on a flat surface.
We cut out the frame for the window and glue the plastic on the inside. You can also secure it with screws.
After the windows are ready, we install them in the corresponding slots of the body and glue the frames. The result should be a design similar to that shown in the figure.

It is better to take purchased metal handles and hinges for the door, since the carriage will be used mercilessly.
Step 7 Upholstery of the interior with fabric is done using a construction stapler. For a carriage in which people will ride, it is better to buy eco-leather, since its wear resistance is higher than other available materials. However, some parts of the interior decoration can be covered with velvet fabric.


We present to you a comparative table of the advantages and disadvantages of eco-leather.
As you can see, all the shortcomings of the material are mainly related to aesthetic characteristics. From a practical point of view, eco-leather is best suited for upholstery of the interior of a carriage.
Step 8 What you do at the stage of decorating the carriage depends only on you. The main thing is not to forget to equip the crew inside with a comfortable sofa, which you can also assemble yourself and upholster with a suitable fabric.
Be sure to take care of the exterior decoration of the cart. Add carved plywood elements throughout the body, don't forget the roof and frame. If you make a lattice for the roof, you can place a real living flower bed on top. This will add charm to the carriage and attract a crowd of tourists.
The carriage is a spectacular retro transport, popular among tourists
You can paint the carriage body with plywood paint, which is available in absolutely any color on the market. Here is an approximate list of painting works:
- surface grinding;
- primer using an acrylic base;
- drying the layer;
- puttying;
- drying putty;
- re-grinding;
- primer;
- soil drying;
- coloring.
How to make wheels for a carriage
Wooden carriage wheels are also easy to make yourself. Their components are:
- rim made of segments;
- sawn hubs;
- metal bandages;
- bearing bushings.
| Step | Description |
|---|---|
| The wheel rim is made of an even number of segments, absolutely identical. Usually there are only seven of them. A socket for a tenon is made from the back of the rim, and a tenon is cut out from the front. A groove must be cut across the base of each tenon to allow air to escape from the groove. A recess is cut out in the middle of each segment, and holes are drilled from the sides, passing through. The rim is assembled according to the “groove-socket” pattern. |
| Let's start making the hub. For such a part you will need a solid piece of good wood. The part is machined similarly to the drawing shown in the figure. Then we prepare a bandage for the resulting part. It is made from metal tubes cut into rings. The inner diameter of the ring corresponds to the outer diameter of the round part of the hub. After warming up the ring, put it on top of the round part of the hub, press in the bushings and let it cool. |
| Now let's start making knitting needles. The shape of the products can be any, the main thing is to follow the basic principles. We cut grooves along the tenons of the knitting needle so that air can escape freely from the sockets. |
| We assemble the wheel and install the bandage on top of its rim. Such a bandage is prepared from strips of cut metal plates, at least 4 millimeters thick. The width of one strip is equal to the width of the wheel rim. Metal fastening is carried out by drilling holes in the surfaces and tightening the screws. |


It should be noted that old-style wooden wheels do not have many advantages. Despite the metal bands, their wear resistance leaves much to be desired.
Some craftsmen advise using rubber tires for carriages, for example, those intended for a motorcycle. This will not only make the carriage ride smoother, but will also ensure a long service life for the carriage.
Video - Making your own wooden carriage wheel
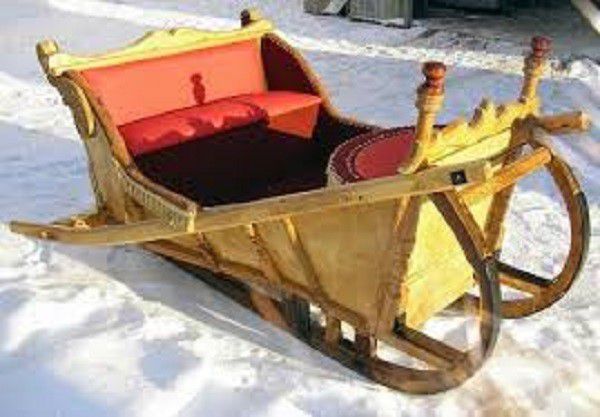
Using the sled
A winter version of the carriage is a sleigh. Sleigh rides are a real curiosity and are especially popular in Russia due to the long winters of unprecedented beauty.
These sleighs are harnessed with one, two or three horses, which will take you into a real winter fairy tale. But to prevent the fairy tale from turning into a cold nightmare next to the broken carriage, it is necessary to correctly construct the structure.
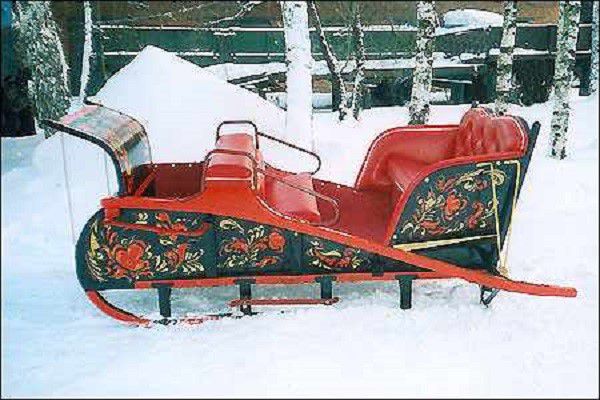
Sleigh - a spectacular winter means of transportation
Materials for production
To make a sled with your own hands we will need the following materials and tools:
- steel pipes with a diameter of 2.5-5 centimeters;
- sheet metal;
- profiles for making corners;
- wooden boards;
- plywood;
- paints for wood and metal;
- varnish for covering street surfaces;
- welding machine;
- jigsaw and other metalworking tools.
Prices for popular brands of portable welding machines
Portable welding machine
Making runners
It is best to use stainless steel pipes, since the sled will be used in the extreme conditions of the Russian winter with its weather changes.
The length of the pipes must be greater than the length of the intended sleigh, since we will bend them on both sides to turn them into runners. A special tool is used for bending. If you don’t have it in your construction arsenal, use a trick: fill the pipes with sand, heat it and start bending.
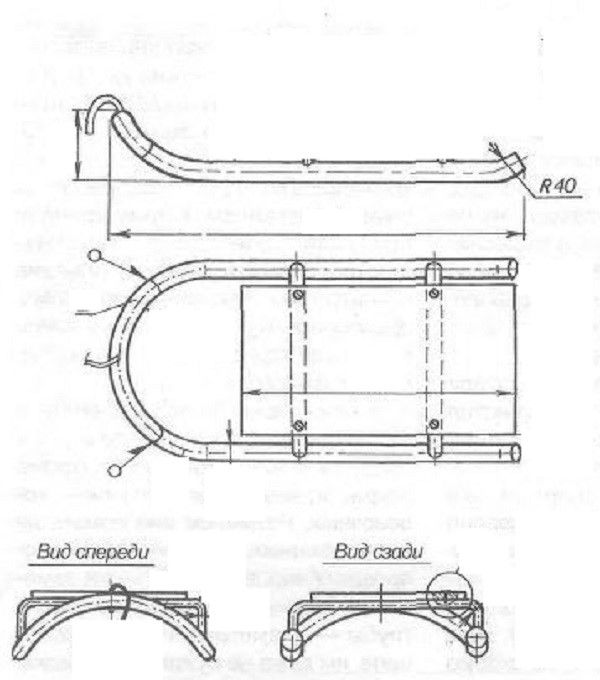
We make racks and crossbars. The first parts are needed so that the sled does not sag under heavy load, the second - to make the structure a single frame structure.
For the manufacture of over-reinforced elements, thin steel pipes, at least 2.5 centimeters in diameter, are used. Install racks on each side of the future sled and weld them securely along with the crossbars and runners.
After the frame is welded, also make so-called fillies, 10 centimeters long, from small steel pipes. Only 12 pieces. Weld them evenly on each side of the vehicle. Afterwards, cut out small plates from metal sheets and attach them to the sled. We use them to attach the shafts.
The sleigh body is made similarly to the carriage body, but is made open. Simply put, half of the carriage body is made and beautifully decorated with decor, then paint and varnish are applied.
Today it is popular to cast the body of a sleigh from metal, but this work is more painstaking and time-consuming. To make the task easier, cut out a frame from plywood and strengthen it by sheathing it with metal sheets.
Let's sum it up
The tourism business in our homeland has always flourished, because many guests from abroad dream of seeing its vast expanses and appreciating the beauty of its cities. If animal husbandry turns out to be your calling, you can also make a profit from the tourism segment by making fashionable retro vehicles with your own hands.
You won’t have to offer your services to tourists. As soon as they see a luxurious carriage or a romantic country cart with a horse and coachman, there will be no end to those who want to take a ride.

You can purchase elements for building a carriage in construction stores in any city or town. Remember, the key to success is persistence. Good luck to you!


