Literally, collage is translated from French as “pasting.” Now collage is a kind of design technique, which consists of making combinations of different materials, such as various pictures, photos, fabric, foil and others. This method of diversifying the surrounding space has been used since ancient times. With the advent of photography, photo collages appeared - photographs pasted onto any basis. How to make a photo collage as a gift for friends and family quickly and easily with your own hands by selecting a theme - we will tell you in our article.
When creating a photo collage, you should follow several basic steps, which we will discuss below.
How to make a photo collage with your own hands in a simple and step-by-step master class
Let's choose a topic.The very first and quite important step is choosing a theme for a photo collage. Usually these are some memorable moments in life, important events, such as a wedding or anniversary, graduation party or travel. And sometimes one photo collage reflects the entire biography of a person.
We select photographs.
The moment of preparing photographs is the most important stage in creating a photo collage. It is necessary to sort the images, select the highest quality ones, and crop them to the desired size. If desired, you can scan the pictures and process them in a special program, setting a certain new style.

And, of course, you can’t do without registration. Here you can show your creativity and imagination. For example, a collage on a birthday theme can be decorated with bright elements, and the photo can be placed in colorful frames. Such a photo collage will certainly lift your spirits and create a feeling of celebration.
Making a paper photo collage.To make it you do not need any special skills or artistic talents. How then can you make a photo collage with your own hands? It's easy with step-by-step instructions. To make a simple photo collage, prepare the following:
- cardboard for the base;
- photos;
- double sided tape;
- decoupage varnish (optional).

Prepare your images by cropping them to the desired size. If you are using plain cardboard, you can tint it first. Then attach the photos to a piece of cardboard using double tape and cover with a layer of varnish. You can do without it. First, place the pictures around the perimeter of the base to achieve symmetry, and then fill in the middle in any order. Ready! Now you can hang the collage on the wall and decorate it as you wish.
We assemble a photo collage on matchboxes using an interesting technique
Now let’s take a closer look at a more complex and interesting version of the collage. You need to prepare:- photos;
- empty matchboxes;
- cardboard;
- glue;
- paints;
- scissors;
- items for decoration.
Lay out the boxes in a rectangle. The most convenient format is 6 x 12. Photos will be placed in these boxes.

Glue the matchboxes onto a cardboard base, and then paint them with a brush or spray paint. Instead of coloring, you can use decorative paper.
While the glue and paint are drying, prepare your photographs. Cut them to fit the box.
When the base is dry, place the photo in the cells. If there are not enough pictures, cover the empty spaces with colored paper.
All that remains is to decorate the collage with decorative elements, such as ribbons, flowers and other similar items. The work is completed. You can give such a photo collage to one of your friends and relatives, or leave it as a memory.
Materials and tools needed to create a framed collage:
- frame (a furniture façade is used here);
- rubber;
- stapler for furniture;
- office clips;
- photo.
First, attach the rubber bands to the back of the frame. The most convenient way to do this is with a stapler, but you can also hammer in small nails or screw in screws. The number of rubber bands depends on the size of the frame.
Then attach the clips to the photo. Use a flat object, such as a ruler.
All that remains is to place the photos on the elastic bands using clips. That's all, you can hang the collage on the wall.

Instead of cutting paper photos with scissors, you can edit them digitally first. Spending some time on the computer will make collage making easier and faster.
You can't do this without a graphic editor. Photoshop is perfect for this purpose. Any beginner can create a photo collage with it.
First you need to choose the size of the base for the composition. Any picture or photograph will be suitable as a background.
Before creating a collage, process the photo by adjusting the brightness, contrast and colors. Experiment with filters and effects.
Add a photo to the collage. The size of images is adjusted using the transform function. Photos can be rotated and changed in every possible way.
Decorate the almost finished collage with graphic elements or brush strokes. Add photo frames, various objects cut out from other images.
You can learn more about homemade photo collages from the videos below.
Video on the topic of the article
Ilya and I have been publishing photos on our Instagram pages for several years now. Here is our daily life, Thailand, family and hobbies.
We are adherents of photo printing: good shots hidden in social networks and on computer hard drives are worthy of decorating the interior, reminding us of the happy moments of our lives. We made this Instagram wall a year ago in our house in Phuket, and finally got around to telling the story of how it was.
Today I want to tell you how to quickly, easily and (of course) on a budget make a collage of small photographs that will become the center of attraction for the whole family and your guests.
1. Select an empty wall. In our house, the choice fell on the wall in the living room to the left of the entrance.
2. We select photographs for the panel and group them into collages for further printing. We printed the photo on a black background with small white borders using our home color printer.

3. Using a utility knife or scissors, cut out the photographs.


4. Of course, we will not mount paper photos on the wall; it will look, to put it mildly, unaesthetic. Therefore, we choose the basis for our collage. We bought a couple of sheets of black foam cardboard from an office supply store. You can choose regular cardboard, plastic - any dense material that holds its shape).
We draw out the base and cut out the blanks with a stationery knife.


5. Glue paper photos onto a thick base (glue stick, PVA). This way we saved an impressive amount of money on separate photo frames.

6. Now you need to place the photo on the wall.
Here is a small lyrical digression. Get ready for the fact that your collage will last a long time. You will not be able to remove blanks from paper wallpaper painlessly - traces of glue or holes will remain in any case.
If you absolutely need a removable option, choose a painted wall and attach the blanks to double-sided tape. In the future, you can remove traces of glue using adhesive remover - a sticker remover sold in office supply or construction stores, for example, from Scotch. We resorted to this method in our first Phuket house.
Another mobile option is to use a large sheet of plywood placed in a beautiful baguette frame. Such a “picture” can simply be hung on a nail. Perhaps this is what our next Instagram wall will be like.
Our house in Phuket was in need of a facelift for a long time, so the owner of the house without hesitation allowed us to stick the photo directly on the wall. In fact, this method is the simplest and highest quality: the workpieces will hold firmly. For our panel we used this glue gun - a very convenient thing, it sticks tightly.

7. At all stages of work we used a long metal ruler. Draw a thin pencil line on the wall - the upper border of the future panel. If you are afraid that you will not be able to erase the pencil (practice on an area hidden from view), use masking tape for this purpose.

8. After pasting the first row of photos at an equal distance from each other, use a ruler or masking tape, placing the photos one below the other.


9. Now things will go faster, and in about half an hour your photo panel is ready!
Who would have thought that successful shots exist not only to be stored on computer hard drives, to be boasted about on social networks and shown on smartphones and tablets. But good shots, reminiscent of the happiest and most joyful moments of life, are truly a worthy decoration for the interior of your apartment. Therefore, we offer you a master class in which we will tell you how to make a photo collage on the wall with your own hands.
Tools and materials Time: 3 hours Difficulty: 2/10
- printed photographs of the same size;
- plastic or foam cardboard;
- stationery knife;
- glue.
From small photographs you can make a beautiful photo collage on the wall with your own hands, which will become a canvas of family history and will remind you of the brightest moments in the life of the family.

Step-by-step master class
So, let's start a DIY photo collage on the wall together.
Step 1: select a wall
We decide on a suitable empty wall. In Photo 2 it is located to the left of the entrance to the living room.

Step 2: select a photo
We select photos for the future panel, sort them into collages to print on a color printer. For example, you can place the image on a black background with a white border.

Step 3: Cut the photo to size
Using scissors or a utility knife, cut out the photographs.


Step 4: make the backing
Paper photos on the wall will look, to put it mildly, unaesthetic. Therefore, they can be placed on a sheet of regular or foam cardboard or plastic. The main thing is that it is a dense material that can hold its shape well.
We outline the base and cut out the blanks with a stationery knife.

We glue the photographs onto the prepared base with PVA or glue stick. By the way, by doing so we saved a significant amount of money on photo frames, which is good news.

Step 5: Place the Photo on the Wall
Now we place our photos on the wall.
However, you should take into account that your collage will hang on the wall for a very long time. And when removed, traces of glue or holes will remain on the wallpaper. But if you need a temporary option, then the base of the photographs should be attached with double-sided tape. Alternatively, you can glue all the photos onto a large sheet of plywood and hang them on a nail like a picture. True, you can also attach it tightly with an adhesive gun.

For accurate work you will need a long ruler. It is convenient to draw a thin line on the wall with a pencil, which will be the upper border of the panel. You can use masking tape for these purposes.

After gluing the first row of photos at the same distance from each other, use a ruler or masking tape to position the next row evenly.

Recently, collage has become very popular among professional photographers; I also often use collage in my work.
Areas of application of collages.
Personally, I use photo collages in the following cases:
1. Collage as a tool for briefly demonstrating a photographer’s portfolio.

2. Collage as a way to show the variety of props and accessories available to the photographer:
A. For a children's photo shoot.


b. For Love Story.

3. A collage of wedding photographs, demonstrating well-chosen accessories, and also telling about the bride’s morning preparations.

4. Collage is a way to demonstrate bright colors, a variety of colors and shapes to create a festive mood. For example, on New Year's Eve.

5. What should I put on the back of a photographer's gift certificate? I came to the conclusion that a collage of photographs is the best solution. One photo is boring, abstract Photoshop solutions are already boring. The collage is interesting to look at and highlights the individual style of the photographer.

How to make a collage from photos.
Making a professional, high-quality and varied collage is very simple; it does not require years of experience in Photoshop and requires very little time. For this I use the well-known Picasa program. With her help, I made all the collages presented here quickly and easily. 
1. Install on your computer. For those who are not familiar with this program, I will say that this is free software from Google for viewing and storing photos. The program is functional, simple and understandable, does not weigh much, and works quickly.
2. Select the photos from which you want to make a collage. Best in JPEG format
I usually create a special folder on my desktop where I put photos for a future collage.
3. Open Picasa. Add a folder with photos to the program (File - Add folder to Picasa).
It happens that the program starts searching and scanning all the images on your computer. If this happens, just stop this process.
 So, add a folder with your photos to the program. Select your folder on the left, and the green “Scan once” checkbox on the right. Photos appear in the program.
4. Select photos in any way known to you. In the menu at the top, click “Create” - “Create photo collage”.
5. In the window that opens, select the collage format (square, A4, 10x15), and the type of collage.
Very often, I use my own format and set a custom aspect ratio. Which is useful when you need to fit, for example, into the size of a site.
To remove unnecessary photos from the collage, simply click on them with the mouse and then press the Delete key.
Select the grid pitch - the thickness of the white line between the photos.
You might want to make a mosaic of photographs. Also, feel free to click on the “Shuffle Photos” button and change their arrangement. You can also swap photos by simply dragging them with the mouse.
Or you might want to make a stack of Polaroids. In any case, experiment with the settings. The program is very simple.  6. Click: “Create a collage” - Draft will appear. You can save it in JPEG format anywhere on your computer.
That's it, your collage is ready. If there are any difficulties, ask your questions, I will be glad to receive comments. Was everything clear in this article?
Each of us has a huge photo archive; photographs accumulate on electronic media and it is not always possible to see what interests us at the moment. There are photographs that I would like to always have before my eyes, be it family history, memories of relatives and friends, pleasant events or pets. From this we can conclude that photographs are one of the best decorations for an apartment. They will enliven the atmosphere of the house, bring comfort and allow you to create a unique style for your “nest” without major alterations. In this article you will learn how to make a collage of photographs on your wall with your own hands. The remarkable thing is that everyone in the family can take part in the creation of this wonderful decor - just like that, a new photo of the “happy moment” will appear.
Collage — literally translated from French as “sticking.” In art, it is a method of decoration where a material of different color and texture is glued onto a base.
Deciding on a place
Before starting work, you should decide on the location of the collage. The room chosen to place the collage must be spacious enough; the wall where we want to place the photographs requires a good view, approximately 2 meters of free space to cover the entire composition. There are many recommendations for placement; it’s up to you to decide which one to choose.
For example, you can choose a wall in the hallway or kitchen, however, in this case, due to the small size of the rooms, there is a danger that the composition will be “lost.”

Think about which photos will go into the collage. One of the main rules is unity of theme, subject, for example, wedding photos or photographs of children. Before placing a photo collage on the wall, it is recommended to lay out the photos on the floor and evaluate their location. At this stage, you can move photo cards or add new ones.

The photo on the wall should be placed in such a way that the center line of the composition is at eye level of the person looking at it. If the photographs are different in size, then the largest one is located slightly above this level to make it easier to view smaller ones. The composition should also not be placed above a bed or sofa - it will be simply inconvenient for you when you want to look at them, and if the fastening is incorrect, the composition may fall.
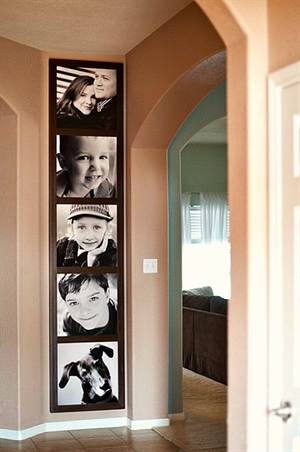
It’s safer to place your favorite moments of your life above the head of the bed; black and white photographs will look very stylish.


Suitable ideas
When posting photos, you can use ready-made design tips, or come up with your own; the main thing here is to feel the general style of the room.
You can use frames of the same size, color and style, or different colors, but no more than three different shapes or sizes of photos. Frames are an important element of decor, and not just the “framing” of a photo. With multi-colored frames it is more difficult, since they require the impeccable taste of the author of the composition. Handmade frames are very original, especially in a child’s room.

If the photos are different in size, then they should be placed from large to small. This composition will look more dynamic.

Original examples
Let's give an example of this way of designing a collage:

Consider the following master classes on making a collage from photos: on a large Whatman paper, draw a base on which the photographs are glued. Photos can overlap each other, but the composition should not be oversaturated.

We place printed photos of the same format in the same frames on the wall. We attach the photographs at the same distance from each other, measuring the desired location using a ruler or masking tape.
If you want to get creative, you can post photos simply and in an original way. Mount a clothesline on the wall in the room and attach a photo using clothespins. It is very easy to update such an exhibition periodically.

A collage of many small photographs placed in one large frame will look original. For the base we need, for example, a sheet of plywood, decorated with a beautiful baguette frame. The result will be a wonderful whole “picture”.

One of the latest creative ideas is to place photos without a frame at all. You will need any support: cardboard, plastic or other material that can hold its shape well. The base needs to be drawn out and the blanks cut out with a knife, and the size of the photo and the base must match. If you wanted to make the size of the base a little larger, you'll get a great frame.
When creating a collage, not only framed photographs are used, but also paintings, mirrors, plates and panels.
Finally, I would like to say about the mounting methods, which depend on the wishes of the author and the covering on the walls. Remember that paper wallpaper may have damage from glue, which will be impossible to disguise. The problem can be easily solved using double-sided tape or special Velcro.
Video on the topic of the article
Video of master classes on making a collage of photographs on the wall:


 - growing in the garden")


 fiery red, reproduction and care, types and hybrids")


 - growing in the garden")

