Sausage and cheese are a universal snack for any occasion. They are used to make sandwiches for breakfast, added to salads and pizza, and also put on the table as a slice. You should not treat this method of serving with disdain, because the overall impression of the table depends on its type. To pleasantly surprise your guests, you should know how to cut cheese and sausage beautifully.
How to make a beautiful cut?
One of the most important rules for beautiful slicing is a well-sharpened knife. A dull knife will only shred food without creating the proper impression. With the help of a sharp knife, you will really cut sausage and cheese beautifully, because the cuts will turn out neat and thin.
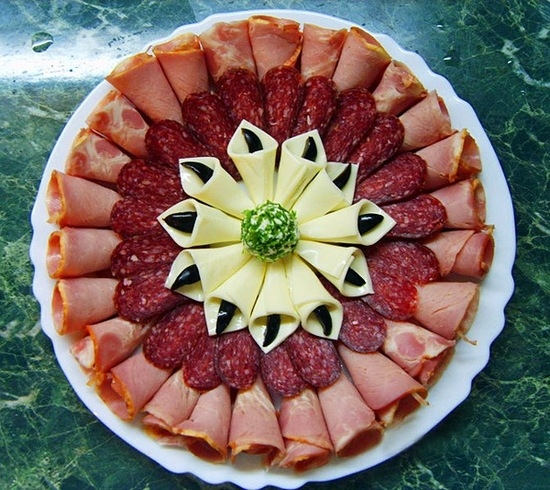
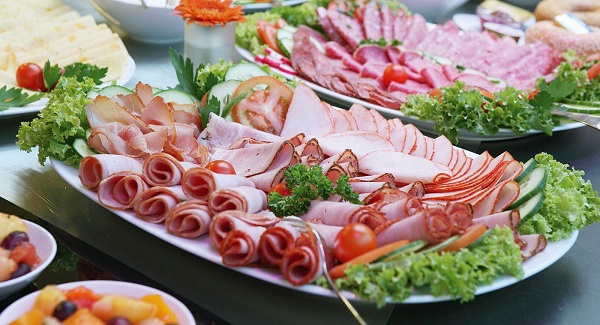
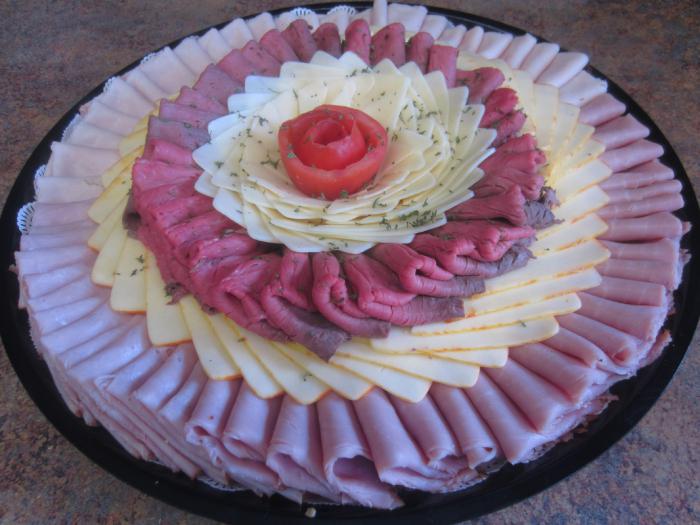
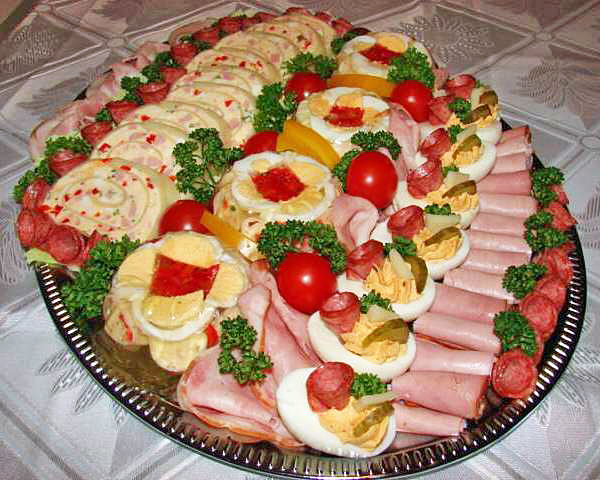
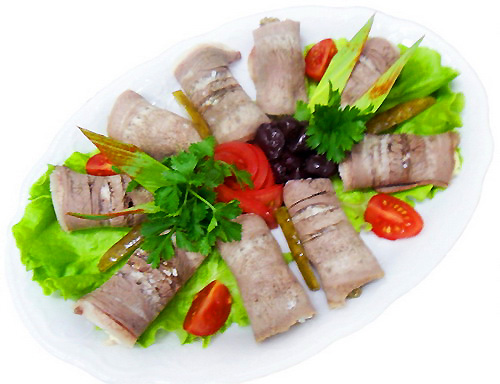
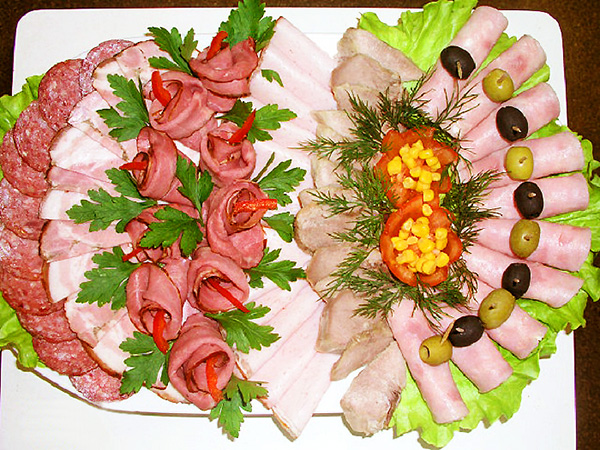
You need to start slicing with sausages, because they retain their proper quality longer appearance. To cut the sausage beautifully, you should carefully divide it into thin slices. Then, you can twist it into various rolls, tubes, roses, etc. You can put sprigs of herbs, olives or lemon inside the sausage tube. Sausages of small diameter can simply be laid out beautifully on a plate.
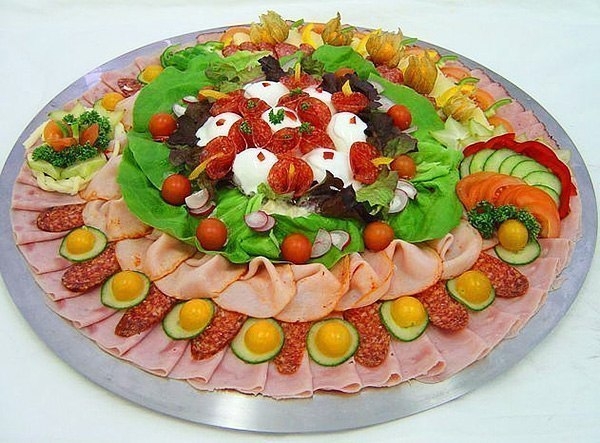
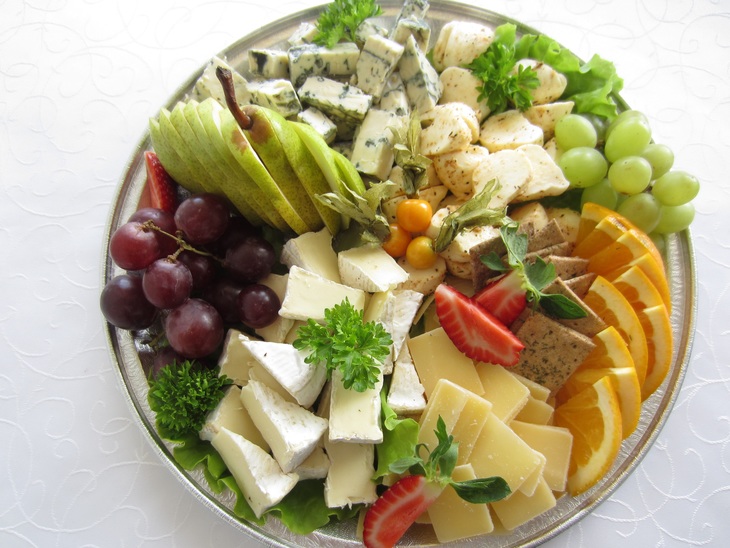
As for sliced cheese, the size of the slices should be small (about 5 - 6 cm). To make the cutting look beautiful on the plate, place lettuce leaves on the bottom. Sausage slices should occupy 2/3 of the plate, and cheese slices should occupy 1/3.
Meat tubes and rolls are placed on the bottom of the plate. Thin slices are laid out on top. You can place a small amount of vegetables on top of the sausage. Place the sliced cheese on the rest of the plate.
This is a fairly simple way to beautifully decorate the cutting.
Learning to cut sausage
- Sausage slices should consist of identical, even and thin pieces. To save time, you can use a special device called “Slayster”, which is used for slicing. You can also stock up on curly knives so that you can use them to cut interesting figures from sausage.
- Before slicing the sausage, you should remove the film from it. To easily clean smoked or dried meat, place it briefly in cold water. If this method does not help, put the sausage in the freezer - then the film will definitely be easy to clean.
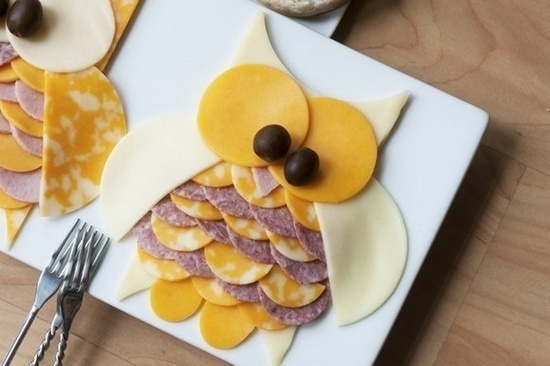
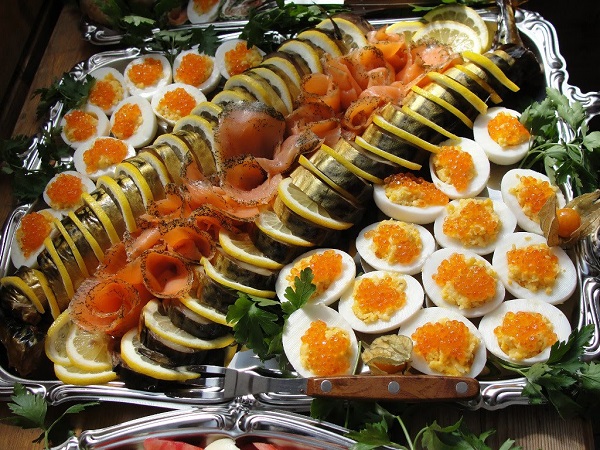
- If you wish, you can beautifully decorate the sausage slices by showing a little imagination. One of the most simple ways- This is a slice laid out in the shape of a flower. Place greens on the edges of a large dish, arrange petals from slices of sausage in a circle, the core of the flower is made of cheese. Moreover, you can cut the cheese with a curly knife to make the dish look more impressive.
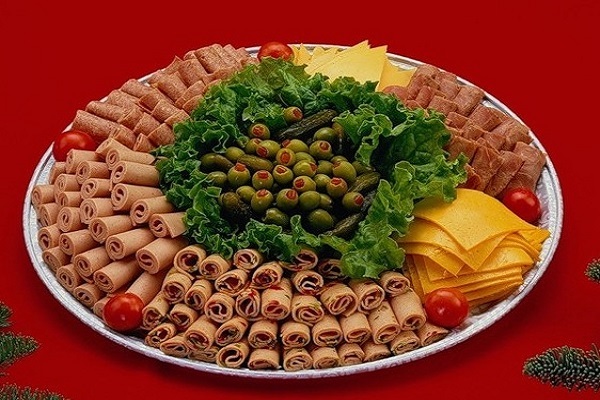
- Dr. An option for decorating the cutting is kala flowers. Thin slices of sausage are rolled into a bud, and pieces of cheese or olives are inserted into the core. Sausage kala is laid out on a plate and decorated with sprigs of greenery.
- You can make roses from sausage. To do this, cut the boiled into thin circles, roll into a bud and tie with a feather of green onion. Each subsequent layer of petals is laid out more freely and bent to the side. These roses will decorate any table.
Rules for cutting design

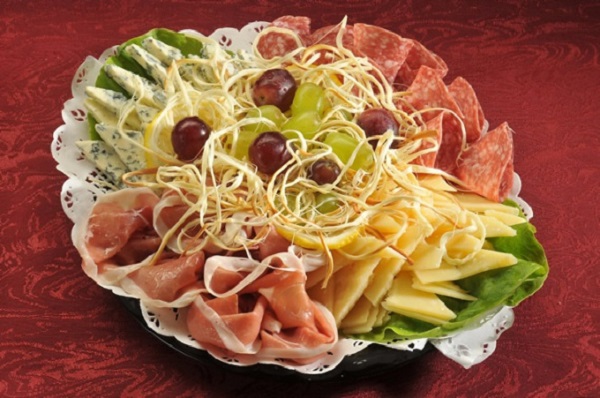
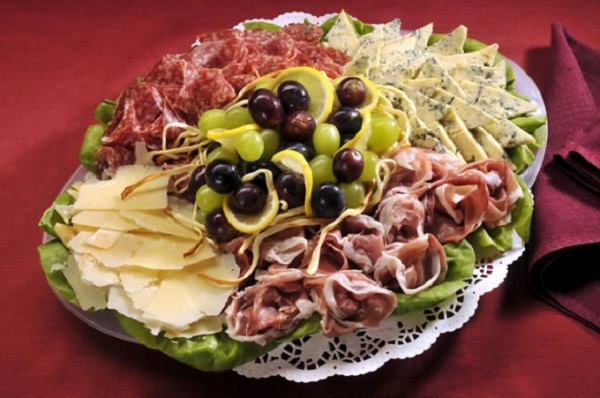
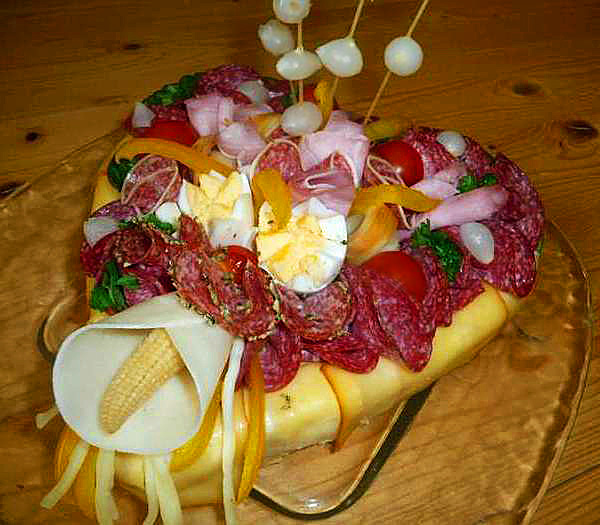
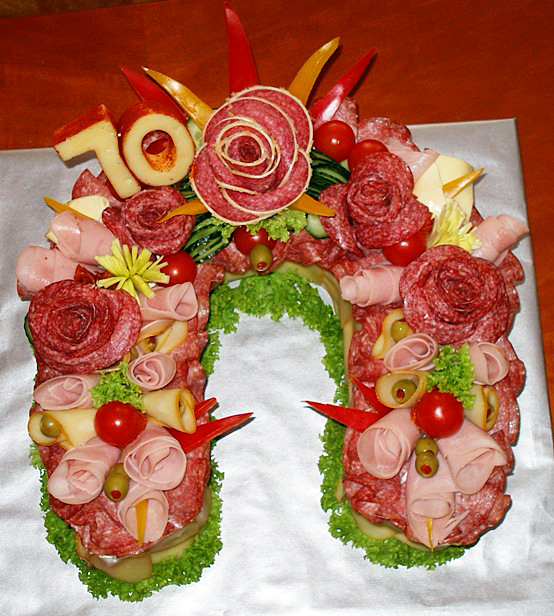
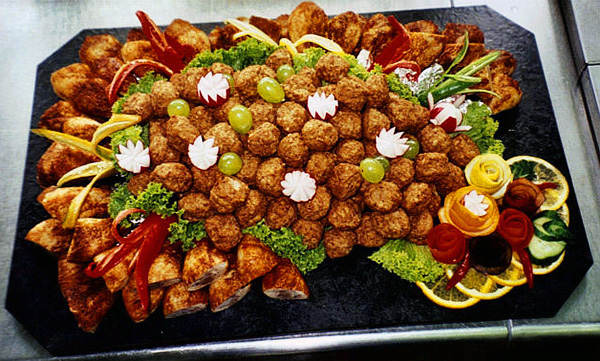
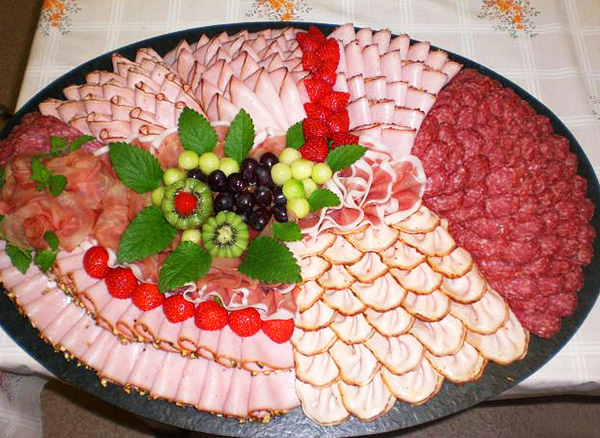
To give the cut original look, you can add additional elements. In addition to greens, olives and lettuce, you can use cherry tomatoes, fresh or pickled cucumbers, pomegranate seeds, strawberries, lemon, mushrooms, nuts, candied fruits, etc.
Some craftswomen decorate the cut with fresh or artificial flowers. You can glean original ideas design in cookbooks, making something unusual and memorable.
To truly surprise guests, some housewives heat up sliced sausage and cheese in microwave oven. This will allow the cheese to melt and partially cover the sausage, giving it an unusual taste.
Sliced sausage and cheese can be served as canapés. Thread pieces of sausage, meat, cheese, vegetables or fruit onto a toothpick or skewer. Mix up the ingredients to create a really interesting cut that's easy to pick up and eat.

Beautiful cuts for the holiday table: what to serve with?
When serving sliced sausage and cheese, it is important to know how and what to serve it with. It is advisable to serve the cut on the table no earlier than 1 hour before the guests arrive. Ideal for slicing vegetable salads, pickles, side dish of potatoes and rice.
As for drinks, the ideal option would be strong grape wines, vodka, cognac, whiskey and various liqueurs. Such drinks stimulate the appetite and are mainly enjoyed with sausage and cheese.


The most effective way for a hostess to make herself known to her guests is to beautifully perform assorted cuts! As they say, appetite comes with eating... And it’s gorgeous set table will additionally create a solemn mood. Don’t pay attention to the apparent complexity; even a novice cook can complete this table decoration. It is only important to take into account a few nuances and take note of ideas from “So Simple!”.
Slicing for the holiday table
The first thing to remember is that the knife must be super sharp. With a dull knife you can only shred food, but we need the opposite result.
The knife blade should completely cut through the product in one go. The slices should be the same size and thickness.

![]()
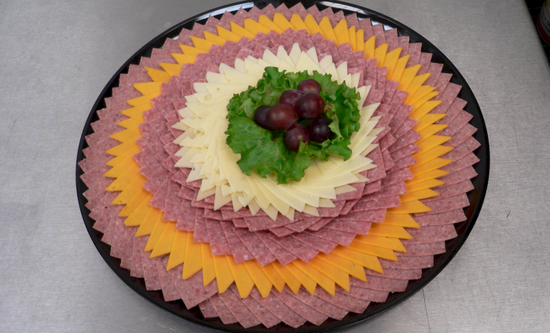
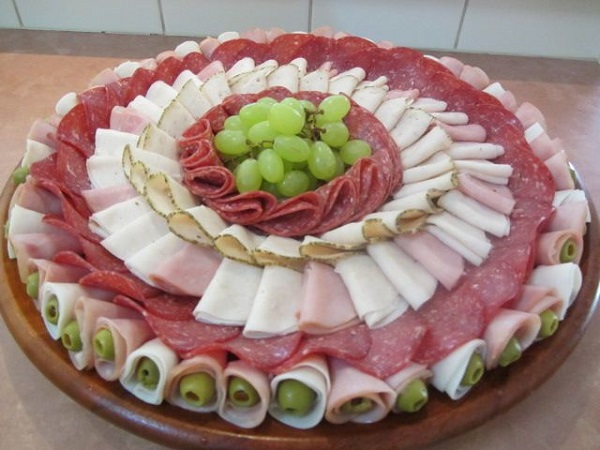
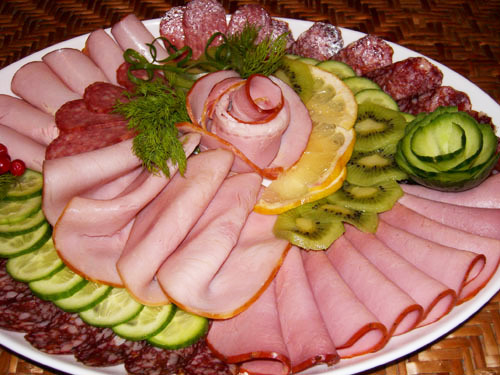
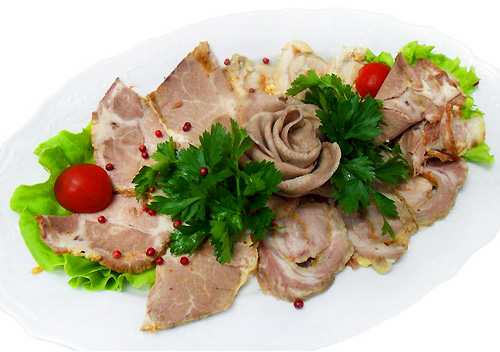
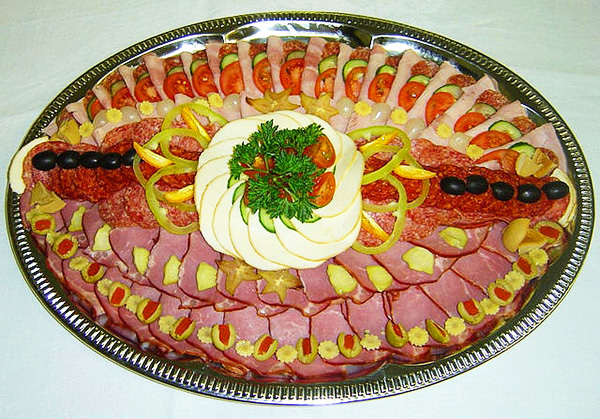
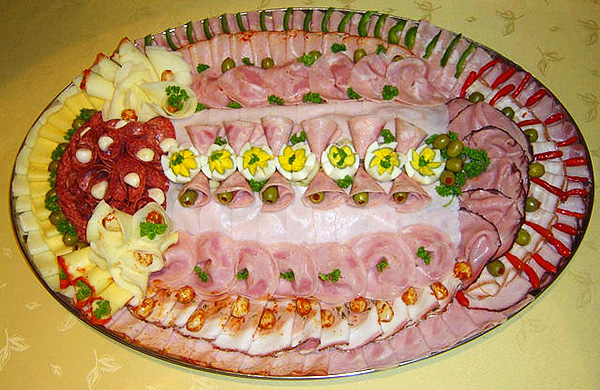
Place boiled pork, ham, and tongue in even rows, alternating with each other. Olives, pickles, and fresh herbs will further decorate the dish.
Start slicing with sausages: they last longer fresh look. Later you can roll the slices into a tube, fold them into a fan, or into a roll.

There are several ways to lay out slices: overlapping, fanned, in even rows (suitable for square dishes).

To make the cut of meat look perfect, cut thin sausage bars at an angle, and if they are too thick, first cut them evenly lengthwise and then cut them into thin slices. You can easily free smoked sausage from the film if you first scald it with boiling water.
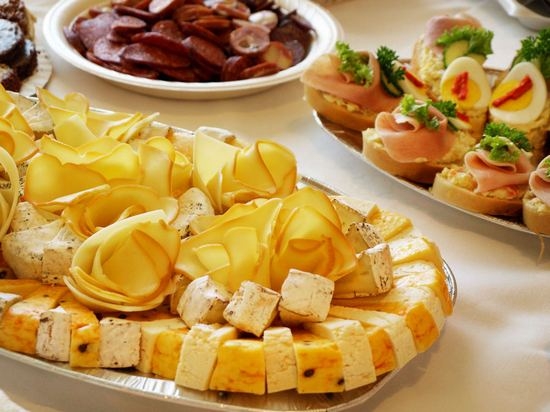
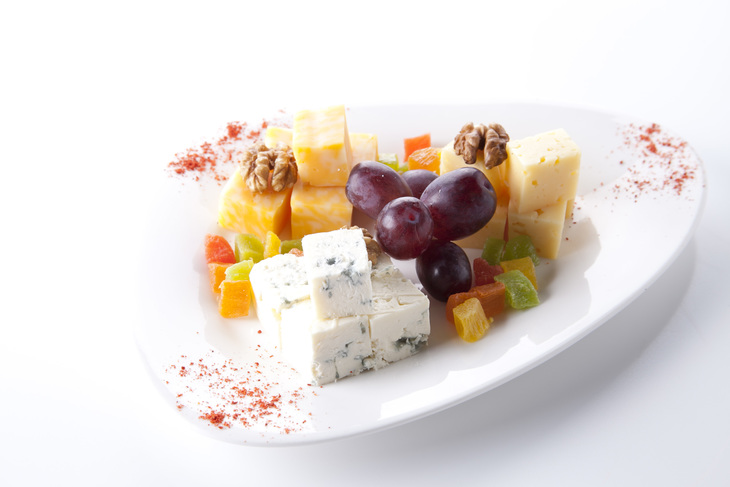
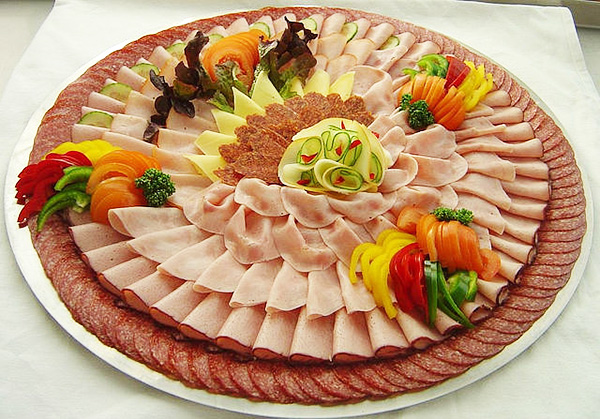
Cheese slices goes well with fruits and nuts, and is prepared just before guests arrive, as the cheese quickly loses its original appearance.
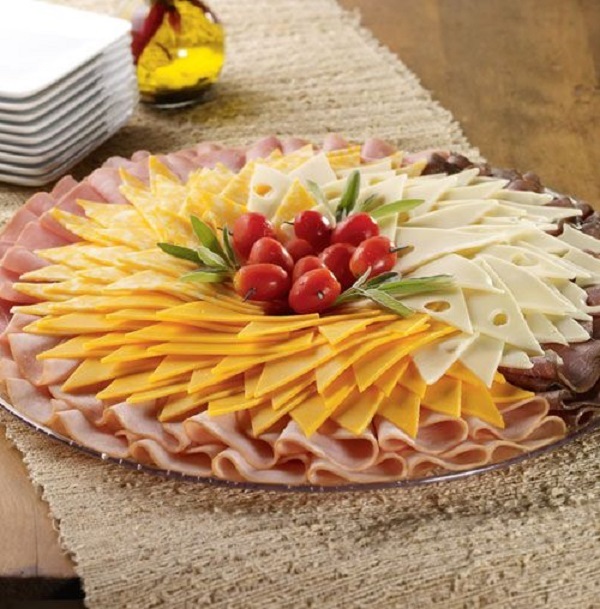
Use for slicing different varieties cheese: this will make the plate look more refined. It’s better to cut soft cheeses into triangles or cubes, this makes them easier to eat, but with hard ones you can get creative.


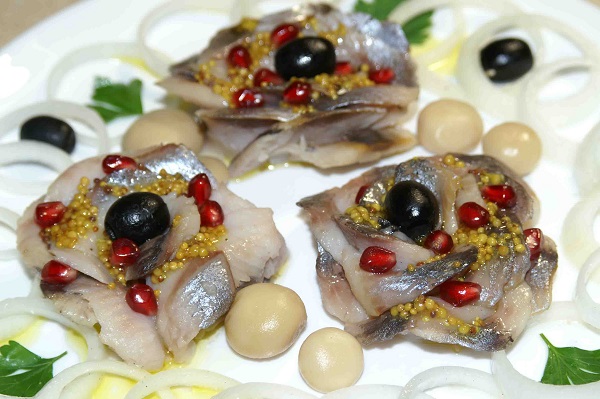
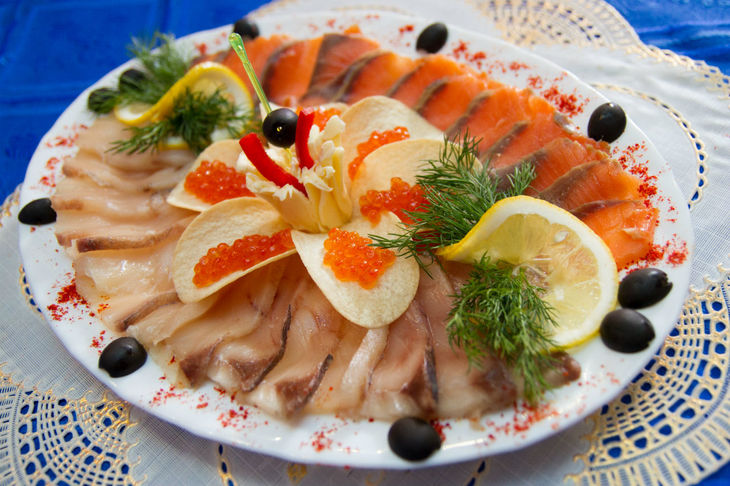
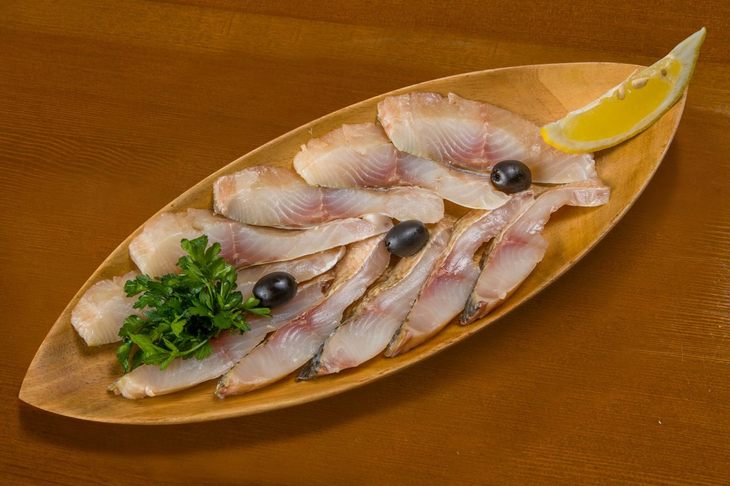
Herring It should also be served effectively!
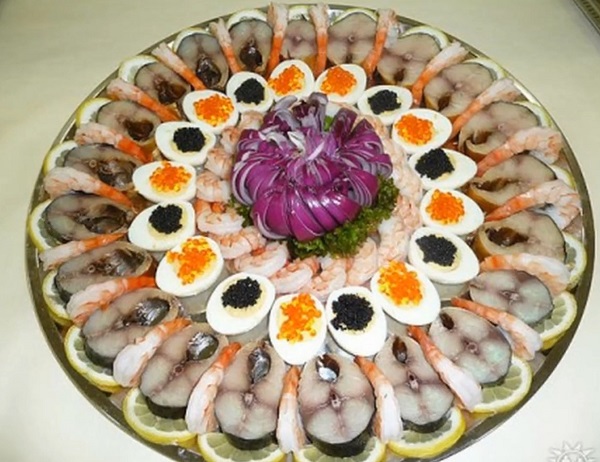
Remember that the fish should first be cleaned of bones using tweezers.

The fish is cut into bite-sized pieces and served with lemon.
Fruit plate Excellent complement to cold appetizers.

This is a real creative laboratory! A team of true like-minded people, each an expert in their field, united by a common goal: to help people. We create materials that are truly worth sharing, and our beloved readers serve as a source of inexhaustible inspiration for us!
As has long been the custom, this is one of the most anticipated and popular dishes on the holiday table, especially now when buffet tables are starting to come into fashion. But how to beautifully cut sausage and cheese so that such a dish will delight your guests? All that is required is good taste, a flight of imagination, and the skill of the housewife.
To amaze your guests and make the festive table chic, you need to think in advance about the design of plates with cheese and sausage. Don't act trivially. It’s not enough to just cut up several types of sausages and cheeses and put all this variety on a big, beautiful plate. As with other dishes on the festive table, cold appetizers must be approached using imagination in order to pleasantly surprise guests and decorate the celebration.
If you find it difficult to do this the first time, then before beautifully slicing the sausage and cheese, you can make a sketch of what you want to get in the end. Any good housewife would prefer to work a little more, but at the same time create a masterpiece that guests can appreciate. After all, everyone can see snacks simply laid out on a plate every day. This is banal and not at all festive. Your painstaking work will be fully rewarded by the emotions of the guests, their admiring exclamations, admiration for the original
Good option
How to beautifully cut sausage and cheese? Now we'll tell you. We offer you one interesting and at the same time quite simple option - you can simply lay out all the available products in the form of flower petals. However, they can be completely different. For example, the middle can be made of pieces of something light, and the rest can be made darker. Such a dish must be decorated with greenery around the edges, which will imitate the leaves of a flower.
An excellent option is kala; to create them, very thinly sliced sausage is rolled up like a bud, and the squares of cheese inside resemble hearts. Or you can put olives or olives inside. In this case, the petal itself is best made from cheese. In the second version, the feces look much more realistic. But in order to beautifully cut cheese and sausage, you should do it very, very thinly. If you make kala from both available materials, you will get a gorgeous festive bouquet on a plate.
Rosette
With a little more work, you can create a more complex and impressive composition. For example, a rose. To make it, pieces of sausage are rolled up and pressed closely against one another. Many people bandage the base green onions. The second layer is made looser and slightly bent outward. And the third one is simply placed on a plate. How to cut sausage and cheese in this case? We make the cheese, which is the base here, into thin slices, and the sausage (it’s better to take boiled one) into not very thick circles. Such a thickness that it is convenient to roll.
 Make a dish with cold snack Additional elements will also help to make things interesting. In addition to the already somewhat banal greens, many housewives add scanty cherry tomatoes or bright berries and fruits, such as cherries, strawberries or kiwis. The appetizer can also be decorated with fresh flowers. Such an interesting composition will look very impressive and will truly become a culinary masterpiece.
Another idea on how to cut cheese beautifully is to cut it into cubes and complete it with halves of grapes on special skewers. You can also use olives or any other fruits and vegetables to taste.
 You can make the cutting original without resorting to flowers. You can roll everything up into rolls and place it in a mound. Another interesting option- this is to place the sausage along the edges, then closer to the center - cheese, and in the very middle - olives, pieces of fruit, tomatoes or gherkins.
How to beautifully cut sausage and cheese? Now we will give some fairly easy tips to make these products look interesting on the plate. They look very impressive various varieties, laid out in sectors - rows, squares, circles or triangles, as you imagine. Another interesting option is to cut the sausage and make a cone out of it, placing greens or half an olive inside. Use skewers or toothpicks to hold the slices together so they don't unravel.
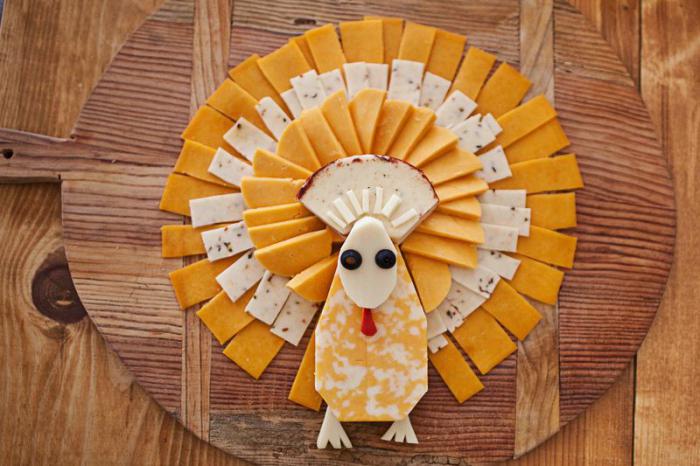 You can cut out various figures from cheese using special knives. Therefore, when working with him, restrain your imagination a little, otherwise you can do a lot of things. Well, if the holiday is associated with lovers, then you can serve cheese hearts; there are even special forms for this. Such an appetizer risks becoming a real decoration not only for the table, but for the entire celebration.
Conclusion
If you have enough time in stock, as well as assistants, then you can make a real work of art, a culinary masterpiece, from slicing.
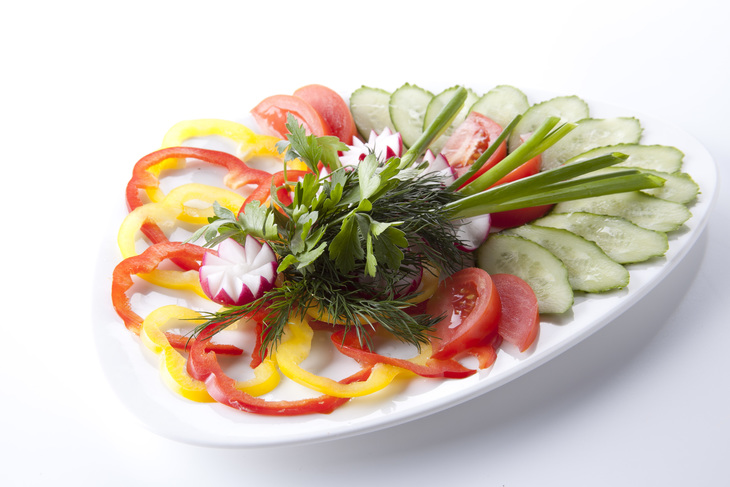
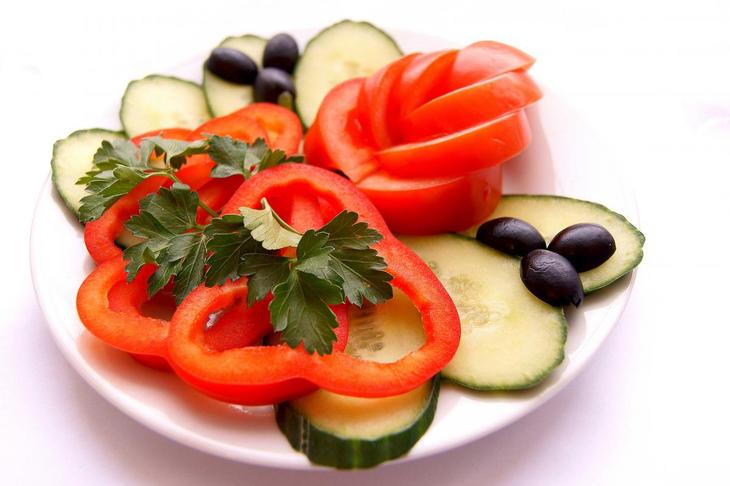
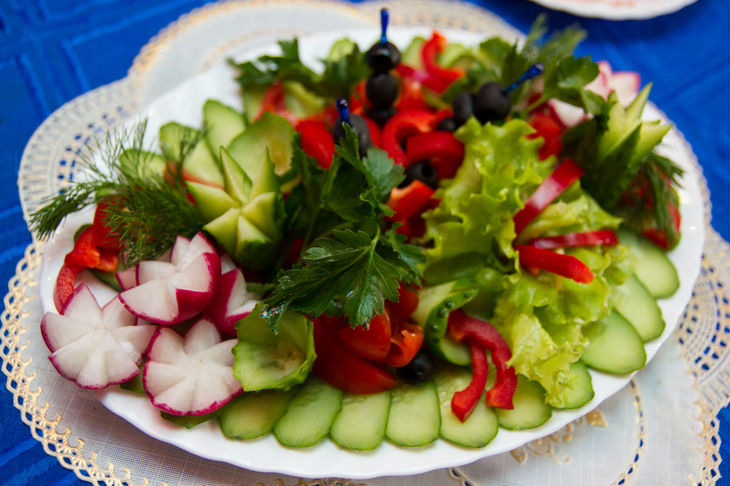
Vegetable slicing
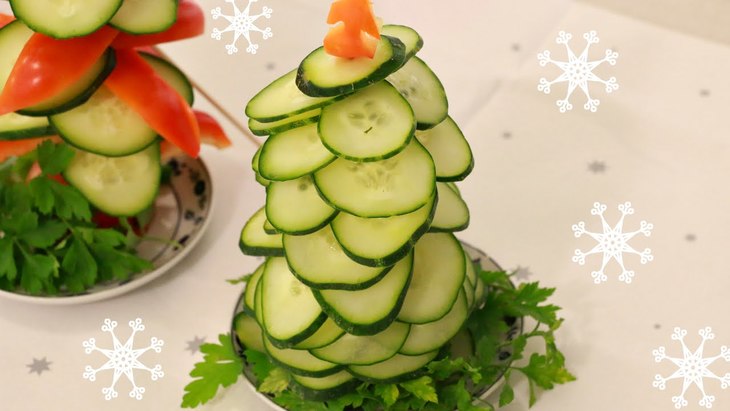
There should be a lot of greens and vegetables on the New Year's table 2015, since the symbol of the coming year is the Sheep (Goat), and it is a herbivore. You can make a whole bouquet of your favorite greenery, you can simply put it on a plate or wooden board - the main thing is to focus on it.
 Source: velieti.ru
The favorite color of the Sheep (Goat) is green, blue; therefore there should be more cucumbers, cabbage, green pepper, eggplants, zucchini and more. A “Christmas tree” made from cucumbers will look beautiful:
 Source: youtube.com
Cut more of your favorite vegetables and arrange them beautifully - this is the motto you can give to the New Year's table 2015.
 Source: virtualtaganrog.ru
 Source: safsat.ru
 Source: ludmila74.ru
 Source: sosna-krsk.ru
 Source: nnv.arriva.ru
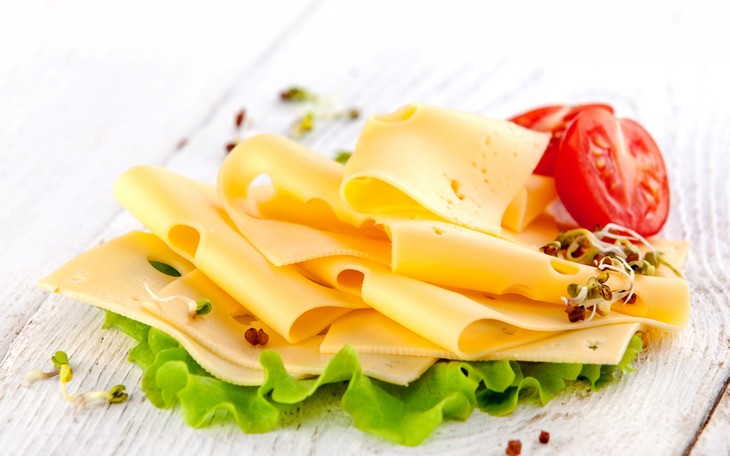
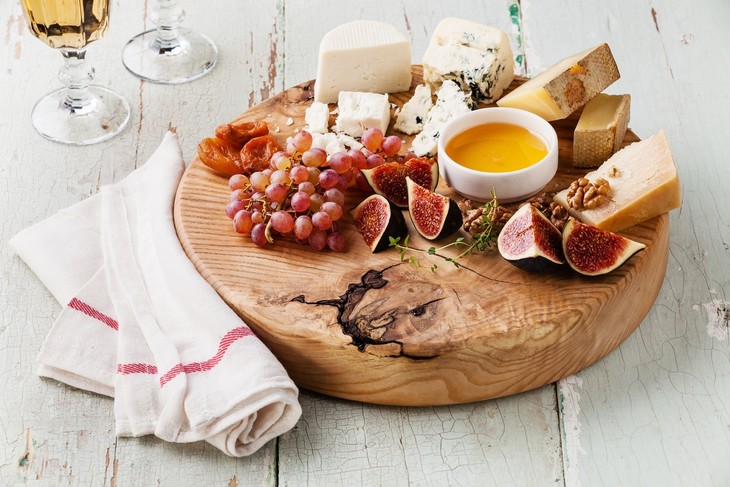
Cheese slices
Sheep and goat cheeses will be very useful on the New Year's table. Moreover, they can be used to make magnificent cuts, from which it is impossible to take your eyes off.
 Source: bankoboev.ru
From an aesthetic point of view the best way To decorate the cheese is the so-called cheese plate.
You can learn how to properly assemble a cheese plate
 Source: suupisted24.ee
 Source: suupisted24.ee
 Source: s-delicious.com
Cheese platters are often served on a wooden board - and this is very important in the year of the green (blue) wooden Sheep (Goat).
 Source: sunny7.ua
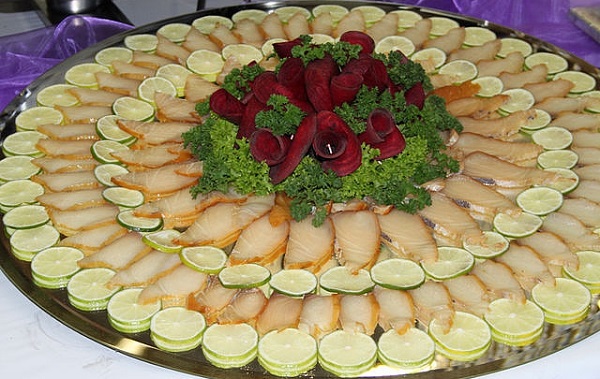
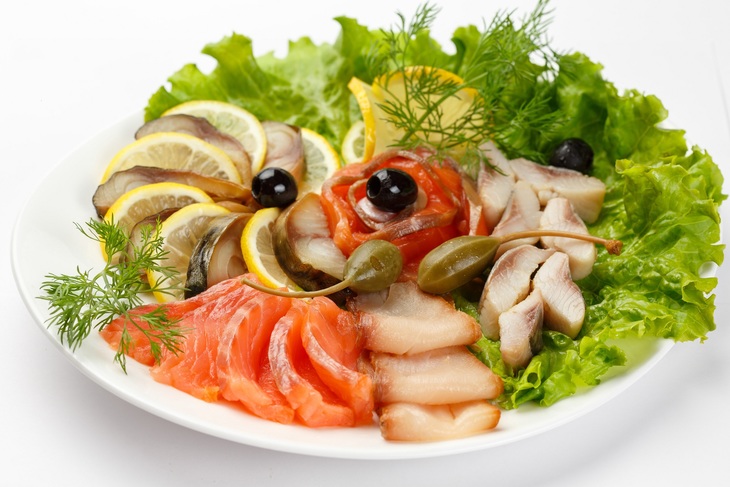
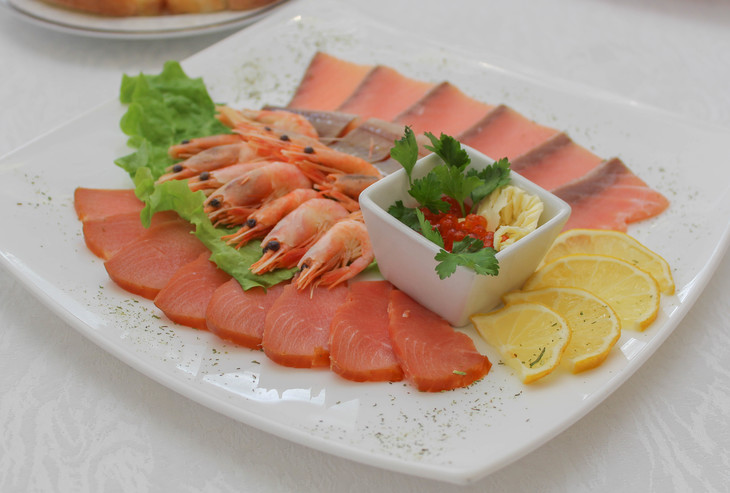
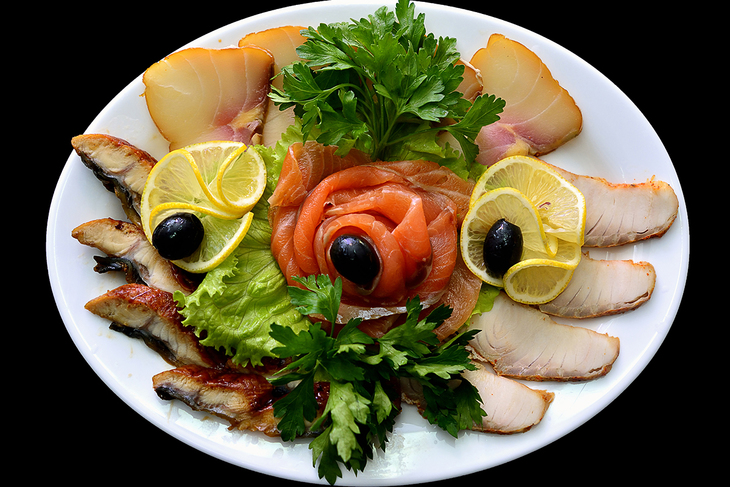
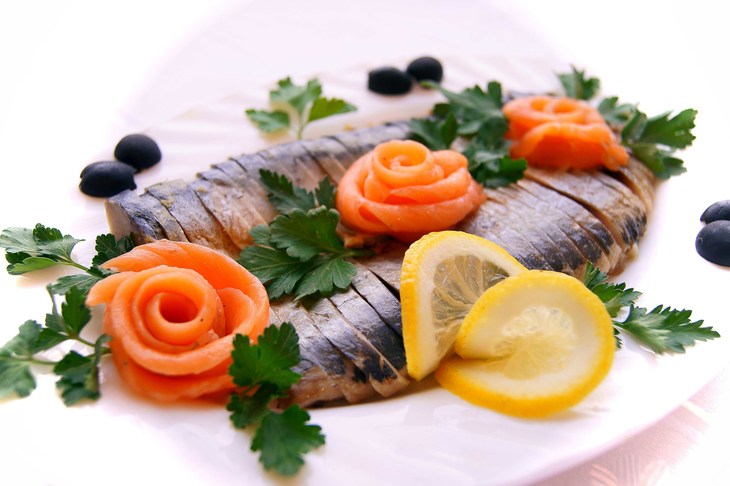
Fish slices
This year there should be more fish and seafood on the table than meat. Moreover, there are so many options for them beautiful design!
 Source: turgai-kazan.ru
 Source: restcdl.ru
 Source: nnv.arriva.ru
 Source: cafe-antalya46.ru
 Source: zu-restoran.ru
 Source: ludmila74.ru
 Source: tary-bary.ru
Sushi and roll lovers have an excellent chance to demonstrate their ability to prepare these popular Japanese delicacies, which can easily replace the usual cut fish. It’s worth giving them credit - the sushi and rolls look simply amazing on the table.
 Source: sushiyen.com.br
 Source: cinemaskope.com
 Source: sushiyen.com.br
 Source: morirestaurante.com.br
 Source: sushiou.de
 Source: sushigarden.com.br
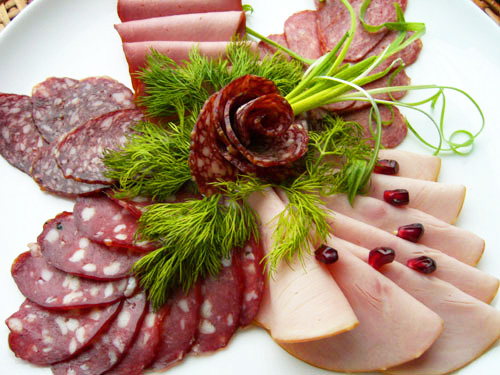
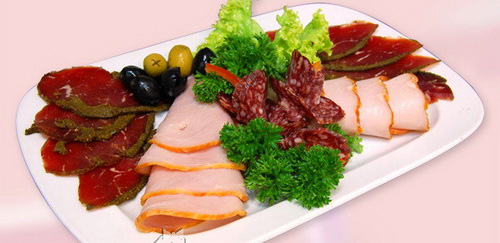
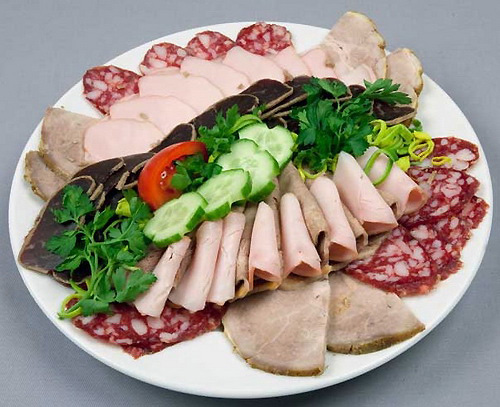
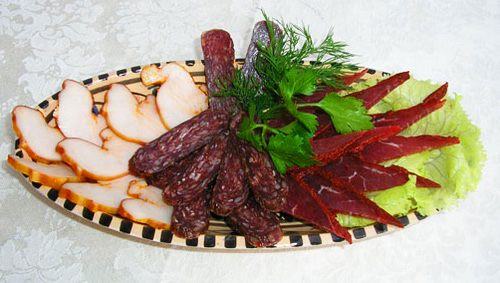
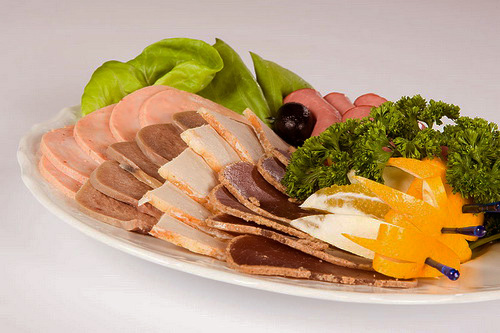
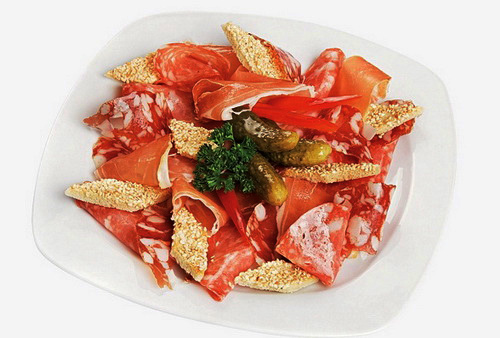
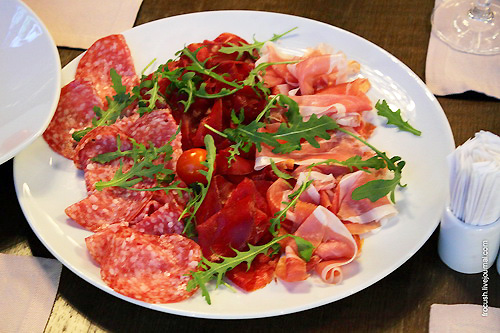
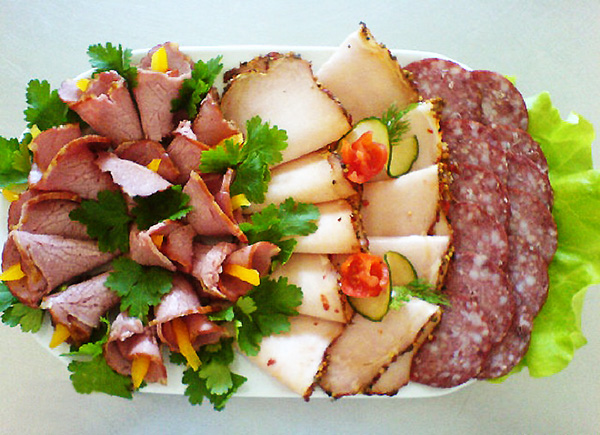
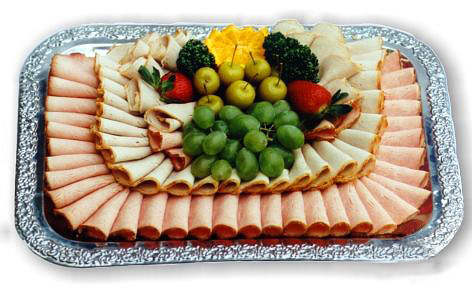
Cold cuts
As already mentioned, there should be less meat and sausages this year than fish. However, cold cuts on the table look no worse than fish. By the way, it is quite possible to combine cold cuts with cheese or vegetables - it turns out very beautifully and elegantly.
Section: TABLE SERVING, DISH DECORATION, ETIQUETTE
Page 14 of the chapter "DECORATION OF DISHES"
This section helps you decorate the most with minimal effort. different dishes and set the table beautifully.
To achieve success, it is recommended to read from.
DECORATING HOMEMADE DISHES
Design specialties-14
Recipes, step-by-step photos
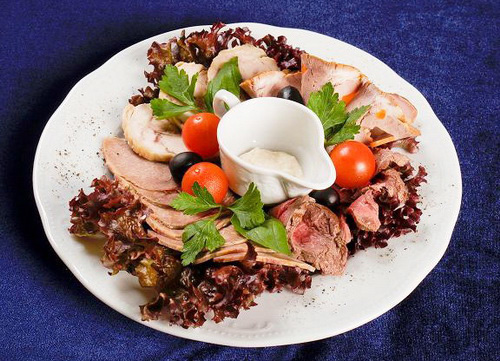
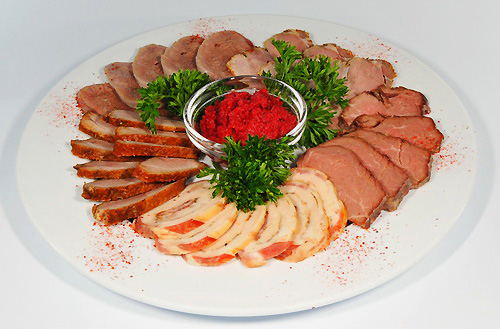
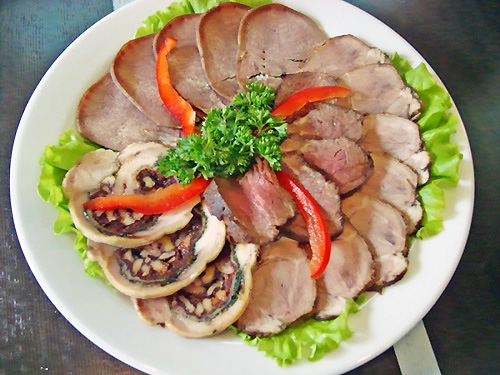
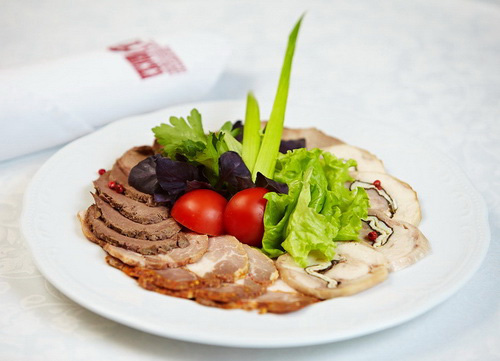
Meat plate
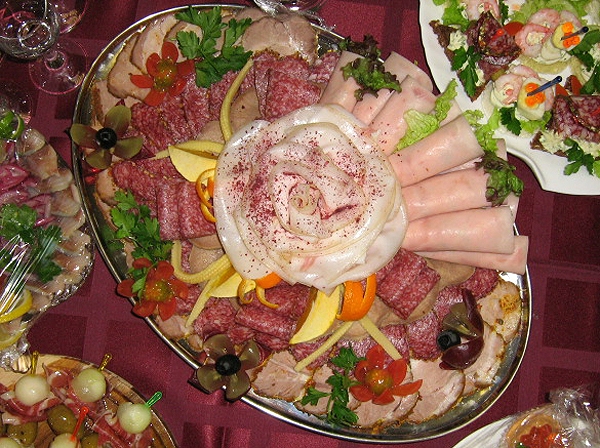
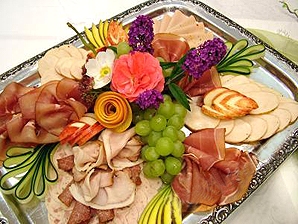

None festive event does not pass without the participation of the “cold meat” dish (meat plate).
In supermarkets you can find a large selection of ready-made meat products for a meat plate, or you can prepare them from meat yourself so that the end result is a wonderful culinary creation.

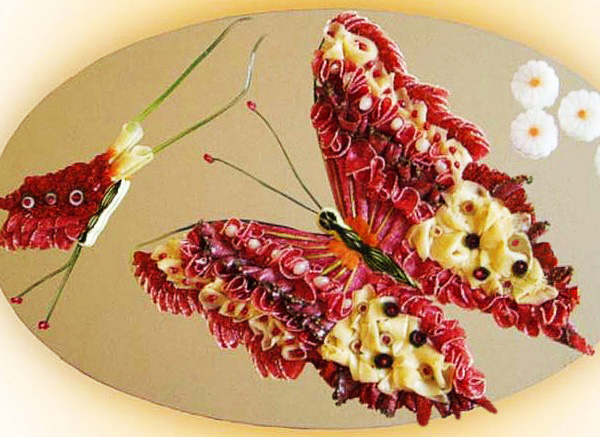
Below are examples of the design of cold cuts for festive table. But still, you should not limit yourself to just repeating what is shown in the pictures - after all, each cut of meat is beautiful and unique in its own way.
To prepare cold cuts, you can use the most various types meat products - sausage, balyki, boiled pork, lard with a cut, brisket and everything that you personally want to see in your cold cuts.
There are no rules or restrictions in preparing and decorating cold cuts (meat plates).

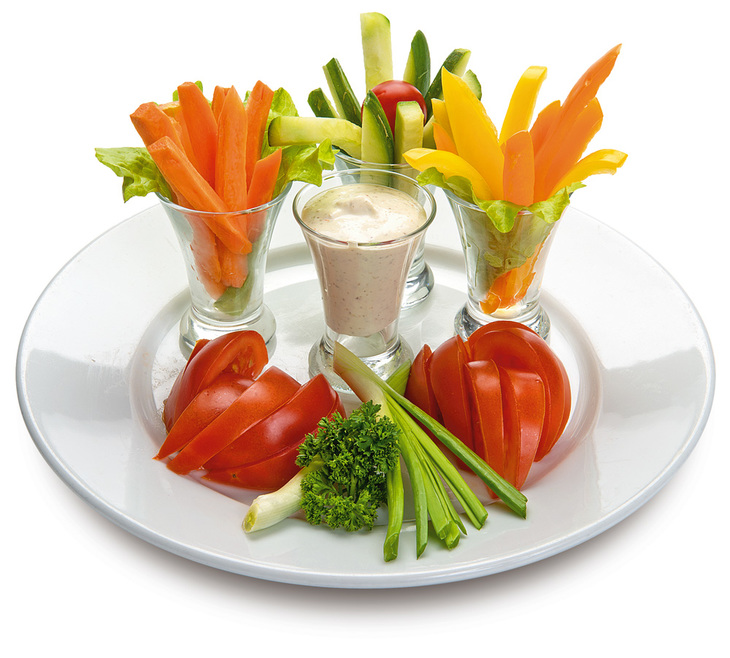
To get a beautiful cut of meat, you can use green lettuce leaves, cucumber slices, cherry tomatoes, black olives, curly parsley and whatever you have enough imagination for and suitable products on hand.
Assorted meats will look beautiful if you roll the balyk into a tube or roll.
You can create an original sliced meat if you place a sauce, for example, horseradish or mustard, in the middle of the serving plate.
You can add pomegranate seeds to decorate cold cuts, and make a beautiful curly serpentine from green onions.
Cold cuts, like a beautiful fruit plate, can be decorated with fresh flowers.
Such assorted meats will look very exotic on the holiday table.
Even the simplest cold cuts, if garnished with a few sprigs of arugula, will look very attractive - no worse than in a decent restaurant, so don’t be afraid to experiment with your inspired culinary creativity.

Sliced meats, like sliced vegetables (vegetable plate), or assorted fish (fish plate) are a reflection of your unique taste and personality. Let's take note of examples of ways to beautifully decorate cold cuts and, combining them to your liking and adding a flight of your unbridled creative imagination, we make your own unique cold cuts for the holiday!


 |
1)
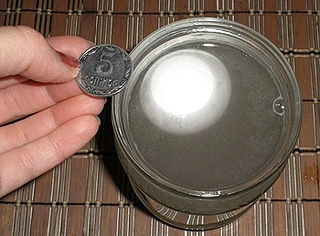
Prepare the brine in such a concentration that it is fresh raw egg swam in it "for five Soviet kopecks." This is a strong saline solution. When you drop a fresh raw egg into it, it will sink into the brine and float up - only the blunt end of the egg, approximately 2.5 cm in diameter, will be visible. |
|
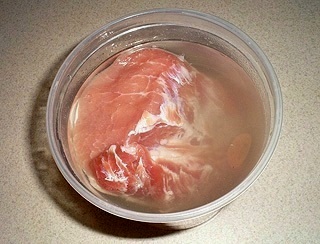 |
2)
Wash fresh meat (pulp) thoroughly under running water, put in cold brine, close with a lid and put in the refrigerator for 1 to 3 days. The time depends on the size of the piece of meat and the desired degree of salting. |
|
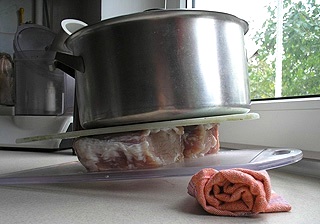 |
3) After 1-3 days, remove the meat from the brine, dry thoroughly with a napkin and place under pressure on an inclined plane for about 1 hour so that the remainder of the brine is squeezed out and flows out. |
|
 |
4)
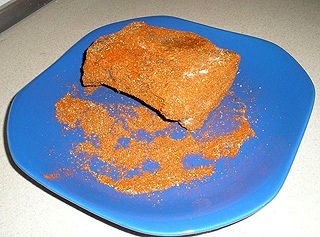
Then rub the meat thoroughly with a mixture of dry seasonings and roll generously in them on all sides. |
|
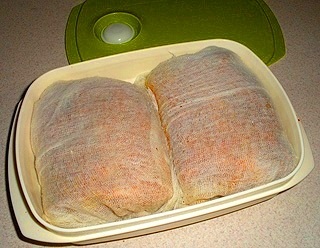 |
5) Wrap the seasoned meat in clean, dry gauze and keep in a sealed container for 1 week in the refrigerator on the middle or lower shelf. |
|
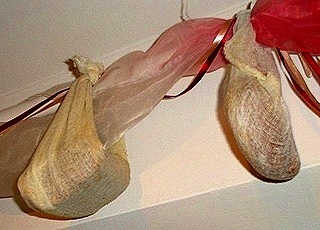 |
6)
After a week, replace the gauze (and additionally roll it in a mixture of seasonings) and hang it in a well-ventilated place. For example, under the ceiling in the kitchen. In the photo, meat in gauze is suspended from a curtain rod. It is especially convenient to prepare dried meat in the cold season, when the heating is on, because... At this time, the air in the apartment is dry and the temperature is cool. |
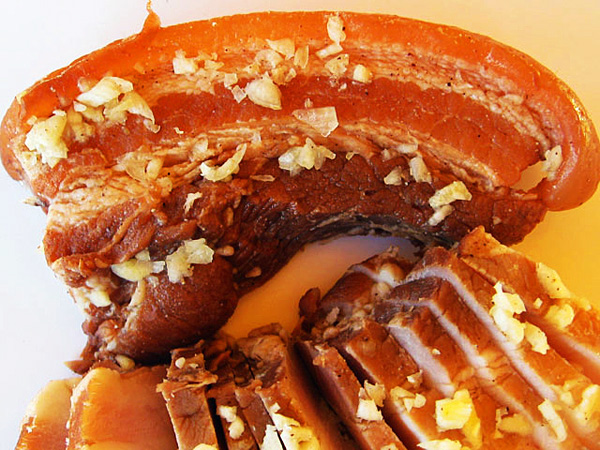
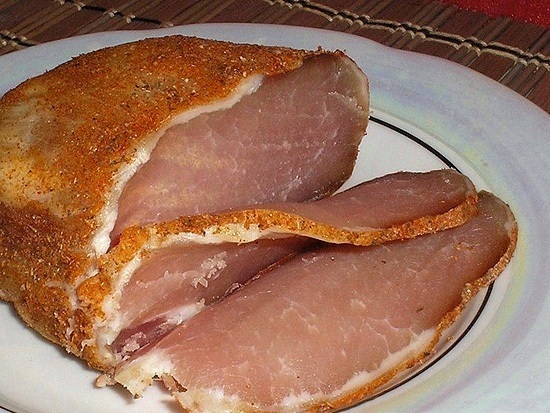
BREAST OR LOIN BOILED IN ONION SKIN BOTTLE
Take lard with abundant streaks of meat, better brisket, you can also take loin.
Boil the brine in an enamel pan.
For 1 liter of water:
• 0.5 faceted glass of salt,
• a generous handful of onion peels,
• a few cloves of garlic,
• spices to taste.
Place a piece of lard into the brine, making sure that the brine completely covers the entire piece of brisket, and boil for 10 minutes.
Remove the saucepan from the heat, when it has cooled under the lid, leave it with all the contents for a day.
After a day, remove the brisket (or lard), let the brine drain and coat with crushed garlic.
After this, you can roll in a mixture of spices to your liking.
Wrap in film and place in the refrigerator for a day, then transfer to the freezer.
As soon as the lard freezes in the freezer, the delicacy is ready.
Brisket prepared this way acquires a beautiful color, as if it had been smoked, and an excellent taste.
ADVICE. When peeling onions, do not throw away the peels, but accumulate them, storing them in a paper bag.
• Real dumplings are cooked only in a decoction of onion skins. To do this, the husks (1 handful per 1 liter of water) are boiled for 10 minutes, then the broth is filtered, salted, brought to a boil and dumplings are placed in it.
• Onion skins add a beautiful color to fish soup and a variety of broths. To do this, the husks are placed in a gauze bag during cooking.

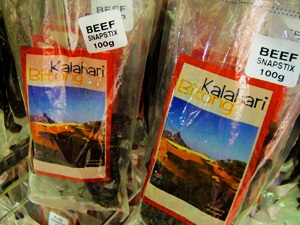
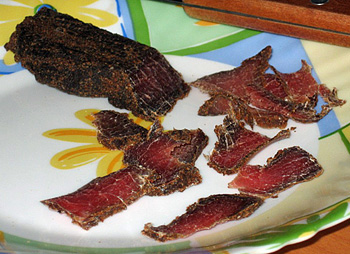
Delicious biltong, dried in thick layers.

The favorite breakfast of African colonialists was biltong, dried in thin layers.
This biltong is quick to prepare.
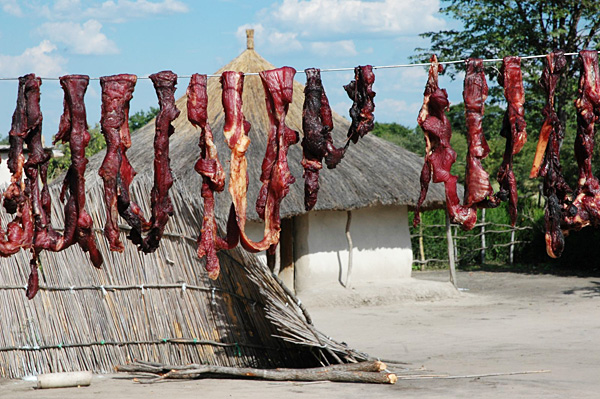
Drying biltong in the central square of one of the African capitals.
Biltong is meat cut into strips, marinated with all sorts of spices and then dried. There are many varieties of biltong depending on the spices, the thickness of the strips cut and the different nuances of drying.
- This meat is familiar to us from childhood through adventure literature. Remember, from Louis Boussenard:
“Our glorious Bechuanas show us how it's done. They have already rested, and look how they carefully cut the remaining meat into thin slices. Can you guess why? They will hang this meat on trees in the full sun and keep it until completely dry. This is what is called "biltong" in these parts.
They will do the same with the second elephant and thus provide themselves with food for a long time.
And now we will make ourselves here in the most comfortable way. Just rely on me. It's almost night, and we're really tired. Our Bechuanas will light fires to drive away the wild animals, which will undoubtedly be attracted by the smells of the slaughterhouse. We will be located not far from the pit in which elephant legs are stewed. This will be for us tomorrow. In the meantime, sleep! May beneficial sleep bring us rest after a hard day.”
Slicing this excellent gourmet meat product will decorate any holiday table. For the festive table, biltong should be cooked in thick layers to make the meat juicier.
Biltong is not only a delicious meat dish, but also one of the best beer snacks. This one is delicious and high-calorie product can also serve as a food supply during hikes and travels.
To prepare biltong, you can use almost any meat - beef, horse meat, venison, chicken, turkey, ostrich and even game, with the exception of pork (since such salting times are too short for pork).
Biltong can be prepared either from thick slices of meat (it takes longer to dry, but is tastier), or from thin ones - it is dried much faster, but it turns out drier.
In any case, this wonderful-tasting meat is prepared simply and quickly.
The biltong example below uses thinly sliced beef.
The meat can be different - thin edge, thick edge, various fillet parts, etc.
The main thing is that the meat is fresh, pink, tender and, preferably, without veins. Although for those whose teeth are in order, the veins are not an obstacle - as we say in Rus', “there is no such thing as tough meat, there are only bad teeth.”
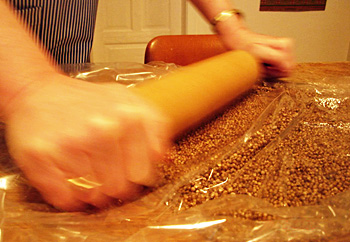
PICKING MIXTURE
To salt meat, prepare a salting mixture per 1 kilogram of meat:
• 1 heaped tablespoon of salt + level tablespoon of salt, totaling approximately 45-50 grams (many recipes recommend less salt - 1 heaped spoon, 30 grams).
The salt is by no means iodized - you need coarsely ground rock salt. If the salt is iodized, the biltong will have a strong iodine flavor!
• 1 level tablespoon of ground coriander. You can do more - it depends on the taste. Coriander is the main spice in biltong.
• 1 heaped teaspoon of sugar (for complete aesthetics, brown cane sugar is recommended, but regular sugar will do)
• 1 teaspoon of black pepper (you can add 1.5-2 teaspoons to taste). You can add red pepper to suit your taste.
• 2 g baking soda
At industrial production For a beautiful color of meat, saltpeter (1 g) is added, but we don’t need extra nitrates.
The coriander is pre-roasted (do not burn it!) and ground in a coffee grinder.
Or spices to grind them are crushed through the film with a rolling pin.
All spices are mixed.
Here's another mix option– classic Namibian composition of curing mixture from Okahandi for 1.5 kg of meat:
• salt - 60 g,
• pepper - 2 g,
• sugar - 15 g,
• soda - 3 g,
• coriander - 15 g.
Based on your own taste, you can create very different pickling mixtures for biltong. The main thing in them is to accurately observe the prescribed amount of salt and coriander.
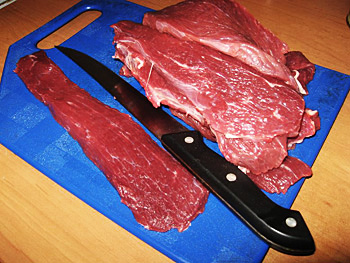 |
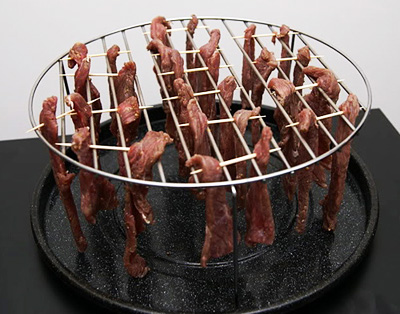
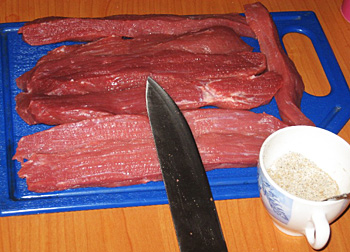
For drying thin slices meat is cut into strips 20-25 cm long, 5-7 cm wide, 1 cm thick(can be thinner), definitely along the grain.
|
|
 |
Spices can be ground with a rolling pin through the film. |
|
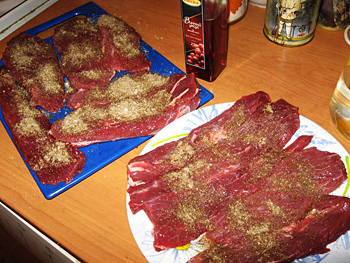 |
Sprinkle sliced pieces of meat on all sides with grape or apple cider vinegar and rub thoroughly with the prepared pickling spices. |
|
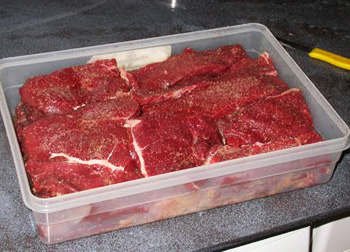 |
Place the meat rubbed with the mixture tightly into any stainless container, put pressure on top and place it in the refrigerator for 12 hours. |
|
 |
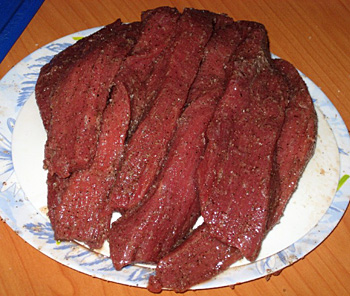
After 12 hours of salting, dilute 6% wine vinegar with water 1:6 (or 9% 1:9). An overly strong vinegar solution will make the meat unpleasantly sour. |
|
 |
After drying by simply hanging it indoors (for example, in the kitchen), the biltong is ready in 1-2 days. |
DRYING BILTONG

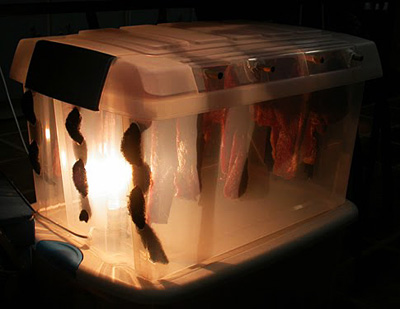
Hanging biltong at the beginning of drying.
|

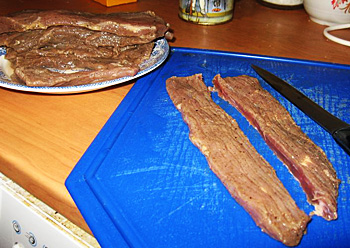
The end of drying is finished biltong.
|
STORING BILTONG
It is not recommended to store biltong for too long, because... it continues to dry out, becoming harder and harder.
To slow down drying, biltong should be stored in the refrigerator tightly wrapped in cling film or placed in a plastic bag.
To store for more than 1 week, carefully wrapped biltong should be placed in the freezer.
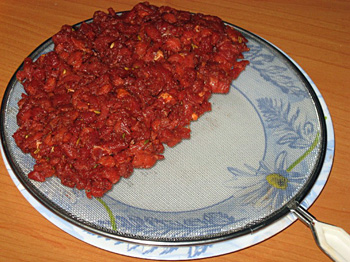
Kitchen scissors can be used to cut hardened biltong into thin pieces.
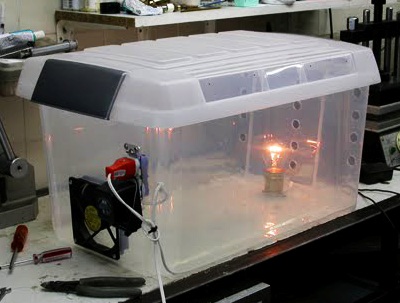
DEVICES FOR DRYING VARIOUS PRODUCTS
(not just biltong)
 |
Homemade device for hanging biltong for drying. |
|
 | ||
 |
The process of making a simple drying device. |
|
 |
The manufactured device can work around the clock for many years and prepare all sorts of delicious things for you (or for sale). |
 |
The chamber is forced-ventilated and heated by an incandescent lamp. A fan with a dust filter is installed at the bottom of the side wall and blows directly onto the light bulb. |
|
 |
YOUR BUSINESS ON BILTONG
|

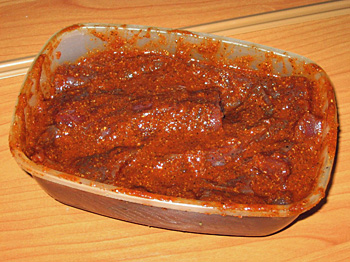
Basturma is beef cured in spices (marinated beef kebab is also called basturma.) Not to be confused with pastrami - smoked marinated meat.
Traditionally, basturma is prepared in fairly thick pieces, about 6 centimeters thick, and dried for a long time, at approximately 8 degrees. WITH.
At home, such basturma will have to be dried in the refrigerator, which, by the way, is an excellent dryer. But not everyone has that much space in their home refrigerator. Moreover, the drying process takes 2-4 weeks. Therefore, it is very difficult to carry out such a process in normal home conditions.
We will use quick way- the meat is cut into thinner strips than usual, so it cooks much faster and does not require a refrigerator for drying.
Some feature of this method is that the finished thin strips will need to be cut into slices very diagonally in order to put them on sandwiches.
But this minor inconvenience of cutting is fully compensated by the speed of preparation and excellent taste, much better than that of industrial “basturma” from the store.
Meat - beef. Traditionally, tenderloin or sirloin cuts are recommended. You can successfully use the rump, thick and thin edge.
We will also need chaman (fenugreek) - it is sold in the markets by spice merchants.
REFERENCE. Fenugreek (lat. Trigonella) is a genus of plants of the legume family of the Moth subfamily (Faboideae). There are about 130 species in the genus. The most famous representatives are fenugreek (Trigonella foenum-graecum) and blue fenugreek (Trigonella caerulea).
On sale this spice is called “chaman” (traders know it).
If there is no chaman, then it will not be quite basturma.
Some say that you can replace it with ground cumin - it will also be tasty, but still not basturma.
There is no problem buying chaman (fenugreek) at the market; a box costs 100 rubles.
 |
A box of fenugreek, bought at the market from a spice merchant for 100 rubles. |
|
 |
1st day. |
|
 |
Salt the meat dry. In this case, the released meat juice does not linger, merging to the side. |
|
 |
It is even better to place the meat on some kind of mesh, for example, which is used to protect against splashes from a frying pan (or other similar structure). The juice will drip onto the plate under the mesh, and air will flow freely from all sides. |
|
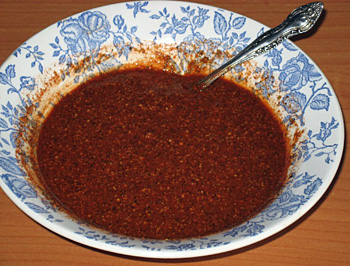 |
3 days pass. The meat is still being salted, and we begin to prepare the marinade with chaman. We dilute the chaman in warm boiled water, a little warmer than room temperature, until it has the consistency of liquid sour cream. Add the rest of the spices and stir. Add more water and stir again. The chaman gradually absorbs water - it swells and thickens. Add water again. The procedure is repeated for quite a long time until a jelly-like mass with the thickness of liquid sour cream is obtained. As a result, you get quite a lot of chamanka marinade. Place in the refrigerator for a day. The photo shows the mass obtained from one spoon of chaman. |
|
 |
4 days have passed since the start of salting. |
|
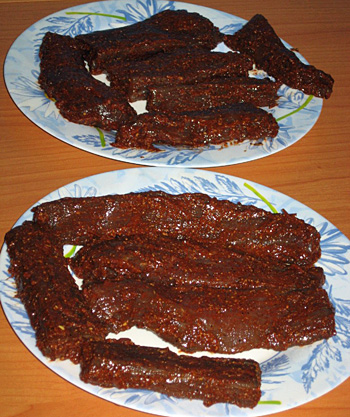 |
A week has passed since the start of the process. |
|
 |
Cut the finished basturma into thin pieces and serve. |
.
It's fast, easy, cheap and damn tasty.
And without using guts!
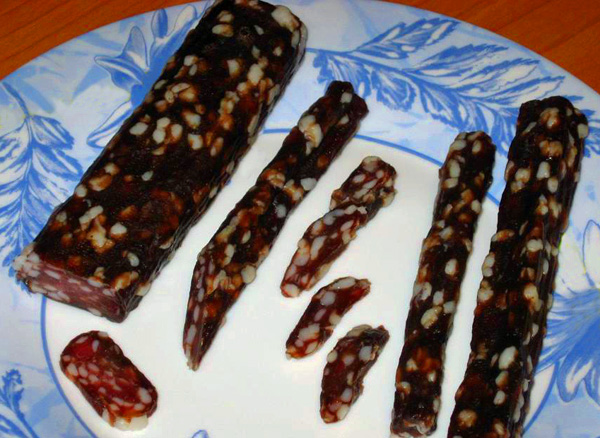
Preparing this type of sausage is not at all difficult, no more difficult than making homemade dumplings.
The main intrigue in sausage is always the intestines. There is a lot of fuss with them; because of the intestines, the sausage takes a long time to dry, which at home requires great heroic conditions.
In addition to achieving excellent culinary results with little effort, in this recipe we can do just fine without any guts.
The essence of the recipe: take marinated meat for biltong (see recipe “1. BILTONG” above), pass it through a meat grinder, add chopped salted lard, shape and dry the sausage.
The result is always wonderful.
Of course, there are many other recipes for homemade dry-cured sausage, but they are more complicated.
So a sausage recipe based on meat marinated like for biltong is what the home cook needs.
Everyone who tries it reports the same impression:
- Tasty! And very similar to smoked...
 |
We marinate the beef as for biltong, and for the same 12 hours (see recipe “1. BILTONG” a little higher). |
|
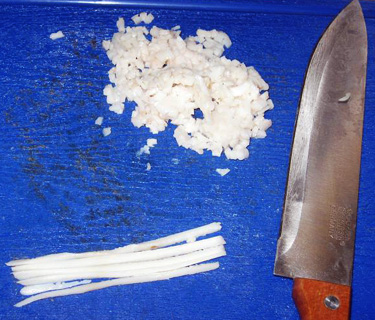 |
Take salted lard. We cut it into thin slices and put it in the freezer. When it freezes, cut it into thin strips and cut the straws into cubes. |
|
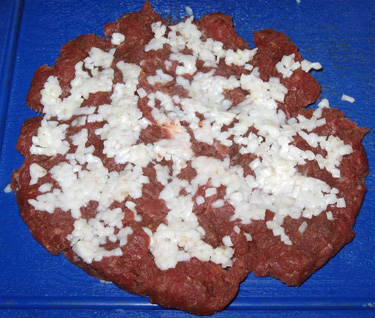 |
Mix the minced meat with lard: approximately 1 part lard to 5 parts meat. |
|
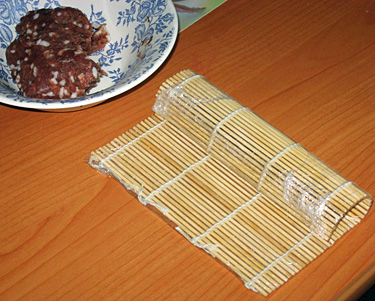 |
Now the main culinary secret is how to do without intestines. To form the sausages, we will use a makisu mat, which is used in Japanese cuisine for making maki rolls. |
|
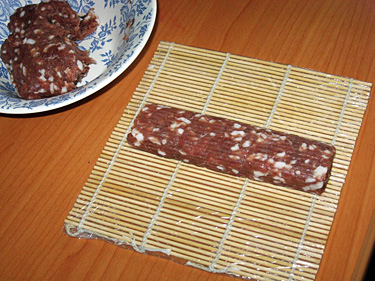 |
Sausages can be made either round or rectangular. |
|
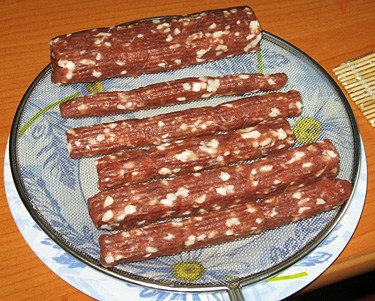 |
The photo shows how many molded sausages were made from 300 g of beef and 60 g of lard. |
|
 |
Another 2-4 days of hanging drying (time depending on thickness), and the sausage is ready. |
Sausage variation with paprika and fennel
By preparing biltong, basturma and dry-cured sausage with minimal effort, as described above, you will not only delight your family and guests with real, nutritious food, but also gain fame as a great home cook. And few people receive such fame.


 Leo born in the year of the Rabbit")


