Lately I've been looking for ways to make PCB manufacturing easier. About a year ago, I came across an interesting page that described the process of modifying an Epson inkjet printer for printing on thick materials, including. on copper textolite. The article described the modification of the Epson C84 printer, however, I had an Epson C86 printer, but because... I think the mechanics of Epson printers are similar for everyone, so I decided to try to upgrade my printer.
In this article I will try to describe in as much detail as possible, step by step, the process of upgrading a printer for printing on copper-bonded PCB.
Necessary materials:
- Well, of course you will need the Epson C80 family printer itself.
- sheet of aluminum or steel material
- staples, bolts, nuts, washers
- a small piece of plywood
- epoxy or superglue
- ink (more on this later)
Tools:
- a grinder (Dremel, etc.) with a cutting wheel (you can try with a small monkey)
- various screwdrivers, wrenches, hexagons
- drill
- hot air gun
Step 1. Disassemble the printer
The first thing I did was remove the rear paper output tray. After this, you need to remove the front tray, side panels and then the main body.
The photographs below show the detailed process of disassembling the printer:


Step 2. Remove the internal parts of the printer
After the printer body is removed, it is necessary to remove some internal parts of the printer. First, you need to remove the paper feed sensor. We will need it later, so do not damage it when removing it.

Then, it is necessary to remove the central pressure rollers, because they may interfere with the feeding of the PCB. In principle, the side rollers can also be removed.

Finally, you need to remove the print head cleaning mechanism. The mechanism is held on by latches and can be removed very easily, but when removing, be very careful, because different tubes fit to it.


The printer disassembly is complete. Now let's start "lifting" it.
Step 3: Removing the print head platform
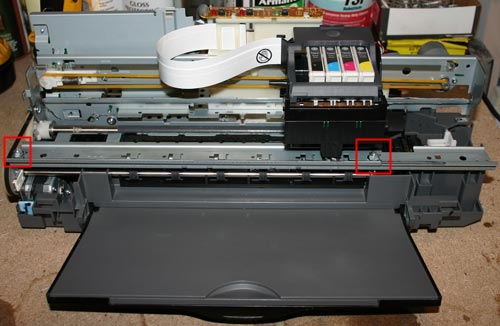
We begin the process of upgrading the printer. The work requires accuracy and the use of protective equipment (you need to protect your eyes!).
First you need to unscrew the rail, which is fastened with two bolts (see photo above). Unscrewed? We put it aside; we will need it later.

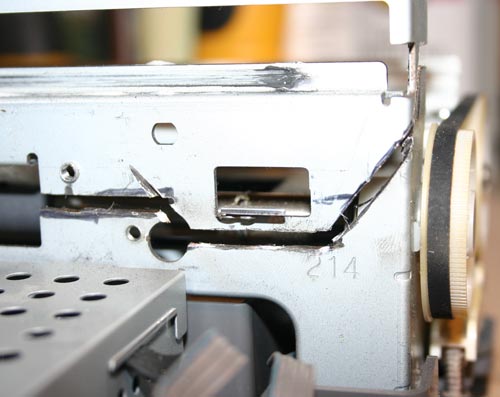
Now notice the 2 bolts near the head cleaning mechanism. We also unscrew them. However, on the left side it is done a little differently; there you can cut off the fastenings.
To remove the entire platform with the head, first, carefully inspect everything and mark with a marker the places where you will need to cut the metal. And then carefully cut the metal with a hand grinder (Dremel, etc.)


Step 4: Clean the print head
This step is optional, but since you have completely disassembled the printer, it is better to clean the print head right away. Moreover, there is nothing complicated about it. For this purpose I used regular ear sticks and glass cleaner.

Step 5: Install the print head platform. Part 1
After everything has been disassembled and cleaned, it is time to assemble the printer, taking into account the required clearance for printing on the PCB. Or, as jeepers say, “lifting” (i.e. lifting). The amount of lifting depends entirely on the material you are going to print on. In my modification of the printer, I planned to use a steel material feeder with a PCB attached to it. The thickness of the platform for supplying material (steel) was 1.5 mm, the thickness of the foil PCB, from which I usually made boards, was also 1.5 mm. However, I decided that the head should not press the material too much, and therefore I chose a gap size of about 9 mm. Moreover, sometimes I print on double-sided PCB, which is slightly thicker than single-sided.

To make it easier for me to control the level of lift, I decided to use washers and nuts, the thickness of which I measured with a caliper. I also bought some long bolts and nuts for them. I started with the front feed system.
Step 6: Install the print head platform. Part 2

Before installing the print head platform, it is necessary to make small jumpers. I made them from corners that I sawed into 2 parts (see photo above). You can of course make them yourself.


Afterwards, I marked the holes for drilling in the printer. The bottom holes are very easy to mark and drill. Then, I immediately screwed the brackets into place.

The next step is to mark and drill the upper holes in the platform; this is somewhat more difficult to do, because everything should be on the same level. To do this, I placed a pair of nuts in the places where the platform joins the base of the printer. Using a level, make sure the platform is level. We mark the holes, drill and tighten with bolts.


Step 7. "Lifting" the print head cleaning mechanism
When the printer finishes printing, the head is “parked” in the head cleaning mechanism, where the head nozzles are cleaned to prevent them from drying out and clogging. This mechanism also needs to be raised a little.

I secured this mechanism using two corners (see photo above).
Step 8: Feed System
At this stage, we will consider the process of manufacturing the feed system and installing the material feed sensor.

When designing the feed system, the first challenge was installing the material feed sensor. Without this sensor the printer would not function, but where and how to install it? When paper passes through the printer, this sensor tells the printer controller when the beginning of the paper has passed and based on this data the printer calculates the exact position of the paper. The feed sensor is a conventional photosensor with an emitting diode. When paper passes (in our case, material), the beam in the sensor is interrupted.
For the sensor and feed system, I decided to make a platform out of plywood.

As you can see in the photo above, I glued several layers of plywood together in order to make the feed flush with the printer. In the far corner of the platform I attached a feed sensor through which the material will flow. I made a small cutout in the plywood to insert the sensor.


The next task was the need to make guides. To do this, I used aluminum corners, which I glued to the plywood. It is important that all angles are clearly 90 degrees and the guides are strictly parallel to each other. As the feed material, I used an aluminum sheet on which the copper-plated PCB will be placed and fixed for printing.


I made the material supply sheet from an aluminum sheet. I tried to make the sheet size approximately equal to A4 format. After reading a little on the Internet about the operation of the paper feed sensor and the printer in general, I found out that for the printer to work correctly, it is necessary to make a small cutout in the corner of the material feed sheet so that the sensor is triggered a little later than the feed rollers begin to spin. The length of the cutout was about 90mm.

After everything was done, I attached a regular sheet of paper to the feed sheet, installed all the drivers on the computer and made a test print on a regular sheet.
Step 9. Filling the ink cartridge

The last part of the printer modification is dedicated to ink. Regular Epson ink is not resistant to the chemical processes that occur during etching of a printed circuit board. Therefore, you need special ink, they are called Mis Pro yellow ink. However, this ink may not be suitable for other printers (non-Epson), because... other types of printheads may be used there (Epson uses a piezoelectric printhead). The online store inksupply.com offers delivery to Russia.

In addition to ink, I bought new cartridges, although of course you can use old ones if you wash them well. Naturally, to refill the cartridges you will also need a regular syringe. Also, I bought a special device for resetting printer cartridges (blue in the photo).
Step 10. Tests

Now let's move on to printing tests. In the design program, I made several blanks for printing, with tracks of different thicknesses.


You can evaluate the quality of printing from the photographs above. And below is a video of printing:
Step 11: Etching
For etching boards manufactured using this method, only a ferric chloride solution is suitable. Other etching methods (copper sulfate, hydrochloric acid, etc.) may corrode Mis Pro yellow ink. When etching with ferric chloride, it is better to heat the printed circuit board using a heat gun, this speeds up the etching process, etc. Less “eating” of the ink layer.

The heating temperature, proportions and duration of etching are selected experimentally.
Reusing equipment, objects, decorations, things is far from a sign of limited funds. Rather, it is an opportunity to show skill, intelligence and prevent the occurrence of waste. Equipment such as scanners, inkjet and laser printers do not wear out very quickly, but they become obsolete soon. This means there is no way to find parts for repair.
Numerous forums will tell you what to do with such devices.
What will we talk about:
Product details
As a rule, only one element in a scanner or laser printer becomes unusable, while the rest of the parts are quite usable. The most valuable in this sense are MFPs and matrix devices. When disassembling the latter with your own hands, you can get a lot of valuable parts.
- Fasteners - screws, nuts, gears, bolts and other small items. For the home craftsman, any fastener is useful, since sometimes the lack of elements of the required diameter makes work very difficult.
- The most valuable part in any type of printer is the guide, made of hardened steel. In many Chinese and Korean devices, the guide is made of cheap alloy and bends even under the weight of the drive belt. Inkjet devices from Canon or Epson use steel. This part is used in the construction of CNC machines or homemade printing devices.
- The head sliding unit - in inkjet devices it is plastic and is only suitable for CNC engravers, but in matrix engravers a bronze bushing is pressed into the unit, so the part can be used on metalworking home machines.
- If you intend to install a printing device, a Canon cartridge is the best option.

- A toothed drive belt is a universal element suitable for any device where it is necessary to transmit force from a stepper motor to a platform. And the belt sliding assembly can be found in MFPs and scanners and even old copiers from Epson.
- Stepper motor – provides the movement of the paper. On older dot matrix and laser devices they are more powerful, however, and the parts of inkjet printers can be used effectively. In addition, the engine along with the controller and driver can be removed from the old machine.
- Limit switches – provide control over paper quality. A necessary part for a homemade printing device or machine.

What can be done from an old printer
An old printer can be modified and used for several other purposes. In this case, you will also need ingenuity and skill, but the result is sometimes very interesting.
What can be done from a Canon or Epson device, and judging by the reviews, this is the most suitable line of MFPs and scanners for modification? Device for printing on thick materials. The basis is most often an old inkjet printer.

- Remove the front tray, input tray, side panels and housing. Remove the paper feed sensor but keep it.
- Remove the pressure and central roller, as well as the head cleaning mechanism.
- The platform with the head can only be removed by cutting it using a hand grinder. For such work you need to wear protective goggles and a respirator.
- The print head is cleaned.
- Then washers and nuts are used to adjust the required gap width. Most often, an old printer is used for printing on textolites, thin sheets of plywood and similar materials. The head cleaning mechanism is then installed on the corners.
- The material supply sensor is a photosensor with an emitting diode. For it and the feeding system, a platform of appropriate size is cut out of plywood. Aluminum corners are mounted as guides for the PCB. The feed sheet is also made of aluminum.
The cartridge is filled with special ink.
The photo shows a modified old printer.

Wind generator from an electric motor
What else can you do with your old printer? A wind generator that converts wind power into electricity. Such a device may well provide for household needs. In essence, this is not the use of the entire device, but only parts. Stepper motors from a laser device or MFP are preferable.

- The old printer is disassembled to remove the stepper motor.
- Assemble the rectifier: 2 diodes are required for each of the 4 phases.
- The blades are made from PVC pipe - this makes it easier to select the desired degree of curvature.
- The bushing with slate is machined to fit the shaft.
- The sleeve is placed on the shaft, secured, and the blades are fixed to the flange. It is important to balance the composition.
- The motor is inserted into a piece of pipe where it is secured with bolts. A duralumin weather vane is fixed to the pipe from the end. The entire structure is supported by a vertical pipe.
The video demonstrates how to assemble a wind generator yourself.
The opportunities that 3D technologies open up for users are so attractive that many have long been wondering whether it is possible to create such an interesting device as a 3D printer with their own hands.
Considering that this technology is relatively new and the equipment that uses it is still quite expensive and not available to most ordinary people, the opportunity to get an affordable 3D printer, at least one assembled from available modules yourself and costing much less than products from companies and firms, is of interest to many. And this dream is completely achievable!
How to make a 3D printer with your own hands?
This idea can be realized by contacting intermediaries offering such modules from global manufacturers. However, as practice shows, this option is unprofitable. Intermediaries are so interested in maintaining only their own benefit, and their needs are so high that the cost of such a printer will not be lower than a ready-made one.
But if you pay attention to Chinese companies that strive to conquer any promising market with products that are in demand, but at affordable prices, then the decision to assemble a 3D printer with your own hands will turn out to be not only correct, but also actually feasible.
Having decided on the manufacturer of modules for assembling a 3D printer with your own hands, you need one more important element - an assembly diagram. And here a big role is played by what tasks the assembled mechanism will face, what is required of it and what method of 3D printing technology will need to be used in its operation.
Today, the Internet offers a large number of different schemes and recommendations for assembly. The easiest way to assemble a 3D printer model is the drawings of which are accessible and understandable.
So, based on the electronic support RAMPS 1.4, five Nema17 stepper motors, two meters of t2.5 belt drive and using the MK2a heating pad with Lm8uu bearings in the amount of 12 pieces, you can become the owner of a completely cost-effective 3D printer assembled with your own hands for only 13 thousand rubles
And this is just one example.
DIY 3D inkjet printer
Another option for obtaining equipment in the form of a 3D printer assembled by yourself is to use an old inkjet machine, which in itself is quite affordable, and when converted for 3D printing it becomes simply priceless for quite affordable money.
Many people have probably encountered difficulties related to the pointlessness of repairing an outdated inkjet and the inability to simply throw it away. But the opportunity to use its elements in a new design, providing this printer with a second life, will probably become quite interesting.
As a supplier of the required critical elements to create a 3D printer from an inkjet, such a machine is simply invaluable.
Among the useful and necessary elements for creating a 3D printer with your own hands will be:
- guide;
- the unit along which the print head moves;
- toothed belt for drive;
- motors for feeding paper and moving the print head, their drivers and controllers;
- limit switches.
Moreover, all these elements are only part of the necessary and important mechanical and electromechanical modules of the old printer for creating a 3D printer yourself.
Popular DIY 3D printers
Today, many have already tried their hand at assembling 3D printers with their own hands, and on the Internet you can find reviews and ratings of the most popular models.
Thus, among the options collected with one’s own hands, the leaders are:
- eprap 3d printer assembled with your own hands and approved by the majority of today’s “Kulibins” for its practicality and efficiency in performing tasks;
- 3d printer on arduino with your own hands, which is quite affordable at a price for almost everyone who has the desire, time and some knowledge in electronics to independently assemble such equipment.
BUDGET CNC, OR WHERE TO GO WITH THE OLD PRINTER.
Everyone who is involved with computer technology still has a lot of outdated, quite serviceable, and also faulty equipment. Dot matrix printers occupy a special place among this junk. Quite serviceable, and unnecessary. It can be a shame to throw away such a “treasure”. You look at it and wonder if it could be turned into something useful. One of the options for such a transformation was made by Yuri from Kharkov.
He kindly provided material about what he got out of it. So, let's see.
Guides, carriages with plain bearings,
stepper motors, timing belts and gears.
Using an aluminum corner, the frame of the future machine is assembled.
We screw the frame to a base made of chipboard or other suitable material.
The base must be rigid and heavy.
The Z coordinate is made from the remains of a 5-inch floppy drive
(guides and sliding bearings are used) and an aluminum corner.
The mechanics are ready. To revive the machine, you need a stepper motor controller.
It is also built using parts from old computers.
Checking the controller.
We check the mobility of the machine.
Attach the felt-tip pen and draw.
I want to try something more serious, so we attach the drimmel and try to mill... soap... quite a suitable material for trying out a pen. In the background you can see how the light bulbs work, serving as a “current generator” for stepper motors.
20.11.15
Any mechanisms break down over time. Quite often, having a considerable age, it is simply unprofitable. If earlier there was a question about the effective disposal of such devices, now it is more urgent to use them to create new convenient and useful devices. What can be done from a broken printer?
Additional income
A service for companies that use them as a source of spare parts for repairing broken office equipment. However, you can make money from this yourself. To do this, the printer must be sold not as a whole, but in parts. Of course, it is difficult to talk about any excess income, but the profit received will still be greater than when selling the entire device in a non-working state.
It is possible that in the near future, printers will be able to reproduce themselves. Thus, the existing 3D device called “Mendel” is able to form almost all parts from thermoplastic for its own production.
Cabinet or drawer for needlework
A broken printer can make a nice cabinet or chest.
An even more interesting solution is to make a craft box out of it. To do this, the internal space of the device is divided into cells using plywood covered with fabric. Fabric pockets are made for necessary small items. You can glue a mirror to the back of the lid using liquid nails, and paint the body with paints.

Cache
A large printer can become a hiding place. To do this, all the electronic filling is removed from it, and a plywood or wire frame is placed inside. The top is covered with fabric. You can store books, personal items and even coiled wires in the cache.
Bar
A similar solution is to use a printer as a bar. At the same time, its internal upholstery should be soft, and lighting can be provided in the body for convenience. Such a bar is at least capable of surprising with its originality.
Bread box or first aid kit
The printer body can be used as a bread bin. To do this, a plywood box is placed inside. It is necessary to provide in advance the possibility of removing it through the top or front panel for cleaning. A similar design can also be used as a first aid kit.

Organizer
Some printers are sized to accommodate horizontal or vertical partitions, between which folders with documents can be neatly placed. To do this, you need to remove all walls, protrusions and fasteners from its interior. Sometimes it is necessary to additionally saw off the front panel. The most important elements in this case are the back and side walls, bottom, panels for receiving and feeding paper.
Wind generator
A low-power wind generator can be made from a printer stepper motor. The first step is to assemble the rectifier. To do this, two diodes are used for each of the four motor phases. The output voltage is stabilized using a capacitor and a voltage regulator. Blades 20-25 cm long are cut from PVC pipe and attached to the shaft. The tail can be made from any lightweight material. The power of such a device depends on the strength of the wind. The wind generator is quite suitable for domestic use. You can use it to charge your camera or phone batteries.

Manufacturing of boards
From an old inkjet printer you can make a device for printing on PCB. This task requires specific knowledge, so specialists in the field of radio electronics can do it. According to them, Epson C80 family models are best suited for this purpose.
Models of cars and motorcycles
The most original way to use broken office equipment was found by Spanish designer Enrique Conde. He creates models of motorcycles, helicopters and cars from them, striking in their effectiveness and realism. This hobby is closer to art and requires certain skills.

So, broken printers are good for more than just ending up in a landfill. With certain changes and modifications, they can continue to benefit their owners.


 for use at low temperatures and a solution based on it")


