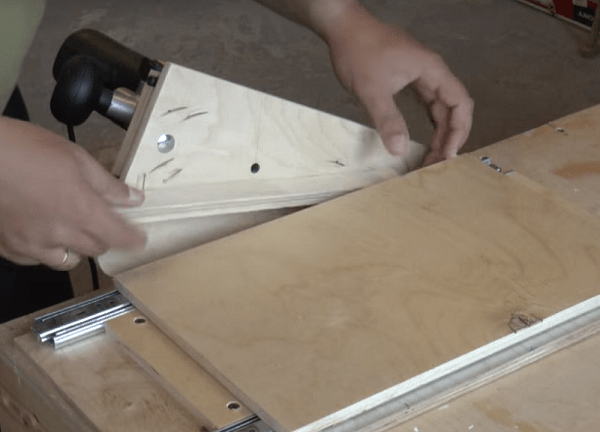
A template for a rectangular shape can be made easily using wide strips of MDF and milling machine on which a copy sleeve and a straight cutter are installed. The photo shows an example of how you can make a template for a photo frame. The dimensions of the frame will depend on the size of the printed photo for which the template is being made.
Copy sleeve in rectangular templates.
 Check the diameter of the copy sleeve installed, the diameter and calculate the offset. Now draw the lines of the first rectangle, according to the size of the photo. Around this first rectangle, draw a second larger one, creating an offset on all sides of the guide sleeve/cutter. The calculation formula is presented below in the article, in our case, if you use a 30 mm copy sleeve with a 10 mm cutter, the offset will be 10 mm. Next, draw a third rectangle, around the second rectangle, and again create an offset. When milling, slats of the same thickness as chipboard are used and they are fixed to the workpiece, which will prevent the router from tilting. Using screws or double-sided tape, secure the four slats to create an outer rectangle and cut clockwise inside the rectangle. The outside shape of the template can be made in a similar way, but it is easier to simply cut off the edges circular saw and rounded the corners with sandpaper. The diagram on the right shows a rectangle layout.
Copy sleeve and cutter offset, simple formula.
 The main thing that the copy sleeve pays attention to is that the cutter cuts at a certain distance from the outer edge of the copy sleeve. This distance depends on the diameter of the sleeve and the diameter of the cutter and is called “offset”. With some standard panels, such as the pattern on kitchen countertops, you won't have to worry about calculating the offset; you simply use a jig with pre-made dimensions for the router, router bit, and coping sleeve. When using your own templates, the offset must be calculated and taken into account in the design. Let's consider a simple formula for calculating the displacement, in our own words, then: (outer diameter of the guide bushing - diameter of the cutter)/2. For example, the copy sleeve has a diameter of 30 mm, and the cutter has a diameter of 10 mm, then we obtain the displacement according to the formula (30-10)/2 = 10 mm. If you still haven't figured it out, the easiest way to figure it out is to install the router bit and guide sleeve on your router, make a straight cut along the straight edge of the fence, and measure the distance from the edge of the cut to the straight edge of the fence. The figure shows a diagram illustrating the above calculation.
A router with a guide bush always produces excellent end results. A guide or copy sleeve is a fairly simple tool for a router; their use opens up a whole world of possibilities for the tool. After the guide sleeve is installed on the router, we mill tenons, grooves, and you can even make any artistic pattern. Many industrial cutter sets can be used with copy bushings. Bushings are usually made of brass or steel and have different internal diameters, so they can use different sizes of cutters. Using different devices you will find large number ways to use a guide bushing for a router in a workshop, for example (main photo above).
Regardless of differences in size and design, all guide bushings operate the same. They have a hole in the center that allows you to insert cutters, as shown in the photo to the left. The bushings consist of two parts: the base and the nut. The base is a bolt with a hole in the center for a cutter, a thrust ring and a thread for a clamping nut. The nut also has a hole in the center. As can be seen from the figure, the base is located on the outer surface of the router base. The nut threads onto the inside of the router base to secure the bushing in place.
Guide the installation of any bushing with a tight-tolerance metal rod and you can be assured of accurate alignment.
Buying a bushing.
The bushings are usually made of brass or steel. Honestly, I don't think one material has a huge advantage over the other. A router with a brass guide bushing is less likely to damage the router bit. Let's take a closer look at the type of brass bushing. Many steel guide bushings are stamped and do not have much precision, so they can result in inaccurate milling. Brass bushings can be shifted in order to correctly position themselves at the base of the router and coordinate the position of the bushing with the center of the cutter. This is important and always gives accurate results; such a bushing solves the problem of centering on the base of any router model.
A router with a guide bushing is required in templates where dovetail cutters are used. The jig kit often already includes the correct guide sleeve for use.
Often, the manufacturer of template rulers such as dovetail grooves will do the work of selecting the correct ruler and guide sleeve (photo on the left). If you want to use your own tools that use bushings, then match the two diameters, cutters and bushings before using them. As a rule, when routing for the first time, I choose a slightly smaller cutter. This provides the necessary margin, for example inside the groove, during preliminary milling. If you use the router as a slotting device, then you must take into account the size of the offset on both sides of the groove; when milling one edge, you need to take into account the offset on only one side. will always open up new possibilities and I think you will agree that guide bushings are in a great way do it. They just require a little skill in setting up to make precise connections.
The right tools and accessories can add even more value to your router.
In the workshop of every woodworker - regardless of skill level - there should be at least one router. This versatile tool works tirelessly to profile edges, make joints (everything from simple mortises to dovetails), and select recesses for inserts (such as inlays) that adorn the piece. The right attachments and accessories can further enhance the value of this machine. Here are six top-priority additions that will increase the functionality of your router. You will find an even larger number of devices, tips, plans and videos for working with a router in the WOOD-Master magazine. Two free videos on setting up and using the dovetail jig and tips for getting the most out of your router table, .
 1. BUSHING THAT GUIDES
By installing a guide sleeve into the opening of your router's sole, you can use it to rout along a guide or template, resulting in perfect parts. Since this machining method uses a simple slot cutter that does not have a bearing, you can even plunge the cutter into the material in the middle of the workpiece.
2. ADVANTAGES OF THE SUBMERSIBLE BASE

Fixed base routers generally cost less than plunge routers and can still handle most of the routing work in your shop. But many fixed base routers can also be purchased as part of a kit that includes a plunge base. This will allow you to start and end the pass in the middle of the workpiece. An example of such operations are flutes and blind grooves, as well as recesses in carved signs made using a router. The electric motor can easily be moved from one base to another, which provides the versatility of two routers at a price slightly higher than the cost of one device. In addition to this, you can mount a fixed base into the router table; To switch to manual milling, it will be enough to move the motor into the submersible base.
3. MILLING TABLE - CONTROL OVER THE SITUATION

Mounting the router upside down on the router table allows for much greater control over the workpiece and the machining process, especially when working with workpieces that are too small to hold by hand. Whether you buy an industrial milling table or build one yourself, the main requirements for it should be a perfectly flat working surface, a precise adjustable longitudinal stop and an efficient connection to the dust removal system. In addition to these basic requirements, also pay attention to the reliability of the switch for starting and stopping the router and the comb clamps, which provide complete control over the workpiece.
4. DEVICE FOR MILLING PERFECTLY PRECISION SLOTS

This device will allow you to mill grooves in the cabinet walls that perfectly match the thickness of the shelves. You don't need special cutters to work with it - it is designed to work with a regular groove cutter and a copy sleeve (we used a sleeve with a diameter of 25 mm and a cutter with a diameter of 12 mm). To begin, select a fold 10 mm wide and 10 mm deep on the inner edges of both guides (A). After this, assemble the device, guided by rice. 1. To adapt the guides to work with a cutter and bushing of other diameters, use them to reduce the width of the folds in the guides. The remaining tab will fit exactly with your cutter/bush combination. To adjust the jig to the required groove width, slide it onto the shelf as shown in rice. 2. Press the guides (A) firmly against the workpiece and tighten the wing nuts. Remove the fixture from the shelf and attach it with clamps to the workpiece in which you want to make a groove, aligning the gap between the guides (A) with the groove marking lines on the workpiece. Having installed the router on the guides, adjust the offset of the cutter. Make a first pass along one of the guides and then a second pass along the opposite guide.


You can find a detailed description of the manufacture of this device and the cutter storage system.
5. “DOVETAIL”: THE MACHINE WILL RELIEF FROM HEADACHES
 Dovetail joints have long been considered hallmark quality carpentry work. With an accurate, easy-to-use open dovetail tool, you can earn a reputation without years of practice. Some jigs allow you to expand your repertoire to include dovetails with variable tenon spacing (for a handcrafted appearance), as well as semi-concealed dovetails, sliding dovetails, and even straight box tenons, for why additional templates are used, included in the kit or purchased separately.
6. STORAGE OF CUTTERS: ADD AS NEEDED
 This modular bit storage system fits into any drawer and easily expands as your bit collection grows. The selected square sizes, which are related to each other as 1:2:3, increase the number possible options placement of cutters. As you can see in the photo, there is also space for wrenches, copying sleeves, and there is also one large square with holes for storing drill bits. To make your modular storage system, cut 19mm thick MDF board lengthwise and then crosswise into 32mm, 64mm and 96mm squares. In the center of each square, drill a hole with a diameter slightly larger than that of the cutter shank - this will make it easier to remove the cutter from the socket: for cutters with 8 and 12 mm shanks - 8.5 and 13 mm in diameter, for drill attachments with 3/32" shanks and 1/8” - 2.8 mm and 3.6 mm, respectively. Dip the squares in an oil-varnish mixture, such as Danish oil, and then, after removing excess product with a cloth, place them to dry on a mosquito net laid on sawhorses. When the coating is dry, place the squares in drawer. To fill the excess space, use tightly fitted strips of 6 mm thick hardboard, and use the resulting trays to store various accessories.

The use of various devices for hand router significantly expands the capabilities of this unit, and also increases the comfort and safety when working with it. There are ready-made models of devices on sale that are designed for use in conjunction with a router, but, as a rule, they are expensive. Therefore, many craftsmen prefer to make accessories for this unit with their own hands.
If you attach a hand router in a special way under the table, you will get a universal carpentry machine that allows you to accurately and quickly process long and short pieces of wood. To make a table for a router with your own hands, you first need to prepare the necessary parts to assemble the entire structure. The figure below shows a cutting map on which all the details of the future milling table are located. They are cut using a circular saw or format cutting machine.
The device can be made made of plywood, chipboard or MDF. The cutting card indicates a material thickness of 19 mm, but this is not a prerequisite. The table can also be assembled from slabs with a thickness of 16 or 18 mm. Of course, to make a countertop it is better to use laminated or plastic-coated sheet materials, which will allow the workpiece to easily slide across the surface.
It should also be noted that this homemade table is intended for installation on trestles. If you need a tabletop option, then the drawers (5) need to be made much wider than 150 mm. Their width should be slightly larger than the height of the device so that it can fit under the countertop.
If the table parts are cut from plywood or MDF, then their ends should be sanded. The ends of parts made from laminated chipboard will need to be covered with a melamine edge using an ordinary iron.
Making a countertop
Installation of the router into the table can be done either with or without the use of a mounting plate. Preparing the countertop for direct mounting the unit is connected to it as follows.
- Since the main slab is 900mm long, its center will be 450mm from the edge. Place a dot in this place and use a square to draw a line.
- Remove the plastic pad from the base of the device.
- Find the middle of the cut on the overlay and draw a line through the center of the sole using a square.
- Place the overlay on the center line of the main plate so that the center of the sole coincides with it, and mark the center of the future hole in the tabletop with a pencil.

- Next, you should make markings for the mounting screws.

- Drill holes through which the unit will be attached to the table. Be sure to countersink them so that the screw heads are slightly recessed into the tabletop.
- Drill a 38mm diameter center hole.
- The next step is make a parallel emphasis. Using a jigsaw or router, make semicircular cuts on the front wall of the stop, as well as on its base.
- Screw the gussets to the stops. Below is a drawing that shows all the indentations for placing gussets.

- Screw the connecting strips to the bottom of the tabletop.

- Assemble the milling machine using the diagram provided below.

Mounting the unit using a mounting plate
When installing the device on the main plate, its thickness significantly reduces the overhang of the cutter. Therefore, to install the unit on thick countertops, it is customary to use thinner mounting plates made of durable materials (steel, duralumin, polycarbonate, getinax or fiberglass). The plate is made as follows.
- From a sheet, for example, textolite, cut a square blank 300 x 300 mm.
- Attach the plastic pad removed from the router base to the top of the plate.
- Select a drill bit that matches the diameter of the mounting screws and drill holes in the plate using the plastic trim as a template.

- Place the plate on the tabletop and trace it with a pencil. After this, inside the resulting outline, draw a square with cut corners, as shown in the following figure.

- This figure with beveled corners must be cut out with a jigsaw, having previously drilled a hole in it for the saw to enter.
- After cutting out the inner part around the outer contour, you should secure the strips using clamps. They will serve template for rolling cutter. The thickness of the strips must be sufficient so that when setting the processing depth, the thrust bearing of the cutter is in the area of the edge of the guides.

- To mill the recess, secure a rolling cutter with an upper bearing in the collet of the unit.

- Set the processing depth. It should be equal to the thickness of the plate intended for mounting the unit.
- Mill this section of the tabletop according to the established template in several passes.
- Place the plate in the made recess. It should be flush with the surface of the main plate. If the plate protrudes a little, then add a little more immersion depth using a micrometer screw and make a second pass with the cutter.
- At the corners of the sample, mark and drill holes for fastening the plate.

- Place the mounting plate in the prepared seat and, holding it, turn the tabletop over. Then drill holes in the plate for fasteners. To hide the bolt heads, countersink holes on the face of the trim.
- Also, all holes on the back side of the tabletop intended for fastening the plate should be widened to accommodate self-locking nuts using a drill with a diameter of 11 mm. The nuts need to be placed in the resulting holes using epoxy glue (you can screw bolts into them for alignment).
Improvement of the stop
The parallel fence can be modified to make setting up the milling table more convenient and quick: to do this, you need to cut C-shaped guides into the tabletop. The profile can be made of aluminum. A straight groove cutter is used for tapping. The profile is placed in the prepared groove and screwed in place.


Next, you should select bolts with a hex head of such a size that it can fit into the C-shaped profile and not rotate in it. Drill 2 holes in the base of the rip fence to match the diameter of the bolt.

You should also cut a C-shaped profile into the front stop bar to attach various clamps and protective covers to it.

The stop is screwed to the tabletop using wing nuts.

On the back side of the stop you can make chamber for connecting a vacuum cleaner. To do this, just cut a square out of plywood, drill a hole in it for the vacuum cleaner pipe and screw the resulting cover to the gussets.

You can also add to the stop safety shield, made of MDF or laminated chipboard and a small rectangle of plexiglass. To select grooves, you can use a jigsaw or a router with a groove cutter installed.

To be able to process small parts, it is necessary to make clamps and clamps from plywood or MDF.

It is made on a circular saw with a pitch between cuts of 2 mm.

If desired, you can make a milling table with tool boxes.

Making the table base
If you need to make a stationary machine from a manual milling machine, then you cannot do without making a solid base. Below is a cutting map with the parts marked on it that will be required to assemble the table base. The dimensions of the parts will need to be adjusted if you use sheet material of a different thickness.


All parts of the table for a manual router are assembled using confirmations. To make it easier to move the table, rollers can be attached to its bottom. If you expand this table a little and attach a circular hand saw in its free part, you will get universal table for router and circular saw.

So that the machine occupies less space, it can be made according to the principle of a table-book with tabletops descending on both sides.

Homemade tools for a router
To expand the functionality of this unit, quite expensive accessories are available for sale. But in order to save money, owners of milling cutters try to make various devices with their own hands that work no worse than factory ones.
A simple tenon cutter for a router is made from two pieces of plywood and a pair of furniture telescopic guides. The milling cutter is installed on a platform that has a hole for the tool. The platform is attached to the workbench at an angle (for more convenient positioning of the equipment in height), as shown in the photo below.


So, the tenoning device is made in the following order.
- Cut 2 platforms of the same size from plywood. The size of the device can be any.
- Place two telescopic guides parallel to each other along the edges of the first platform and fasten them with screws.

- For more precise positioning of the guides, you can screw two strips of equal length between them.

- You should extend the counter strips and place a second platform under them flush with the first. Use a pencil to place points through the bar on the second site, and then draw a line through them.
- Remove the strikers from the guides by pressing on the plastic “antennae” located on their reverse side.
- Place the strikers on the marked area so that the line passes through the center of the mounting holes, and screw them in with screws.

- Carefully align the 2 guides and push them in (you should hear a click). If you insert a part askew, you will break the telescopes and balls will spill out of them.

- Between the vertical stop with the unit and the movable table it is necessary maintain a certain distance. This is done so that when lowering the cutter it does not touch the table platform. Since in this case the maximum overhang of the cutter will be about 25 mm, you can temporarily lay a bar of the same width, that is, 25 mm, between the table and the stop. The bar will allow you to place the structure parallel to the vertical stop
 .
. - At the next stage, holding the fixture, drill 2 holes for the dowels. They will allow you to quickly position the tenoner on the workbench. When the holes are ready, insert a couple of dowels into them. Now you can remove the bar placed between the stop and the device.

- Now that the movable table is fixed, a vertical stop must be installed on its upper platform, as shown in the following figure. For rigidity, the stop is supported by two gussets.

- When all tenoning elements are secured, testing can begin. Place the workpiece on the fixture table and press it against the stop. Set the required cutter height, turn on the unit and mill the workpiece.

- After the first pass, turn the workpiece 180 degrees and repeat the processing.

- Rotate the workpiece 90 degrees, placing it on the edge, and repeat the operation again.

- Rotate the part 180 degrees and draw final processing thorn.

As a result, you will get an even and high-quality tenon.

By changing the height of the cutter relative to the tenoning platform, you can obtain tenons of various thicknesses.
Copy sleeve
If your router did not come with a copy sleeve, then you can make one in literally 30 minutes using improvised materials. For homemade products you will need a metal or duralumin washer, which can be made from sheet metal, and a plumbing threaded extension.

The copy sleeve is made in the following way.
- Select a nut that fits the threads of the extension and cut it with a grinder so that you get a thin ring. After this, straighten it on the sharpening machine.

- It is necessary to make a round platform for the sleeve from sheet metal or aluminum 2 mm thick. Depending on the model of the unit, the hole in its base may have different shape
. In this case, the platform must have cuts on the sides, which are ground off on a sharpening machine.

- After sanding off the washer on both sides, place it on the sole of the unit.

- Place the unit vertically without removing the washer and mark with a pencil the places for fastening through the holes in the base of the unit.

- The places marked with a pencil must be marked for precise positioning of the drill.


- First, drill the holes with a thin drill bit, and then with a drill bit that matches the diameter of the mounting bolt.


- Place the washer on the threaded extension and tighten the ring nut. Clamp the part in a vice and trim the excess thread flush with the nut using a grinder.


- Clamp the part in a vice with the other side and shorten it slightly.

- Align the part on the grinding wheel, insert it into the base of the device and secure it with screws. The ring nut should be slightly below the base of the unit.


Guides for working with a router
If you need to select a very long groove in the workpiece, you will need a tool for the router, which is called a tire. Ready-made metal tires can be purchased in specialized stores. But they are also easy to make with your own hands from plastic, plywood or MDF.
The thickness of the material should be about 10 mm so that the parts can be tightened with screws.
The guide for the unit is very simple to make.
- Cut three strips on a circular saw. One wide, about 200 mm, and 2 narrow ones - 140 and 40 mm each.
- Also make a small strip from the same material, about 300 mm long and 20 mm wide.
- Place a 140 mm wide piece on a wide strip, align it along the edge and screw both pieces together with screws.
- Place a narrow strip 40 mm wide on top of the wide strip, opposite the screwed part. For precise positioning, place a 20 mm wide strip between the upper parts and screw the narrow strip to the lower part with screws. Thus, you will get a long tire with a groove 20 mm wide.
- Take a 20 mm wide strip and screw it to the base of the device, as shown in the following photo. To select a groove, select straight or shaped groove cutter and is fixed in the collet of the device.

When all the fixtures are prepared, follow these steps. Place the workpiece that needs to be processed along its entire length on the workbench, place the tire on it, securing it with clamps. Insert the strip attached to the router base into the groove of the guide. Start the machine and mill the workpiece along its entire length.
If you need to select a deep groove, then processing occurs in several passes so that the equipment is immersed into the workpiece gradually.


Accessories for a hand router can expand the functionality of hand-held power tools and make their use more convenient, comfortable and safe. Serial models of such devices are quite expensive, but you can save on their purchase and make devices for equipping a wood router with your own hands.
Various types of attachments can turn a hand router into a truly universal tool.
The main task that milling tools solve is to ensure that the tool is positioned in relation to the surface being machined in the required spatial position. Some of the most commonly used milling machine attachments come standard with milling machines. Those models that have a highly specialized purpose are purchased separately or made by hand. At the same time, many devices for a wood router have such a design that making them yourself does not present any special problems. For homemade devices for a hand router, you don’t even need drawings - their drawings will be enough.
Among the accessories for a wood router that you can make yourself, there are a number of popular models. Let's take a closer look at them.
Rip fence for straight and curved cuts
It is possible to ensure the stability of the router when processing narrow surfaces without special devices. This problem is solved using two boards, which are attached to both sides of the workpiece in such a way as to form one plane with the surface on which the groove is made. When using this technological technique, the router itself is positioned using a parallel stop.


