Among the New Year's decor, which can be easily made from ordinary office paper, it is necessary to mention voluminous icicles.
Paper icicles are made quickly and look very impressive, especially if you add a small tassel of yarn and a few bright beads to them.
For the craft you will need:
- 2 squares of office colored paper 9*9 cm;
- lace or threads for knitting;
- 3 beads for decoration;
- scissors;
- gypsy needle.
How to make an icicle out of paper:

- On a square sheet, use folds to mark both middle and two diagonal lines.
- We connect the halves of the horizontal line, the figure turns into a triangle of several layers along the edges.
- In origami, such a basic figure is called a “water bomb”.
- Raise the first layer of the triangle on the right side.

- We combine the line that was the side with the vertical line emanating from the vertex of the triangle. Smooth out the folds.
- Bend the left side of the resulting quadrilateral to the right. Raise the top layer of the triangle on the left side.
- We repeat point 5.
- We turn the figure over to the other side and lift up the right side of the triangle.

- We repeat point 5.
- Repeat step 5 for the last (left) side of the triangle.
- We make the second half of the icicle in the same way.
- Now we make the suspension. Insert a piece of cord or knitting thread folded in half into a gypsy needle.

- We pierce the upper part of the icicle in the middle, bringing the needle out from the inside. We remove the needle - a loop remains. We tie a thick knot at the ends from the inside out - such that it does not slip through the hole.
- For the tassel, wrap 7 circles of thread around three folded fingers.
- We cut the resulting skein in two places and tie it with another thread in the middle.
- We put all the threads of the brush together and under the knot we wind several turns of another thread, which we secure with a knot and hide the ends under the turns. We trim the brush with scissors.

- We thread both ends of the thread on which the brush is held into a needle, and string 3 beads on them.
- Now we puncture the second half of the paper icicle in the center from the outside, bringing the needle inward.
- Closer to the paper, tighten a thick knot and trim off the excess thread.
- We insert both halves of the icicle into each other. This requires accuracy and slowness. Each long, sharp part of the icicle should lie under the short triangle-pocket of the other part. Refill parts sequentially.
For strength, I put a couple of drops of glue under the pockets. Otherwise, the weight of the beads could separate the paper structure.

Enjoy your preparations for the holidays!
Shared master class
Kononenko Anastasia
Dear friends, today I continue the theme of decorating windows for the New Year. I will share with you the stencils that I especially like. I'll tell you how to make New Year's drawings on windows using them. Let's talk about whether it is possible to change the dimensions of a template in Word and Excel and what to do if you don’t have a printer at home, but you need to transfer the image to paper.
And, of course, we’ll look at the most painstaking work - cutting. Its result directly affects the beauty of the New Year's window. Well, let's understand all the intricacies of New Year's paper drawings, which are also called vytynankas.
Stencils of New Year's drawings for paper windows
How do you like this winter fairy tale made from plain paper? The result is a wonderful composition. As you can see, it consists of several stencils: a forest clearing, deer, snowflakes, the moon and other little things.

I really like this New Year’s scene on the window, it’s simply mesmerizing.


And another stencil of the New Year's city.

If you make Santa Claus like this on a paper window, although he looks more like Santa Claus, it will be fun.

Here is another stencil of the main wizard of the New Year.

If you want to decorate a window with a drawing of Father Frost and the Snow Maiden, familiar to us from childhood, then take this template.

You can decorate the window with a New Year tree and a sleigh with gifts. Look how wonderful they are.


These patterns of festive balls, icicles and bells will look very elegant and gentle on the window.


I would like to present you with another template - this stencil, in my opinion, should turn out to be very interesting.

What do you think of this template? I think it will be the perfect New Year's drawing.


And, of course, what would it be without a Snowman and holiday candles. I think you will like these templates as much as I do.


New Year's stencils for windows made of paper
How to print
After you have decided on a template for a New Year's drawing, beginners may have a question: “How to print a New Year's stencil and how to make it larger if it turns out to be small.”
There's nothing complicated about it. I will offer you three options, and you give preference to the one that is convenient and easier for you.
Working in Word
In order to start working in Word, save the template you have chosen to your computer. Then open Word. Next, click “Insert” and “Drawing”. A window will appear in which you need to select your template.

As you can see, the drawing is small, it will be barely noticeable on the window. In Word you can stretch it to the size of a sheet. To do this, point the arrow at the picture and press the left mouse button. A frame will appear around it. By stretching it, the picture enlarges.
If the lines of your drawing come out pale, you can strengthen them. Again, move the arrow to the picture, press the left mouse button and when the frame appears, at the very top of the screen you will see the inscription “Format”. Click on it. We look for the word “Correction” in the same panel and click. A drop-down menu will open. In the “Sharpness Adjustment” section, select your template with an increase of 50%.

I've made the page smaller so you can see how I managed to stretch the image across the entire page.
Working in Excel
If you want to get a much larger picture, then you won't be able to do it without Excel. Let's go to this program. Just like in Word, click “Insert” and “Drawing”. In the window that appears, look for your template.

Move the arrow to the picture and click on the left mouse button. A frame will appear, with which you need to stretch the picture. In Excel, this can be done to very large scales, both downwards and to the side, only then the drawing will consist of several parts. The program itself will separate the drawing for printing. I got 8 sheets.

Translating the stencil using paper and pencil
If you don't have a printer at home, use the third method. By the way, it can be applied after working in Word and Excel, when the picture is enlarged.
We take any template that you like.
Point the arrow at the picture and press the right mouse button. A list appears from which you need to select “Open image”.

The image will open in a separate window. It will be small, but you can make it full screen. To do this, hold down the Ctrl button, and without releasing it, press “+” again until the picture fills the entire screen.

After this, take a blank sheet of paper and apply it to the screen. We arm ourselves with a pencil and redraw the picture. With the backlight from the monitor this will be easy to do.

How to cut paper stencils for windows
To cut out a stencil, you will need small scissors, a knife and some kind of wooden or plastic board so that the table does not get damaged while working with a sharp tool. The ideal knife for this is a wallpaper knife. It can be bought at any hardware store.
We cut out the main design with small scissors, but all the internal contours with a small knife. We do everything so that the black lines of the stencil are on the part that will be removed.
How to glue a paper stencil to a window
It seems that this is elementary, however, there are many but... Some glue with ordinary water or soapy water, while for others such stencils disappear. Why is this happening? It all depends on the window itself. If it is dry, then it is enough to moisten the stencil with a liquid soap composition or walk it over the glass and then stick it on. But the design will not always remain on glass that sweats. Therefore, to say: “Guys, stick like this and everything will be fine” is not entirely fair.
Each window requires an individual approach. It is necessary to take into account, as I already said, whether it is crying or not. What temperature is in the room - cold or warm - this also has an effect. Here everything is individual, as they say at random - it holds, it doesn’t hold. All I can offer you is to tell you about all the different methods used for gluing paper stencils. I think one of these versions will definitely suit you.
- Soap composition or simply rub with well-soaked laundry soap.
- Transparent tape, but it leaves an imprint on the glass.
- Diluted toothpaste, but not very rare.
- Kefir, as strange as it may seem, people use this drink too, but it will also cause stains on the window and if you have a cat, the decoration will not last long, as you understand.
- Flour paste, which is prepared on the basis of flour and water. The consistency should be like sour cream. But again, there is the issue of stains on the glass during washing in the spring.
- Starch paste is diluted starch.
- Dry glue stick.
- Another gluing option is with regular milk.
- Sugar syrup - boil and then glue.
- Prepare the gelatin liquid as usual, but add a little more water than indicated in the recipe.
- Double-sided tape, it is hardly noticeable on the glass, it can be easily removed, but then you need to carefully wash off the traces.
- Men's shaving cream, dissolve in a small amount of water. The composition should not be liquid.
As you can see, everyone sticks differently, so make a choice, try it and then you will know exactly which method suits you.
My article about New Year's drawings on windows was quite lengthy. I hope you liked the cutting stencils and that the master class was interesting and understandable for you. I wish everyone good luck and, of course, patience, because in order to prepare such templates you need fortitude and inspiration.
I wish everyone happiness, Natalia Murga
You can create a New Year's atmosphere with handmade items cut out of paper. They are called vytynanki, which means “clippings.” Here you can find silhouettes of New Year's heroes: Father Frost and Snow Maiden, snowmen, gnomes, various Christmas trees, balls and bells, snowflakes, snow-covered houses, figurines of deer and cute animals.
Today we offer you stencils for New Year's decorations of various themes. Let's be inspired by the actions of the masters and the finished works for decorating windows, Christmas trees, postcards, and the New Year's scene. The given templates can be easily printed on a sheet of white paper, cut out and pasted on the window with soapy water, or fixed in other corners of the New Year's interior.
With small cutouts you can decorate a window or create a composition on a windowsill or table; larger cutouts can be used to decorate walls in a room or on a stage.
These are the images you might end up with:


Stencils for the silhouette cutting of the Snow Maiden and Father Frost:


Choose your favorite stencil with the image of Grandfather Frost and his granddaughter. As a tool, you can use thin scissors, stationery knives, you will definitely need a backing board so as not to scratch the table.
Vytynanka Christmas tree
You can cut out the Christmas tree using a stencil as a silhouette, or you can make a symmetrical cutout by folding a sheet of paper in half. We make a standing Christmas tree in one of the following ways: glue two symmetrical Christmas trees onto an oval paper stand, or fold each Christmas tree in half and glue it together.


Snowflakes and ballerinas
Snowflakes are very different. Especially if the master uses all his imagination. So, you can cut out a symmetrical snowflake by folding the paper several times. Look what design was applied in the form of a stencil and what an unusual tip the snowflakes have.


Inside a snowflake there can be a completely independent composition. For example, a New Year's snowman or a snowy forest.


Snowflakes can take the form of light snow ballerinas. To do this, cut out the silhouette of a ballerina separately, put an openwork snowflake on it and hang it by a thread. It turns out to be a very delicate airy decoration.

Christmas balls
Christmas tree decorations can be cut out either in a symmetrical pattern or using an individual stencil. These decorations can be used to complement a composition on a window, decorate a Christmas tree, or attach them with threads to a chandelier or curtain.


Bells
We make carved bells using a stencil. If you glue translucent paper, for example, tracing paper, to the inside of the cutout, then such a bell can be used with a backlight effect.


Reindeer, sleigh, cart
Another fabulous New Year's hero is the deer. The delivery of the wizard Father Frost and the Snow Maiden is associated with it. We offer stencils for cutting out deer, carts and sleighs.


Snowmen
Charming good-natured Snowmen should definitely decorate the New Year's house. It’s easy to cut out their figures symmetrically, or you can make a “family photo of Snowmen” or a composition with a Christmas tree and children.


New Year numbers
You can cut out beautiful numbers for the coming New Year using these templates:


Beasts, signs and symbols
You can make a custom New Year's decoration. To do this, cut out paper silhouettes of your favorite pets, fairy tale and cartoon characters, birds and animals in a fabulous winter forest.


Cut out the figures of the sun and moon using stencils and complete your composition.


Snowy houses
It will be very cozy if there is a snow-covered house on the window in the New Year's picture. It could be a small hut or a whole palace.


Children
Who is looking forward to the New Year and Santa Claus the most? Well, of course, children! Using silhouette cuttings from paper, we make figures of children near the Christmas tree, with gifts, singing and dancing, in a word, we bring the true atmosphere of the holiday!


Candle
We offer options for vytynanok - candles. They can be independent or combined with balls, bells, branches and bows.


Nativity
For Christmas, you can cut out thematic patterns dedicated to the events and circumstances of this event. These can be silhouettes of Jerusalem, images of angels, shepherds and wise men. And don't forget about the Star of Bethlehem!


You can separately cut out the silhouette of the Star of Bethlehem:


The central place among the Christmas decorations should, of course, be given to the Nativity scene - the cave in which the Savior was born. The manger of the Divine Child is comfortably surrounded by hay and domestic animals.


Composition with lighting
With openwork paper cutouts you can decorate not only the window, but also create a three-dimensional panorama on the windowsill. It will be especially impressive if you put a garland or small lights inside the box.


Get involved in the design of New Year's decorations - made of paper with your children. This is not only useful for developing imagination and training fine motor skills, but will also give you a lot of pleasure from joint creativity, and then from contemplating the resulting beauty!
For cups for candles:
Two glass jars of different sizes
various lace ribbons 70 cm long
organza ribbon 70 cm long
satin ribbon 70 cm long
cotton cord 70 cm long
window film with “Deer” and “Squirrel” motifs
2 wooden snowflakes with a diameter of 3−4 cm
2 white wax beads with a diameter of 8 mm
white acrylic matte paint
Besides:
scissors scraper or flexible plastic spatula kebab sticks clear tapeFor snowflakes and icicles:

Ice-simulating structural gel paste in a tube
transparencies
Czech beads and cut glass beads with a diameter of 2−6 mm
artificial decorative sparkling ice crystals
thin silver thread or silver cord with a diameter of 1 mm
white organza ribbons 10 and 3 mm wide, 30 cm long
white satin ribbon 3 mm wide and 30 cm long
self-adhesive transparent faceted glass beads with a diameter of 8−10 mm
silver wire with a diameter of 0.25 mm
Besides:
scissors paint spatula drill 1 mm diameter drill bit hot glue gun darning needlefor free download
Step 1
Enlarge the motifs for snowflakes and icicles and secure them with tape on the back of the film.
For icicles, use a spatula to apply structural gel paste to the film, and apply it in an uneven layer, in places forming “piles” reminiscent of snowdrifts.

Scatter small beads and sparkling artificial ice crystals over the still soft gel paste.
Step 2
When applied, the gel paste has a milky color and, depending on the thickness of the layer, dries within 2-4 days. Once the gel paste has dried, the film can be removed.
After this, grease the icicles on the reverse side with gel paste and, as the first time, sprinkle with beads and sparkling ice crystals.
Step 3
When the icicle is completely dry, drill a hole with a diameter of 1 mm for hanging. Insert a thin wire into the hole and bend it into a small loop. Hang the icicle on a thin silver cord. Place a satin ribbon and two organza ribbons in the shape of a bow, tie with silver wire and hot glue to a loop for hanging.Step 4
Degrease glass jars. Measure the circumference of the cans and cut out a film with motifs 2 cm longer. Place the film around the can and stick it without folds. At the same time, press it with a squeegee or a flexible plastic spatula.
Tie the jars with various ribbons and lace, as shown in the photo, and additionally decorate them with wooden snowflakes. Place a candle in a jar or fill it with Christmas balls.
Step 5
The motif for the snowflake, as well as for the icicle, is fixed under the film.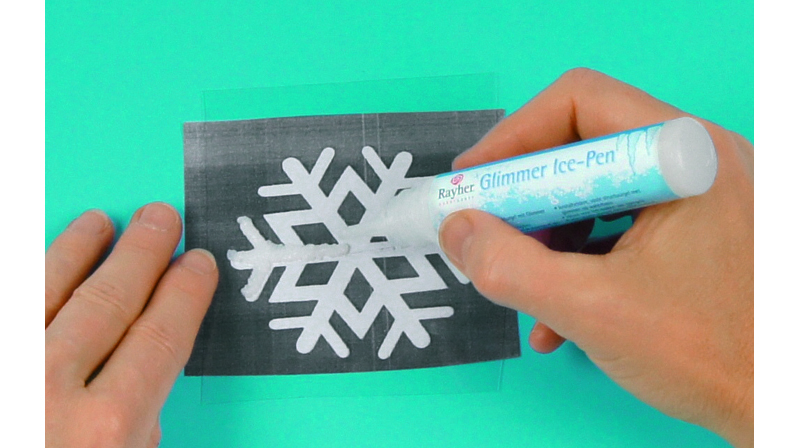
Squeeze the structural gel paste onto the film directly from the tube. In this case, hold the tip of the tube vertically, squeeze out the gel paste slowly and follow the contours of the motif with the lines of the gel paste. Thus, using lines of gel paste, alternately repeat each ray of the snowflake. In the middle, press a large cut glass bead into the gel paste.

After this, sprinkle the gel paste with a thin layer of sparkling ice, leave to dry for 1-2 days and finally carefully and slowly remove the film. Use a thick darning needle to make a hole and hang the snowflake on a thin silver thread.
Guys, we put our soul into the site. Thank you for that
that you are discovering this beauty. Thanks for the inspiration and the goosebumps.
Join us on Facebook And In contact with
Many people notice that the older they get, the more difficult it is to re-experience that magical feeling of a fairy tale and miracle that always came to us as children on New Year's Eve.
But we're in website We are sure that the New Year's mood will not keep you waiting if you make one of these wonderful decorations for your home and Christmas tree with your own hands. Almost all of them, with the exception of two or three, do not require much time and any special materials - they can be made in half an hour from what is at hand.
Stars made of threads
Wreath made of balloons and an old hanger
In just half an hour, you can make a colorful wreath by purchasing a couple of sets of inexpensive balloons. Blogger Jennifer, the author of this article, recommends straightening out an old hanger, but if you don't have one, a piece of strong wire will do just fine.
- You will need: a couple of sets of balls (20-25 balls of different colors and sizes), a wire hanger or wire, fir branches, braid or a ready-made decoration for decorating a wreath.
Tablecloth made of snowflakes
A delicate and surprisingly festive tablecloth will be made from snowflakes, which we have gotten our hands on since childhood. You can sit down and cut out snowflakes with the whole family, and then lay them out on the table and fasten them with small pieces of tape. A wonderful solution for entertaining guests or just having lunch with the family during the holidays.
Multi-colored hats
The cutest colored hats can be made from leftover yarn, which can be used to make a garland for a Christmas tree or to decorate a wall. Or hang them on a window or chandelier at different levels. Children over five years old will also be great at making this simple decoration. See details.
- You will need: a roll of toilet paper for rings (or regular cardboard or thick paper), scissors, colorful yarn and a good mood.
Lamp “Snowy City”
For this charming lamp, you need to measure a piece of paper around the circumference of the jar with a small margin (for gluing), draw and cut out a simple city or forest landscape. Wrap it around the jar and place a candle inside.
- You will need: a jar, thick paper of any color, maybe white, any candle. Another option is to cover the top of the jar with “falling snow” using a special “snow” spray, which is sold in hobby stores.
Balloons with photos
A great idea for decorating a Christmas tree or as a gift for relatives and friends. The photo needs to be rolled into a tube so that it fits into the hole of the ball, and then straightened out with a wooden stick or tweezers. Small black and white rectangular photographs are suitable, and you can also cut the photo according to the shape of a ball or silhouette (as in the case of a cat in the snow).
- You will need: plastic or glass balls, photographs, various things to fill the ball - tinsel, garlands, coarse salt (for snow).
New Year's lamps
And this miracle is a matter of five minutes. It is enough to collect balls, fir branches, cones and put them in a transparent vase (or a cute jar) and add glowing garlands.
Embers
Glowing garlands, hidden among cones, branches and pine paws, create the effect of smoldering coals in the fireplace or a cozy fire. They even seem to be heating up. For this purpose, a basket that has been lying on the balcony for a hundred years, a nice bucket or, for example, a wicker container for small items from Ikea will be suitable. You will find everything else (except for the garland, of course) in the park.
Floating candles
A very simple decoration for the New Year's table or for a cozy evening with friends during the New Year holidays - a composition with candles floating in a vessel with water, cranberries and pine branches. You can use cones, orange slices, fresh flowers and leaves from a flower shop - whatever your imagination tells you. And as a candlestick - deep plates, vases, jars, glasses, the main thing is that they are transparent.
Snowman on the refrigerator or door
Children will definitely be delighted with this - it’s fast, fun and very simple, because even a three-year-old can handle cutting out large parts. It is enough to cut out circles, a nose and a scarf from self-adhesive paper, wrapping paper or colored cardboard and attach them to regular or double-sided tape.
Snowflakes on the window
Interesting use for a glue gun lying around. In order to glue these snowflakes to the glass, just lightly press them to the surface. For details see our video.
- You will need: a stencil with a snowflake drawn with a black marker, tracing paper (parchment, baking paper), a glue gun and a little patience.
Christmas trees-candies
You can build bright Christmas trees with your kids for a children's party or decorate a festive table with them. Cut out triangles from colored paper or cardboard, attach with tape to a toothpick and stick the resulting Christmas trees into the candies.
- You will need: Hershey's Kisses or any other truffle candies, toothpicks, tape, colored paper or cardboard with a design.
Garland with photographs and drawings
New Year, Christmas - warm, family holidays. And it will come in very handy with photographs, children's drawings, and pictures. The easiest way to secure them is with clothespins, which can be decorated with hearts or snowflakes.
Origami star
Painted spoons
Ordinary metal spoons or wooden cooking spoons are transformed into interesting New Year's decorations using acrylic paints. Kids will definitely love this idea. If you bend the handle of metal spoons, you can hang them on the Christmas tree. And wooden spoons will look great in the kitchen or in a bouquet with fir branches.


 What happened in 1654-1667")


 for use at low temperatures and a solution based on it")


